Ranunculus captivate gardeners with their bright, layered petals that look like tiny roses. Their blooms glow in vivid shades of pink, orange, yellow, and white. Each flower brings color and joy to spring gardens, making ranunculus a favorite among flower lovers. They are also long-lasting when cut, perfect for bouquets and home displays. With the right care, these stunning flowers can return every year, growing stronger and more vibrant each season.
To keep ranunculus thriving, you must understand their needs from planting to blooming. They prefer cool weather, well-drained soil, and gentle watering. Proper care encourages deep roots, tall stems, and abundant blossoms. This guide will help you master every step to grow ranunculus with lasting beauty. Whether you garden in pots or flower beds, you can enjoy dazzling blooms year after year with a little attention and love.
Understanding Ranunculus Growth Cycle

Ranunculus plants follow a fascinating and predictable growth pattern that helps gardeners plan their care effectively. These flowers start from corms, which look like tiny, dry claws when dormant. Inside, they store enough energy to support the entire next growing season. The cycle begins in late fall or early winter, when corms are planted in cool, well-draining soil. During this early stage, the plant concentrates on root development underground. Though nothing appears above the surface, the corms are actively establishing the foundation for vigorous growth and spectacular blooms.
As temperatures begin to rise in late winter, small green shoots start to appear. The plant produces lush foliage that captures sunlight, fueling the formation of buds. Each bud gradually unfolds into a stunning flower, often layered like a rose, with brilliant colors from white to pink, red, orange, and yellow. This blooming phase, which typically occurs in early to mid-spring, is the most beautiful part of the cycle. During this time, consistent watering, gentle feeding, and good sunlight are essential for long-lasting blooms and healthy leaves that nourish the corm for next season.
After the flowering period ends, usually in late spring or early summer, the ranunculus begins to slow down. The leaves turn yellow as nutrients are drawn back into the corm. This marks the start of the dormant stage. Once the foliage has completely dried, gardeners can lift the corms for storage or leave them in the ground if the climate is mild and soil drains well. Proper drying and storage in a cool, dark, and airy location ensure the corms remain healthy for future planting. By understanding this natural cycle, gardeners can maintain vibrant, thriving ranunculus year after year.
Choosing the Right Location for Ranunculus
Selecting the perfect location is one of the most important steps in growing healthy and vibrant ranunculus. These plants love sunlight but dislike extreme heat, so choosing the right spot ensures strong growth and abundant blooms. Ranunculus thrive best in areas with cool winters and mild springs. They need at least six hours of direct sunlight daily to develop strong stems and vivid colors. However, in regions with very hot climates, providing light afternoon shade helps protect flowers from fading too quickly. Proper air circulation also matters, as it keeps leaves dry and reduces the risk of fungal diseases.
Soil conditions play a crucial role in the success of your ranunculus garden. These flowers prefer rich, well-draining soil with a slightly acidic to neutral pH. Heavy clay soil retains too much moisture and can cause corms to rot before they sprout. If your soil is dense, loosen it with compost, coarse sand, or peat moss to improve drainage. Raised beds or large containers are excellent options if your garden soil stays wet after rain. A well-prepared bed gives roots room to spread and supports healthy plant development throughout the growing season.
When planting, choose a sheltered location away from strong winds that can damage delicate stems and petals. Gentle breezes are fine, but constant exposure to harsh wind can stunt growth or break flower stalks. Grouping plants close together provides natural protection while creating a lush, colorful display. With careful attention to sunlight, soil, and wind exposure, your ranunculus will flourish beautifully and reward you with masses of brilliant blooms every spring.
Soil Preparation and Planting Techniques for Ranunculus
Preparing the soil correctly before planting ranunculus is essential for strong root growth and vibrant blooms. These flowers need loose, fertile soil that drains well, as soggy conditions quickly lead to root and corm rot. Begin by choosing a sunny site with good drainage, then work the soil to a depth of about 20 to 25 centimeters. Mix in plenty of organic matter such as compost or well-rotted manure to improve texture and nutrient content. Avoid compacted or heavy clay soil, which traps moisture. If the soil is dense, add sand or perlite to enhance aeration and drainage. Healthy soil encourages the corms to sprout evenly and supports long-lasting flowering.
Before planting, soak the corms in room-temperature water for four to six hours. This helps them rehydrate after dormancy and prepares them for quick root formation. When planting, place the corms with the claw-like tips facing downward and the flat side upward. Set them about 5 centimeters deep and 10 to 15 centimeters apart. The correct spacing allows for good airflow and prevents fungal problems during humid conditions. Once planted, water gently to settle the soil around the corms but avoid overwatering. Keep the soil slightly moist until new shoots appear in a few weeks.
Mulching the bed with straw or compost helps maintain moisture levels and regulates soil temperature. In cooler regions, consider covering the bed with a light frost cloth during cold nights to protect emerging growth. Consistent care during the early stage ensures strong plants that produce multiple blooms later in spring. By preparing the soil properly and planting with attention to detail, you give your ranunculus the best possible start for a season filled with radiant color and lush beauty.
Watering and Moisture Management for Healthy Growth
Watering plays a critical role in keeping ranunculus healthy and ensuring continuous blooming throughout the season. These plants love consistent moisture but cannot tolerate waterlogged soil. After planting, water the bed lightly to help the corms settle and begin rooting. Once shoots emerge, maintain even soil moisture by watering deeply once or twice a week. The goal is to keep the soil damp but never soggy. Irregular watering causes stress and may lead to yellow leaves or small flowers. Using a drip irrigation system or soaker hose helps deliver water directly to the roots without wetting the foliage, reducing the risk of fungal problems.
During the active growing phase, consistent watering supports vigorous leaf and flower development. Ranunculus plants have shallow roots, so the topsoil should not be allowed to dry out completely. However, avoid watering late in the day when temperatures drop, as cool, wet soil can promote rot. Early morning watering is best, giving the plants time to absorb moisture before heat builds. Monitor soil texture frequently—if it feels dry about 3 centimeters below the surface, it’s time to water. Proper hydration keeps stems strong, colors vivid, and blooms full and layered.
As the blooming season ends and the foliage begins to yellow, reduce watering gradually. At this stage, the plant is transferring nutrients back to the corms for next year’s growth. Overwatering now can damage the dormant stage and shorten the life of the corms. Once the leaves have fully died back, stop watering completely to allow the soil to dry. This signals the start of dormancy, preparing your ranunculus for the next cycle. With balanced moisture management, you ensure lush growth, extended flowering, and long-lasting plant vitality season after season.
Fertilizing Ranunculus for Vibrant and Lasting Blooms
Fertilizing ranunculus properly is key to encouraging strong growth and abundant, long-lasting blooms. These plants require nutrient-rich soil to develop healthy foliage and large, layered flowers. Before planting, enrich the soil with compost or organic matter to provide a slow-release source of nutrients. Once the shoots emerge, begin feeding with a balanced fertilizer containing equal parts nitrogen, phosphorus, and potassium. This supports leaf development, root strength, and early bud formation. Organic options like fish emulsion or compost tea work well for gardeners seeking a natural approach. Early, balanced feeding ensures that the plants build a sturdy foundation for vigorous flowering later in the season.
As the ranunculus enters the active blooming stage, switch to a fertilizer with higher phosphorus and potassium content. These nutrients stimulate abundant flower production and enhance color vibrancy. Feed every two to three weeks using a diluted liquid fertilizer for quick nutrient absorption. Avoid over-fertilizing, as too much nitrogen can cause lush foliage but few blooms. Water the plants before and after applying fertilizer to prevent root burn. Regular feeding, combined with consistent watering, maintains continuous flowering and healthy, glossy leaves throughout spring. The results are larger, brighter blooms that last longer on the plant and in floral arrangements.
When the flowering season ends and the foliage begins to fade, stop fertilizing entirely. The plant is entering dormancy, and excess nutrients at this stage can interfere with corm development. Allow the leaves to die back naturally so that nutrients are recycled into the corm for next year’s growth. Consistent but moderate fertilization helps your ranunculus thrive, ensuring rich color, strong stems, and resilient plants that return beautifully each spring. With proper feeding, your garden will glow with energy and vivid, unforgettable blooms season after season.
Pruning and Deadheading Ranunculus for Prolonged Blooming
Pruning and deadheading ranunculus are essential practices that keep the plants looking neat and encourage continuous blooming. As flowers fade, removing spent blooms redirects the plant’s energy toward producing new buds instead of forming seeds. Begin by checking your plants regularly during the blooming season. Once petals start to wilt or brown, cut the flower stem down to the base using clean, sharp scissors or pruning shears. Be careful not to damage surrounding foliage, as healthy leaves are still providing energy to the plant. Regular deadheading keeps the garden fresh and extends the flowering period by several weeks.
Besides removing spent blooms, pruning also helps maintain plant health and shape. Trim any yellow or damaged leaves to improve air circulation and reduce the risk of fungal diseases. This simple maintenance step prevents overcrowding and allows sunlight to reach all parts of the plant. In dense plantings, thinning out weaker stems can improve airflow and encourage stronger, more vigorous growth. Pruning is best done early in the morning when the plant is fully hydrated. Consistency is key—frequent light trimming supports steady renewal without stressing the plant.
When the flowering season ends and the foliage begins to yellow naturally, stop pruning and allow the leaves to die back on their own. This signals the start of dormancy, during which the plant stores energy in its corms for the next growing cycle. Avoid cutting green leaves too early, as this reduces the nutrients available for next year’s blooms. By following proper pruning and deadheading techniques, you’ll ensure your ranunculus stays healthy, vibrant, and ready to burst into color again in the following spring.
Protecting Ranunculus from Pests and Diseases
Preventing Common Pests
Ranunculus plants attract several garden pests that can damage their foliage and reduce bloom quality. Aphids, thrips, and spider mites are the most frequent offenders, feeding on plant sap and weakening stems. These pests usually appear during warm, dry conditions and reproduce quickly if not controlled. Check your plants often, especially the undersides of leaves, for small insects or sticky residue. If found early, you can spray the plants with a strong jet of water to dislodge them. For heavier infestations, apply insecticidal soap or neem oil, both of which are safe and effective natural solutions. Healthy plants grown in well-drained soil with good airflow are less prone to pest problems.
Regular garden hygiene also plays an important role in pest prevention. Remove dead leaves and plant debris from around the base, as these can harbor insect eggs and larvae. Avoid over-fertilizing with nitrogen, which encourages soft new growth that pests love. Companion planting with marigolds or lavender can help deter insects naturally. Keeping the area weed-free reduces competition for nutrients and prevents pests from spreading between plants. Early detection, combined with careful maintenance and organic controls, keeps pest populations low and protects your ranunculus from serious damage throughout the season.
Avoiding and Managing Diseases
Fungal diseases are among the most common issues for ranunculus, particularly in wet or humid conditions. Root rot, powdery mildew, and botrytis blight can develop if the soil stays waterlogged or the foliage remains damp for long periods. To prevent these problems, ensure proper drainage and water early in the day so leaves dry quickly. Spacing plants correctly also improves airflow and lowers humidity around the foliage. If you notice moldy patches or gray fuzz on leaves, remove affected parts immediately and dispose of them away from the garden.
Using a preventive fungicide or natural treatment such as a diluted baking soda solution can help protect plants during rainy weather. Always water at the base rather than over the foliage to reduce the spread of spores. Rotate planting locations every year to prevent soil-borne pathogens from accumulating. Healthy soil rich in organic matter and balanced nutrients supports natural resistance against infection. By maintaining cleanliness, providing ideal growing conditions, and reacting quickly to the first signs of trouble, you can keep ranunculus plants free from disease and thriving with strong, colorful blooms season after season.
Common Mistakes to Avoid When Growing Ranunculus
Overwatering the Corms
One of the most common and damaging mistakes gardeners make with ranunculus is overwatering, particularly during the early stages of growth. These delicate plants prefer evenly moist soil but cannot tolerate soggy conditions. When corms are exposed to excess water, they quickly begin to rot, preventing healthy root formation and sprouting. The key is to water only when the top few centimeters of soil feel dry to the touch. Well-drained soil is essential, and raised beds or containers often work best for controlling moisture levels. Always water gently to settle the soil after planting, then allow it to dry slightly before the next watering.
As the plants grow, consistent but moderate moisture ensures lush foliage and long-lasting blooms. Avoid watering late in the evening when temperatures drop, as this encourages fungal diseases. Early morning watering allows the soil to dry gradually through the day, reducing risk of rot. Mulching around the plants helps retain just the right amount of moisture while preventing weeds from competing for water. Learning to balance watering—neither too much nor too little—is the foundation of successful ranunculus care. With proper hydration habits, your plants will stay healthy, vigorous, and ready to bloom in brilliant color each spring.
Planting Corms at the Wrong Depth
Planting ranunculus corms at the incorrect depth is another mistake that can ruin an otherwise healthy crop. If corms are buried too deeply, shoots struggle to break through the surface, leading to stunted or uneven growth. On the other hand, planting too shallow leaves the corms exposed to temperature fluctuations and drying winds. The ideal planting depth is around 5 centimeters, which offers stability and protection. Always position the claw-like tips downward and the flat side facing up. This orientation helps roots grow properly while ensuring shoots rise easily toward the surface.
After planting, press the soil gently around each corm but avoid compacting it too tightly, as this restricts airflow and water movement. For gardeners in cooler regions, a thin layer of mulch helps regulate temperature and keeps soil moisture consistent. In warmer climates, use light, airy soil to prevent overheating. Uneven planting depth often results in delayed blooming and weak stems, but with careful attention, you’ll enjoy uniform growth and vibrant flowers. Consistency across your bed ensures that all plants bloom together for a striking and professional-looking garden display.
Ignoring Temperature Requirements
Ranunculus thrive in cool, mild weather, and temperature control plays a vital role in their growth. Many gardeners make the mistake of planting too early or too late in the season. If planted during hot weather, the corms may remain dormant or rot before sprouting. In contrast, planting when the soil is too cold can delay root development and lead to poor growth. The best planting time depends on your climate. In warm regions, plant corms in late fall or early winter, while in cooler areas, early spring is ideal once frost danger has passed.
Temperature stress often leads to weak stems and fewer blooms, so timing is crucial. During unexpected cold snaps, protect your plants with frost cloths or light row covers. In hot zones, provide some afternoon shade to prevent overheating. Keeping the soil temperature between 10°C and 20°C ensures ideal growing conditions. Monitoring weather patterns and adjusting planting times can make the difference between a disappointing and a spectacular flowering season. When temperature needs are respected, ranunculus thrive with lush foliage, rich colors, and strong, resilient growth.
Neglecting Post-Bloom Care
Neglecting ranunculus after flowering is a mistake that reduces their performance in the following year. Once blooming ends, many gardeners cut off the leaves too early or stop watering abruptly. However, the foliage plays a critical role in photosynthesis, storing energy in the corms for the next growth cycle. Allow the leaves to yellow and die naturally before removing them. This process usually takes several weeks, during which time the corms absorb nutrients from the fading foliage. Reducing watering gradually instead of stopping suddenly helps the plant transition smoothly into dormancy.
After the foliage has completely dried, lift the corms carefully from the soil and clean off any debris. Allow them to air dry for several days in a cool, shaded place. Store them in paper bags or mesh containers filled with dry peat moss or sawdust to prevent mold. Keep them in a cool, dark, and well-ventilated area until replanting. Skipping this step or leaving corms in soggy ground invites decay and shortens their lifespan. Proper post-bloom care ensures your ranunculus will return stronger, producing even more stunning blooms in the seasons to come.
Companion Planting for a More Vibrant Garden
Planting ranunculus alongside complementary species can enhance both the beauty and health of your garden. Companion planting maximizes space, attracts pollinators, and naturally reduces pests. Ranunculus grows best with other spring bloomers that share similar water and sunlight needs, creating a harmonious and continuous display of color. By carefully selecting companions, you can extend the visual appeal of your garden throughout the growing season.
Ranunculus pairs beautifully with spring bulbs such as tulips, daffodils, and hyacinths. These plants bloom around the same time, adding layers of texture and color that make flower beds more dynamic. Their overlapping watering and sunlight requirements simplify maintenance while providing a seamless succession of blooms. As the bulbs fade, ranunculus continue to flower, maintaining a vibrant garden display without gaps.
Combining ranunculus with hardy annuals like pansies or violas, or low-growing perennials such as lavender, salvia, or dusty miller, further enriches your planting scheme. These companions offer contrasting textures and colors that highlight the delicate petals of ranunculus. They also improve airflow around the plants and help regulate soil moisture. Thoughtful companion planting creates a balanced, lush, and resilient garden, ensuring your ranunculus thrive while contributing to an engaging, colorful outdoor space.
FAQ About Caring for Ranunculus
How often should I water ranunculus?
Water ranunculus deeply two or three times a week, keeping the soil evenly moist but never soggy. Always check the top inch of soil — if it’s dry, it’s time to water. Avoid wetting the leaves to prevent fungal issues and maintain steady moisture throughout the blooming period for the healthiest growth.
Why are my ranunculus leaves turning yellow?
Yellow leaves often signal overwatering, poor drainage, or nutrient deficiency. Check that your soil drains well and isn’t compacted. Reduce watering slightly and ensure proper sunlight exposure. Feeding your plants with a balanced fertilizer can also restore their vibrant green color and encourage strong, continued growth.
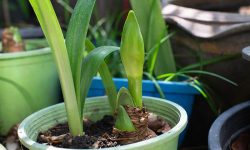
Can I grow ranunculus in pots?
Yes, ranunculus grow beautifully in pots if they have good drainage and enough space for root development. Choose a container with holes at the bottom and use light, well-draining soil. Place it in full sun, water consistently, and feed regularly during the active growing season for lush, colorful blooms.
What should I do after ranunculus finish blooming?
After blooming, let the foliage yellow and die back naturally. This process allows nutrients to return to the bulbs. Once the leaves have fully withered, dig up the corms, clean them, and store them in a cool, dry place. Replant them next season for another stunning display.
Can ranunculus survive the winter outdoors?
In mild climates (zones 8–10), ranunculus can overwinter in the ground with light mulch protection. In colder regions, they won’t survive frost, so dig up the corms before freezing temperatures arrive. Store them indoors in a dry, ventilated space until it’s safe to plant again in spring.
Conclusion
Ranunculus are stunning, versatile flowers that reward careful attention with vibrant, long-lasting blooms. By understanding their growth cycle, choosing the right location, preparing soil properly, and providing consistent watering and fertilization, gardeners can ensure healthy plants year after year. Pruning, deadheading, and protecting from pests and diseases further enhance their beauty and longevity. Avoiding common mistakes and practicing thoughtful companion planting enriches both the garden’s appearance and plant vitality. With patience and proper care, ranunculus become a reliable source of spring color, transforming any garden into a lively, elegant, and captivating floral display season after season.