Daisies are cheerful, iconic flowers that brighten up gardens with their simple beauty and long blooming period. Whether you’re growing Shasta daisies, Gerbera daisies, or the classic Oxeye variety, one of the key techniques to keeping them vibrant throughout the season is deadheading. This simple maintenance practice involves removing spent or fading blooms to redirect the plant’s energy toward new growth. By learning how to deadhead daisies properly, you not only enhance the overall appearance of your garden but also stimulate the plant to produce even more flowers.
In this article, we’ll walk you through every essential detail of deadheading daisies—from why it matters to when and how to do it. Whether you’re a seasoned gardener or just starting, understanding this process will help you nurture healthier plants and enjoy an extended blooming period with fuller, more prolific blooms.
The Importance of Deadheading Daisies
Deadheading is more than just a cosmetic task—it plays a vital role in the life cycle of daisies. When a flower begins to fade, the plant typically starts channeling energy into seed production. This is a natural response, as the primary biological goal of any plant is reproduction. However, for gardeners who want continuous blooms rather than seeds, this redirection of energy can cut the flowering season short.
By removing the old, spent flowers promptly, you interrupt the seed-forming process. This encourages the plant to produce more buds in an attempt to complete its reproductive cycle. As a result, your daisies continue to flower generously, giving your garden sustained color and vitality. Additionally, deadheading helps prevent diseases that may thrive on decaying plant matter and improves the plant’s overall form.
For gardeners who take pride in the look and longevity of their blooms, deadheading becomes an essential routine. It also aligns with good horticultural hygiene, keeping your flower beds clean, well-managed, and resistant to pests.
When to Start Deadheading Daisies
Timing is an important consideration when it comes to deadheading daisies. You’ll want to begin the process as soon as the first blooms begin to fade. With many varieties of daisies, this could be as early as late spring or early summer, depending on your region and the specific cultivar you’re growing.
The key sign that it’s time to deadhead is when petals begin to droop, fade in color, or start curling inward. The center disc of the flower may also darken or become dry and brittle. At this stage, the bloom is no longer contributing to the plant’s aesthetic appeal and is beginning to signal the plant to stop blooming.
Regular monitoring is essential during the blooming season. Check your plants every few days, especially during periods of warm weather when daisies bloom rapidly. By staying proactive and consistent with deadheading, you encourage a more prolonged and productive flowering cycle that can extend well into late summer or even early fall.
Tools and Preparation for Effective Deadheading
Before getting started, it’s important to prepare properly to ensure clean and effective deadheading. Using the right tools not only protects the plant but also minimizes your effort. A pair of sharp garden shears or pruning scissors is ideal, especially for tougher or woody stems. For smaller daisy varieties with softer stems, your fingers can be just as effective if used carefully.
Make sure all your tools are clean and sterilized. Dirty or rusty blades can introduce bacteria or fungal spores that may harm your daisies. A quick wipe with rubbing alcohol before and after deadheading sessions will go a long way in preventing disease.
It’s also helpful to wear gloves to protect your hands from sticky sap or potential allergens. Although daisies are generally safe to handle, some people may experience mild irritation. Having a small bucket or compost bin nearby makes cleanup easier and keeps your garden neat as you collect the spent blooms.
Choose a time of day when the plant is dry, ideally in the morning after the dew has evaporated. This reduces the risk of fungal infection that thrives in moist conditions. Deadheading in dry weather allows any small wounds left behind to heal quickly and minimizes plant stress.
How to Identify Spent Daisy Blooms
Accurately identifying the flowers that need to be removed is crucial to avoid damaging healthy buds. A spent daisy bloom typically looks faded, limp, and lifeless. The petals may begin to brown at the tips, curl inward, or detach easily from the flower head. In contrast, a fresh bloom will have vibrant petals that stand upright and a central disc that appears bright and full.
Another indication is the overall posture of the flower. A healthy daisy holds itself high, with firm stems and symmetrical form. A flower that’s past its prime often droops or begins to tilt awkwardly. The leaves surrounding the bloom may also start to yellow or show signs of stress.
Take a close look at the plant, especially the topmost stems where blooms emerge. Identifying the right stage of decline ensures that you only remove what’s necessary and leave behind developing buds that will soon blossom.
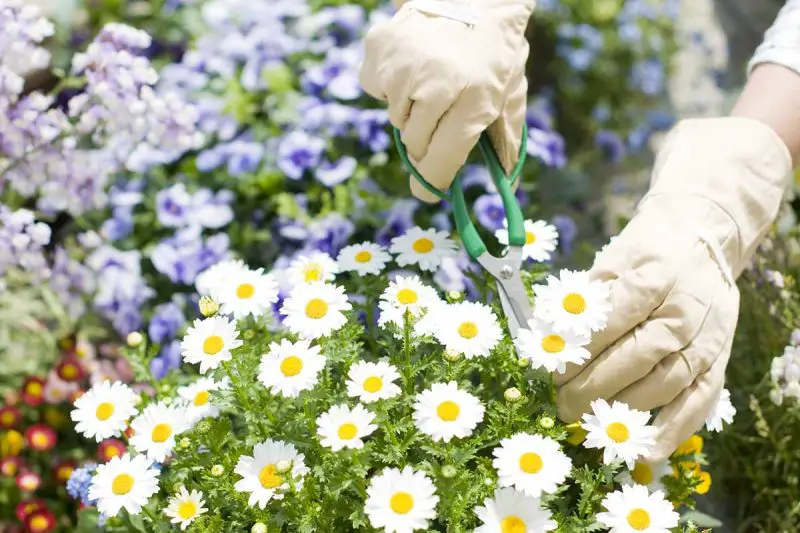
The Correct Technique for Deadheading Daisies
Once you’ve located the spent blooms, it’s time to remove them. The best approach is to follow the stem from the flower head downward until you reach a point where new growth or a set of leaves is emerging. Cut just above this point, taking care not to damage the healthy foliage or buds nearby.
Removing only the flower head may not be enough, as it can leave behind an unsightly bare stem that continues to draw energy. By cutting slightly lower—down to the next leaf junction or lateral bud—you promote cleaner growth and reduce the chance of regrowth from a withered stem.
If you’re using your fingers, grip the stem gently between your thumb and forefinger and pinch it off with a clean snap. Be cautious not to tear or crush the stem, as this can lead to open wounds susceptible to infection. Precision and gentleness are key to ensuring the plant recovers quickly and focuses its energy on producing new flowers.
What to Do After Deadheading
Once you’ve finished deadheading, it’s beneficial to follow up with light maintenance to help your daisies recover and thrive. Water the plant if the soil feels dry, ensuring consistent moisture to support new bloom development. Applying a balanced, slow-release fertilizer can also give your daisies a nutritional boost, encouraging lush growth and robust flowering.
Mulching around the base of the plant helps retain soil moisture and regulates temperature, both of which are vital for daisy health. Keep an eye on your plants over the next few days, watching for signs of new buds forming at the junctions where you removed the spent blooms.
You may also notice that the overall form of the plant begins to improve. Deadheading often results in a more compact, bushier appearance, as energy is redirected into side shoots and new stems. This makes your garden more visually pleasing and reduces the need for trimming or reshaping.
Common Mistakes to Avoid When Deadheading
While deadheading is simple in theory, a few common errors can hinder your success. One frequent mistake is cutting too high on the stem, which leaves a long, leafless stalk that serves no purpose and can detract from the plant’s appearance. Another is removing healthy buds by misidentifying them as spent flowers.
Timing errors can also reduce the effectiveness of deadheading. Waiting too long to remove a faded bloom means the plant has already begun diverting energy into seed production. Conversely, cutting a bloom too early may rob it of its full display potential.
Using dull or dirty tools is another risk that can lead to disease or plant injury. Always make sure your blades are sharp, and clean them thoroughly before and after each session. Taking the time to inspect your work and make thoughtful cuts results in better long-term health for your daisies.
The Long-Term Benefits of Consistent Deadheading
Over time, consistent deadheading transforms how your daisies grow and bloom. Plants that are deadheaded regularly tend to live longer, produce more flowers, and maintain a healthier shape. The process also helps in managing overcrowding by controlling where and how new growth appears.
By removing dead blooms, you create space for light and air to circulate through the plant, reducing the chance of mildew or fungal infections. You also minimize the spread of pests that might be attracted to decaying petals and stems.
Deadheading becomes a habit that pays dividends across the growing season. As your daisies reward you with successive waves of blooms, the garden feels more alive and continuously renewed. This active engagement with your plants deepens your connection to the garden and enhances the joy of flower cultivation.
Do All Types of Daisies Require Deadheading?
Not all daisies respond to deadheading in the same way. Shasta daisies, for example, greatly benefit from deadheading and will reward you with repeat blooms throughout the summer. Gerbera daisies also bloom more prolifically when regularly maintained, although they can be a bit more delicate in terms of handling.
Oxeye daisies, on the other hand, tend to be more self-sustaining. While they still benefit from the occasional removal of spent blooms, they don’t always require intensive deadheading. Similarly, wild varieties or native daisies may continue blooming without intervention, although their appearance can become untidy.
Understanding the needs of your specific daisy variety helps you make the most out of your gardening efforts. Tailoring your approach to the plant’s natural tendencies ensures you’re not overworking the plant or wasting time on unnecessary tasks.
Seasonal Considerations for Deadheading
The season plays a significant role in how and when you deadhead. During the peak of summer, daisies grow and bloom rapidly, meaning you’ll need to check them more frequently for fading flowers. As the season winds down into late summer or early fall, you can gradually reduce the frequency.
In some regions, deadheading can continue well into fall if the weather remains warm. However, once the plant enters dormancy or the risk of frost approaches, it’s best to stop deadheading and allow the plant to transition naturally. Some gardeners even choose to leave the final blooms intact so they can go to seed, providing food for birds or enabling reseeding for the following year.
By aligning your deadheading schedule with the rhythm of the seasons, you promote plant health while adapting to the natural cycles of growth and rest.
FAQs About Deadheading Daisies
What happens if I don’t deadhead my daisies?
If you skip deadheading, your daisies will divert energy into seed production rather than new flowers. This can shorten the blooming season and reduce the plant’s overall vitality.
Can I deadhead daisies with my hands?
Yes, for soft-stemmed daisies, you can use your fingers to gently pinch off spent blooms. However, using sterilized scissors or pruning shears is safer and more precise.
How often should I deadhead daisies?
You should check your daisies every few days during the blooming season. The more frequently you deadhead fading blooms, the longer your plants will continue to flower.
Will deadheading extend the lifespan of my daisy plant?
While deadheading doesn’t change the biological lifespan, it does help maintain the plant’s vigor, reduce disease risk, and encourage continued blooming throughout its natural growing season.
Conclusion: Healthy Daisies Start with a Simple Step
Deadheading daisies may seem like a minor task, but its impact on your garden can be transformative. By removing spent blooms at the right time and in the right way, you promote continued flowering, prevent disease, and maintain a tidy, thriving garden. It’s an investment in the health and beauty of your plants that pays off with every new bloom.
From spring through fall, deadheading becomes a rewarding part of the gardening process. It encourages you to observe your plants closely, respond to their needs, and enjoy the cycle of renewal they offer. With a little time and care, your daisies will flourish, giving you a garden filled with vibrant flowers and healthy, vigorous plants.