Foxgloves are among the most captivating flowers in any garden, admired for their tall, bell-shaped blossoms and striking colors that range from soft pinks to deep purples. These elegant plants add vertical beauty and a touch of cottage charm to borders, woodlands, and garden paths. However, their beauty can fade quickly without proper care. One of the most effective ways to keep foxgloves blooming beautifully throughout the season is deadheading — the simple process of removing spent flowers to encourage new growth. Knowing how to deadhead foxglove correctly can transform your garden into a continuous display of color and life.
Deadheading foxgloves is about more than just appearance; it’s a key practice for plant health and longevity. By cutting off faded blooms at the right time, gardeners prevent seed production, redirecting energy into fresh flower spikes. This encourages longer flowering periods and stronger, healthier plants. In this detailed guide, you’ll learn everything about how and when to deadhead foxgloves, the tools you need, common mistakes to avoid, and the aftercare steps that ensure lush, continuous flowering all season long.
Understanding Foxglove Growth and Bloom Cycle
Foxgloves, scientifically known as Digitalis purpurea, are biennial or short-lived perennial plants that follow a fascinating two-year life cycle. In their first year, they focus on building a strong rosette of leaves close to the ground. This stage allows the plant to establish a deep root system capable of supporting its impressive flowering stalks later. During the second year, foxgloves send up tall spikes covered in tubular blossoms that attract bees, hummingbirds, and butterflies. This growth pattern is essential to understand before learning how to deadhead, as timing depends heavily on which stage the plant is in.
Once foxgloves begin blooming in late spring or early summer, each spike opens its flowers from the bottom upward. The blooming process can last several weeks as new buds continue to open near the top while older ones fade below. This unique flowering pattern means that deadheading must be done progressively, removing spent blooms while newer ones continue to open. If left alone, foxgloves will eventually shift energy toward seed production instead of forming additional blossoms. By intervening through timely deadheading, gardeners can significantly extend the flowering season.
After the primary blooming phase ends, foxgloves often produce smaller secondary spikes if properly maintained. These secondary blooms may not be as tall or dense as the first, but they still provide delightful color and attract pollinators. Understanding the natural rhythm of the foxglove’s growth and flowering cycle helps gardeners anticipate when to prune and how to stimulate continuous growth. With careful attention to each stage, your foxgloves will thrive, rebloom, and add vibrant elegance to your garden long after their initial display.
Why Deadheading Foxgloves Matters
Deadheading foxgloves is one of the simplest yet most rewarding gardening practices. When foxgloves finish blooming, their energy naturally shifts toward seed production. While this process is important for natural propagation, it shortens the flowering season and weakens the plant’s vitality. By removing faded flowers, you redirect the plant’s energy from making seeds to producing new buds and foliage. This not only extends the bloom period but also encourages stronger, healthier plants capable of a second flush of flowers later in the season. For gardeners who love continuous color, learning how to deadhead foxglove is an essential skill.
Another reason deadheading matters is disease prevention. Old, decaying blooms can attract moisture and foster fungal growth, such as powdery mildew or botrytis. Removing spent flowers keeps the plant clean and allows for better air circulation around the leaves and stems. Healthy airflow reduces humidity buildup and minimizes pest infestations, particularly aphids, which are drawn to weak or decaying growth. In this way, deadheading not only keeps your garden looking tidy but also acts as a form of preventive plant care, helping foxgloves thrive in varying weather conditions.
Lastly, deadheading enhances the overall aesthetic of your garden. Foxgloves are known for their tall, graceful spikes that add height and texture to garden borders. However, once flowers fade and turn brown, they can make the entire plant look tired and neglected. Regularly removing old spikes keeps the display fresh and eye-catching, ensuring that the remaining blooms continue to draw attention. A well-deadheaded foxglove plant stands tall, lush, and vibrant, contributing to a garden that feels alive and meticulously cared for.
When to Deadhead Foxgloves
The timing of deadheading is critical to achieving continuous flowering in foxgloves. The best time to begin is when the lower blooms on a spike start to fade while the upper ones are still vibrant. This signals that the plant is finishing its first bloom cycle and preparing to transition energy toward seed production. Acting at this point allows gardeners to redirect that energy into forming new buds rather than seeds. The earlier fading flowers are removed, the more quickly the plant can focus on creating secondary spikes that will appear later in the summer.
Foxgloves bloom from the bottom of the spike upward, which means not all flowers fade at the same time. It’s best to remove the spent lower flowers progressively while leaving the upper ones to continue blooming. Once the entire spike has finished flowering, it should be cut back to just above a healthy set of leaves. Doing so prevents the plant from diverting energy into seed-making and stimulates new lateral shoots that may produce another round of blooms. Consistent observation during this stage helps maintain the plant’s vigor and ensures no opportunity for regrowth is lost.
Climate also plays an important role in timing. In cooler regions, foxgloves may rebloom naturally after the first cutback, while in warmer climates, the second bloom might be shorter but still impressive. Hot, dry weather can cause flowers to fade faster, so gardeners should monitor closely and act promptly. Deadheading at the right moment can mean the difference between a single bloom season and a spectacular, long-lasting display that brightens your garden well into autumn.
Tools You’ll Need for Deadheading Foxgloves
Choosing the Right Cutting Tools
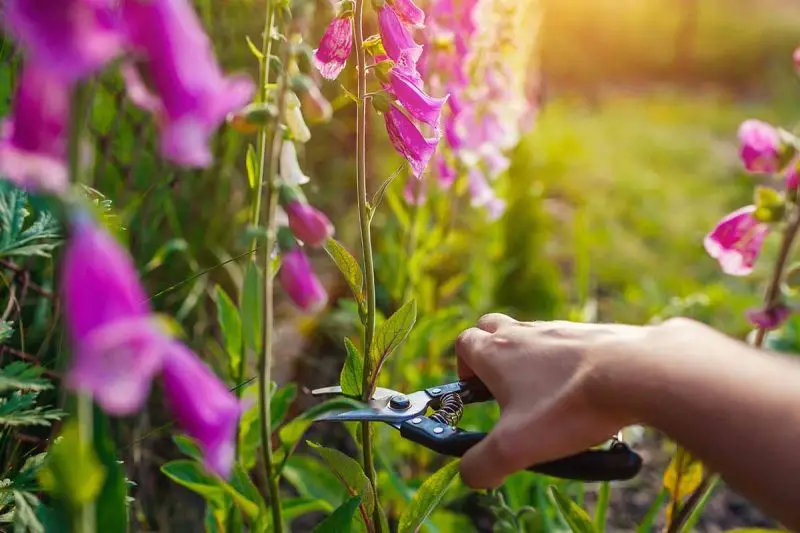
Using the right tools makes a big difference when deadheading foxgloves. Because their stems are tall and slightly soft, clean, precise cuts are essential to prevent tearing and disease. A pair of sharp garden shears or bypass pruners is ideal for trimming flower spikes, while smaller scissors or snips work well for removing individual blossoms. Dull or rusty blades can crush the stems, leaving wounds that invite pests and fungal infections. Always choose high-quality, sharp tools that fit comfortably in your hand, allowing smooth and controlled movements.
Before you begin, sanitize your tools to reduce the risk of spreading bacteria or fungus between plants. Wipe the blades with rubbing alcohol or a mild bleach solution, then rinse and dry them thoroughly. Keeping tools clean not only promotes healthier plants but also makes cutting easier. For gardeners maintaining multiple foxglove plants, it’s best to re-sanitize shears between uses. By combining sharp, well-maintained tools with careful technique, you ensure every cut is smooth, clean, and encourages fast recovery, leading to healthier and longer-lasting foxgloves.
Helpful Accessories for Easier Maintenance
While pruning shears are the main tools for deadheading, having a few additional accessories makes the process smoother and safer. A sturdy pair of gardening gloves is essential, as foxglove leaves contain compounds that can irritate the skin. Gloves also protect your hands from accidental nicks and help you grip tall stems more firmly. A small garden bucket or bag for collecting cuttings keeps your workspace tidy and prevents the spread of decaying plant material that could harbor disease.
For very tall foxgloves, especially those exceeding four feet, using a light stake or soft tie can steady the stem while you cut. This prevents accidental bending or snapping during maintenance. A handheld sprayer or watering can is also useful for rinsing tools and watering plants immediately after trimming. Working early in the morning or late afternoon makes the process more comfortable and reduces plant stress. With the right accessories, deadheading foxgloves becomes not only efficient but also enjoyable, leaving your garden clean, organized, and blooming beautifully.
How to Deadhead Foxgloves Step by Step
Deadheading foxgloves is a straightforward process once you understand where and how to cut. Start by examining the flower spikes and identifying where blooms have faded. Foxgloves flower from the bottom upward, so the lower blossoms will wilt first while the upper ones may still look fresh. Using clean, sharp pruning shears, snip off the individual faded flowers or cut the stem back to just above a healthy set of leaves. This encourages the plant to redirect its energy into developing side shoots and new buds rather than producing seeds. Always make a clean, angled cut to allow water to drain off easily and prevent disease from entering the stem.
Once an entire spike has finished blooming, it’s best to remove the whole stalk to stimulate new growth. Cut the stem back to the base of the rosette or slightly above it, depending on the plant’s height and health. Be sure not to remove too many leaves, as they are vital for photosynthesis and energy storage. After cutting, discard the spent spikes rather than leaving them on the ground, as decaying material can attract pests or mold. If your foxglove has multiple spikes, deadhead each one as it finishes to maintain continuous growth and flowering.
After deadheading, give the plant a good watering to help it recover. A light feeding with a balanced fertilizer will support the growth of new shoots and potential secondary blooms. Within a few weeks, fresh green stems often begin to appear from the base of the plant. These new shoots can produce a second round of flowers, keeping your garden colorful deep into summer. Regularly repeating this process ensures your foxgloves remain healthy, vibrant, and blooming beautifully throughout the growing season.
Seasonal Care After Deadheading
Proper seasonal care ensures that foxgloves remain strong and ready for another bloom cycle. After deadheading, maintain steady soil moisture and add a thin layer of mulch to protect the roots from summer heat. In regions with high temperatures, provide partial afternoon shade to prevent wilting. During rainy periods, check drainage frequently to avoid standing water that can cause root rot. Keeping the soil evenly moist but never soggy helps foxgloves sustain healthy foliage and prepare for secondary spikes.
As the growing season progresses into late summer and early fall, reduce watering slightly while keeping the soil damp enough to support recovery. If the plant has produced secondary blooms, trim them once they fade to redirect energy toward strengthening the root system. Applying compost or an organic slow-release fertilizer at this stage improves soil structure and nutrient balance. This late-season feeding supports the plant’s energy storage, ensuring it comes back stronger in the next cycle.
Before winter arrives, cut back the remaining foliage to a few inches above the soil once frost threatens. Apply a protective layer of mulch or dry leaves over the base to shield it from cold damage. In mild climates, foxgloves may remain semi-evergreen, requiring only light trimming and protection. Consistent seasonal care after deadheading not only enhances bloom longevity but also ensures vigorous regrowth and vibrant color displays year after year.
Propagating and Rejuvenating Foxgloves
Propagation allows gardeners to expand their foxglove collection and maintain continuous displays of these striking flowers. The easiest method is letting some plants self-seed naturally after deadheading most but not all spikes. Allowing a few flower stalks to mature and set seed ensures new seedlings the following spring. These young plants will typically bloom in their second year, continuing the garden’s natural rhythm without extra effort.
For more controlled propagation, collect seeds from mature pods once they dry and begin to split open. Sow them in seed trays filled with moist, well-draining compost and keep them in a cool, shaded spot. Germination usually occurs within two to three weeks. Transplant seedlings outdoors once they have developed several sets of true leaves, spacing them about a foot apart. This method allows you to maintain consistent bloom quality and control color variety across your garden.
Another rejuvenation technique involves lifting and dividing perennial varieties every few years. Carefully dig around the base of the plant after flowering and separate healthy offshoots from the main crown. Replant them in enriched soil to promote stronger, more uniform growth. Division not only revitalizes aging plants but also prevents overcrowding. Combining propagation with proper deadheading creates a self-sustaining cycle, ensuring your foxgloves remain lush, colorful, and full of life for seasons to come.
Aftercare for Deadheaded Foxgloves
Watering and Feeding After Deadheading
Once you’ve finished deadheading, your foxgloves will enter a brief recovery stage before producing new growth. During this time, consistent watering is essential. The soil should remain moist but never soggy, as waterlogged roots can lead to crown rot. Deep watering encourages the roots to grow stronger and anchor the plant more securely, especially during warm weather. It’s best to water early in the morning so that moisture can reach the roots before evaporation begins, keeping the plant hydrated throughout the day.
Feeding after deadheading gives the plant the nutrients it needs to regenerate and prepare for another bloom cycle. Use a balanced fertilizer that’s slightly higher in phosphorus and potassium to support bud formation and root health. Avoid heavy nitrogen fertilizers, which promote leafy growth at the expense of flowers. A diluted liquid feed every few weeks helps maintain steady nutrition. Adding a thin layer of organic mulch around the base helps retain soil moisture, regulate temperature, and suppress weeds. Proper watering and feeding after trimming ensure your foxgloves recover quickly and reward you with a vibrant second display of blossoms.
Protecting and Supporting Regrowth
After deadheading, foxgloves begin sending out new shoots and secondary spikes, which are often more delicate than the first. These young stems need extra support and protection to develop fully. If your garden is exposed to wind, consider using a small stake or soft garden tie to stabilize the plant and prevent breakage. Tall varieties are especially prone to bending under their own weight as new spikes form, so securing them early ensures upright, healthy growth.
Pests like aphids, slugs, and snails are particularly attracted to tender new shoots. Inspect the plants regularly and remove any pests you spot. Organic methods such as neem oil or diatomaceous earth can help keep infestations under control. Maintaining good air circulation around your plants by spacing them adequately also helps prevent fungal infections like powdery mildew. Providing partial afternoon shade during hot summer days reduces stress on regrowing plants. With these simple aftercare steps, your foxgloves will bounce back stronger, producing lush foliage and a stunning second round of blossoms.
Pests and Diseases After Deadheading
Foxgloves, though resilient and low-maintenance, can become vulnerable to pests and diseases after deadheading when their energy is focused on regrowth. The tender new shoots that emerge after trimming are particularly attractive to aphids, slugs, and snails. Aphids tend to cluster on the undersides of leaves and flower stems, sucking out sap and weakening the plant. Slugs and snails, on the other hand, cause visible holes in leaves and can quickly destroy young shoots. Regular inspection is the best defense against these pests. Early morning or late evening checks allow you to spot activity before damage spreads.
Controlling these pests can be done effectively without harsh chemicals. Introducing beneficial insects like ladybugs helps control aphid populations naturally. For slugs and snails, scattering diatomaceous earth or crushed eggshells around the base of the plants creates a barrier they avoid crossing. You can also use organic slug pellets or shallow dishes of beer as simple traps. Maintaining clean soil by removing fallen petals and decaying plant material helps prevent pest infestations before they begin. Healthy, well-aerated soil discourages both pests and fungal problems, ensuring the plant stays vigorous and disease-free.
Fungal diseases are another challenge that can arise after deadheading, particularly powdery mildew and leaf spot. These issues often develop in humid conditions with poor air circulation. To prevent them, avoid overhead watering and instead irrigate at the soil level to keep foliage dry. If signs of mildew appear, prune affected leaves immediately and treat with a sulfur-based or neem oil fungicide. Ensuring good spacing between plants allows air to circulate freely, reducing humidity around the foliage. Regular observation, proper hygiene, and balanced watering together form the best defense against post-deadheading problems, keeping your foxgloves lush, healthy, and blooming beautifully.
Common Mistakes When Deadheading Foxgloves
Cutting Too Far Down the Stem
One of the most common mistakes gardeners make when deadheading foxgloves is cutting the stem too far down. Many assume that trimming the entire stalk close to the base encourages new growth, but this can actually damage the crown, where the plant produces new shoots. Removing too much of the stem leaves the plant vulnerable to rot, especially if moisture collects near the wound. It also weakens the plant’s ability to photosynthesize, reducing its energy reserves for producing secondary spikes. The proper approach is to cut just above a healthy set of leaves or emerging shoots, keeping enough stem intact to support regrowth.
Using sharp, clean tools is equally important when making these cuts. Ragged or crushed stems can slow healing and invite disease. Always make clean, angled cuts to help water drain away from the wound. After trimming, inspect the crown to ensure it remains dry and healthy. If heavy rain is expected, adding a light layer of mulch can protect the cut area from excess moisture. Cutting carefully and correctly allows your foxgloves to recover faster and continue producing beautiful, upright blooms throughout the season.
Deadheading Too Early or Too Late
Timing plays a crucial role in successful deadheading, and acting too early or too late can affect your foxglove’s performance. Cutting too early removes flowers that are still feeding the plant through photosynthesis. This weakens the plant and shortens its blooming period. On the other hand, waiting too long allows the plant to divert energy into seed production, which reduces its ability to form new buds. The best time to deadhead is when most of the blooms on a spike have faded but before seed pods form.
Gardeners should monitor foxgloves closely throughout their blooming cycle. The lower flowers typically wilt first, while upper ones remain open for several more days. Once the majority of blooms look faded, trim the entire spike back to just above healthy leaves. In cooler climates, this practice often results in a second bloom within weeks. Consistent observation and timely cutting ensure that your foxgloves maintain strength, rebloom effectively, and continue adding color to the garden for months rather than weeks.
Ignoring Post-Deadheading Maintenance
Another common error is assuming the job ends once the spikes are cut. In reality, foxgloves need attentive care after deadheading to recover and prepare for another round of blooms. Without proper watering and feeding, the plant may remain weak or fail to produce new spikes. Consistent moisture and balanced nutrition are essential to fuel regrowth. Applying a light fertilizer and watering deeply after trimming ensures the plant regains strength.
Environmental stress can also affect recovery. Hot, dry weather can cause wilting, while excessive humidity promotes fungal problems. Providing afternoon shade and maintaining good air circulation keeps the plant healthy during its regrowth phase. Removing fallen petals and old leaves from around the base helps prevent pests and diseases. Taking care of your foxgloves after deadheading is just as important as the cutting itself. With proper maintenance, they’ll reward you with strong, colorful spikes that continue to brighten your garden long after the first bloom fades.
Tips for Successful Foxglove Deadheading
Deadheading foxgloves successfully requires both timing and consistency. The most effective approach is to check your plants frequently during the blooming season and remove fading flowers as soon as they appear. This habit prevents the plant from diverting energy into seed production and encourages new spikes to form. When cutting, always identify healthy leaves or shoots below the faded blooms and make your cuts just above them. This allows the plant to recover quickly and produce strong lateral shoots that carry new flowers. Regular maintenance ensures continuous color throughout the summer and helps the plant remain vigorous well into the next growing season.
Cleanliness and care during the process are equally important. Always use sharp, disinfected tools to make smooth cuts that heal quickly. Wipe pruning shears with alcohol before and after use to avoid spreading diseases between plants. After deadheading, remove all cuttings, petals, and debris from the ground to discourage pests and mildew. Applying a layer of mulch around the base helps retain soil moisture and regulate temperature while keeping the roots cool. These small but crucial details maintain a healthy growing environment that supports lush regrowth and long-lasting blooms.
Finally, remember that deadheading is most effective when combined with proper aftercare. Water your foxgloves deeply and feed them lightly after each trimming session to promote rapid recovery. If you live in a hot or dry climate, providing light afternoon shade protects the plants from heat stress. Gardeners in cooler regions can expect stronger secondary blooms and even self-seeding under the right conditions. With consistent attention and thoughtful care, your foxgloves will reward you with multiple flushes of flowers, transforming your garden into a colorful display of elegance and natural charm.
FAQs About Deadheading Foxgloves
When should I start deadheading foxgloves?
Begin deadheading as soon as the lower flowers on each spike start to fade while the upper ones remain open. This timing prevents seed formation and encourages the plant to focus energy on developing new shoots and secondary flower spikes later in the season.
How far down should I cut when deadheading?
Cut each faded flower spike back to just above a healthy set of leaves or emerging shoots. Avoid cutting too close to the base, as this can damage the crown and hinder regrowth. Clean, angled cuts help water drain off and protect the plant from rot.
Will foxgloves bloom again after deadheading?
Yes, with proper care, foxgloves can produce smaller secondary spikes later in the season. Regular watering, feeding, and maintaining cool soil conditions after deadheading help encourage a second flush of flowers that extend the blooming period well into late summer.
What happens if I don’t deadhead foxgloves?
If you skip deadheading, foxgloves will focus their energy on producing seeds instead of new flowers. This shortens the blooming season and can weaken the plant. However, untrimmed foxgloves may self-seed naturally, leading to new plants the following year.
Can I deadhead foxgloves in hot weather?
Yes, but it’s best to do it early in the morning or late in the afternoon. Avoid trimming during peak heat to reduce stress on the plant. Water thoroughly after cutting and add mulch to help retain moisture and protect the roots from drying out.
Conclusion
Deadheading foxgloves is a simple yet powerful way to keep your garden bursting with color all season long. By removing faded blooms at the right time and providing consistent care afterward, you encourage the plant to produce fresh spikes and extend its flowering period. Clean tools, proper timing, and steady aftercare make all the difference between a short bloom and continuous color. With patience and attention, foxgloves will reward you with tall, graceful stalks covered in vibrant bell-shaped flowers, transforming your garden into a stunning, ever-blooming display of natural beauty and charm year after year.