Deadheading is one of the most essential techniques any rose grower can master. It’s a simple practice that can dramatically improve the appearance, health, and flowering capacity of your rose bushes. While it may sound technical or even intimidating to beginners, deadheading simply refers to the removal of spent flowers to encourage new growth and continuous blooming. With the right timing and technique, your rose bushes can look more vibrant and deliver a constant display of fresh blossoms throughout the growing season.
Roses are among the most cherished flowering plants, often regarded as the queen of the garden. Their elegance and charm are unparalleled, but keeping them at their best requires thoughtful care. One of the secrets to maintaining their beauty lies in removing faded blooms before they can turn into seed heads. This not only enhances the bush’s appearance but also redirects the plant’s energy into producing new flowers instead of seeds. By understanding the proper way to deadhead, you can keep your roses blooming longer and looking their best well into the season.
In this comprehensive guide, we will explore everything you need to know about deadheading rose bushes—from the science behind it to the best techniques, timing, and tips for success. Whether you are tending hybrid teas, floribundas, or shrub roses, mastering deadheading will be a game-changer in your rose gardening experience.
Understanding Why Deadheading Matters
The biological purpose of a flower is to attract pollinators and produce seeds. Once a rose bloom begins to fade, the plant shifts its energy from growing new flowers to developing seeds within the spent blossom. This natural process can reduce the number of future blooms and cause your rose bush to look tired or unkempt. Deadheading interrupts this cycle, allowing the plant to conserve energy and continue producing fresh flowers.
Deadheading also improves the overall appearance of the plant by removing withered petals and preventing the formation of rose hips, which are the seed pods. If left in place, these hips can weigh down stems and lead to a bushier, less graceful shape. By regularly removing dead flowers, you encourage a tidier, more aesthetically pleasing form and stronger bloom performance.
Moreover, frequent deadheading contributes to better plant health. It reduces the chances of disease by eliminating decaying organic material where pests and fungi may take hold. This small but significant task plays a critical role in your rose maintenance routine, especially during the peak growing months when plants are most active.
When to Start Deadheading Rose Bushes
Timing is crucial when it comes to deadheading roses. You should begin deadheading as soon as the first flush of blooms starts to fade. Typically, this occurs in late spring or early summer, depending on your region and rose variety. By acting early, you can encourage a quick turnaround and enjoy a second or even third wave of blooms before the growing season ends.
Deadheading should be performed throughout the blooming period, especially after each flush of flowers. Roses often bloom in cycles, and removing spent blooms after each wave ensures that the plant transitions smoothly into producing the next set. In warmer climates, where roses can bloom almost year-round, you may find yourself deadheading well into autumn.
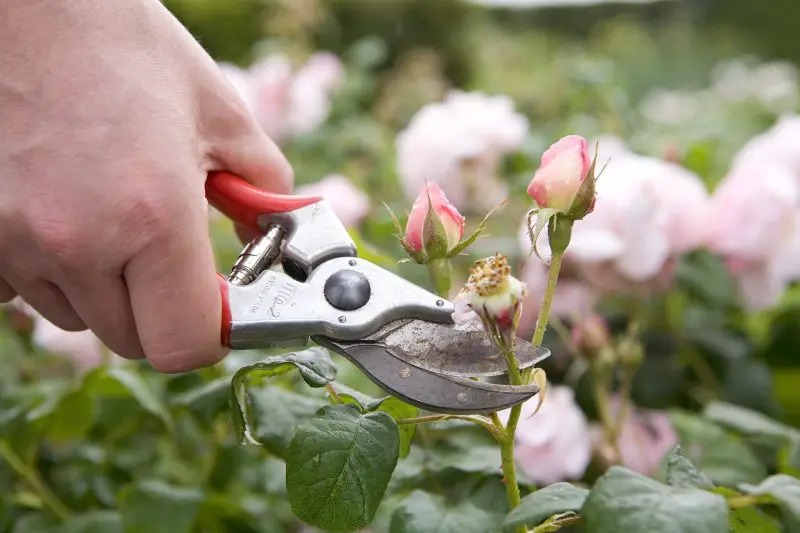
Avoid deadheading too early in the blooming cycle. Wait until the petals have begun to wilt and the flower loses its color and shape. Deadheading at this stage ensures you’re not removing flowers prematurely, which could interfere with pollination or waste potential bloom time. By staying observant and regularly checking your roses, you can deadhead at the perfect moment for each individual flower.
Identifying the Right Place to Cut
The location of your cut plays a big role in how the plant responds. To encourage vigorous new growth and shape the plant effectively, you’ll want to cut just above a healthy set of five leaflets on the stem. This is typically the point where new shoots are most likely to emerge and support strong future blooms.
The five-leaflet rule is not arbitrary. Roses often produce their next flowering cane from the node above a group of five leaves. Cutting too high—above a group of three leaflets—may result in weak or blind shoots that don’t produce blooms. Conversely, cutting too low can reduce the overall size of the bush and limit its branching potential.
Angle is also important. Make your cut at a 45-degree angle, sloping away from the bud eye or the set of leaves. This shape helps water run off the cut surface and reduces the likelihood of rot. Using clean, sharp pruning shears ensures a smooth cut and minimizes damage to the plant’s tissues.
Choosing the Right Tools for the Job
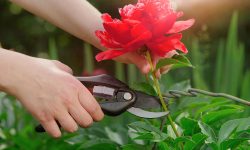
Using the correct tools can make the deadheading process smoother and more effective. The primary tool you’ll need is a pair of sharp bypass pruning shears. These shears make clean cuts without crushing the stem, which is vital for quick healing and preventing infection. Keep your shears sanitized between uses to avoid spreading diseases from one plant to another.
For smaller roses or light-touch deadheading, you may prefer using garden scissors or even your fingers. Pinching off spent blooms can be sufficient for miniature or patio roses, though it’s less precise. However, when dealing with large or woody stems, bypass pruners provide the necessary leverage and clean cut.
Wearing gardening gloves is also highly recommended. Many rose varieties have sharp thorns that can cause skin irritation or injury. Gloves protect your hands while allowing you to handle branches confidently. Choosing gloves with a snug fit and good flexibility will help maintain control during the cutting process.
Special Considerations for Different Rose Types
Not all rose bushes respond to deadheading in the same way. Hybrid tea roses, for example, benefit greatly from deadheading since they typically produce one flower per stem. Removing the faded bloom encourages the plant to generate a new flowering cane. Floribundas and grandifloras, which produce clusters of flowers, may require removing the entire cluster once all the individual blooms have faded.
Shrub roses and landscape roses, such as Knock Out or Drift roses, are often self-cleaning. This means they shed their old petals naturally and may not require regular deadheading to continue blooming. However, occasional trimming of spent blooms can still improve appearance and stimulate more vigorous flowering in some cases.
Climbing roses need a slightly different approach. These plants often bloom on old wood, so aggressive deadheading or pruning can disrupt their flowering cycle. It’s best to remove individual faded blooms without cutting too deeply into the canes. Understanding the growth habits of your specific rose variety will help you tailor your deadheading approach for optimal results.
Encouraging Continuous Blooms Throughout the Season
Regular deadheading is a proven way to extend the blooming season. By removing spent flowers promptly, you send a clear signal to the plant that its reproductive work isn’t finished. In response, the rose bush produces new buds and enters another bloom cycle. This process can continue all summer and even into early fall in favorable climates.
Supplementing deadheading with consistent care also supports repeat blooming. Roses are heavy feeders and benefit from periodic fertilization after each bloom flush. A balanced rose fertilizer or compost tea can provide the nutrients needed for bud development and flower production. Adequate sunlight, proper watering, and disease prevention are equally important to keep the plant in top form.
Weather can also affect how quickly your rose recovers after deadheading. In warm, sunny conditions, new buds may appear within a week or two. Cooler or cloudier weather may slow growth, but regular maintenance will still yield visible improvements over time. The key is to remain consistent and patient as you encourage wave after wave of vibrant blossoms.
Avoiding Common Mistakes When Deadheading
While deadheading is simple in concept, a few common mistakes can hinder your success. One frequent error is cutting too close to the bud eye or leaf node. This can damage emerging growth and delay blooming. Always leave about a quarter-inch of stem above the node to protect the bud and ensure healthy regrowth.
Another mistake is neglecting to sanitize tools between uses. Dirty or dull pruners can introduce bacteria or fungi into open wounds, leading to infections such as black spot or cane blight. Cleaning your shears with rubbing alcohol or a bleach solution after each use is a quick and effective way to maintain plant health.
Some gardeners also deadhead too aggressively or at the wrong time of year. As the growing season winds down in late fall, roses begin preparing for dormancy. Deadheading during this phase may confuse the plant and disrupt its natural cycle. It’s best to stop deadheading about six weeks before your area’s expected first frost, allowing the plant to form rose hips and harden off for winter.
Knowing When to Stop Deadheading for the Season
As summer fades into autumn, your rose bushes start shifting into dormancy. During this transitional period, it’s important to ease off on deadheading. Allowing the final blooms to mature and form rose hips signals the plant to slow down and prepare for the colder months ahead. This natural transition is essential for winter survival and next year’s performance.
In cold climates, ceasing deadheading by late August or early September gives the plant enough time to form hips and begin the hardening process. The hips also provide food for birds and wildlife during the lean winter months, adding ecological value to your garden. In mild climates, where roses may bloom nearly year-round, you can continue light deadheading until the plants naturally slow their growth.
Knowing when to stop deadheading is just as important as knowing when to start. It’s a final act of care that respects the rose bush’s seasonal rhythm and ensures its long-term vitality. Observing your plants and adjusting your actions to their needs is the hallmark of a mindful gardener.
FAQs about How to Deadhead Rose Bushes
What happens if I don’t deadhead my rose bushes?
If you skip deadheading, the plant will put energy into forming seeds instead of producing new blooms. This can reduce the overall flower display and lead to a messier appearance.
Can I deadhead roses with my fingers?
You can pinch off small or soft flower heads with your fingers, especially on miniature roses. However, using sharp pruning shears is recommended for cleaner cuts and better plant health.
Should I deadhead climbing roses the same way?
Climbing roses require a gentler approach. Avoid cutting deep into canes. Remove only the faded flower heads while preserving the structure of the long stems.
When should I stop deadheading for the year?
You should stop deadheading about six weeks before the first frost in your region. This allows the plant to form rose hips and begin preparing for winter dormancy.
Do Knock Out roses need to be deadheaded?
Knock Out roses are self-cleaning and don’t strictly require deadheading, but occasional removal of spent blooms can enhance appearance and encourage faster reblooming.
Final Thoughts on Mastering the Art of Deadheading
Deadheading rose bushes may seem like a small task, but its impact on your garden’s beauty and health is profound. This simple yet powerful technique keeps your roses blooming, your plants tidy, and your garden vibrant. By understanding the purpose, timing, and method behind deadheading, you can transform ordinary rose care into a rewarding and visually stunning experience.
Whether you’re tending a single hybrid tea or managing an expansive rose garden, deadheading should become a regular part of your gardening routine. It connects you to your plants, encourages observation, and offers the satisfaction of nurturing continuous blooms. With a little practice and patience, you’ll be well on your way to achieving the stunning results every rose gardener desires.