If you’re wondering how to grow bromeliads indoors successfully for beginners, you’ve come to the right place. Bromeliads are stunning tropical plants that add vibrant color and unique texture to any indoor space. With the right care, even novice gardeners can enjoy their bold foliage and long-lasting blooms year-round.
This guide covers everything beginners need to know to grow bromeliads indoors successfully. From choosing the right varieties and preparing the ideal environment to proper watering and fertilizing techniques, you’ll learn how to create the perfect conditions for your bromeliads to thrive and flourish inside your home.
Choosing the Right Bromeliad for Indoors
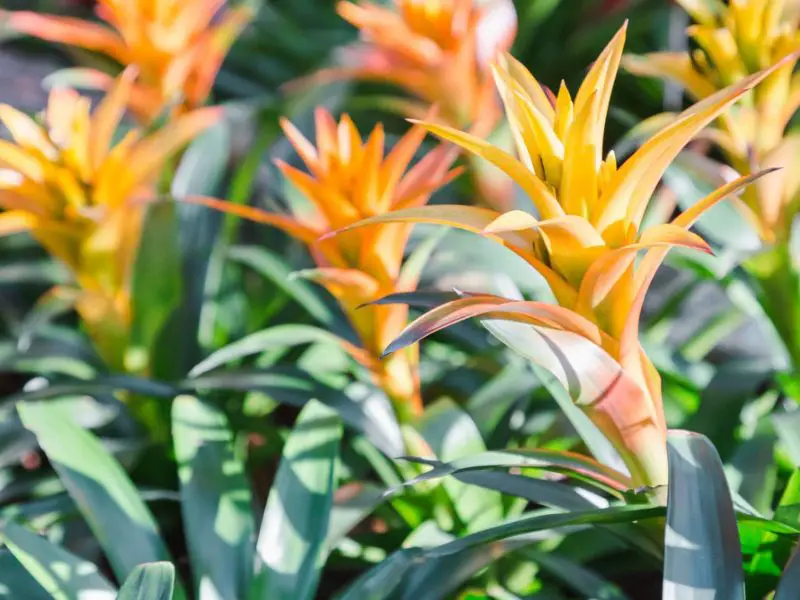
Popular Indoor Bromeliad Varieties
Not all bromeliads thrive indoors, but several varieties have adapted well to typical household environments. Guzmania is a top choice for beginners due to its vivid flower bracts and tolerance for medium to low light. Aechmea varieties, like Aechmea fasciata, display striking silver-striped leaves and long-lasting pink blooms, thriving near bright windows. Neoregelia offers colorful foliage rather than showy flowers, with many compact varieties ideal for shelves or terrariums. Vriesea, known for its feather-like flower spikes and soft leaves, also adapts well to indoor humidity when misted regularly. These four types cover a broad range of appearances and sizes, giving indoor gardeners flexible options for decorating living spaces with tropical flair.
Considerations for Selection
When selecting a bromeliad for indoor growing, first evaluate the available space and expected growth habits of the plant. Some species grow upright and compact, while others spread outward with a rosette shape. Lighting is another crucial factor—bright, indirect light suits most indoor bromeliads best, although varieties with tougher, leathery leaves (like many Aechmea) can handle stronger light. On the other hand, bromeliads with soft, tender foliage (such as Guzmania and Vriesea) are more shade-tolerant and may prefer a spot away from direct afternoon sun. Air circulation and humidity should also be considered, as bromeliads originate from tropical environments. Choose a variety that matches your indoor climate and maintenance style to ensure healthy, long-lasting growth.
Preparing the Right Indoor Environment
Light Requirements
Bromeliads need light to thrive but dislike harsh sun. Bright, indirect light works best. An east-facing window provides gentle morning light. A west-facing window gives stronger afternoon light but may need sheer curtains. Avoid placing the plant in direct sunlight. Leaves may bleach or burn if light is too intense. In low-light homes, use a full-spectrum LED grow light. Position the light about 6 to 12 inches above the plant. Aim for 12 to 14 hours of light per day for healthy growth.
Temperature and Humidity
Keep indoor temperatures steady. Bromeliads prefer a range of 65°F to 80°F. Avoid temperatures below 50°F. Do not place the plant near cold drafts or heat sources. Sudden changes can damage the leaves. Bromeliads also need high humidity. Aim for 50% to 60% humidity indoors. Use a room humidifier if needed. A shallow tray with water and pebbles under the pot can also help. Mist the leaves lightly in the morning during dry seasons.
Air Circulation
Stagnant air can lead to rot and disease. Place the plant in an open space, not crowded by furniture. Avoid dark, stuffy corners. A nearby ceiling or oscillating fan on low setting improves airflow. Open a window occasionally if weather allows. Do not place the plant in direct path of strong air from vents or fans. Gentle airflow helps mimic natural tropical breezes. This reduces fungal problems and keeps leaves dry and healthy.
Choosing the Right Container and Soil
Pot Selection
Always choose a pot with multiple drainage holes. Bromeliads do not tolerate soggy roots. Excess water must drain freely to avoid root rot. Use a pot that fits the root ball snugly. A pot that is too large can retain excess moisture and delay drying. Smaller pots encourage better root control and faster drying between waterings. Terra cotta pots are especially helpful. They are porous, allowing air and moisture to pass through the sides. This keeps the root zone more balanced. Terra cotta also adds weight, which helps support taller bromeliads and prevents tipping. Plastic pots are lightweight and retain more moisture. If using plastic, monitor soil moisture more carefully. Always match the pot size to the plant’s maturity and type.
Soil Mix for Bromeliads
Bromeliads need a fast-draining, aerated growing medium. Use a custom blend for the best results. Combine orchid bark, coarse perlite, and peat moss in equal parts. This mixture creates a loose structure that retains just enough moisture without becoming compacted. Avoid heavy garden soil or standard potting mixes. These hold too much water and may suffocate the roots. Add extra horticultural charcoal to improve air circulation and reduce odor. For terrestrial bromeliads, you can also add coarse sand or fine gravel. This improves drainage and keeps the base of the plant dry. For epiphytic types, avoid soil altogether. Mount them on cork bark or driftwood using sphagnum moss to anchor the roots. Mist these setups regularly to maintain humidity. Clean and sterilize all materials before planting to prevent disease or pests. A breathable soil mix keeps the plant healthy and encourages strong root development.
Watering Bromeliads Properly Indoors
Central Tank Watering
Many bromeliads store water in a central tank or cup formed by overlapping leaves. Keep this tank filled with filtered or rainwater to avoid mineral buildup. Use room-temperature water to prevent shock. Replace the water every few days, especially in warm or humid environments. Weekly flushing is essential. Fill the tank completely, then tilt the plant gently to drain all water out. This prevents bacterial growth, mosquito larvae, and algae buildup. Never leave stagnant water in the tank for extended periods. In low-humidity homes, occasional misting around the tank can also boost humidity levels.
Root Zone Moisture
Bromeliads absorb some moisture through roots, but their root systems are mainly for anchoring. The soil should remain slightly moist, never wet. Let the top inch of the medium dry before watering again. Use a watering can with a narrow spout to target the base of the plant, not the leaves. Pour water slowly to avoid pooling. Always use well-draining soil to prevent sogginess. Place the pot on a saucer filled with pebbles if extra humidity is needed, but keep the pot above the waterline to avoid soaking the roots. Poor drainage is the most common cause of root rot in indoor bromeliads.
Adjusting Watering Frequency
Bromeliad watering needs vary with environmental changes. In spring and summer, higher temperatures and active growth require more frequent watering—about once a week or slightly more in dry indoor air. In fall and winter, reduce watering to once every two to three weeks, especially if light and heat levels drop. Always observe the plant. Curling leaves may indicate underwatering, while soft or browning leaf bases often signal overwatering. Homes with central heating or air conditioning may dry the air, so adjust your schedule accordingly. Use a hygrometer to monitor humidity and a moisture meter to check the soil if needed.
Fertilizing Indoor Bromeliads
Types of Fertilizer
Bromeliads have modest nutritional needs, so it’s best to use a gentle fertilizer. A balanced, water-soluble formula with equal parts nitrogen (N), phosphorus (P), and potassium (K)—such as 10-10-10 or 20-20-20—is effective when diluted properly. For best results, dilute it to one-quarter or one-half of the recommended strength. Specialized bromeliad or orchid fertilizers are excellent choices, as they are designed for epiphytic plants with similar sensitivities.
In addition to liquid fertilizer, you can use slow-release pellets formulated for indoor tropical plants. These pellets release nutrients gradually over several months, making them ideal for those who prefer a low-maintenance approach. However, use them sparingly—bromeliads are sensitive to salt buildup, which can occur from excess nutrients.
Organic options like fish emulsion or seaweed extract can also be used, but should be diluted even further. These natural fertilizers provide micronutrients and promote healthy growth without risking chemical burn.
When and How to Fertilize
The best time to fertilize bromeliads is during their active growing season, typically from spring through early fall. During this period, apply liquid fertilizer every four to six weeks. Always water the plant lightly before applying fertilizer to prevent root burn, especially if applying it to the soil.
There are two primary ways to fertilize bromeliads indoors:
Feeding through the central tank: Pour the diluted fertilizer solution into the plant’s central cup or tank. This allows the plant to absorb nutrients gradually as it would in its native rainforest habitat. Be sure to flush the tank with clean water a few days later to avoid residue or buildup.
Soil application: Alternatively, apply the diluted solution directly to the growing medium. This method is especially effective for terrestrially potted bromeliads or those that don’t retain much water in their central cup. Be careful not to saturate the roots—moderate feeding is key.
Avoid fertilizing during winter or when the plant enters dormancy. During this time, the plant’s nutrient requirements drop significantly, and feeding can lead to salt accumulation or damage. Signs of over-fertilization include leaf tip burn, fading color, or stunted flower development. When in doubt, it’s better to underfeed than overfeed a bromeliad.
Encouraging Bromeliads to Bloom Indoors
Flowering Triggers
Bromeliads typically bloom once in their lifetime, usually after reaching maturity—often between one and three years. Indoors, bright, indirect light is the most important factor. Place your plant near an east or south-facing window with filtered light. Without enough light, blooming may never happen.
Temperature and humidity also influence flowering. Aim for daytime temperatures between 65°F and 80°F (18°C to 27°C), with slightly cooler nights. Humidity above 50% helps mimic tropical conditions. Use a humidifier or pebble tray if your air is dry.
Also ensure your watering is consistent. Keep the central “cup” filled with clean water and refresh it often. Allow the soil to dry slightly between waterings. With the right light, warmth, humidity, and hydration, your bromeliad will eventually bloom.
Ethylene Gas Method
If your bromeliad is mature and healthy but still hasn’t bloomed, try the ethylene gas method using a ripe apple. Place the plant and apple in a clear plastic bag for 7 to 10 days, sealing it lightly. Keep the bag in a warm, shaded spot.
The apple releases ethylene gas, a natural trigger for flowering. Be sure the plant is dry before sealing to prevent mold. After treatment, return the bromeliad to its usual spot. If it works, you’ll see a flower spike form in six to twelve weeks.
This method works best on well-cared-for, mature plants. It won’t help young or stressed bromeliads but can give blooming a gentle nudge under ideal indoor conditions.
Common Problems and How to Solve Them
Yellowing Leaves
Yellow leaves are one of the most common signs of stress in bromeliads and are often caused by overwatering or poor drainage. When the soil stays soggy for too long, roots can suffocate, leading to nutrient deficiencies that manifest as yellowing.
Another frequent culprit is inadequate light. Bromeliads need bright, indirect sunlight to maintain their color and vigor. If your plant is in a dim corner, consider moving it closer to a well-lit window, but avoid harsh midday sun that can scorch the leaves.
To fix the issue, first check soil moisture levels—if it feels wet more than an inch below the surface, hold off on watering. Make sure the container has drainage holes, and empty any water that collects in the saucer. A quick adjustment in watering or light exposure often brings leaves back to a healthier shade.
Brown Leaf Tips
Brown, crispy leaf tips usually signal low humidity, a common issue in heated or air-conditioned indoor spaces. Bromeliads are tropical by nature and thrive in environments with 50% or higher humidity. Use a humidifier, group houseplants together, or place your bromeliad on a tray of pebbles and water to raise ambient humidity.
Another cause could be salt or chemical buildup from tap water. These minerals accumulate over time and burn leaf edges. To avoid this, switch to rainwater, distilled water, or filtered water for both the central cup and the soil. You can also flush the soil every few months with clean water to remove salts.
For cosmetic repair, trim away the brown tips with clean scissors, cutting just outside the healthy tissue to prevent further damage.
Root Rot
Root rot is a serious condition, often caused by standing water in the soil or poorly draining potting mixes. Symptoms include wilting, foul odor, mushy roots, and eventually collapsing leaves.
To prevent this, always grow bromeliads in a well-draining, airy mix—orchid bark, perlite, or a specific bromeliad blend works well. Avoid using standard potting soil alone, as it holds too much moisture. Make sure your pot has sufficient drainage holes and never allow it to sit in water.
If root rot occurs, remove the plant from the pot and cut away all affected roots with sterilized scissors. Rinse the remaining roots and repot in fresh, dry medium. Allow the plant to rest for a day before lightly watering again. Going forward, only water when the top inch of soil feels dry and refresh the central cup regularly with clean water.
Monitoring your plant regularly and providing the right growing conditions can help avoid these common issues and keep your bromeliad vibrant and healthy indoors.
Propagating Bromeliads from Pups
Spring and Summer
Spring and summer mark the bromeliad’s active growth phase. During this time, increase watering to keep the central tank filled and the soil slightly moist. Fertilize every 4 to 6 weeks with a diluted, balanced fertilizer to support healthy leaf and root development. Rotate the plant regularly to expose all sides to light, promoting even growth. Keep an eye out for common pests like mealybugs and spider mites, which thrive in warmer conditions, and treat promptly if detected.
Fall and Winter
As temperatures drop, bromeliads enter a slower growth period. Reduce watering frequency to prevent waterlogging, allowing the soil to dry more between waterings. Stop fertilizing during these cooler months, as the plant’s nutrient needs decrease. Keep the bromeliad in a warm spot away from drafts or cold windows to avoid stress. Ensure it still receives bright, indirect light to maintain health through dormancy until growth resumes in spring.
Decorating with Bromeliads Indoors
Using Bromeliads in Home Décor
Bromeliads offer a striking and vibrant addition to any indoor space with their bold colors and uniquely textured leaves. Their bright flowers and exotic foliage make them excellent statement plants that instantly draw attention. Placing bromeliads in living rooms, kitchens, bathrooms, or entryways can create a lively, tropical atmosphere. These plants work beautifully with various interior styles—from sleek modern to relaxed bohemian or lush tropical themes—bringing a natural, refreshing vibe that enlivens the environment. Their compact size and varied forms make them versatile enough to fit on shelves, tables, or windowsills.
Creative Displays
For a dynamic and visually appealing display, combine bromeliads with other houseplants that offer contrasting leaf shapes, heights, and colors. Grouping several plants together creates layers and texture, enhancing the overall aesthetic. Choose decorative pots in materials like ceramic, terracotta, or woven baskets to complement your décor style and add personality. Consider mounting bromeliads on natural elements such as driftwood, bark, or stones to highlight their unique epiphytic nature, bringing an artistic, organic touch. Hanging planters and vertical garden setups also provide great ways to showcase bromeliads’ architectural forms, transforming them into living sculptures that elevate your indoor space. With thoughtful arrangement, bromeliads can serve both as vibrant focal points and harmonious components of your home greenery.
Long-Term Bromeliad Care and Enjoyment
Maintaining Healthy Growth
To keep your bromeliad thriving over the long term, consistently provide bright, indirect light that mimics its natural tropical habitat. Maintain a regular watering schedule, ensuring the central tank is filled and the soil stays slightly moist but never soggy. Feed your plant periodically with a diluted balanced fertilizer during the growing season to promote healthy foliage and vibrant blooms. Regularly inspect your bromeliad and promptly remove any dead, yellowing, or damaged leaves to prevent disease and maintain a neat appearance. Occasionally wipe the leaves with a damp cloth or gently rinse them to remove dust and improve photosynthesis, helping the plant look fresh and vibrant year-round.
Recycling the Life Cycle
Bromeliads have a natural life cycle where the mother plant eventually ages and declines after flowering. When this happens, your attention should shift to the pups—the offsets growing at the base. These pups are the future of your bromeliad collection. By providing them with the same attentive care—proper light, watering, and feeding—you encourage them to establish strong root systems and healthy growth. Over time, pups mature into full-sized plants that will bloom themselves and produce new pups, continuing the cycle. This natural propagation process ensures you can enjoy a thriving bromeliad display indefinitely, with new plants renewing your collection season after season.
Frequently Asked Questions About Growing Bromeliads Indoors
How often should I water my indoor bromeliad?
Water your bromeliad about once a week, keeping the central tank filled with fresh, room-temperature water. Also, lightly moisten the soil when the top inch feels dry. Adjust frequency based on humidity and temperature—more in warmer, drier conditions and less in cooler, humid environments.
What kind of light do bromeliads need indoors?
Bromeliads thrive in bright, indirect light. Place them near east- or west-facing windows where they receive filtered sunlight. Avoid direct midday sun, which can scorch the leaves, but insufficient light may slow growth and prevent blooming.
Can I use tap water to water my bromeliad?
Tap water often contains chlorine and minerals that can build up and damage the plant over time. It’s better to use filtered, distilled, or collected rainwater to keep your bromeliad healthy and prevent leaf tip browning or root issues.
How do I encourage my bromeliad to bloom indoors?
Provide consistent care with proper light and watering. When mature, you can encourage blooming by placing the plant in a plastic bag with a ripe apple for 7–10 days to expose it to ethylene gas, a natural flowering hormone. Be cautious not to stress young or unhealthy plants with this method.
How do I propagate bromeliads successfully from pups?
Wait until pups are at least one-third the size of the mother plant before separating. Use a sterilized knife to cut them away with some roots attached. Plant pups in a well-draining mix and keep them in bright, indirect light. Water lightly until they establish roots and new growth appears.
Conclusion
Growing bromeliads indoors successfully is a rewarding experience, especially for beginners eager to bring a touch of the tropics into their homes. By understanding the plant’s needs and mimicking its natural environment, you can cultivate vibrant, healthy bromeliads that brighten your living space for years to come. With patience and consistent care, even novice gardeners can enjoy the spectacular blooms and fascinating growth patterns of these tropical treasures.