Calendula, often called pot marigold, brings a burst of cheerful yellow and orange to any garden while offering surprising medicinal and companion planting benefits. Known for its ease of growth and long blooming season, calendula is a favorite among beginner and seasoned gardeners alike. Whether grown in containers or garden beds, this flower adds both beauty and purpose to your space.
From seed to bloom, growing calendula is a rewarding journey that begins with the right timing and care. This guide will walk you through every step—selecting seeds, sowing, caring, and harvesting—so you can enjoy lush, vibrant blooms throughout the growing season while supporting pollinators and enhancing your garden’s vitality.
Why Grow Calendula in Your Garden
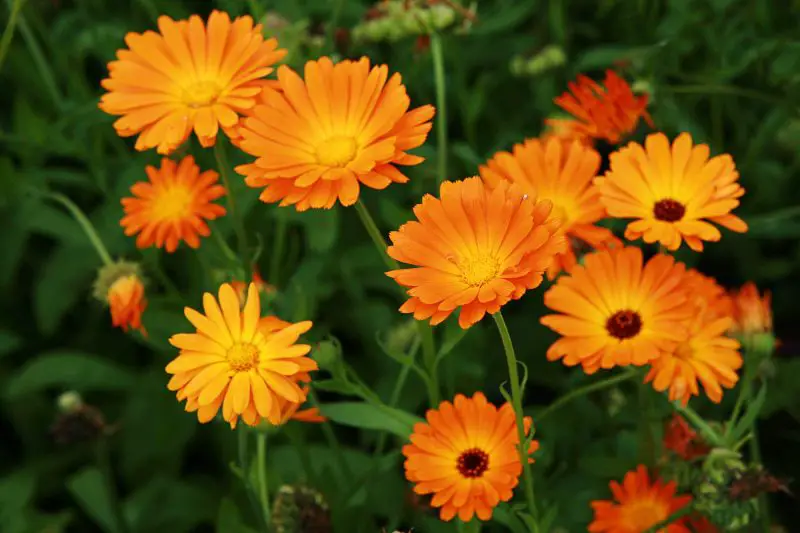
Calendula is more than just a pretty face in the garden—it’s a powerhouse of beauty, utility, and ecological value. One of the top reasons gardeners love calendula is its long-lasting and vibrant bloom period, stretching from early spring until frost. These bright yellow and orange flowers instantly uplift borders, pathways, and containers, creating an inviting and cheerful atmosphere.
Beyond aesthetics, calendula is also prized for its edible and medicinal qualities. The petals are not only safe to eat but also rich in antioxidants, making them a colorful addition to salads, teas, and baked goods. Calendula oil, extracted from the blossoms, is commonly used in homemade skincare products to soothe irritated or dry skin.
This flower is also an excellent companion plant. Its aromatic foliage helps deter pests like aphids and whiteflies, while its nectar-rich blooms attract beneficial insects such as bees, hoverflies, and ladybugs. It plays a vital role in organic and pollinator-friendly gardens.
Moreover, calendula is incredibly easy to grow. It thrives in poor soil, tolerates light frosts, and readily reseeds itself—making it ideal for gardeners looking for low-maintenance, high-impact results. Whether you’re cultivating a vibrant flower bed, a productive kitchen garden, or a pollinator haven, calendula is a smart, rewarding choice.
Understanding Calendula Varieties
The Diversity of Calendula Blooms
Although all calendulas belong to the species Calendula officinalis, they vary significantly in flower form, color intensity, and growth habit. From simple daisy-like petals to quilled, almost chrysanthemum-style blooms, these flowers can bring a surprising amount of diversity to your garden. Some varieties lean toward medicinal use, while others are bred purely for ornamental value. Understanding this range helps gardeners tailor their calendula planting to their aesthetic goals and practical needs.
Popular Calendula Cultivars for Gardeners
Several calendula cultivars have become favorites among gardeners. ‘Pacific Beauty’ is a standout choice, known for its large, bright blooms in shades of yellow, gold, and orange, which thrive in borders and pollinator gardens. For those interested in herbal remedies, ‘Resina’ is highly prized for its exceptionally high resin content, making it ideal for skincare products and infusions.
‘Radio’ brings dramatic flair with its quilled petals and brilliant orange hue—perfect for cutting gardens or as a bold focal point. Meanwhile, ‘Touch of Red Buff’ adds a vintage charm with warm peach petals tinged with red, offering a softer, cottage-style feel.
Growth Habits and Size Differences
Calendula varieties also differ in plant structure and size. Most cultivars grow between 12 to 24 inches tall, with compact types forming neat mounds and others stretching a bit more with a slightly open or sprawling form. Compact forms are excellent for edging pathways and raised beds, while taller ones do well as backdrops in smaller flower beds. Choosing a type that complements your garden layout can help calendula thrive without overcrowding other plants.
Selecting Varieties Based on Climate and Purpose
Your regional climate and purpose for growing calendula should also influence your variety selection. In cooler regions or areas with shorter seasons, early-flowering cultivars like ‘Alpha’ can ensure a full bloom cycle before heat or frost becomes a concern. In temperate zones, varieties that bloom over extended periods can provide long-lasting color from early spring to fall.
If your main goal is medicinal use, stick to varieties like ‘Resina’ that are bred for their healing properties. But if you’re planting for pollinators or ornamental purposes, flower-rich cultivars with showy, vibrant petals like ‘Pacific Beauty’ or ‘Orange Flash’ will keep bees and butterflies coming back all season long.
Choosing the Right Time to Plant Calendula
Calendula thrives in cool weather, making early spring and fall the ideal times for planting. In most temperate zones, you can sow seeds directly into the ground once the soil is workable and the threat of frost has passed—typically in March or April.
In mild winter regions, fall planting allows calendula to bloom earlier in spring. Gardeners in zones 8 and warmer can even enjoy blooms through winter, as calendula tolerates light frost. Starting seeds indoors four to six weeks before the last frost offers a head start and ensures early flowers in spring.
Avoid planting during midsummer heat, especially in warmer climates, as calendula may wilt or stop blooming. Instead, treat it as a cool-season plant—best grown in spring or fall for consistent color and healthy growth.
By timing your planting based on local climate patterns, you’ll maximize bloom time, encourage strong root development, and enjoy vibrant calendula flowers for months.
Preparing the Soil for Calendula Seeds
Calendula prefers loose, well-draining soil rich in organic matter. Before planting, loosen the top 6 to 8 inches of soil using a garden fork or spade to improve aeration and root penetration. Mix in compost or aged manure to boost fertility and enhance moisture retention without causing sogginess.
Aim for a slightly acidic to neutral pH, ideally between 6.0 and 7.0. If drainage is poor, consider adding coarse sand or planting in raised beds to prevent waterlogging, which can rot seeds and roots.
Rake the soil surface smooth before sowing to ensure good seed-to-soil contact. A fine, crumbly texture helps calendula seeds settle in place and germinate evenly. Taking time to prepare the soil well creates a healthy foundation for vibrant, long-lasting blooms.
How to Sow Calendula Seeds Outdoors
To sow calendula seeds directly in the garden, wait until after the last frost when the soil has warmed to at least 60°F (15°C). Choose a sunny location and prepare the soil by raking it smooth and free of debris.
Scatter the seeds thinly over the surface, then cover them lightly with about ¼ inch (0.5 cm) of fine soil or compost. Press down gently to ensure good contact with the soil. Water gently but thoroughly to moisten the top layer without washing the seeds away.
Keep the area consistently moist during germination, which usually takes 7 to 14 days. Once seedlings emerge, thin them to about 8 to 12 inches apart to allow for proper airflow and healthy growth. With the right start, calendula will establish quickly and begin flowering in as little as 6 to 8 weeks.
Starting Calendula Indoors for Early Blooms
Starting calendula seeds indoors is a smart way to enjoy earlier blooms, especially in regions with short growing seasons or unpredictable spring weather. Begin the process 6 to 8 weeks before your region’s last expected frost date.
Use small pots or seed trays filled with a lightweight, well-draining seed-starting mix. Sow the seeds about ¼ inch deep and gently firm the soil over them. Water carefully to moisten the soil evenly, and place the containers in a bright location with temperatures around 65–70°F (18–21°C). If natural light is limited, use grow lights to ensure seedlings receive at least 12–14 hours of light daily.
Germination typically takes 7 to 10 days. Once seedlings develop two sets of true leaves, you can begin hardening them off by gradually introducing them to outdoor conditions over 7 to 10 days. After the danger of frost has passed, transplant them into the garden, spacing them about 8 to 12 inches apart. Starting indoors not only accelerates the flowering process but also gives you a head start on a season filled with vibrant color.
Best Location for Growing Calendula
Calendula thrives in sunny spots where it can receive at least 6 hours of direct sunlight each day. Full sun encourages the plant to produce more blooms with richer color, stronger stems, and better resistance to disease. In especially hot climates, a location with light afternoon shade can help prolong blooming during peak summer heat.
Choose a site with well-draining soil to prevent root rot, as calendula does not tolerate standing water. Slightly acidic to neutral soil (pH 6.0–7.0) is ideal. Raised beds, borders, and containers all work well, provided they offer good air circulation and protection from excessive wind, which can damage taller flower stalks.
Calendula is highly adaptable and will grow in poor soils, but it performs best when planted in moderately fertile ground enriched with compost or aged manure. For kitchen gardens, plant calendula near vegetables like tomatoes or lettuces—its natural pest-repelling qualities can help protect nearby crops. Whether tucked along walkways, garden edges, or in flower beds, calendula’s ideal location is one that offers sunlight, airflow, and accessible care.
Watering Requirements for Calendula
Calendula prefers consistently moist but not soggy soil, especially during its early growth and flowering stages. When seedlings are young or newly transplanted, keep the top inch of soil evenly moist to support strong root development. As the plant matures, it becomes more drought-tolerant, but regular watering will still encourage continuous blooming and lush foliage.
Deep watering once or twice a week is usually sufficient, depending on rainfall and temperature. During hot or windy weather, you may need to water more frequently to prevent wilting. It’s best to water calendula in the morning, allowing excess moisture on leaves to dry by afternoon and minimizing the risk of fungal diseases.
Avoid overwatering, as soggy soil can lead to root rot or mildew problems. Let the top layer of soil dry slightly between waterings. If growing calendula in containers, ensure pots have good drainage holes and monitor moisture more often, as potted plants dry out faster than those in the ground.
Mulching around calendula plants with straw, bark, or compost can help retain moisture, reduce evaporation, and suppress weeds—further reducing the frequency of watering while supporting healthy, vibrant growth.
Feeding Calendula Plants
Calendula is not a heavy feeder, but providing the right nutrients can significantly enhance its growth, flower production, and overall plant health. If you’ve amended your soil with compost before planting, calendula can thrive without frequent fertilization. However, for long blooming seasons or container-grown plants, occasional feeding is beneficial.
Use a balanced, water-soluble fertilizer diluted to half strength every four to six weeks during the growing season. This helps support continual flower formation without promoting excessive leafy growth, which can reduce blooming. If your calendula shows signs of nutrient deficiency—such as pale leaves or stunted growth—apply a low-nitrogen fertilizer to boost flower production.
Organic options like fish emulsion, compost tea, or worm castings are also excellent for feeding calendula gently while enriching the soil. Always avoid over-fertilizing, as too much nitrogen can result in lush foliage with fewer flowers. When growing calendula as part of a pollinator garden or for edible use, stick with natural and organic fertilizers to keep plants safe and chemical-free.
Mulching Around Calendula Plants
Applying mulch around calendula plants offers multiple benefits that contribute to healthier growth and longer-lasting blooms. Mulch helps retain soil moisture, regulate temperature, and suppress weed competition—all of which support strong, vibrant calendula.
Use a light layer of organic mulch such as shredded straw, compost, dried grass clippings, or bark chips. Spread the mulch around the base of the plants, keeping it a few inches away from the stems to prevent moisture buildup and potential rot. Mulching is especially useful during dry periods or in hot climates where calendula might otherwise struggle with heat stress and water loss.
In cooler regions, mulch also helps extend the blooming season by insulating the roots during early frosts. As the mulch decomposes, it gradually enriches the soil with nutrients, providing ongoing support to your calendula without additional feeding. Refresh the mulch layer as needed throughout the season to maintain its effectiveness and keep the garden looking tidy.
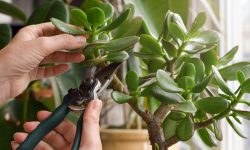
Deadheading for Continued Bloom
Deadheading is one of the simplest yet most effective ways to keep calendula blooming throughout the growing season. By regularly removing spent flowers, you prevent the plant from putting energy into seed production and instead encourage it to produce new buds.
To deadhead calendula, pinch or snip off faded blooms just above a healthy set of leaves. It’s best to do this weekly or whenever you notice withering flowers. Not only does this tidy up the appearance of the plant, but it also signals the calendula to redirect its resources toward creating more blossoms.
If left unattended, calendula will quickly go to seed and flowering will slow or stop altogether. Frequent deadheading delays this natural process, extending the blooming window by several weeks or even months. In milder climates, this practice can keep calendula vibrant well into fall, allowing your garden to remain colorful and cheerful for longer.
Managing Pests and Diseases
Calendula is generally a hardy plant with good resistance, but it’s not immune to common garden pests and diseases. Aphids are the most frequent intruders, often clustering on new growth and flower buds. If left unchecked, they can distort leaves and reduce blooming. To control them, rinse plants with a strong stream of water or apply insecticidal soap early in the morning when pollinators are less active.
Another common issue is powdery mildew, especially in humid or overcrowded conditions. This fungal disease appears as a white, powdery coating on leaves and can hinder photosynthesis. Improve air circulation by spacing plants properly and avoid overhead watering. If mildew appears, remove affected leaves and apply an organic fungicide if needed.
Slugs and snails may also feed on tender young seedlings, particularly in damp areas. Hand-picking them in the evening and using copper barriers or diatomaceous earth can help reduce damage.
By keeping an eye on your calendula plants, providing proper spacing, and reacting early to signs of stress, you can maintain their health naturally and enjoy months of trouble-free blooms.
Harvesting Calendula Flowers
Harvesting calendula at the right time not only maximizes bloom production but also preserves the plant’s medicinal and cosmetic value. The best time to pick the flowers is in the morning after the dew has dried but before the sun becomes too intense. At this point, the essential oils and beneficial compounds are most concentrated in the petals and center disk.
Choose blooms that are fully open and vibrant. Gently pinch or snip the flower heads just above a leaf node to encourage new growth. Frequent harvesting stimulates the plant to produce even more flowers throughout the season, making calendula a continuous source of color and utility.
After harvesting, spread the flowers out in a single layer in a warm, dry, and well-ventilated area away from direct sunlight to dry them for later use. Dried calendula petals can be stored in an airtight container and used for teas, infused oils, skin salves, or potpourri. With regular picking, you can enjoy both fresh and dried calendula for months, all while keeping your garden blooming.
Saving Seeds from Calendula
Saving seeds from calendula is a simple and rewarding way to ensure a continuous supply of these cheerful blooms year after year. Once flowering slows down and the petals begin to wither, allow some of the flower heads to remain on the plant instead of deadheading them. Over time, these spent blooms will dry out and form distinctive, curved seed heads that look like tiny brown claws or crescents.
Wait until the seed heads are completely dry and brown on the plant before collecting. Gently pull or snap off the heads, then rub them between your fingers to release the seeds. Make sure they are thoroughly dry before storing to prevent mold or decay.
Store your calendula seeds in a paper envelope or a glass jar with a label noting the variety and harvest date. Keep the container in a cool, dark, and dry place. Properly saved seeds can remain viable for several years. By collecting your own seeds, you not only save money but also preserve plants that are well-adapted to your specific garden conditions.
Companion Planting with Calendula
Calendula is more than just a pretty face in the garden—it’s a powerful companion plant that brings real benefits to your vegetable beds and flower borders. Its bright blooms attract a variety of beneficial insects like ladybugs, lacewings, and hoverflies, which help control aphids, whiteflies, and other garden pests naturally. Calendula also draws in pollinators such as bees and butterflies, making it an excellent partner for fruits and vegetables that rely on insect pollination.
In vegetable gardens, calendula pairs especially well with crops like tomatoes, carrots, lettuce, beans, and broccoli. Its strong scent can help mask the aroma of more vulnerable plants, confusing pests like aphids and cabbage moths. When grown near leafy greens, calendula can help reduce damage from slugs by attracting them away from your crops.
Calendula also improves soil health by producing long taproots that gently aerate the soil and pull up nutrients from deeper layers. Its flowers and foliage break down easily into compost, enriching the garden naturally. Whether you’re planting it in raised beds, borders, or between rows, calendula’s role as a protective and productive companion makes it a valuable addition to any garden layout.
Overwintering Calendula in Mild Climates
In regions with mild winters—typically USDA zones 8 to 10—calendula can often survive through the colder months with minimal protection. While calendula is technically a cool-season annual, it behaves like a short-lived perennial in these climates, especially if winters are frost-free or only experience light frosts.
To help calendula thrive through winter, keep the plants lightly mulched with organic material like straw or shredded leaves. This insulation helps protect the roots from temperature swings and conserves soil moisture. Make sure the soil remains well-draining, as calendula doesn’t tolerate soggy conditions during cooler months.
Continue light deadheading and remove damaged leaves to prevent fungal issues in damp weather. If your area experiences occasional frosts, consider using a frost cloth or row cover during particularly cold nights. In protected garden beds or containers near walls, calendula may bloom sporadically throughout winter and bounce back quickly in early spring with fresh growth and flowers.
Encouraging Self-Seeding for Future Blooms
Calendula is a generous self-seeder, and with a little encouragement, it can return year after year without replanting. To promote natural reseeding, allow some of the healthiest flowers to mature fully on the plant until they form dry seed heads. These seed heads will eventually release their curved, brown seeds onto the soil below.
Avoid heavy mulching late in the season, as it can block seeds from reaching the soil surface or germinating properly. Lightly rake the soil to help seeds settle, and water occasionally during dry spells to support early sprouting. In mild climates, these seeds may germinate in late fall and bloom in early spring. In cooler zones, they’ll lie dormant through winter and emerge as soon as temperatures rise.
By letting calendula seed itself, you’ll enjoy a more natural, effortless wave of color each year, often with new seedlings popping up in unexpected corners of the garden.
Using Calendula in the Kitchen and Home
Growing Calendula in Containers
Calendula adapts beautifully to container gardening, making it a perfect choice for balconies, patios, and small spaces. With its compact size and shallow root system, it thrives in pots at least 6 to 8 inches deep with good drainage. Use a high-quality potting mix that is loose and well-draining—amending with compost or perlite helps retain moisture without waterlogging the roots.
Choose a sunny spot for your container, as calendula needs at least 6 hours of direct sunlight daily. Water regularly to keep the soil evenly moist, especially during hot spells, but avoid soggy conditions. Since nutrients wash out of containers faster, feed calendula every 3 to 4 weeks with a balanced liquid fertilizer to promote lush growth and consistent blooms.
Deadheading spent flowers is even more important in containers to encourage repeat flowering and keep the plant tidy. Calendula grown in pots can bloom just as profusely as those in garden beds if given the right care, and they offer the added benefit of being easy to move or protect in harsh weather.
Growing calendula in containers also reduces the risk of soilborne diseases and makes pest control more manageable, giving you healthy blooms right at your doorstep.
Common Growing Challenges and Solutions
Poor Germination Rates
Calendula seeds can sometimes be slow or inconsistent to germinate, especially if environmental conditions are not ideal. One of the most common causes is soil temperature that’s either too low or fluctuating. For best results, sow seeds when the soil is consistently between 15–21°C (60–70°F). Heavy or compacted soil can also reduce oxygen flow to the seed, slowing germination. Use a light, well-draining potting mix and sow seeds just beneath the soil surface—no deeper than 0.5 cm (1/4 inch). Keep the soil moist but not saturated, as waterlogged conditions can cause seeds to rot before sprouting. In cooler climates, starting seeds indoors may provide a more stable environment to promote early success.
Leggy Seedlings
Seedlings that appear long, thin, and weak—commonly referred to as “leggy”—are often grown under insufficient light. This problem arises when seedlings stretch toward a light source in an attempt to get more exposure, resulting in fragile stems that are prone to bending or falling over. Calendula thrives in full sun and needs at least 6–8 hours of direct light each day. If starting seeds indoors, place them under grow lights no more than a few centimeters above the tops of the plants, adjusting as they grow. A bright, south-facing windowsill can also work if temperatures stay moderate. Ensuring seedlings have adequate spacing and air circulation will help strengthen their structure and prevent fungal issues like damping-off.
Yellowing Leaves or Stunted Growth
When calendula plants display yellow leaves or seem to stop growing altogether, the issue is usually tied to soil fertility or pH imbalance. Calendula prefers a neutral to slightly acidic pH (around 6.0–7.0) and soil that’s moderately fertile. Excessive nitrogen can lead to lush green foliage but very few blooms, while a lack of nutrients, especially nitrogen and iron, can result in pale, yellowing leaves. Feed plants with a diluted balanced fertilizer (such as 10-10-10) every 3–4 weeks during the growing season, or amend the soil with compost at planting time. Also ensure your plants are not rootbound or competing with weeds, which can restrict access to nutrients and water.
Fungal Diseases
Calendula is relatively disease-resistant but can suffer from fungal issues under poor growing conditions. Powdery mildew is one of the most common problems, especially during humid or overcrowded conditions. This appears as a white, powdery coating on leaves and stems and can reduce flowering and plant vigor. Good air circulation, spacing between plants, and avoiding overhead watering are key preventive steps. Water early in the morning and direct irrigation at the base of the plant. Root rot and damping-off can also be problematic when soil stays too wet or lacks drainage—avoid these by planting in well-draining soil and never letting the roots sit in standing water. For severe infections, organic fungicides such as sulfur or potassium bicarbonate can help.
Pest Infestations
While calendula helps deter many harmful insects in the garden, it’s not immune to pest problems itself. Aphids are perhaps the most common invaders, often clustering on tender new growth and sucking plant sap, which causes curling or distorted leaves. Whiteflies, thrips, and spider mites can also become issues in hot or dry environments. Slugs and snails may feed on young calendula leaves and petals, particularly in moist areas. Regularly inspect your plants and use targeted controls like neem oil, insecticidal soap, or homemade garlic spray to discourage infestations. Introducing beneficial predators such as ladybugs or lacewings is another eco-friendly option. Remove any debris around the base of the plants where pests might hide.
Excessive Heat or Humidity
Calendula prefers cool to mild temperatures and can begin to decline during intense summer heat, especially if combined with high humidity. Signs of heat stress include drooping foliage, slower flowering, or total cessation of blooming. In hot climates, provide partial afternoon shade to help the plants recover and mulch around the base to regulate soil temperature and retain moisture. Water deeply but infrequently to encourage strong root systems. Deadheading spent flowers will also encourage fresh blooms, even in less-than-ideal weather. Some gardeners treat calendula as a cool-season annual, pulling it out during midsummer and replanting in early fall when temperatures cool again.
FAQs About Planting Calendula seeds
What is the best time of year to plant calendula seeds?
Calendula seeds germinate best in cool temperatures, ideally between 10–21°C. In most temperate climates, early spring is the best time to direct sow seeds outdoors. If you’re aiming for an earlier start, you can sow seeds indoors about 6 to 8 weeks before your last expected frost. In regions with mild winters, calendula can also be planted in fall for winter and early spring blooms.
How long does it take for calendula to bloom from seed?
Calendula typically begins blooming about 6 to 8 weeks after germination. With proper care, such as consistent moisture, full sun exposure, and regular deadheading, calendula plants will produce flowers continuously throughout the season until the heat of midsummer or the arrival of frost.
Can calendula grow in partial shade?
Calendula prefers full sun to produce the most blooms, but it can tolerate partial shade, especially in hot climates. In regions with intense summer sun, a spot that receives morning light and afternoon shade can help prolong blooming and reduce stress from heat. However, too much shade may lead to leggy growth and fewer flowers.
Do calendula plants attract pollinators?
Yes, calendula is known to attract a variety of pollinators, including bees, hoverflies, and butterflies. Its bright, daisy-like flowers are rich in nectar and pollen, making them a valuable addition to pollinator-friendly gardens. Calendula also acts as a trap crop for aphids, drawing pests away from more sensitive plants.
How do I store harvested calendula petals for later use?
After harvesting calendula flowers, gently pull off the petals and spread them out in a single layer on a mesh screen or paper towel in a warm, dry, well-ventilated area. Allow them to air dry for several days until crisp. Store the dried petals in an airtight glass jar, away from light and moisture, to preserve their color and potency for up to a year. These dried petals can be used in teas, infused oils, salves, or natural dyes.
Final Thoughts on Growing Calendula
Calendula is a joyful addition to any garden, offering beauty, resilience, and multiple uses. From sowing seeds to harvesting blooms, it rewards even minimal effort with bright flowers and herbal benefits. By following the steps outlined in this guide, you can grow calendula successfully and enjoy its full potential from seed to bloom in your vibrant garden.