Crepe myrtles (Lagerstroemia species) are beloved ornamental trees and shrubs known for their vibrant summer blooms, attractive bark, and versatile size, making them a favorite in many gardens and landscapes. While buying nursery plants is an option, growing crepe myrtles from cuttings offers an affordable and rewarding way to propagate these beautiful plants at home.
Successfully rooting crepe myrtle cuttings allows gardeners to produce clones of desired varieties, preserving flower color and tree form. This method ensures that the new plants retain all the characteristics of the parent, giving consistent and reliable results.
This article will guide you through the entire process of growing crepe myrtles from cuttings, providing detailed steps to help you achieve healthy, thriving new plants for your garden.
Understanding Crepe Myrtle Propagation
Before diving into the step-by-step method, it’s important to understand why propagation by cuttings is a preferred technique. Crepe myrtles produce a wide range of cultivars with distinct flower colors, growth habits, and bark textures. Propagating through cuttings ensures the offspring is genetically identical to the parent, maintaining the specific traits gardeners desire. Unlike propagation by seeds, which can result in variable offspring, cuttings provide uniformity.
Furthermore, cuttings allow gardeners to bypass the lengthy juvenile phase of seed-grown plants. Seedlings may take several years to flower, while cuttings from mature plants often bloom much sooner. This faster route to flowering, combined with the cost savings and personal satisfaction of growing your own plants, makes propagation by cuttings an attractive option for gardeners.
Choosing the Right Time to Take Cuttings
Timing plays a critical role in the success of rooting crepe myrtle cuttings. The ideal period to take cuttings is during late spring to early summer when new growth begins to harden but is still pliable. This semi-hardwood stage provides the best balance of moisture and maturity needed for root development.
Taking cuttings too early, when the stems are still soft and herbaceous, can cause cuttings to wilt or rot. On the other hand, cuttings from fully mature, woody stems often root poorly due to reduced hormone activity and higher lignin content. Selecting healthy stems free from disease and pest damage also enhances the chances of successful rooting.
Preparing Cuttings for Rooting
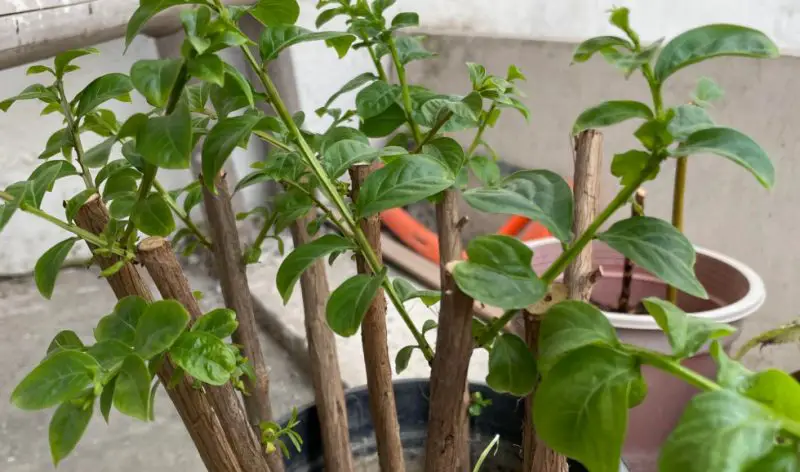
Once the right stems are selected, the preparation of cuttings requires attention to detail. Cuttings should be approximately 6 to 8 inches long, with several leaf nodes present. Nodes are the areas where roots will develop, so ensuring multiple nodes increases the likelihood of rooting.
Leaves on the lower half of the cutting should be removed to reduce moisture loss and prevent fungal problems. Retaining a few leaves on the top half allows photosynthesis to continue, supporting root growth. If the remaining leaves are large, cutting them in half helps decrease water loss through transpiration without completely eliminating the leaf surface area.
The base of each cutting needs a clean, angled cut to increase the surface area for root formation. Using a sharp, sterilized pruning shear or knife reduces the risk of introducing diseases. After cutting, some gardeners dip the base of the cutting into a rooting hormone powder or gel to encourage root development. While this step is optional, rooting hormones containing auxins can significantly improve success rates by stimulating root initiation.
Selecting the Growing Medium
The choice of growing medium is vital to provide the right balance of moisture retention and drainage. Crepe myrtle cuttings require a medium that is moist but not waterlogged to prevent rot while supplying adequate oxygen for root formation.
A commonly used medium includes a mix of peat moss and perlite or coarse sand. Peat moss retains moisture and provides an acidic environment favorable for root growth, while perlite or sand improves aeration and drainage. Sterilizing the medium by baking or using a fresh commercial mix helps avoid fungal infections that can destroy cuttings.
Filling small pots or trays with this medium, gently firming it around the cuttings, ensures good contact between the stem and soil. Pressing too hard can damage the stem, while loose media can cause air pockets, impeding root growth.
Creating the Right Environment for Rooting
Rooting crepe myrtle cuttings successfully depends largely on creating a stable, humid environment that reduces moisture loss and stress. High humidity prevents the cuttings from drying out before roots develop, which can take several weeks.
Gardeners often cover cuttings with a clear plastic dome, bag, or place them inside a mini greenhouse to trap humidity. However, it is essential to allow some air circulation to prevent mold and fungal growth. Opening the cover periodically or using a humidity dome with vents achieves this balance.
Temperature is another crucial factor. The ideal rooting temperature for crepe myrtle cuttings ranges between 70°F and 75°F (21°C to 24°C). Warmer temperatures accelerate root growth, but excessive heat can dry the cuttings. Bottom heat from a heating mat placed under the pots can improve rooting rates, especially in cooler environments.
Watering and Maintenance During Rooting
Maintaining consistent moisture levels is vital while cuttings develop roots. The growing medium should be kept evenly moist but never soggy. Overwatering leads to root rot and fungal diseases, while underwatering causes the cutting to dry out and die.
Mist spraying the cuttings daily or twice daily can supplement humidity, especially if the environment is dry. Monitoring the moisture by gently touching the medium helps prevent extremes. As roots begin to form, cuttings may appear more turgid and vigorous, signaling readiness for the next stage.
Avoid fertilizing cuttings during rooting, as the young stems lack a root system to absorb nutrients. Too much fertilizer can burn delicate tissues and hinder root formation.
Recognizing Successful Root Development
Root development usually begins within 4 to 8 weeks after planting, depending on environmental conditions and cutting quality. Gently tugging on the cutting can help check for resistance, indicating roots have formed and anchored the plant.
Visual signs include new leaf growth or the cutting maintaining a healthy green color without wilting. If roots are visible through the drainage holes or if the cutting resists gentle pulling, it is ready for transplantation.
Cuttings that fail to root will typically wilt, turn brown, or develop rot at the base. Such cuttings should be discarded to prevent spreading pathogens.
Transplanting Rooted Cuttings
Once roots are established, transplanting the new crepe myrtle into larger pots or the garden is the next step. Choosing a well-drained soil rich in organic matter supports healthy growth. Avoid heavy clay soils prone to waterlogging, which can harm young roots.
When transplanting, handle the root ball carefully to avoid damage. Water the plant thoroughly after transplanting to settle the soil around the roots and reduce transplant shock. Initially, keeping the plant in partial shade helps it adjust to new conditions before exposure to full sun.
Gradually acclimating the plant to outdoor conditions, a process called hardening off, increases survival chances when moved permanently outside.
Caring for Young Crepe Myrtles
Young crepe myrtles require attentive care to ensure robust growth. Providing adequate water during dry spells, especially in the first year, encourages root establishment. Mulching around the base conserves soil moisture and reduces weeds.
Fertilization can begin after the plant shows new growth, typically with a balanced, slow-release fertilizer. Pruning is generally minimal during the first year but can be done to shape the plant or remove weak growth.
Protecting young plants from pests such as aphids, Japanese beetles, and powdery mildew ensures healthy development. Regular inspection and natural pest control methods maintain plant vigor.
Common Challenges and Troubleshooting
Several challenges can arise when growing crepe myrtles from cuttings. Failure to root is often caused by poor cutting selection, improper environmental conditions, or fungal diseases. Ensuring cuttings are taken from healthy plants during the correct growth stage minimizes issues.
Excess moisture can cause fungal rot, so proper drainage and humidity control are essential. Insufficient humidity leads to drying and wilting. Balancing these factors requires close monitoring.
If fungal infections occur, treating with a fungicide or removing affected cuttings prevents spread. Patience is crucial, as rooting can be slow. Experimenting with rooting hormones or bottom heat may improve success rates.
Advantages of Growing Crepe Myrtles from Cuttings
Growing crepe myrtles from cuttings has several advantages beyond cost savings. It allows gardeners to replicate favorite cultivars reliably. Propagation is an enjoyable and educational gardening activity, connecting growers more deeply to their plants.
Clonal propagation ensures uniformity in flower color and plant habit, which is important for landscape design. Additionally, growing from cuttings often produces flowering plants more quickly than seeds, providing earlier garden enjoyment.
Frequently Asked Questions About How to Grow Crepe Myrtles from Cuttings
What is the best time of year to take crepe myrtle cuttings?
The ideal time to take crepe myrtle cuttings is late spring to early summer when the new growth is semi-hardwood—meaning it has started to mature but is still flexible. This stage provides the best chance for successful rooting.
Should I use rooting hormone when propagating crepe myrtles from cuttings?
While not absolutely necessary, using a rooting hormone can significantly increase the success rate by stimulating root growth. Hormones containing auxins are most effective and can be found as powders or gels at garden centers.
How long does it take for crepe myrtle cuttings to root?
Rooting typically occurs within 4 to 8 weeks under optimal conditions. Factors such as temperature, humidity, and the quality of the cutting can affect rooting time.
What type of soil or medium is best for rooting crepe myrtle cuttings?
A well-draining, moist medium such as a mix of peat moss and perlite or coarse sand is ideal. This combination retains moisture while providing good aeration to prevent rot.
How can I tell if my crepe myrtle cutting has successfully rooted?
New root growth can sometimes be seen through drainage holes, but gently tugging the cutting is a good test. If there is resistance, it means roots have formed. Also, healthy green leaves and new growth indicate successful rooting.
How should I care for rooted crepe myrtle cuttings after transplanting?
After transplanting, keep the plants in partial shade initially and water regularly to establish roots. Gradually acclimate the plants to full sun. Applying balanced fertilizer and protecting against pests will help ensure healthy growth.
Can I propagate crepe myrtles from softwood cuttings?
Softwood cuttings (very young, tender shoots) generally have lower success rates with crepe myrtles compared to semi-hardwood cuttings. It’s best to use semi-hardwood cuttings taken in late spring or early summer.
Conclusion
Successfully growing crepe myrtles from cuttings is an achievable and rewarding project for gardeners of all skill levels. By selecting the right time and materials, preparing cuttings carefully, creating optimal rooting conditions, and providing attentive care, you can propagate your favorite crepe myrtle varieties with confidence. The process not only saves money but also deepens your connection to these stunning flowering trees. With patience and persistence, your crepe myrtle cuttings will develop into thriving plants that beautify your garden for years to come.