There’s something magical about plumerias. With their vibrant colors and intoxicating fragrance, these tropical beauties can instantly transport you to a warm, breezy paradise—even if you’re growing them on your patio or windowsill. If you’ve ever admired a blooming plumeria and wished you could grow one yourself, the good news is: you absolutely can, even if you’re a complete beginner.
In this comprehensive guide, you’ll discover everything you need to successfully grow plumeria from cuttings—from choosing healthy stems and preparing the right soil to encouraging strong roots and brilliant blooms. With the right techniques and a bit of patience, you’ll soon enjoy the rewards of your very own thriving plumeria, one cutting at a time.
Understanding Plumeria Growth and Propagation Basics
The Unique Growth Cycle of Plumeria
Plumeria, also known as frangipani, is a tropical deciduous shrub or small tree that grows in warm climates. Unlike many common flowering plants, plumeria follows a distinct seasonal cycle. In spring and summer, it focuses on producing lush green foliage and fragrant flowers, while in late fall and winter, it goes dormant—shedding its leaves and conserving energy in its thick, succulent stems. Understanding this cycle is key to successful propagation, especially when timing your cuttings and anticipating rooting periods.
During active growth, plumeria requires abundant sunlight, warmth, and consistent but well-drained moisture. However, in dormancy, its water needs decrease dramatically, and overwatering can cause rot. These shifts in needs make it critical to adjust care and timing during the propagation process.
Why Cuttings Are a Preferred Method
While plumeria can be grown from seed, propagation by cuttings is far more reliable and faster, especially for beginners. Seed-grown plumeria takes several years to flower and may not retain the characteristics of the parent plant. In contrast, a cutting is a clone that ensures flower color, growth habit, and fragrance will match the original.
Cuttings also root relatively easily under the right conditions and begin producing leaves and even flowers within a single growing season. This makes them ideal for home gardeners looking to expand their collection or preserve a favorite variety.
Timing Matters: When to Take and Plant Cuttings
The best time to propagate plumeria from cuttings is during the active growing season—typically from late spring to midsummer. At this time, the plant is actively channeling energy into growth, which supports quicker root development. Avoid taking cuttings in late fall or winter when the plant is dormant, as the likelihood of root failure increases significantly.
You should also consider temperature and humidity: cuttings root best in warm conditions (around 75–85°F or 24–29°C), with high light levels and moderate air moisture. Providing the right environmental context greatly improves your success rate and reduces the risk of rot or fungal disease.
Anatomy of a Healthy Plumeria Cutting
A strong cutting typically measures between 12 and 18 inches in length and has a thick, firm stem. It should be taken from a branch that is mature but not woody, with no visible signs of disease or insect damage. The base of the cutting should be cleanly cut with sterilized tools, then allowed to dry (a process called “curing”) for 5 to 7 days in a dry, shaded area to form a protective callus. This step is essential to prevent rot when the cutting is placed in soil or another rooting medium.
By understanding these foundational principles—growth habits, timing, and cutting preparation—you’re setting yourself up for propagation success and long-term plumeria health.
Choosing the Right Plumeria Cutting
Selecting Optimal Wood for Propagation
The success of growing plumeria from cuttings largely depends on selecting the right type of stem. The ideal cutting should be semi-hardwood, taken from mature growth that is between 6 months to 1 year old. Young green stems are more prone to dehydration and rot, while overly woody branches may struggle to initiate root development.
Avoid using stems that feel soft, bend easily, or show signs of rot, especially at the tip. A healthy cutting will feel firm and, when freshly cut, should exude thick, white sap—a strong indicator of active, disease-free tissue.
Length and Diameter Considerations
A cutting length of 12 to 18 inches is ideal. Cuttings shorter than 10 inches often lack stored energy to produce a robust root system, while those longer than 20 inches are more vulnerable to desiccation and mechanical damage. Aim for a stem diameter between 0.75 and 1.25 inches—roughly the size of an adult thumb to wrist—ensuring enough vascular tissue for water and nutrient transport.
Nodal Structure and Leaf Attachment
Examine the stem for visible nodes, where leaves previously attached. Each node represents a potential site for root development. Cuttings with evenly spaced, healthy nodes tend to root more vigorously. All leaves should be removed before planting to reduce moisture loss and fungal risk. However, the leaf scars should be intact and clean, showing that the stem was actively growing.
Disease and Pest Check
Inspect the cutting carefully for any signs of black spots, soft rot, or white scale insects (like cochineal). These symptoms suggest underlying infections and can drastically lower propagation success. Cuttings with deep scars, cracks, or mushy tissue should be discarded as they are more susceptible to fungal entry after planting.
Timing the Cutting
Avoid taking cuttings from plumeria while it is flowering, as energy is diverted to bloom production rather than root development. The best time to collect cuttings is in early to mid-summer, when the plant is in an active vegetative phase. Cut the stem in the cool morning hours to minimize dehydration, and process it quickly to avoid tissue oxidation.
Letting the Cutting Callus Before Planting
Why Callusing Is Essential
Allowing your plumeria cutting to callus is one of the most critical steps in successful propagation. Freshly cut plumeria stems exude a milky latex sap that protects the plant but also leaves the tissue vulnerable to rot if planted immediately. By allowing the cut end to dry and form a protective callus, you dramatically reduce the chance of bacterial and fungal infections. A properly callused cutting creates a natural seal over the wound, which supports healthy root formation and long-term viability.
How to Callus Correctly
After taking your cutting, gently rinse the cut end with clean water to remove excess sap and pat it dry with a paper towel. Then, place the cutting upright or slightly angled in a dry, shaded location with good airflow. Avoid exposing it to direct sunlight or high humidity, as these conditions may encourage mold growth.
Leave the cutting undisturbed for 7 to 14 days. In humid climates or during the rainy season, it may take up to 21 days. You’ll know it’s ready when the cut surface becomes dry, hard, and slightly gray in appearance. Pressing gently with your finger should reveal a toughened surface, not soft or moist tissue.
Environmental Conditions During Callusing
Ideal callusing conditions include daytime temperatures between 75°F and 90°F (24°C to 32°C) with low ambient humidity. Placing the cutting on a wire rack or mesh tray allows for air circulation all around the stem. Do not place it directly on soil or moist surfaces, which can draw moisture into the stem and introduce pathogens.
If you are in a region with consistently high humidity, using a small fan in your callusing area may help improve air movement and prevent fungal issues. In dry climates, monitor for signs of shriveling, especially in thin-stemmed varieties, and move the cutting to a slightly more humid but still ventilated space if needed.
Risks of Skipping This Step
Planting a cutting too soon—before it forms a proper callus—is one of the most common reasons plumeria propagations fail. The moisture in the soil can seep into the vascular tissue and promote stem rot before roots even begin to form. Skipping the callusing process also increases vulnerability to black tip rot, a disease that can destroy the cutting within days.
Preparing the Pot and Soil for Rooting
Choosing the Right Pot Size and Type
Selecting the proper container for rooting your plumeria cutting is critical to encouraging successful root development. A small to medium-sized pot—typically 1 to 2 gallons in volume—is ideal, depending on the size of the cutting. Too large a pot holds excess moisture, increasing the risk of rot, while too small a pot may restrict airflow and root spread.
Terracotta pots are preferred because they allow for natural air exchange through their porous structure, which helps prevent moisture buildup in the root zone. However, plastic pots are also acceptable if they have ample drainage holes and are not left sitting in trays of water.
Ensure the pot is clean and sterilized before use to avoid introducing pathogens. If reusing a container, wash it with a bleach solution diluted 1:10 with water, then rinse and dry thoroughly.
Creating the Ideal Soil Mix
Plumeria cuttings require a well-draining, aerated medium that holds minimal moisture. The goal is to mimic the natural gritty soils of tropical and subtropical regions where plumerias thrive.
A high-performance rooting mix might include a base of cactus or succulent soil combined with coarse perlite, pumice, or coarse sand. A commonly recommended blend is two parts coarse perlite to one part cactus mix, which provides both support and drainage. Avoid rich, organic composts or peat-heavy mixes at this stage, as they tend to retain too much moisture and can smother the base of the cutting.
If preparing your own mix, sterilize all components by baking or solarizing to eliminate potential fungal spores or pests.
Enhancing Drainage and Root Oxygenation
To improve drainage even further, consider layering a small amount of gravel or chunky perlite at the bottom of the pot. This promotes faster outflow of excess water, reducing the likelihood of pooling at the base.
Do not compact the soil when filling the pot. A loose, airy structure allows young roots to penetrate easily and access oxygen. Lightly tap the pot to settle the mix instead of pressing it down. After placing the cutting, gently firm the soil just enough to hold the stem upright.
If you’re propagating in a humid climate, consider using mesh-bottom trays or placing your pot on an elevated grate to ensure maximum air exchange from below.
Planting the Cutting for Successful Root Development
Inserting the Cutting at the Right Depth
Once your plumeria cutting has formed a dry, callused end, it’s ready for planting. Insert the callused base of the cutting approximately 3 to 5 inches deep into the prepared potting mix. The depth should be enough to support the cutting securely upright without staking but shallow enough to keep most of the stem exposed to air and light.
Placing the cutting too deep can trap moisture around the callus and increase the risk of stem rot. Before placing it in the soil, double-check that the base is fully dry and firm to the touch—any softness could indicate premature decay, and the cutting should not be planted until fully healed.
To minimize damage to the base, use a stick or dibble to pre-form the hole in the soil before inserting the cutting. Gently press the soil around the cutting to stabilize it, but avoid compacting the mix, which could reduce airflow and slow rooting.
Providing Proper Support Without Overwatering
For tall or top-heavy plumeria cuttings, provide light support using a bamboo stake or similar rod, but avoid tying the cutting too tightly. Allow for slight movement, which encourages stronger root anchoring. Make sure the pot is placed in a location sheltered from strong winds or disturbances that could dislodge the cutting.
Immediately after planting, water the soil lightly—just enough to settle it around the cutting. Do not soak the medium. After this initial watering, it’s essential to let the soil dry out completely before the next water. Overwatering at this stage is the leading cause of failure due to rot. The goal is to encourage roots to grow out seeking moisture, not to drown the cutting in wet soil.
Depending on humidity, temperature, and airflow, it may take 2 to 6 weeks before any root development begins. During this time, monitor the cutting for firmness. A healthy cutting will stay turgid and gradually show signs of new leaf growth, which is a reliable indicator that rooting is underway.
Rooting in Warm, Bright Conditions
Plumeria cuttings root best in warm temperatures between 75°F and 85°F (24°C–29°C). Position the pot in a location that receives bright, indirect light—such as near a sunny window, greenhouse, or under a shaded patio if propagating outdoors. Avoid direct, intense sunlight at this stage, which can desiccate the top of the cutting before roots form.
If indoor temperatures are cooler, consider using a heat mat under the pot to gently warm the root zone and stimulate growth. In high-humidity climates, ensure good ventilation to prevent mold or fungal growth on the surface of the soil or base of the cutting.
Watering Schedule During Root Formation
Understanding the Critical Role of Water Management
During the early stages of propagation, overwatering is one of the most common and fatal mistakes gardeners make. Plumeria cuttings do not yet have roots to absorb moisture, so excess water will accumulate around the base, creating ideal conditions for rot and fungal diseases. The goal of the watering schedule during root formation is to maintain a balance between preventing desiccation and avoiding rot.
The best approach is to water minimally and only when necessary. At this stage, the cutting is not actively taking up moisture, and any wetness in the soil should be able to dry out completely between waterings. The medium should feel dry to the touch before you consider adding more water.
The First Watering and What Comes Next
After planting the cutting, apply a light watering just to settle the soil around the base. This initial watering helps eliminate air pockets and gently compresses the soil for stability. Use a spray bottle or watering can with a narrow spout to control the flow and avoid over-saturating the medium.
After this first application, withhold all further watering for at least 5 to 10 days, depending on ambient temperature and humidity. The potting mix should be allowed to dry out completely. This dry period mimics the natural drought conditions plumeria experiences in its native tropical environment, which helps stimulate root development as the cutting seeks out moisture.
Signs to Look for Before Watering Again
The safest way to determine when to water again is to check both the surface and the lower parts of the soil. Insert your finger or a wooden stick about two inches into the medium. If it feels completely dry and shows no signs of moisture, you can water again—lightly. If it’s still damp or cool, wait a few more days and check again.
Avoid watering on a set schedule; instead, respond to the actual condition of the soil. For most indoor conditions, watering once every 10 to 14 days may be sufficient. In humid climates, this interval may extend to over two weeks, while in hot, arid environments, it could be slightly shorter.
Adjusting for Environment and Container Size
Environmental conditions such as airflow, sunlight, and temperature significantly influence how quickly your soil dries out. A well-ventilated, warm location speeds evaporation and allows safer, more frequent light watering. Similarly, small containers tend to dry out faster than large pots, so the pot size should be considered in your watering plan.
If you’re using a heat mat to warm the root zone, monitor soil moisture more frequently, as the added warmth may increase evaporation and potentially dry the soil faster. However, always allow the mix to become dry between waterings to avoid saturation and decay.
Light and Temperature Requirements
Optimal Light Conditions for Root Initiation
Plumeria cuttings require high light levels during root formation, but not direct, intense sunlight. While mature plumerias thrive in full sun, young, unrooted cuttings are more vulnerable to dehydration and sunburn. The goal is to provide bright, indirect light or filtered sunlight during the first 4 to 6 weeks after planting.
Placing your cuttings near a south- or west-facing window indoors with a sheer curtain is ideal. Outdoors, a location with dappled shade or morning sun followed by afternoon shade works well. Excessive light or heat at this stage can dry out the exposed cambium or cause tissue damage at the callused end, especially if the cutting hasn’t yet formed roots.
If rooting indoors and natural light is limited, you can supplement with full-spectrum grow lights set at about 12 to 14 inches above the plant. Maintain the light on for 12 to 14 hours daily, mimicking tropical day lengths. Avoid using incandescent bulbs, which produce too much heat without the needed spectrum.
Importance of Heat in Stimulating Root Growth
Temperature plays a critical role in activating the physiological processes that lead to root development in plumeria cuttings. The ideal root zone temperature is between 75°F and 85°F (24°C to 29°C). Temperatures below 65°F (18°C) significantly reduce the chances of successful rooting, causing dormancy or decay.
To maintain this optimal temperature, many growers use bottom heat with a seedling heat mat. These mats gently warm the root zone without affecting ambient air temperature, which is especially helpful in cooler climates or during early spring propagation. Always monitor soil temperature using a soil thermometer, not just ambient air readings.
When using heat mats, it’s crucial to avoid overheating. If soil temperatures exceed 90°F (32°C), root growth may stall, and microbial activity could increase, leading to rot. Maintain consistent heat both day and night during the rooting phase.
Air Temperature and Humidity Balance
Alongside root zone warmth, ambient air temperatures should be kept between 70°F and 85°F (21°C to 29°C). Nighttime temperatures should not dip below 60°F (15°C). Inconsistent temperatures can shock the cutting or slow its metabolic activity.
Plumeria cuttings also benefit from moderate humidity levels, especially in arid climates. Keep the relative humidity around 40% to 60% during the rooting period. If your indoor air is too dry, you can lightly mist the air around the plant (not the cutting itself) or place a humidity tray nearby. Avoid enclosing the cutting in plastic or humidity domes, which may trap moisture and promote rot on unrooted stems.
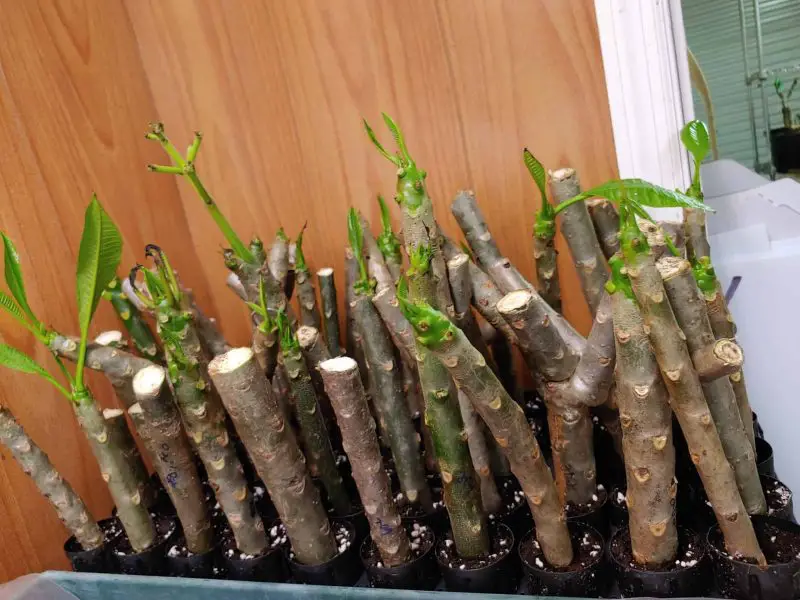
Signs of Root Development and Healthy Growth
Early Visual Indicators of Root Initiation
The first few weeks after planting a plumeria cutting are critical, and while roots form below the surface, there are subtle above-ground signs that indicate successful root initiation. One of the earliest signs is turgidity in the stem—a plump, firm feel rather than a soft, shriveled texture. A cutting that stays firm for more than two weeks suggests internal water regulation is beginning, usually due to root primordia forming near the callus.
Another subtle indicator is color change at the leaf nodes. You may observe a slight swelling or greening at the tips, where new growth will eventually emerge. This typically occurs between weeks 3 to 6, depending on temperature and light.
Appearance of New Leaf Growth
Perhaps the most reliable sign of root development is the emergence of new leaves from the growing tip. Plumeria cuttings often remain dormant until a root system is established, as new leaf development requires active nutrient and moisture uptake.
When new leaves begin to unfurl and maintain upright posture rather than wilting, it’s a clear sign that roots are anchoring the cutting and supplying water. Be cautious: in some cases, a cutting may produce leaves prematurely by using stored moisture, but without actual root growth. If the stem begins to wrinkle or collapse even as leaves emerge, it likely lacks sufficient root support and needs inspection.
Resistance Test for Root Anchorage
To confirm root development more definitively, conduct a gentle resistance test. After 4 to 6 weeks, lightly tug the base of the cutting. If you feel resistance or the cutting does not lift easily, roots have likely anchored it into the soil. Avoid pulling too forcefully, as this may damage fragile new roots.
If resistance is absent and the cutting is loose, inspect the callused base. If it appears mushy or discolored, the cutting may be rotting rather than rooting. A firm, light tan or white base indicates good potential for further root expansion.
Growth Rate After Root Establishment
Once roots are established, plumeria cuttings enter an active growth phase. You’ll notice increased leaf size, followed by branching or bud formation in the leaf axils. The stem may elongate slightly, and color at the growing tip intensifies. In some climates, a well-rooted cutting planted early enough in the growing season may even produce its first bloom within the first year, especially if provided with sufficient light and warmth.
Transplanting Rooted Plumeria Cuttings
Timing the Transplant for Optimal Success
Once your plumeria cutting has established a healthy root system—typically indicated by firm anchorage, vigorous leaf growth, and visible signs of root development near drainage holes or pot edges—it is time to consider transplanting it into a larger pot. The ideal time to transplant is during active growth periods in late spring or early summer, when warm temperatures and longer daylight hours support rapid root expansion and stem development.
Avoid transplanting during cooler months or in the middle of extreme heatwaves, as sudden changes in soil volume, moisture retention, or root exposure can stress the young plant and delay its growth.
Selecting the Right Container Size and Material
Choose a pot that is 1 to 2 inches wider in diameter than the current one, allowing room for root growth without overwhelming the young root ball. Oversized containers retain excessive moisture, which can suffocate roots or encourage fungal rot. Ensure the pot has multiple adequate drainage holes, as plumerias are highly susceptible to root rot in stagnant water.
Clay or terracotta pots are preferred because they offer breathability, which helps prevent overwatering. However, in hot and dry climates, plastic pots may be more practical as they retain moisture longer, reducing watering frequency.
Soil Mix Preparation for Transplanted Plumeria
Use a well-draining, coarse-textured soil mix similar to the rooting medium, ideally with a blend of perlite, coarse sand, pumice, and cactus potting mix. You can also include small amounts of aged compost or worm castings to introduce organic nutrients.
To reduce transplant shock, pre-moisten the soil lightly before filling the new pot. This helps settle the medium around the roots without compacting it, and reduces air pockets that may expose roots to drying.
Transplanting Technique for Healthy Establishment
Carefully remove the plumeria from its current container by tipping it on its side and gently coaxing the root ball out. Avoid pulling the stem directly, as this can cause root tearing. Inspect the roots for health—white or light tan roots indicate vigor, while black or mushy roots should be trimmed with sterilized scissors.
Position the cutting in the center of the new pot, ensuring the root crown is slightly above soil level to prevent stem rot. Fill in around the root ball with fresh soil, gently pressing down to secure the plant but without compacting the medium too tightly.
Water thoroughly after transplanting to settle the soil and hydrate the roots. Afterward, allow the top inch of soil to dry before watering again, following a cautious schedule for the first 2 to 3 weeks.
Post-Transplant Care and Monitoring
Place the newly transplanted plumeria in a bright but partially shaded area for the first week to allow it to recover from root disturbance. Avoid fertilizing immediately after transplanting—wait about two to three weeks until new growth appears, signaling that the plant has resumed active development.
Watch closely for signs of transplant stress, such as yellowing leaves, stem wrinkling, or stunted growth. In most cases, with proper soil, container size, and moisture control, plumerias bounce back quickly and begin producing new foliage within a few weeks.
Fertilizing After Transplanting for Optimal Growth
Timing the First Post-Transplant Fertilizer Application
Once your plumeria cutting has been successfully transplanted and shows signs of new growth—such as fresh leaf formation or elongation of the main stem—it’s time to begin a structured fertilizing routine. Typically, this occurs about two to three weeks after transplanting, depending on environmental conditions and the plant’s recovery speed. Fertilizing too early can stress the root system, which may still be adjusting to its new potting environment.
Choosing the Right Type of Fertilizer
Plumerias respond best to balanced or bloom-boosting fertilizers depending on the stage of growth. For newly rooted plants focused on vegetative growth, use a fertilizer with a balanced N-P-K ratio, such as 10-10-10 or 14-14-14. As the plant matures and prepares for blooming, switch to a formula higher in phosphorus, such as 10-30-10 or 0-50-30, to encourage robust flower development.
For plumerias grown in containers, it’s especially important to use a water-soluble fertilizer that can be absorbed quickly through the roots without building up excessive salts in the soil. Slow-release granular fertilizers are also effective, but they should be applied with greater caution to avoid overfeeding in small pots.
Fertilizing Frequency and Technique
Feed your plumeria every 2 to 3 weeks during the active growing season, typically from spring through early fall. Always water the plant before applying fertilizer to protect the roots from chemical burn. Use a diluted mixture—generally at half the manufacturer’s recommended strength—for the first few applications to ease the plant into a regular feeding schedule.
As the plant establishes more leaves and enters flowering mode, you can increase the strength gradually. Avoid letting fertilizer touch the base of the stem, especially near the root crown, to prevent chemical damage or rot.
Complementing Fertilization with Micronutrients
In addition to major nutrients, plumerias benefit greatly from supplemental micronutrients, particularly magnesium and calcium, which support healthy leaf color and strong cell structure. Epsom salt (magnesium sulfate) can be applied monthly at a rate of one tablespoon per gallon of water to improve leaf chlorophyll production and prevent yellowing between veins.
You can also use a complete foliar spray formulated for plumeria or tropical plants to supply trace elements like iron, zinc, and manganese—especially useful if you’re growing in a potting mix with limited organic content.
Signs of Nutrient Deficiency or Overfeeding
Watch for common nutrient-related symptoms as you fertilize. Yellowing leaves may indicate nitrogen deficiency, while poor blooming despite healthy foliage may point to low phosphorus availability. Conversely, brown leaf tips or salt crust on the soil surface could suggest overfeeding.
To avoid problems, flush the container soil with plain water once every 6 to 8 weeks to remove built-up fertilizer salts and restore a balanced soil environment.
Seasonal Adjustments
As temperatures cool and the plant begins to go dormant in late fall or early winter, discontinue fertilization entirely. Feeding during dormancy can force weak, leggy growth and disrupt the plant’s natural rest cycle. Resume your fertilizing schedule in the following spring when new leaves emerge.
Fertilizing for Strong Growth and Blooming
Understanding Plumeria Nutrient Needs
Plumeria plants, though tolerant of tough conditions, require a balanced and consistent fertilization plan to develop strong branches, lush foliage, and abundant, vibrant blooms. In their natural tropical habitat, plumerias draw nutrients from mineral-rich soil, decaying organic matter, and seasonal rain. To replicate these conditions indoors or in containers, growers must supplement essential macro and micronutrients through fertilization.
In general, a plumeria’s nutrient needs evolve with its growth stage. Young rooted cuttings focus primarily on nitrogen to build foliage and stems, while mature plants require more phosphorus and potassium to support flower bud initiation and bloom longevity.
Choosing the Ideal Fertilizer Ratio
A good starting point for most growers is a high-phosphorus fertilizer, such as 10-30-10 or 10-50-10, particularly if your goal is to stimulate blooming. The elevated phosphorus encourages strong root systems and more reliable flower formation.
For periods of vegetative growth, especially early in the season or during a plant’s recovery after transplanting, a more balanced fertilizer, like 14-14-14 or 20-20-20, supports even development across foliage, roots, and shoots. If you’re growing plumeria primarily for structural growth in its first year, these balanced options offer flexibility and reliability.
Some experienced growers also rotate fertilizer formulas during the season—starting with balanced feeding in spring and shifting to bloom boosters in mid to late summer to match the plant’s changing energy demands.
Fertilization Schedule and Best Practices
For optimal growth, begin fertilizing once new leaves appear after transplanting, typically 2 to 3 weeks after rooting. Feed every 10 to 14 days during the active growing season using a water-soluble fertilizer mixed at half-strength initially, increasing to full strength once the plant shows robust leaf production.
Apply fertilizer to pre-moistened soil, never to dry roots, to avoid chemical burn. For plumerias in pots, ensure that excess fertilizer salts do not build up by occasionally flushing the soil with clean water, especially when using synthetic products.
Organic alternatives like fish emulsion, seaweed extract, or compost tea can be used monthly to gently support healthy microbial activity in the soil, which indirectly enhances nutrient uptake.
Micronutrient Supplements for Premium Performance
Beyond nitrogen, phosphorus, and potassium, plumerias also benefit from micronutrients, particularly magnesium, which supports leaf chlorophyll production and prevents interveinal yellowing. Monthly foliar applications of Epsom salts (1 tablespoon per gallon of water) help maintain leaf health and vibrant color.
Trace elements such as iron, manganese, and zinc may also be necessary, especially in container setups where the soil lacks natural replenishment. Foliar sprays containing chelated micronutrients provide an efficient, fast-absorbing solution.
Avoiding Overfertilization and Common Mistakes
Signs of overfertilization include leaf tip burn, salt crusts on the soil surface, and poor root performance. Always follow label instructions and remember that more fertilizer is not better—overfeeding stresses the plant and can lead to reduced blooming or even root death.
If growth seems lush but flower production is poor, it may be a sign of too much nitrogen, which promotes leaves at the expense of flowers. In such cases, dial back nitrogen-heavy feeds and increase phosphorus-based bloom boosters.
Pests and Disease Prevention for Young Plants
Common Threats to Young Plumeria Cuttings
Young plumeria cuttings are especially vulnerable to insect pests and fungal diseases, primarily due to their soft, developing tissues and lack of established immunity. The most common pests include spider mites, aphids, mealybugs, and whiteflies, which can stunt growth by sucking sap and spreading viruses. Fungal issues like stem rot and leaf spot can occur if moisture is not properly managed during the early rooting phase.
Integrated Pest Management (IPM) Strategies
To keep your cuttings healthy, begin with preventive action. Always use sterile tools when taking and planting cuttings. Grow in clean, well-draining soil, and avoid overhead watering that leaves leaves or stems damp for extended periods. Ensure adequate air circulation around the plant to discourage fungal spores and pest infestations.
Inspect plants weekly, especially the undersides of leaves and near growth tips. At the first sign of pest activity, remove affected parts manually and use organic insecticidal soap or neem oil spray, applying in the early morning or evening to prevent leaf burn.
Boosting Natural Resistance
Strong, well-fed plants are less attractive to pests. Applying a monthly foliar spray of seaweed extract or compost tea can boost immunity. Keeping stress low through proper light, water, and nutrition also reduces susceptibility to disease and pest attacks.
If you’re rooting several cuttings, quarantine new ones before placing them with established plants to avoid cross-contamination.
Overwintering Rooted Cuttings Indoors
Preparing for the Dormant Season
As temperatures drop below 50°F (10°C), plumeria rooted cuttings must be brought indoors to avoid cold damage. Gradually reduce watering in early fall to encourage the plant to enter dormancy. Cease fertilization completely by mid-autumn to avoid promoting weak growth during the rest period.
Creating the Right Indoor Conditions
Place your rooted cuttings in a bright, dry location with temperatures between 55–65°F (13–18°C). While light is still important, they can tolerate slightly lower light during dormancy. Avoid drafty windows or direct exposure to heaters, as rapid temperature changes can stress the plant.
Watering and Maintenance During Dormancy
Only water when the soil is completely dry, typically every 3–4 weeks, to prevent root rot. Leaves may drop—this is normal. Do not panic, as the plant is conserving energy for spring growth. Inspect for pests monthly, even in dormancy.
By keeping the plant dry, cool, and protected from frost, your rooted plumeria will safely overwinter and be ready to flourish again in the next growing season.
Transitioning Back Outdoors in Spring
Timing and Temperature Awareness
Begin transitioning your plumeria cutting back outdoors once nighttime temperatures consistently stay above 55°F (13°C). This usually occurs in late spring, depending on your region. Avoid moving it out too early, as cold snaps can shock the plant.
Gradual Reintroduction to Sunlight
Start by placing the plant in a shaded outdoor spot for a few hours a day. Over the next 7–10 days, gradually increase exposure to full sunlight. This acclimation prevents sunburn on tender new leaves and promotes robust growth.
Resuming Active Care
Once outdoors full-time, resume a regular watering schedule and begin light fertilizing with a phosphorus-rich bloom booster to encourage early flower development. Check for pests as new growth appears, and consider repotting if rootbound.
Proper transitioning gives your plumeria a strong head start, reducing stress and maximizing blooming potential for the season ahead.
Troubleshooting Common Propagation Issues
Cutting Fails to Root After Several Weeks
A frequent reason for failure in root initiation is inadequate callusing or planting into a medium that retains too much moisture. If the cutting was placed into soil before a firm, dry callus had formed, necrosis often occurs at the wound site. For optimal rooting success, the cutting should be left in a dry, shaded, and well-ventilated area for at least 7 to 14 days depending on humidity, until a waxy, corky surface develops at the cut.
In terms of rooting medium, a sterile, sharply-draining mix such as coarse perlite, pumice, or a cactus-specific blend is crucial. Avoid organic-heavy or peat-based soils, which promote fungal growth and anaerobic conditions.
Environmental parameters also play a pivotal role. Root development is greatly enhanced in warm soil temperatures between 75°F and 85°F (24°C–29°C). Cooler conditions will dramatically slow cellular activity and increase susceptibility to rot. Bottom heat mats can be employed to maintain consistent warmth at the rooting zone.
Base Rot and Tissue Collapse
Rot at the base is often initiated by high moisture levels combined with low airflow and microbial presence in the medium. It typically begins as a soft, darkened area that rapidly progresses. To intervene, unpot the cutting immediately, excise any blackened tissue with a sterile blade, and sterilize the remaining stem with a dilute hydrogen peroxide solution. Allow it to re-callus in a dry location for another 5 to 7 days before attempting to reroot in fresh, dry medium.
To prevent recurrence, avoid watering until root initials are confirmed. You can check rooting progress by gently tugging the cutting — resistance often means root development has started. Watering too early, especially in humid environments, is the primary cause of rot.
Leaf Yellowing, Wilting, or Drop-Off
Plumeria cuttings frequently drop older leaves during rooting as a stress response. However, premature or widespread yellowing is commonly due to photoinhibition (too little light), overwatering, or fungal infection. Ensure your cutting receives 12 to 14 hours of bright indirect sunlight or supplemental grow light, especially in indoor settings. Maintain air circulation with a small fan to avoid fungal proliferation.
A cutting with healthy, turgid upper stems but some leaf loss is usually not a concern. Avoid fertilizing until the root system is established — early nutrient uptake by an unrooted cutting can cause salt burn or osmotic stress.
Mold Growth on Cutting Surface or Soil
White or gray mold growth, especially near the base, indicates excessive humidity and stagnant air. Isolate the cutting immediately, remove any visible mold with a soft brush, and apply a sulfur-based fungicide or diluted neem oil spray. Reevaluate airflow, and increase spacing between cuttings to avoid cross-contamination.
Encouraging Early Flowering in New Plants
To encourage plumeria cuttings to flower within their first growing season, it’s essential to focus on optimizing three critical areas: light intensity, nutrient balance, and growth control.
New plants require full sun exposure for at least 6 to 8 hours daily. Insufficient light will delay bloom initiation, even if the plant is otherwise healthy. For indoor or greenhouse starts, supplemental lighting may be needed to maintain the photoperiod and intensity.
Fertilization should shift toward bloom-promoting formulas once the plant has a stable root system and has begun active vegetative growth. Choose a fertilizer with a higher middle number (phosphorus) such as 10-30-10 to promote bud formation. Avoid high-nitrogen feeds during this period, as they encourage foliage growth at the expense of flowers.
Lastly, controlling plant stress is vital. Ensure consistent watering during active growth while allowing the soil to dry slightly between cycles. Once flower buds begin to form, reduce water slightly to mimic natural dry-season conditions that often trigger blooming in plumerias.
With these conditions in place, many healthy, well-rooted cuttings can produce their first blooms within 6 to 10 months.
Frequently Asked Questions
How long does it take for plumeria cuttings to root?
Under ideal conditions, plumeria cuttings typically root in 4 to 8 weeks. Rooting speed depends on environmental factors like temperature, light, and humidity. Warmer temperatures and well-draining soil with moderate moisture can accelerate root formation, while cooler weather or overwatering may delay or inhibit rooting.
When is the best time to take and plant plumeria cuttings?
The best time to take and plant plumeria cuttings is during the late spring to early summer, when the plant is in its active growth phase. During this time, the higher temperatures and increased sunlight provide optimal conditions for rooting. Avoid propagating during dormancy in late fall or winter, as cuttings are less likely to root successfully.
Can I root a plumeria cutting in water?
While some gardeners attempt water rooting, it is not the preferred method for plumeria. Water propagation often leads to stem rot or weak root systems. Plumeria cuttings root more reliably in a well-draining soil or sand-perlite mix, which reduces excess moisture and allows the callused end to stay dry and oxygenated.
Should I use rooting hormone on plumeria cuttings?
Using rooting hormone is optional but can improve success rates. It encourages faster root initiation and protects against rot and pathogens. Dip the callused end of the cutting into a powdered rooting hormone before planting to enhance rooting speed, especially if conditions are not ideal.
What kind of soil should I use for rooting cuttings?
Use a fast-draining medium such as cactus mix, coarse sand mixed with perlite, or a succulent soil blend. Avoid peat-heavy or dense potting mixes that retain water. The ideal mix should be dry to the touch between watering and allow air to reach the developing roots.
How often should I water a newly planted cutting?
Do not water immediately after planting. Wait 7 to 10 days after placing the cutting into soil, then begin very light watering every 10 to 14 days, depending on temperature and humidity. Once roots are confirmed, increase watering frequency slightly but continue to allow the soil to dry between sessions.
Can I grow plumeria indoors?
Plumeria can be grown indoors if it receives at least 6 hours of strong sunlight per day, ideally near a south-facing window. Without enough light, it may survive but will likely not flower. Supplemental grow lights can support indoor cultivation in lower-light environments, especially during winter.
How large should a cutting be for successful propagation?
Cuttings should generally be 12 to 18 inches long and about as thick as your index finger or a pencil. Thicker, mature wood increases the likelihood of successful rooting and produces more vigorous plants. Avoid green or overly soft growth, as these segments are more prone to rot.
Is it possible to flower a plumeria cutting in its first year?
Yes, some plumeria cuttings may flower in their first growing season if rooted early and grown in full sun with proper feeding. However, it’s more common for blooms to appear in the second season after a strong root system has formed. Focus on healthy growth and branch development in the first year for best long-term performance.
What temperature range is best for rooting?
Rooting plumeria cuttings requires temperatures between 70°F and 90°F. Consistently warm soil and air encourage root development. If growing indoors or in a cooler climate, consider using a heat mat or propagating in a greenhouse to maintain the desired temperature range.
Should I cover the cutting with plastic to retain humidity?
Unlike some soft-stemmed plants, plumeria does not require high humidity to root and actually benefits from dry air conditions. Covering the cutting may increase the risk of rot due to trapped moisture. Ensure air circulation is good and avoid excess humidity around the base.
What should I do if the cutting shows signs of rot?
If the stem base turns black, mushy, or smells foul, it is likely rotting. Remove the cutting from the soil, trim away the rotted portion with sterile shears, and allow it to recallus in a dry, shaded area. Once dry, replant in a fresh, well-draining mix. Review watering habits to prevent recurrence.
How long can I store a cutting before planting?
Plumeria cuttings can be stored dry in a cool, shaded place for up to 4 to 6 weeks. As long as they remain firm and mold-free, they are viable for rooting. The longer a cutting is stored, the more likely it will begin to dry out, so timely planting is recommended for best results.
Conclusion: Mastering Plumeria Propagation with Confidence
Growing plumeria from cuttings is not only satisfying but also surprisingly simple with the right knowledge and preparation. Whether you’re a first-time propagator or expanding your tropical garden, success lies in careful attention to detail.
By mastering proper techniques—from selecting healthy cuttings to maintaining optimal light, soil, and watering—you can enjoy thriving plumeria plants that bring beauty and fragrance to your home or garden for years to come.