Plumeria, also known as frangipani, is beloved for its lush tropical charm and sweetly scented flowers. Native to the warm regions of Central America and the Caribbean, this stunning plant has become a favorite among gardeners in tropical and subtropical zones, as well as those who grow it in containers to enjoy on sunny patios and balconies.
While plumeria can be grown from seeds, propagation from cuttings is by far the quickest and most dependable method—especially if you want a new plant that mirrors the flower color, shape, and growth habit of the original. This guide provides a step-by-step breakdown of how to grow plumeria from cuttings, using expert techniques to give you the best chance of rooting success.
Understanding Why Cuttings Are the Best Way to Propagate Plumeria

Propagating plumeria from cuttings offers distinct advantages that make it the preferred method for both home gardeners and tropical plant collectors. Cuttings produce exact genetic replicas of the parent plant, which means you’re guaranteed to preserve specific traits like flower color, fragrance, and growth habit. This is especially important for hybrid varieties that don’t grow true from seed.
Another major benefit is speed. Plumeria grown from cuttings can develop roots within weeks and begin blooming within their first year under the right conditions. In contrast, seed-grown plants can take years to flower and may produce unexpected results. For anyone wanting quicker results and consistent plant quality, propagation by cuttings is the most efficient and dependable path.
Selecting the Right Cutting for Successful Growth
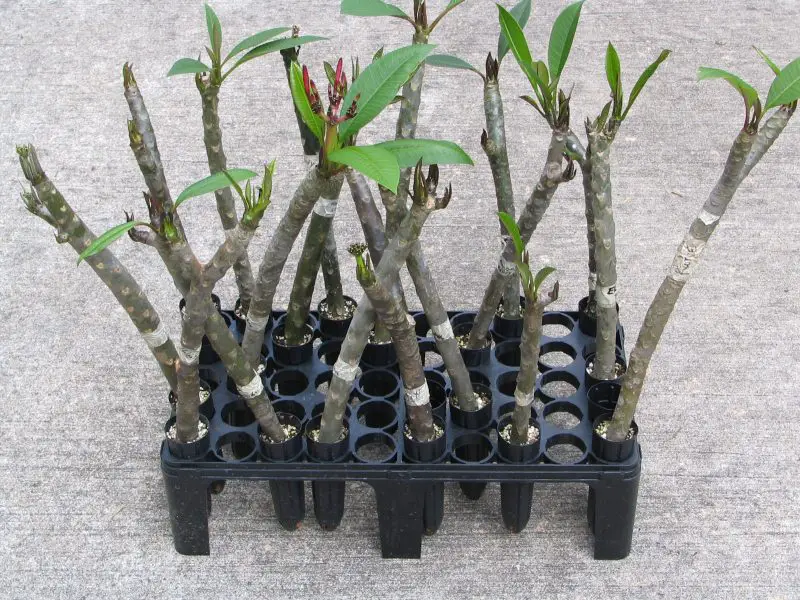
Choosing a strong, healthy cutting is essential for successful plumeria propagation. The ideal cutting should come from semi-hardwood—mature but not overly woody—preferably a branch that is at least one year old and measures around 12 to 18 inches in length. This size ensures the stem has enough stored energy to root effectively. Avoid thin green shoots or overly woody branches, as they either rot easily or take too long to root.
Look for a non-flowering branch that has finished blooming and is free from pests, black spots, or any signs of disease or rot. Always inspect the parent plant thoroughly—healthy cuttings begin with a healthy source. Avoid branches recently treated with pesticides or synthetic chemicals, as these can inhibit root formation.
The best time to take plumeria cuttings is in late spring or early summer, when the plant is actively growing and producing natural rooting hormones. This timing, combined with warm temperatures and consistent humidity, encourages quick callus formation and strong root development. In cooler regions, indoor propagation with supplemental heat and light may be required.
By selecting the right branch at the right time, you lay a solid foundation for fast rooting and a thriving new plumeria.
Preparing the Plumeria Cutting Before Planting
Begin by using sterilized pruning shears to make a clean, angled cut on a healthy plumeria branch. Remove most of the leaves, keeping only the top few, and trim them down if large. This reduces moisture loss and prevents stress on the cutting. Any flowers or buds should also be removed to redirect energy toward root formation.
Let the cutting dry in a shaded, well-ventilated space for 5 to 10 days to allow a callus to form over the cut. This callusing process is vital, as it seals the wound and helps prevent rot when planted. In humid climates, it may take a few extra days for the end to become firm and dry.
For added protection, some growers dust the cut end with powdered sulfur or cinnamon. If using rooting hormone, wait until the callus has formed before applying. Keep the cutting upright during this period, away from moisture or soil, to avoid premature rot. Proper preparation at this stage lays the foundation for successful rooting.
Choosing the Ideal Growing Medium for Rooting
Successful plumeria propagation starts with choosing the right growing medium that balances moisture retention with excellent aeration. Plumeria cuttings are especially vulnerable to rot in wet conditions, so your soil mix must drain quickly while staying lightly moist around the developing roots.
An ideal mix consists of two parts coarse perlite or pumice combined with one part cactus potting soil or coconut coir. You can also create a custom blend using equal parts perlite, coarse sand, and a light organic material such as peat moss or finely screened compost. The goal is to ensure rapid drainage while maintaining minimal but consistent humidity at the rooting zone.
Avoid traditional potting soil, clay-heavy earth, or mixes rich in peat alone, as these tend to hold too much moisture and reduce airflow—conditions that foster fungal diseases and stem rot. Sterilize the mix if you’re reusing materials to prevent pathogen buildup.
Choose a container at least 10–12 inches deep to support the vertical growth of the cutting and allow room for root expansion. Terracotta pots are excellent because they wick away excess moisture, but plastic pots with wide drainage holes also work well if managed carefully. Ensure the container has multiple holes at the base for proper outflow of excess water.
Before planting, slightly moisten the soil—just enough to make it feel barely damp to the touch. It should crumble easily in your hand, not stick together or drip. This helps eliminate dry pockets while avoiding saturation, setting the stage for consistent root initiation without the risk of rot.
How to Plant the Cutting Correctly
Start by selecting a clean container filled with a well-draining soil mix, such as cactus mix blended with coarse sand or perlite. Before placing the cutting, use a stick or dibber to create a planting hole in the center—this ensures you won’t damage the delicate callused base during insertion.
Insert the plumeria cutting so that at least one-third of its length is buried in the soil. Press the surrounding mix gently but firmly to secure the base and eliminate air pockets, which can reduce stability or cause rot. If the cutting feels unstable, support it with a bamboo stake or a few small rocks to prevent movement while roots develop.
Position the container in a warm, sheltered area that receives bright, indirect sunlight for most of the day. Avoid intense, direct sun during the hottest hours, especially before rooting occurs, as excessive heat can stress the plant or dehydrate the exposed cutting. Ideal ambient temperatures range from 70°F to 85°F (21°C to 29°C), with nighttime temperatures not dropping below 60°F.
For indoor propagation, consider using a seedling heat mat beneath the container. Maintaining a consistent root-zone temperature around 75°F (24°C) accelerates root formation and helps prevent rot. Additionally, avoid placing the pot in a location with stagnant air—gentle ventilation will discourage fungal growth and create a healthier rooting environment.
Do not water heavily after planting. Instead, give the soil a light misting or minimal water just to settle it. Then begin the careful watering cycle described earlier. With optimal conditions, root development should begin in three to six weeks, after which signs of new leaf growth will follow.
Watering and Caring for the Cutting During Rooting
The first sign your plumeria cutting may be rooting is the appearance of new leaves, typically within 4–8 weeks. However, since the plant can sprout leaves using stored energy, leaf growth alone isn’t proof of roots.
To confirm rooting, gently tug the base of the stem after 4–5 weeks. If you feel resistance, roots have likely formed. Avoid pulling hard to prevent damage.
As roots develop, leaf size and number increase, and the stem becomes sturdier. Begin watering more deeply once the topsoil dries out, but avoid soggy conditions to prevent rot.
If grown indoors or in shade, gradually introduce the plant to brighter sunlight over 1–2 weeks to avoid leaf scorch. This transition helps the young plant adjust to outdoor conditions and encourages stronger growth.
Transitioning to a Permanent Container or Garden Bed
After your plumeria cutting has established roots and shows clear signs of growth, it’s time to move it to a more permanent location. If planting outdoors, wait until nighttime temperatures are consistently above 60°F. Plumerias prefer full sun and well-drained soil. Indoors, a south-facing window or grow light setup is ideal.
When transplanting, handle the roots gently and choose a container at least two inches wider than the root ball. Incorporate a slow-release fertilizer high in phosphorus to support blooming, and continue to water only when the top soil feels dry.
Common Problems and How to Solve Them
While plumeria cuttings are generally easy to root under the right conditions, several common issues can hinder success if not managed properly. Understanding the root causes and applying corrective action early can make the difference between a thriving plant and a failed attempt.
Stem Rot and Soft Tissue Collapse
One of the most common and serious issues is stem rot, which typically arises from overwatering, overly compact or moisture-retentive soil, or poor air circulation. This fungal or bacterial infection usually starts at the base of the cutting and moves upward, turning tissue soft, dark, and mushy. If detected early, you can often salvage the cutting by removing it from the soil, trimming off the rotted portion with a sterilized blade, and allowing the remaining healthy section to callus again for 5 to 7 days in a dry, shaded spot.
To prevent recurrence, repot the cutting in fresh, sterile, fast-draining soil, and consider dusting the cut end with sulfur powder or a fungicide before replanting. Always use clean containers with ample drainage and avoid watering until the callus is firm and dry.
Mold or Mildew on the Soil Surface
Mold, mildew, or fungal spots on the surface of the potting mix are usually signs of high humidity, poor ventilation, or overwatering. While surface mold is often harmless, it indicates a need to improve environmental conditions. Move the pot to a brighter, breezier area and allow the topsoil to dry between waterings. If mold persists, scrape off the top layer of affected soil and replace it with fresh, dry medium. A light dusting of cinnamon powder, a natural antifungal, can help suppress surface mold.
Failure to Root
If your cutting hasn’t rooted after six to eight weeks, it could be due to a variety of factors:
Insufficient callusing: Planting before the cut end fully callused can lead to rot rather than root formation.
Cool temperatures: Rooting slows significantly below 70°F (21°C). Consider using a heat mat to maintain optimal warmth, especially in cooler climates.
Low light levels: Plumeria cuttings need bright, indirect light to support photosynthesis and trigger rooting. If indoors, place near a south-facing window or use supplemental grow lights.
Improper cutting selection: Cuttings taken from immature, overly thin, or flowering branches are less likely to root successfully.
In these cases, don’t be discouraged. Examine what may have gone wrong, and start over using improved technique: choose a mature branch with ideal thickness, allow proper callusing, use a sterile and well-draining medium, and maintain consistent warmth and light throughout the rooting process.
Premature Leaf Drop or Wrinkling
Sometimes, even healthy cuttings may lose leaves or appear wrinkled. This could result from water stress—either too much or too little—or the natural response of the plant adjusting to its new environment. Wrinkling can also be a sign that the cutting is drawing on internal moisture reserves before roots form. If the stem remains firm, the cutting is still viable. Maintain proper care, avoid excessive watering, and give it time.
By staying observant and fine-tuning your approach, you’ll build a better understanding of your plumeria’s needs and improve your propagation success over time.
Encouraging Blooming After Establishment
Once your plumeria plant is well-rooted and growing, you’ll want to encourage flowering. Plumerias typically bloom best with full sun exposure and regular feeding. Use a bloom-promoting fertilizer with higher phosphorus levels during the growing season. Reduce watering during the winter rest period, and resume once active growth appears in spring.
With time and care, your plumeria will reward you with clusters of colorful, fragrant flowers in shades of pink, yellow, white, and red—making the propagation journey well worth the effort.
FAQ About Growing Plumeria from Cuttings
How do I know when a plumeria cutting is ready to be planted?
After taking a plumeria cutting, it should be left to dry and callus for 5 to 14 days depending on humidity and temperature. You’ll know it’s ready to be planted when the cut end is completely dry, no longer sticky, and has formed a firm, protective layer. This helps prevent rot once the cutting is placed into soil. In humid climates, it may take longer for this process to complete.
What is the best soil mix for rooting plumeria cuttings?
Plumeria requires a very well-draining soil mix to prevent root rot. A high-quality mix includes cactus soil combined with perlite, pumice, or coarse sand. An ideal ratio is two parts cactus potting mix to one part perlite. Avoid peat-heavy mixes, as they retain too much moisture. Sterilizing the soil before use can also prevent fungal infections during rooting.
Should I water the cutting immediately after planting?
No. Watering immediately after planting increases the risk of rot, especially since the cutting has not yet developed roots. Wait about 5 to 7 days after planting to water for the first time. During this time, keep the cutting in a warm, bright location, and only water lightly once the soil becomes completely dry.
What is the ideal temperature range for rooting plumeria cuttings?
Plumeria cuttings root best in warm temperatures ranging from 75°F to 85°F (24°C to 29°C). Consistently warm temperatures encourage rapid root development. If growing indoors, consider using a seedling heat mat under your container to maintain warmth at the root zone, especially during cool nights.
Can I root plumeria cuttings in water?
While it is possible, rooting plumeria in water is generally not recommended. The thick, succulent stems are prone to rotting when submerged. Soil or soilless media like perlite provide a more stable environment for root development. If water propagation is attempted, the water must be changed frequently and the cutting carefully monitored for signs of rot.
How long does it take for plumeria cuttings to grow leaves after rooting?
After roots form—typically within 3 to 6 weeks—new leaf growth may appear within 2 to 4 weeks. However, timing can vary depending on temperature, light, and the variety of plumeria. Lack of new growth does not necessarily mean failure; some cuttings may root successfully but remain dormant until conditions are optimal.
Why is my plumeria cutting soft or mushy?
A soft or mushy stem is a sign of rot, often caused by excess moisture, lack of air circulation, or planting before the cut end has fully callused. If caught early, you may be able to salvage the cutting by trimming off the rotted portion with a sterile blade and allowing the stem to re-callus before replanting. Discard the cutting if rot has spread up the stem.
What is the best time of year to take and root plumeria cuttings?
The best time to propagate plumeria from cuttings is during the plant’s active growing season, typically late spring through mid-summer. During this period, the warm temperatures and long daylight hours promote rapid rooting and healthy growth. Avoid taking cuttings during winter dormancy, as rooting success drops significantly.
How much sunlight do plumeria cuttings need during propagation?
While rooting, plumeria cuttings benefit from bright but indirect sunlight. Direct sun can cause dehydration before the roots develop, especially if the temperatures are high. Once roots are established and new growth appears, gradually increase sun exposure until the plant can handle full sunlight.
Do I need to fertilize plumeria cuttings before they root?
No. Fertilizing unrooted cuttings is not recommended and can actually stress or burn the cutting. Wait until the cutting has produced new growth and established roots before introducing a balanced fertilizer. When feeding begins, choose a bloom-boosting fertilizer high in phosphorus to support flower production later in the season.
Can I propagate plumeria in containers permanently?
Yes. Plumeria grows very well in large containers, especially in regions with cold winters. Choose a container with excellent drainage holes, and repot every 2 to 3 years to refresh the soil and encourage healthy root expansion. Container-grown plumeria also allows you to move the plant indoors during the winter to prevent frost damage.
Conclusion
Growing plumeria from cuttings is a straightforward and highly rewarding process for any level of gardener. By selecting healthy cuttings, allowing proper callusing, using the right soil, and managing watering carefully, you can turn a single branch into a thriving tropical plant. With patience and the right techniques, you’ll enjoy the satisfaction of nurturing your plumeria from the very first step to full bloom.


