Marigolds are some of the most cheerful flowers you can grow, known for their brilliant shades of orange, gold, and yellow. They bloom abundantly throughout the summer and bring life to any garden with minimal care. What many gardeners don’t realize is that you don’t need to buy new marigold seeds every year. Instead, you can easily harvest your own from mature flowers. Learning how to harvest marigold seeds ensures endless blooms season after season, saving both money and effort. It’s a simple, satisfying process that deepens your connection to gardening while preserving your favorite varieties for years to come.
Harvesting marigold seeds is not only about collecting them but also about knowing when and how to do it correctly. Timing, drying, and storage all play vital roles in keeping your seeds viable for next season. With a little patience and attention, you can gather hundreds of seeds from just a few plants. Whether you grow French, African, or signet marigolds, mastering this technique guarantees a fresh burst of color every spring. By understanding the proper steps, you’ll enjoy a never-ending cycle of blooms that brighten your garden and fill it with warmth year after year.
Understanding Marigold Seed Formation
Before learning how to harvest marigold seeds, it’s important to understand how these seeds form. Marigolds begin their life cycle as bright blossoms that attract pollinators such as bees and butterflies. Once pollinated, the flowers start to fade and dry, turning from vibrant petals into brown, brittle seed heads. Inside these dried flower heads lies the treasure—slender black-and-white seeds that hold the promise of next season’s blooms. Each bloom can produce dozens of seeds, making marigolds one of the most rewarding plants to collect from. Recognizing this transformation helps you know the perfect moment to harvest.
The process begins once the petals fall and the flower head becomes papery to the touch. At this stage, the seeds inside have fully matured but are still protected by the dried base of the bloom. If you harvest too early, the seeds may not have developed completely and could fail to germinate. Waiting until the heads are completely dry ensures that the seeds have absorbed enough nutrients from the plant to be viable. Observing this natural drying process teaches patience and a better understanding of your marigolds’ growth cycle.
Different marigold varieties—such as African, French, and signet—develop their seeds in similar ways, but their size and shape can vary slightly. African marigolds produce larger seed heads, while French types often have smaller but more numerous ones. No matter the variety, the visual cue of a withered, brown flower is a universal sign of readiness. By paying attention to these details, you’ll know exactly when your marigolds are ready to give back the seeds that will bloom again next season.
When to Harvest Marigold Seeds
Timing is everything when it comes to harvesting marigold seeds. Picking the flower heads too early can result in immature seeds that won’t germinate, while waiting too long may cause them to scatter or rot. The ideal time to harvest marigold seeds is when the flower heads have completely dried on the plant. You’ll notice the petals turning brown and crisp, and the center becoming firm and dry. This typically happens a few weeks after the bloom fades, depending on your local climate and weather conditions. Dry, sunny days are best for collecting seeds since moisture can easily spoil them.
If the flower heads still feel soft or show signs of green, it’s better to wait a few more days. Seeds harvested from half-dry blooms are often underdeveloped and prone to mold. Gently touch the flower head—if it crumbles easily between your fingers and the base feels brittle, the seeds inside are ready. Avoid harvesting during or after rain, as excess moisture can cause premature decay. In regions with high humidity, wait for a clear afternoon when the plants have had time to dry under the sun. Choosing the right moment ensures higher germination rates and healthier seedlings next season.
Late summer and early fall are usually the most productive times for marigold seed harvesting. By this point, your plants have reached full maturity and produced several waves of blooms. As the growing season winds down, let a few flower heads remain on the plant until they completely dry. This natural drying period gives the seeds time to mature fully. Collecting them at this stage guarantees strong, viable seeds that will sprout quickly when replanted next spring. Perfect timing turns a simple task into a season-sustaining success.
How to Collect Marigold Seeds
Collecting marigold seeds is a simple yet delicate process that requires attention to timing and handling. Once your marigold flowers have dried completely, use clean garden scissors or your fingers to remove the brown, brittle heads from the stems. It’s best to collect them in the late morning after the dew has evaporated. Avoid harvesting during damp or rainy conditions, as moisture can lead to mold and ruin the seeds. Place the dried flower heads in a paper bag or basket rather than plastic, allowing air to circulate and prevent condensation. Collect only fully dried heads to ensure that the seeds inside are mature and viable for planting next season.
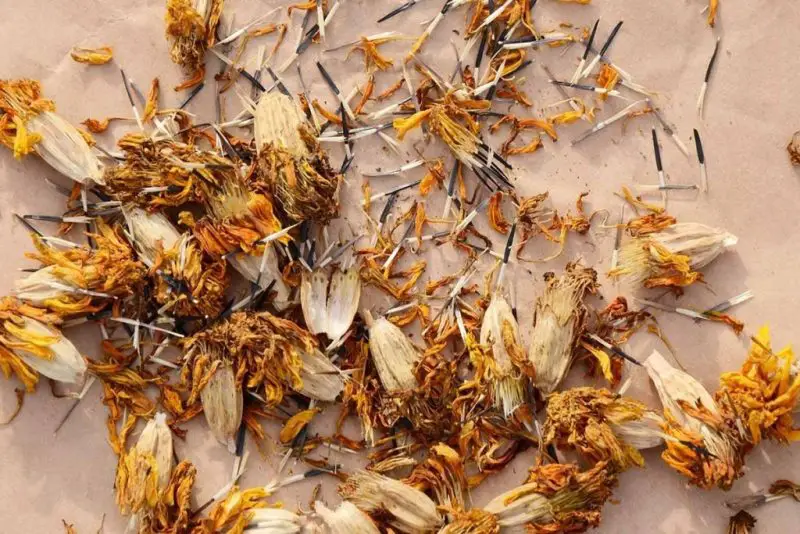
After gathering the seed heads, gently break them open over a flat surface, such as a tray or piece of paper. Inside, you’ll find thin, elongated seeds that are black on one end and pale tan on the other. These are the marigold seeds ready for saving. Remove any chaff, dried petals, or debris to separate the seeds from unwanted plant material. Handle them gently to avoid damaging their fragile tips. Once cleaned, spread the seeds out in a single layer on a dry paper towel or screen to air dry for a few days. Proper drying prevents mold and ensures long-term viability during storage.
When working with multiple marigold varieties, label your seeds clearly. Each type—African, French, or signet—has unique colors and sizes, so keeping them organized avoids confusion when planting. Keeping the varieties separate also preserves their specific traits, as marigolds can cross-pollinate if grown closely together. With careful collection and proper drying, you’ll have an abundant supply of marigold seeds ready to plant when spring returns. This simple act allows you to continue enjoying your favorite blooms year after year without ever needing to purchase new seeds again.
How to Dry Marigold Seeds Properly
Drying marigold seeds correctly is one of the most crucial steps to ensure they remain viable for the next planting season. Freshly collected seeds contain natural moisture that, if not removed, can cause mold or premature decay during storage. After separating the seeds from their dried flower heads, spread them evenly on a paper towel, newspaper, or mesh screen. Choose a well-ventilated area away from direct sunlight to prevent overheating, which can reduce germination potential. The drying process typically takes three to five days, depending on humidity levels. Turn the seeds gently each day to ensure even airflow and complete drying on all sides.
You’ll know the seeds are fully dry when they feel crisp to the touch and snap easily when bent. If they still feel soft or flexible, give them more time. Avoid using artificial heat sources like ovens or hairdryers, as these can damage the seed embryos and render them sterile. The goal is to let them dry slowly and naturally in a stable environment. Proper air circulation is essential, especially in humid climates. If needed, use a small fan on a low setting to maintain airflow. Patience during this stage pays off later with better germination results and healthier plants.
Once the seeds are completely dry, inspect them one last time to ensure there’s no residual moisture. Remove any damaged or discolored seeds before storage. Properly dried marigold seeds can last up to two years without losing vitality if stored correctly. The drying stage bridges the gap between harvesting and storing, making it a key part of preserving your marigold collection. Taking time to dry your seeds carefully ensures that each one remains full of life, ready to burst into color when planted next season.
How to Store Marigold Seeds for Maximum Viability
Once your marigold seeds are fully dry, proper storage is the next essential step to maintain their viability for future planting. The key to successful storage lies in keeping seeds cool, dry, and away from direct sunlight. Place the dried seeds in paper envelopes, small paper bags, or breathable seed packets rather than plastic containers. Paper allows air to circulate and prevents condensation buildup that can lead to mold. Label each packet with the marigold variety and collection date to help track freshness. If you have several types, such as African or French marigolds, keeping them organized will make replanting easier and preserve their distinct characteristics.
After packaging, store your seed envelopes in an airtight container such as a glass jar or metal tin to protect them from pests and moisture. Add a small silica gel packet or a spoonful of uncooked rice inside the container to absorb any residual humidity. Place the container in a cool, dark location—such as a closet, basement, or refrigerator—where the temperature remains stable. Avoid exposing seeds to fluctuating heat or humidity, as this can shorten their lifespan. A storage temperature around 40°F (4°C) is ideal for maintaining long-term seed health and preventing premature sprouting.
Properly stored marigold seeds can remain viable for one to two years, and in some cases, even longer if conditions are optimal. Before planting season begins, test a few seeds by germinating them on a damp paper towel to check their vitality. If most sprout within a week, your seeds are still strong and ready for planting. Taking care during storage ensures that your marigold collection remains vibrant and productive year after year, giving you the joy of bright, golden blooms every growing season.
How to Replant Marigold Seeds for the Next Season
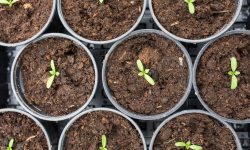
Replanting marigold seeds is an exciting part of the gardening cycle, allowing you to bring new life from last season’s blooms. To begin, choose a well-draining soil mix rich in organic matter. Marigolds thrive in loose, fertile soil that allows air and water to reach the roots easily. Start your seeds indoors about six to eight weeks before the last expected frost. Fill seed trays or small pots with moist soil and lightly press the seeds into the surface, covering them with a thin layer of soil—about one-quarter inch deep. Keep the soil consistently damp but never waterlogged, as excess moisture can cause the seeds to rot before germination. Place the trays in a warm, bright location where temperatures stay between 65°F and 75°F.
Within five to seven days, tiny green seedlings should begin to emerge. At this stage, light becomes essential for healthy growth. Place seedlings near a sunny window or under grow lights to prevent them from becoming leggy. Once the seedlings have developed two to three sets of true leaves, they’re ready to be transplanted into individual pots or directly into the garden. Before transplanting outdoors, harden them off by gradually exposing them to outdoor conditions for a few hours each day. This step strengthens their stems and prepares them for full sun exposure.
When replanting into the garden, choose a sunny location that receives at least six hours of sunlight per day. Space marigold plants according to their variety—French marigolds can be placed closer together, while African marigolds need more room to grow. Water newly transplanted seedlings gently and keep the soil slightly moist as they establish roots. Within weeks, your marigolds will flourish, bringing the same radiant colors and beauty as the parent plants. Replanting harvested seeds completes the gardening cycle, rewarding you with lush, vibrant blooms that renew your garden’s charm each year.
Common Mistakes When Harvesting Marigold Seeds
Harvesting Too Early
One of the most common mistakes gardeners make when collecting marigold seeds is harvesting the flower heads too early. Seeds that are picked before they’ve fully matured will often appear pale, soft, and underdeveloped. These immature seeds lack the nutrients and energy needed for successful germination. The temptation to collect early often comes from seeing flowers fade, but the real signal of readiness is dryness, not color. Always wait until the flower heads have turned completely brown and feel crisp to the touch. If the base is still green or flexible, the seeds inside are not ready for collection.
When harvested too soon, these seeds often fail to sprout, or if they do, the seedlings are weak and short-lived. This mistake can waste valuable time and effort during the next growing season. Patience is key to harvesting quality seeds that can produce healthy plants. Leaving the flower heads on the plant for an extra week allows them to finish ripening naturally. When collected at the proper stage, seeds will be firm, dark, and fully developed, guaranteeing strong germination. Timing is everything—by observing the plant carefully and waiting until complete dryness, you’ll ensure your seeds are viable, resilient, and ready to bloom beautifully next season.
Storing Wet or Damp Seeds
Another mistake that often ruins harvested marigold seeds is storing them before they are completely dry. Even a small amount of trapped moisture can trigger mold growth or cause the seeds to rot during storage. Many gardeners collect seeds and seal them immediately in airtight jars or plastic bags, unintentionally creating a humid environment that shortens the seeds’ lifespan. Moisture is the silent killer of stored seeds and can destroy a full season’s worth of effort in just weeks.
To avoid this, always dry your marigold seeds for several days in a cool, well-ventilated space away from direct sunlight. Spread them evenly on a paper towel, newspaper, or fine mesh to promote airflow on all sides. Test dryness by bending a seed—if it breaks easily with a snap, it’s ready for storage. Only after complete drying should you place them in envelopes or airtight containers with a desiccant, such as silica gel or uncooked rice, to absorb any remaining moisture. Proper drying not only extends seed life but also preserves their ability to germinate quickly and grow vigorously once replanted. This simple precaution protects your seeds and guarantees success for the next season’s garden.
Mixing Different Marigold Varieties
A less obvious but equally important mistake is mixing different marigold varieties when harvesting seeds. Marigolds, especially when grown close together, can cross-pollinate easily. This means that seeds collected from one flower might not produce identical plants the next season. For example, seeds from a French marigold grown near an African marigold could result in unpredictable hybrids that differ in color, size, and bloom pattern. While hybridization isn’t necessarily bad, it can be disappointing for gardeners hoping to preserve specific traits like color intensity or bloom shape.
To maintain the purity of each variety, harvest seeds from marigolds that are planted apart from other types. Label each group carefully as you collect and store the seeds. Keeping separate envelopes for every variety helps avoid confusion and ensures consistent results year after year. If you enjoy experimenting, you can still grow hybrids intentionally, but labeling helps you track which combinations produce the most appealing results. By avoiding this mix-up, you’ll maintain strong, reliable marigold lines that continue to bloom true to form.
Ignoring Pest or Disease Damage
Another critical mistake gardeners make is collecting seeds from flowers affected by pests or disease. Damaged blooms often contain weakened or contaminated seeds that can carry issues into the next generation. Aphids, mold, and fungal infections can all compromise seed health. These problems are not always visible—sometimes, the seeds look normal but fail to sprout later. Harvesting from unhealthy plants reduces the chance of strong germination and can even spread pathogens to your soil or future seedlings.
Before collecting, always inspect your marigold plants for signs of discoloration, soft spots, or pest infestation. Choose seeds from the healthiest flowers on robust, pest-free plants. Discard any that appear shrunken, discolored, or have unusual texture. Sanitizing your tools and hands before handling seeds also prevents contamination. Healthy parent plants yield strong, disease-free offspring that perform better in the garden. By being selective and cautious, you’ll preserve the vitality of your marigold collection and enjoy abundant, trouble-free blooms in the next growing season.
Tips for Successful Marigold Seed Harvesting
Harvesting marigold seeds successfully starts with healthy, mature plants. Always choose your best-performing marigolds as seed sources—those that have shown vibrant color, abundant blooms, and strong stems. Avoid collecting seeds from plants that appear weak, diseased, or have been exposed to pesticides, as their seeds may not germinate well or may produce unhealthy offspring. Allow the flowers to complete their natural life cycle before harvesting. The longer they stay on the plant after blooming, the more nutrients the seeds absorb. This patience leads to fuller, stronger seeds that are far more likely to thrive when planted.
Another essential tip is to collect seeds during dry weather. Humid or rainy conditions can increase the risk of mold developing both before and after harvesting. Always harvest in the late morning when dew has evaporated but before midday heat becomes too strong. Handle seed heads gently to prevent them from shattering and scattering the seeds. Using paper bags or breathable baskets helps prevent moisture buildup while you work. Once you’ve gathered your seed heads, process and dry them immediately. This simple routine maintains seed quality and prevents potential spoilage.
Proper labeling and organization are also vital for success. After drying, label each batch clearly with the marigold variety and date of harvest. Store seeds in a cool, dark, and dry environment where temperature and humidity remain stable. If you’re saving several varieties, keep them separated to prevent cross-contamination. Reviewing your labels before planting ensures you can replant your favorite colors and forms. By following these tips, you’ll build a sustainable seed collection that yields vibrant, consistent blooms year after year, turning a single marigold season into a cycle of endless color and joy.
How to Test Marigold Seed Viability Before Planting
Testing marigold seed viability before planting ensures that your time, effort, and care in harvesting were worthwhile. One of the most effective and simple ways to test is the paper towel method. Take a small sample—around ten seeds—from your stored batch. Place them evenly on a damp paper towel and fold it gently to cover the seeds. Then, put the towel inside a resealable plastic bag or airtight container to create a humid environment. Store it in a warm, well-lit area with temperatures around 70°F (21°C). Within five to seven days, you should begin to see small white roots emerging from healthy seeds. A germination rate above 80% indicates strong seed viability and readiness for planting.
If fewer than half of the seeds sprout, it’s a sign that the batch may have lost vigor due to age or improper storage. In that case, plant extra seeds to compensate or refresh your collection with new ones. Be sure to check the towel daily to keep it moist but not soggy, as excessive moisture can cause mold. This germination test not only helps you assess the quality of your seeds but also prevents wasted space and effort in your garden. Performing this test every spring helps you identify which stored batches remain reliable year after year.
You can also inspect seeds visually before testing. Healthy marigold seeds are slender, dark-tipped, and firm when pressed. Seeds that are brittle, discolored, or soft likely won’t germinate. Another quick method is the float test—place seeds in a bowl of water and let them sit for 15 minutes. Viable seeds typically sink, while hollow or weak ones float. Combining these methods gives you an accurate idea of your seeds’ strength. Testing ensures that only the most viable marigold seeds make it into your garden, guaranteeing lush, colorful blooms in the coming season.
Benefits of Saving and Harvesting Your Own Marigold Seeds
Saving and harvesting your own marigold seeds offers more than just a practical benefit—it’s a rewarding gardening experience that builds sustainability and personal satisfaction. By collecting seeds from your healthiest and most beautiful plants, you ensure that next year’s blooms inherit the best traits. This selective process gives you control over color, size, and resilience, creating a garden that reflects your personal preferences. It also connects you more deeply with the life cycle of your plants, turning gardening from a seasonal task into a continuous, fulfilling practice.
Financially, saving seeds is incredibly cost-effective. A single marigold plant can produce hundreds of seeds, enough to fill your garden and share with friends. Over time, you can develop your own strain of marigolds adapted perfectly to your local climate. This natural adaptation increases your plants’ strength and bloom consistency each year. Plus, reusing seeds supports sustainable gardening by reducing dependence on commercial seed production and packaging.
Emotionally, there’s a sense of pride and continuity in growing flowers from seeds you’ve nurtured yourself. Each new bloom feels like a personal success—a colorful reminder of your care and patience. Passing down saved seeds to friends, family, or community gardens continues this cycle of growth and sharing. Harvesting your own marigold seeds isn’t just about saving money or ensuring beauty; it’s about cultivating a lasting relationship with your garden. Every flower that blooms from a saved seed carries a story—a connection to the gardener who cared enough to preserve it.
FAQs About Harvesting Marigold Seeds
When is the best time to harvest marigold seeds?
The best time to harvest marigold seeds is when the flower heads are completely dry and brown. This usually occurs a few weeks after blooming. Collect them on a sunny, dry day to prevent mold, ensuring the seeds are mature, crisp, and ready for long-term storage.
How can I tell if marigold seeds are mature?
Mature marigold seeds are long, slender, and dark-tipped. The seed head feels brittle and dry when ready. If the base still feels soft or green, wait longer. Fully developed seeds will separate easily from the flower head and produce strong, healthy plants when replanted.
How long do marigold seeds last in storage?
When stored correctly in a cool, dark, and dry place, marigold seeds can remain viable for one to two years. Using paper envelopes or glass jars with a desiccant helps prevent moisture damage. Always test older seeds for germination before planting to ensure success.
Can I harvest seeds from hybrid marigolds?
You can collect seeds from hybrid marigolds, but they may not produce identical plants. Hybrid seeds often revert to one parent’s traits or display unexpected variations in color and size. For consistent results, harvest seeds from open-pollinated or heirloom marigold varieties instead.
Why didn’t my harvested marigold seeds germinate?
If seeds fail to germinate, they were likely harvested too early or stored while damp. Overexposure to moisture, mold, or heat can also kill embryos. Always dry seeds thoroughly and store them in cool, dry conditions. Testing a few before planting helps confirm viability.
Conclusion
Harvesting marigold seeds is a simple yet deeply rewarding gardening ritual. With patience, proper drying, and careful storage, each seed you save becomes a promise of future color and life. Testing their viability ensures only the strongest bloom again, turning your garden into a cycle of renewal and beauty. Every flower that emerges carries your care, your time, and your dedication. By mastering the art of harvesting and saving seeds, you not only preserve your favorite marigold varieties but also cultivate sustainability, creativity, and pride in every new season of vibrant, golden blooms.