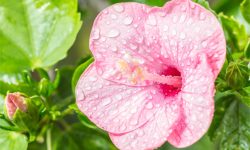
Petunias are among the most beloved flowering plants, known for their vibrant colors, rich fragrance, and ability to brighten any garden space. Whether you grow them in hanging baskets, window boxes, or flower beds, petunias deliver a stunning display from spring through fall. Many gardeners purchase new seeds or seedlings each year, but did you know that you can harvest your own petunia seeds and regrow them season after season? Learning this process not only saves money but also allows you to preserve your favorite petunia varieties for years to come.
Harvesting petunia seeds is simpler than most people think, yet it requires timing, observation, and gentle handling. Understanding when the seeds are ready and how to collect and store them properly ensures you’ll have a fresh supply for next year’s blooms. In this detailed guide, you’ll discover how to identify mature seed pods, extract seeds without damaging them, and store them to maintain viability. With the right approach, your garden can burst into color every season — all from your own hand-harvested petunia seeds.
Understanding Petunia Seed Formation

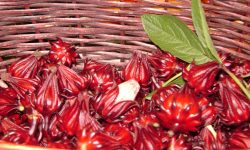
Before harvesting petunia seeds, it’s important to understand how these tiny seeds develop and mature. Petunias produce seeds through pollination, which can occur naturally via wind, insects, or self-pollination within the flower. After a bloom fades, it leaves behind a small green pod at the base of the flower, known as the seed capsule. Inside this capsule, hundreds of tiny seeds begin to form. The pod gradually swells as the seeds develop, and over several weeks, it changes color from green to light brown or tan. This color change is the first visible sign that the seeds are ripening. During this phase, the plant’s energy shifts from producing blooms to nourishing and hardening the seeds inside the pods.
Each petunia seed is extremely small — often no larger than a grain of dust — making the harvesting process delicate and precise. When seed pods are harvested too early, the seeds inside are soft, light-colored, and incapable of germination. On the other hand, if you wait too long, the pods may split open naturally, scattering the seeds onto the ground. Observing the pods daily during late summer helps you catch them at just the right stage. Mature pods feel dry and slightly papery when touched but haven’t yet cracked open. At this point, the seeds inside are fully developed, dark brown, and ready to be collected.
Understanding the stages of seed development helps gardeners determine the optimal harvesting time for maximum viability. Petunias follow a predictable pattern: flowering, fading, pod formation, and drying. Recognizing these stages allows you to plan your harvest window precisely. Once you can distinguish between immature and mature pods, you’ll be able to collect seeds efficiently without losing them to premature dispersal. Mastering this observation skill ensures every harvest yields healthy, viable petunia seeds for next season’s garden.
When and How to Identify Mature Petunia Seed Pods
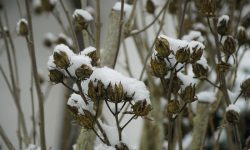
Knowing the right time to harvest petunia seeds is crucial for successful collection. Petunia flowers begin forming seed pods once their petals have withered and fallen off. These small pods develop at the base of the bloom, gradually enlarging over the following weeks. During this time, they transition from soft green to pale yellow and eventually to a light tan or brown shade. The transformation signals that the seeds inside are maturing. You’ll notice the pods becoming dry and slightly brittle, a clear indicator that they are nearly ready for harvest. If you look closely, the pod’s outer layer will start to wrinkle and appear papery in texture. This is the perfect sign to prepare for collection.
To check whether a pod is fully mature, gently press it between your fingers. A mature pod feels dry and firm, not soft or fleshy. You can also shake it lightly — if it rattles, it means the seeds inside have hardened and dried, confirming readiness for harvest. However, avoid waiting too long. Once the pods dry completely, they will naturally crack open and release their seeds into the surrounding soil. To prevent losing them, it’s best to collect pods just before they split. Always choose a dry, sunny day for harvesting, as moisture can make the pods slippery and difficult to handle.
Timing is everything when it comes to identifying mature seed pods. Picking too early results in underdeveloped seeds that won’t sprout, while waiting too long risks losing them to the wind or rain. With practice, you’ll easily recognize when the pods have reached the ideal stage. Mature petunia pods will have a papery feel, a tan color, and a slight rattle when shaken — these are the signs of perfect harvesting readiness. Once you identify them correctly, you can begin collecting and preserving your seeds for future seasons.
How to Collect Petunia Seeds Step by Step
Harvesting petunia seeds is a simple yet delicate process that requires patience and attention to detail. Begin by selecting healthy, fully mature plants that have finished blooming for the season. These plants should have dry, tan-colored seed pods that have not yet burst open. It’s best to collect the seeds on a dry, sunny day when humidity is low, as moisture can cause mold or make the pods slippery to handle. Using clean, sharp scissors or pruning shears, snip the seed pods from the plant carefully to avoid damaging the stems or spilling the seeds. Place the pods in a paper envelope or a shallow dish to prevent them from scattering. Avoid using plastic containers at this stage, as they trap moisture and can lead to mold development.
Once you’ve gathered all the pods, allow them to dry further indoors for a few days. Spread them out on a sheet of paper or a fine mesh tray in a well-ventilated, shaded area. This additional drying period ensures the pods are completely crisp before you open them. When the pods are dry enough, gently crush or twist them between your fingers over a clean white sheet of paper. The tiny, dust-like seeds will fall out easily. You’ll notice that each pod contains dozens of minuscule seeds, so work slowly and carefully to collect as many as possible. Use a fine brush or a folded piece of paper to transfer the seeds into a small container.
After collecting, inspect the seeds and remove any debris or pieces of pod material. Let the seeds air-dry for another day to eliminate any remaining moisture before storing them. Properly collected petunia seeds should be dry, lightweight, and dark brown in color. Avoid blowing on them or using fans, as their small size makes them easy to lose. This careful, step-by-step method ensures that you gather viable, high-quality seeds ready for long-term storage and future planting.
Drying and Cleaning Petunia Seeds Properly
How to Dry Petunia Seeds Correctly
After collecting your petunia seeds, drying them properly is essential to preserve their quality and prevent mold growth. Even if the pods seemed dry during harvest, residual moisture inside the seeds can cause them to spoil if stored too soon. To dry them thoroughly, spread the seeds in a thin layer on a clean sheet of paper, coffee filter, or fine mesh screen. Keep them in a warm, dry, and well-ventilated area away from direct sunlight, which can damage their viability. A room with gentle airflow is ideal, as it helps remove lingering humidity. Stir or gently shake the seeds daily to ensure even drying and to prevent them from sticking together.
Typically, petunia seeds take about five to seven days to dry completely, depending on humidity levels. You’ll know they are ready when they feel crisp and flow freely when moved. Avoid using ovens, heaters, or hair dryers, as excessive heat can destroy the delicate embryos inside. Once fully dry, the seeds should appear dark brown and lightweight. Properly dried seeds are less prone to fungal problems and will remain viable longer in storage. Patience during this stage is crucial, as rushed drying can undo all your hard work.
Cleaning and Preparing Seeds for Storage
Once the seeds are fully dry, cleaning them helps ensure only viable, healthy ones are stored. Petunia seeds are tiny and can mix easily with bits of dried pods or dust. To clean them, gently blow away loose debris or use a soft artist’s brush to separate seeds from unwanted material. You can also roll them between your fingers to break apart any clumps. Take care not to crush the seeds, as their thin outer coating is fragile. Working over a clean white surface makes it easier to see and collect the small particles.
If you want to test the quality of your seeds before storage, gently press a few between your fingers. Mature seeds feel firm and solid, while immature ones crumble easily. Discard any damaged or discolored seeds. After cleaning, transfer the seeds to a paper envelope or breathable pouch for storage. Avoid plastic bags, as they can trap moisture. Label each envelope with the date and variety to keep your collection organized. Clean, dry seeds are the foundation of successful petunia propagation for seasons to come.
Best Ways to Store Petunia Seeds for Long-Term Viability
Storing petunia seeds properly is just as important as collecting them. Even the healthiest seeds will lose their viability quickly if exposed to humidity, heat, or light. The best storage method starts with choosing the right container. Paper envelopes, seed packets, or small glass jars with tight-fitting lids work well for keeping moisture out. Avoid plastic bags, as they can trap condensation and lead to mold growth. Before sealing your seeds, make sure they are completely dry — even slight dampness can ruin them over time. Label each container with the date of harvest and the petunia variety to stay organized for future planting seasons.
Once packed, store the containers in a cool, dark, and dry place. Ideal storage temperatures range from 40°F to 50°F (4°C–10°C), making a refrigerator or basement an excellent choice. If using a fridge, place the seed containers inside an airtight jar with a small packet of silica gel to absorb any remaining moisture. Avoid storing seeds near fruits or vegetables, as the ethylene gas they emit can reduce seed longevity. Under optimal conditions, petunia seeds can remain viable for up to three years, though their germination rate gradually declines over time.
When you’re ready to plant, allow the seeds to return to room temperature before opening their container. This prevents condensation from forming on the seeds as they warm up, which could compromise their quality. Keeping your seeds dry, cool, and shielded from light ensures they stay viable for multiple seasons. With proper storage, you can maintain a continuous cycle of vibrant petunia blooms year after year, all from your carefully harvested and preserved seeds.
How to Test Petunia Seeds for Viability Before Planting
Testing petunia seeds for viability is an important step before planting, ensuring your effort results in healthy, productive blooms. Over time, stored seeds naturally lose vigor, so checking their germination potential helps avoid disappointment. The most reliable way to test viability is the paper towel method. Begin by placing ten to twenty seeds on a moist paper towel, fold it gently, and slide it into a resealable plastic bag to keep humidity consistent. Keep the bag in a warm spot, ideally between 70°F and 75°F (21°C–24°C), and ensure the towel stays damp but not soaked. After about a week, you should see small white sprouts emerging from viable seeds. This simple test provides a clear indicator of which seeds are worth planting.
Once the initial sprouting occurs, monitor and count how many seeds germinate within two weeks. If 8 out of 10 seeds sprout, you have an 80% germination rate, which indicates excellent viability. Seeds with a 60–70% rate can still be planted, though you may need to sow more densely to compensate for weaker results. However, if fewer than half sprout, it’s best to replace the old batch with fresher seeds. Keeping track of these rates helps you understand how well your storage methods have worked. You can also note which seed batches produce the strongest, most vigorous sprouts for future planting reference.
For gardeners storing seeds long-term, performing this test every spring is a good habit. It allows you to refresh your seed stock and ensure consistent growth year after year. Remember to discard any seeds showing mold, discoloration, or unusual softness — these are signs of decay or contamination. Clean, viable seeds give your petunias a strong start and improve overall germination success. With just a few minutes of preparation, you can confidently plant knowing that every seed has the potential to grow into a healthy, blooming petunia.
Common Mistakes to Avoid When Harvesting Petunia Seeds
Harvesting Pods Too Early
One of the most frequent mistakes gardeners make is collecting petunia seed pods before they’re fully mature. Immature pods may appear large and healthy on the outside, but the seeds inside are often pale, soft, and underdeveloped — making them incapable of germination. Harvesting too early interrupts the seed maturation process, resulting in a batch with very low viability. It’s crucial to wait until the pods turn from green to tan or light brown and feel dry to the touch. At this stage, the seeds inside are hardened and ready for storage or immediate drying. Patience during this period ensures that your harvest yields strong, viable seeds.
To avoid premature harvesting, monitor your petunias closely in the final weeks of blooming. Check pods daily for color and texture changes, especially as the weather begins to warm and dry. If you’re uncertain whether a pod is ready, gently shake it — a soft rattling sound means the seeds inside are mature. By waiting for these signs, you’ll collect only the healthiest seeds, ensuring successful germination in the next growing season.
Storing Seeds with Moisture
Another common mistake is storing seeds before they are completely dry. Even a small amount of trapped moisture can cause mold growth or lead to premature decay. Freshly collected seeds often contain residual humidity that isn’t visible to the eye. Storing them too soon — especially in sealed containers — creates a humid environment where fungus thrives. To prevent this, always allow seeds to air dry for at least a week in a warm, shaded area with good airflow. Proper drying preserves their quality and prevents clumping during storage.
Once you’re sure the seeds are completely dry, use breathable materials like paper envelopes or cloth bags instead of plastic containers. Label them clearly with the harvest date and variety name to stay organized. If stored in a cool, dark, and dry place, petunia seeds can stay viable for up to three years. Taking these precautions helps ensure your seeds remain healthy, potent, and ready for germination when planting season returns.
How to Replant Harvested Petunia Seeds Successfully
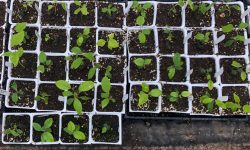
Replanting harvested petunia seeds is a simple yet rewarding process that allows you to keep your garden blooming with your favorite varieties year after year. Start by preparing a clean seed tray or shallow container with a light, well-draining seed-starting mix. Avoid using heavy garden soil, which compacts easily and can suffocate seedlings. Lightly moisten the mix until it feels damp but not soggy. Sprinkle your harvested seeds evenly across the surface — since petunia seeds need light to germinate, do not bury them under soil. Gently press them down with your fingertips to ensure good contact with the surface, then mist with water to keep them in place. This gentle preparation gives your seeds the perfect foundation for sprouting.
After sowing, cover the tray with a clear plastic lid or wrap to create a humid, greenhouse-like environment. Place it in a warm, bright area that receives indirect sunlight, maintaining temperatures between 70°F and 75°F (21°C–24°C). Avoid direct sun, which can overheat the soil and dry out the seeds too quickly. Check daily to make sure the surface stays moist but not waterlogged. If condensation builds up on the cover, lift it briefly to allow airflow. In one to two weeks, you’ll notice tiny green sprouts appearing — a sure sign your harvested seeds are viable and healthy. Once most of the seedlings have emerged, remove the cover completely to prevent mold and promote strong growth.
When your seedlings develop two or more true leaves, it’s time to transplant them into larger pots or directly into your garden. Use nutrient-rich, loose soil and ensure each plant has enough space for air circulation and root development. Water regularly but avoid soaking the soil, as petunias prefer consistent moisture with good drainage. For outdoor transplanting, wait until after the last frost and gradually acclimate the seedlings to outdoor conditions for several days. With the right replanting technique and careful attention, your harvested petunia seeds will flourish into stunning, vibrant blooms — continuing the cycle of beauty you started from your own garden.
Tips for Maximizing Future Petunia Blooms from Harvested Seeds
Once you’ve harvested and replanted your petunia seeds, proper care during the early growth stages plays a key role in ensuring abundant blooms later. Start by providing the seedlings with plenty of bright, indirect sunlight each day. Petunias thrive on light, and strong lighting encourages compact, sturdy growth rather than leggy stems. If you’re growing them indoors, use fluorescent or LED grow lights for 14 to 16 hours a day. Consistent warmth between 65°F and 75°F (18°C–24°C) supports healthy root development and faster leaf growth. Avoid overwatering — instead, mist the soil gently and keep it evenly moist. This helps young plants establish without suffering from root rot or fungus.
As your petunia seedlings mature, begin feeding them with a diluted liquid fertilizer every two weeks. A balanced formula with equal parts nitrogen, phosphorus, and potassium (such as 10-10-10) works perfectly. Once the plants reach 3 to 4 inches tall, pinch back the growing tips to encourage bushier growth and more flower buds. This technique prevents the plants from becoming spindly and promotes fuller, longer-lasting blooms throughout the growing season. Regular deadheading — removing faded flowers — also directs energy toward producing new blossoms instead of seed pods, keeping your petunias vibrant for months.
For outdoor petunias, soil quality and sunlight exposure are the main factors behind continuous blooming. Plant them in fertile, well-draining soil enriched with compost to provide lasting nutrition. Choose a spot that receives at least six hours of sunlight daily for maximum flower production. During hot months, water deeply in the morning to help the roots stay hydrated through the day. Adding a thin layer of mulch helps retain moisture and keeps the roots cool. With these careful, consistent steps, your harvested petunia seeds will grow into healthy, colorful plants that reward your effort with lush, cascading flowers season after season.
FAQs About Harvesting and Storing Petunia Seeds
How do I know when petunia seeds are ready to harvest?
Petunia seeds are ready to harvest when the flower pods at the base of the bloom turn light brown or tan and feel dry to the touch. Mature pods may appear slightly papery and begin to wrinkle. Avoid harvesting too early when the pods are still green, as the seeds inside will not be viable.
What is the best way to dry petunia seeds after harvesting?
After collecting the pods, spread them out on a sheet of paper or a fine mesh tray in a warm, shaded, and well-ventilated area. Allow them to dry for five to seven days. Once the pods are crisp, gently crush them to release the tiny seeds. Never use heat or direct sunlight for drying, as this can damage the embryos.
How long can petunia seeds last in storage?
When properly dried and stored in a cool, dark, and dry place, petunia seeds can remain viable for up to three years. Storing them in paper envelopes or airtight glass jars helps preserve quality. For best results, keep them in a refrigerator with a silica gel packet to absorb excess moisture.
Can I store petunia seeds in plastic bags?
It’s best to avoid storing seeds in plastic bags, as they trap moisture and encourage mold growth. Instead, use breathable materials like paper or cloth envelopes. If you must use plastic containers, ensure the seeds are completely dry and include a desiccant packet to maintain dryness.
How can I improve germination from my harvested seeds?
To boost germination success, pre-soak your petunia seeds in lukewarm water for two to three hours before planting. Maintain consistent warmth around 70°F to 75°F (21°C–24°C) and provide plenty of indirect light during germination. Avoid burying the seeds — simply press them onto the soil surface and mist gently for best results.
Conclusion
Harvesting and replanting petunia seeds is one of the most satisfying ways to extend your garden’s beauty year after year. By carefully identifying mature pods, drying the seeds properly, and storing them under ideal conditions, you can preserve your favorite varieties naturally. When replanted, these tiny seeds reward your effort with lush, colorful blooms that brighten any space. Patience, observation, and gentle care are the keys to success. With the right techniques, you’ll not only save money but also enjoy the joy of nurturing a complete life cycle — from flower to seed, and seed back to bloom.