Dahlias bring gardens to life with their vivid colors and layered petals. Each bloom looks like a small masterpiece of nature, bursting with beauty and grace. These flowers love warmth and sunshine, thriving in late summer and early autumn. But once frost arrives, their fragile tubers face danger. Cold soil and freezing air can damage them within hours. Many gardeners lose their plants each winter simply because they don’t protect them in time. Learning how to overwinter dahlias and protect them from frost damage is the secret to keeping their beauty alive year after year.
Saving dahlias through the cold season is easier than it seems. With the right care, their tubers rest safely until spring returns. The process begins before frost touches the soil. Digging, drying, and storing them properly make all the difference. When done carefully, dahlias will bloom even stronger the following year. Each flower that reappears feels like a reward for patience and effort. Overwintering dahlias keeps their life cycle unbroken, ensuring your garden stays colorful and full of charm season after season.
Understanding Dahlias and Why They Need Protection from Frost

Dahlias are tropical flowers that love sunlight, warm soil, and mild air. Their roots, known as tubers, act like hidden storage organs. Each tuber collects nutrients during summer to support future growth. These plants flourish in late summer gardens where the soil stays warm. But when temperatures fall below 50°F (10°C), growth stops. Once frost forms on the ground, water inside the plant’s cells freezes. The ice crystals damage tissues and cause decay within hours. Unlike hardy perennials, dahlias cannot repair frost injury. Their soft roots collapse and rot easily if left unprotected.
Knowing why frost harms dahlias helps gardeners plan ahead. The first frost marks the end of their growing cycle. When leaves turn black and wilt, the plant signals dormancy. This stage is a natural pause, not death, if managed correctly. Acting before the second frost is crucial. Digging and storing the tubers at this time keeps them alive underground. In regions with heavy frost or freezing soil, overwintering indoors becomes the only safe option. Proper care during this transition determines whether your dahlias will bloom again next season.
Different climates affect dahlias in unique ways. Gardeners in mild zones may leave tubers in the ground with mulch for protection. Those in colder regions must dig them out for indoor storage. Watching local weather reports helps you know when to begin. Once you understand your region’s frost pattern, overwintering becomes easy. Protecting dahlias from frost means saving their life source — the tubers. When cared for correctly, they rest through winter and return stronger in spring, rewarding your effort with stunning, colorful blooms.
When to Start Preparing Dahlias for Winter
Timing is everything when overwintering dahlias. Preparation should begin a few weeks before the first expected frost. Dahlias grow best in late summer and early fall when the days are warm. As temperatures drop below 50°F (10°C), growth slows, and the plant enters rest mode. Watching local weather reports helps you anticipate frost accurately. The goal is to act before the ground freezes but after the plant finishes blooming. Waiting too long risks frost damage, while acting too early weakens tuber development. Balanced timing keeps the roots strong and ready for storage.
The first sign of seasonal change appears when leaves start turning yellow or drooping. This signals that the tubers have stored enough nutrients for the winter. At this point, stop fertilizing and reduce watering gradually. Allowing the soil to dry slightly helps the tubers harden and resist rot. When the first frost finally darkens the leaves, cut back the stems to about six inches above the soil. This prevents moisture from entering the hollow stems. A few dry days after cutting make digging and cleaning easier.
Different climates demand slightly different schedules. Gardeners in northern areas should act as soon as frost appears in the forecast. In milder zones, waiting until mid or late fall often works well. Soil type also affects timing — sandy soil cools faster than clay. Checking both temperature and moisture ensures better results. Preparation done at the right time saves effort later and guarantees healthy tubers. Once you master the rhythm of your region, overwintering becomes second nature..
How to Dig Up Dahlias Before Frost Arrives
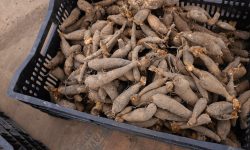
Digging up dahlias at the right time is essential for protecting their tubers. Start once frost blackens the leaves but before the ground freezes solid. Working too early or too late can harm the roots. Use a garden fork or spade instead of a shovel. These tools lift the tubers gently without cutting them. Begin digging about a foot away from the base to avoid injury. Loosen the soil slowly, moving around the plant in a full circle. Once free, lift the entire clump carefully by the stems and shake off loose dirt. Handle the tubers gently because they bruise easily.
After removing the clump, trim the stems to about four inches. Short stems make cleaning and drying easier. Remove any thick clumps of soil stuck between the roots. Avoid washing the tubers at this stage because moisture encourages rot. Instead, brush away as much dirt as possible with your hands. Leave the cleaned clumps in a shaded area for a few hours to let excess moisture evaporate. This short resting period allows the skin to toughen slightly before drying. Strong skin prevents damage during handling and storage.
Inspect each tuber carefully while digging. Discard any that feel soft, cracked, or rotten. Healthy tubers should feel firm, plump, and smooth. Label each clump with the variety name if you grow different types. This helps you identify them easily next spring. Once the tubers are clean and organized, move them indoors for drying. Careful digging keeps the roots whole and ready for successful overwintering. Each unbroken tuber means a stronger, more vibrant plant next year.
Cleaning and Drying Dahlia Tubers for Storage
Cleaning Dahlia Tubers the Right Way
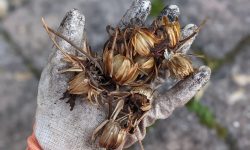
Proper cleaning keeps dahlia tubers healthy and free from decay. After digging them out, let the clumps rest in a shaded spot for a few hours. This allows surface moisture and dirt to dry slightly. Once the soil feels loose, gently brush away the remaining dirt with your hands. Avoid using water unless the soil is heavy or sticky. If washing is necessary, use a light stream and dry them immediately. Water left between the roots encourages mold and rot. Handle every tuber carefully, as even small cuts shorten their lifespan during winter storage.
When the surface looks clean, check for damage or disease. Remove small, weak, or broken tubers and keep only the firm, healthy ones. Cut away any rotted sections using a clean knife. Wipe the tool with alcohol between cuts to prevent spreading infection. Always work in a clean, dry area with good air circulation. Label each clump with its variety name before drying. Proper cleaning reduces disease risks and prepares the tubers for long-term storage in stable conditions.
Drying Dahlia Tubers Before Storing
Drying is the most important step before placing tubers in storage. Moisture left inside causes rot even in cool temperatures. Spread the cleaned tubers in a single layer on newspaper or mesh trays. Keep them in a dark, well-ventilated room for several days. The air should feel dry and cool but not cold. Avoid direct sunlight because it hardens the skin too quickly and damages texture. Turn the tubers daily so every side dries evenly. You will know they are ready when the outer skin feels dry and slightly firm.
If your climate is humid, use a small fan to improve airflow. Do not rush the process by using heaters. High heat removes too much moisture and weakens the tissue. Proper drying balances water inside the tubers, keeping them flexible and strong. Once completely dry, brush off any remaining soil again. The tubers should feel light but not brittle. Preparing them this way ensures that your dahlias rest safely through winter and awaken beautifully when spring returns.
Best Storage Methods for Overwintering Dahlias
Storing Dahlias in Peat Moss
Peat moss offers one of the safest and easiest ways to store dahlias during winter. After cleaning and drying, prepare a sturdy box lined with newspaper. Spread a thin layer of dry peat moss at the bottom. Arrange the tubers gently, leaving small gaps between them. Cover completely with another layer of peat moss. The moss maintains balanced humidity, prevents mold, and allows gentle airflow. Store the box in a cool, dark location with temperatures between 40°F and 50°F. Avoid areas that freeze or stay damp because excess moisture causes rot quickly.
Check the tubers every few weeks throughout winter. If they feel soft or shriveled, mist the peat moss lightly with clean water. Do not overwater, as this causes mold growth. Remove any decayed or damaged tubers right away. Healthy ones remain firm and slightly plump. In early spring, bring the box into a warmer area for gradual reawakening. Shake off peat moss carefully before replanting. Peat moss provides excellent moisture control and temperature stability, keeping dahlias healthy until planting season returns.
Storing Dahlias in Wood Shavings
Wood shavings create a soft, natural cushion that keeps dahlias safe all winter. Choose untreated pine or cedar shavings since they resist mold and pests. Prepare a ventilated box or crate lined with newspaper. Add a layer of shavings at the bottom, then place the tubers in a single layer. Leave small gaps for airflow, and cover them completely with another layer of shavings. Keep the container in a cool, dry place away from heaters or windows. Ideal temperatures range between 40°F and 50°F for consistent preservation.
Inspect the box monthly to monitor the condition of the tubers. Remove any that show mold or rot immediately. If the tubers appear wrinkled, add a touch of moisture by misting nearby air. Avoid soaking the shavings because trapped water encourages fungus. Replace old shavings if they lose freshness or absorb odor. When spring arrives, remove the tubers gently, brush them clean, and check for firmness. Wood shavings provide insulation and gentle dryness, ensuring healthy, strong dahlias ready for planting.
Storing Dahlias in Paper Bags or Cardboard Boxes
Paper bags and cardboard boxes offer an affordable and practical way to overwinter small dahlia collections. They breathe naturally and protect against excess humidity. Label each container with the variety name for easy identification. Place one or two tubers per bag with a handful of dry vermiculite or sawdust. Fold the top loosely to allow airflow. Store the bags in a dark, cool room such as a cellar, closet, or insulated garage. Temperatures should remain steady between 40°F and 50°F for best results.
Check the bags every few weeks throughout winter. Remove any tubers that feel soft or look discolored. Replace the drying material if it feels damp or compacted. Do not use plastic bags since they trap moisture and encourage rot. This method is perfect for gardeners with limited space or different varieties. Paper allows natural breathing while keeping tubers safe and dry. When spring arrives, your dahlias stay firm, colorful, and ready to awaken under the first warm light of the new season.
How to Replant Dahlias After Winter
Replanting dahlias after winter is the most rewarding stage of the entire process. The first step is to bring the stored tubers back to life gradually. Remove them from storage a few weeks before the last expected frost. Inspect each tuber carefully and discard any that look soft or shriveled. Healthy tubers feel firm and slightly heavy. Place them in a warm, bright area for several days. This gentle warmth helps them wake from dormancy. If they appear dry, mist them lightly with clean water. The goal is to rehydrate the tubers slowly without soaking them.
Once the soil warms to about 60°F (15°C), prepare your planting area. Choose a sunny location with well-draining soil. Dig holes about six inches deep and space them at least twelve inches apart. Place each tuber horizontally with the eye facing upward. Cover lightly with soil and water just enough to settle it. Overwatering early slows sprouting and invites rot. Add compost or aged manure to improve soil fertility. After planting, keep the area moist but never soggy. The first shoots appear within two to four weeks.
Monitor your dahlias closely during the first month after replanting. Protect young shoots from late frost using cloth or mulch if needed. Gradually increase watering as growth strengthens. Pinch the first set of buds for bushier plants. Fertilize with a balanced mix once shoots reach six inches tall. Healthy tubers quickly establish strong roots and produce vibrant blooms by midsummer. Replanting correctly ensures your dahlias reward you with color, fragrance, and long-lasting beauty all season long.
Caring for Dahlias After Planting
Caring for dahlias properly after planting helps them grow fast and bloom beautifully. The first few weeks are the most important. Dahlias love sunlight and need at least six hours of direct sun daily. Keep the soil moist but never waterlogged. Overwatering suffocates roots and causes rot. Use your fingers to test the top layer of soil. If it feels dry, water deeply until the soil feels evenly moist. Mulch around the base with straw or shredded bark to retain moisture and reduce weeds. Good airflow also helps prevent fungal problems during early growth.
Once the plants reach about one foot tall, start regular feeding. Dahlias are heavy feeders and need nutrition to build strong stems and large flowers. Apply a balanced fertilizer every three to four weeks. Avoid products high in nitrogen, as they encourage leaves but delay blooms. Instead, choose one rich in phosphorus and potassium. Pinch the tips of young shoots to promote branching. This step creates fuller plants with more blooms later in the season. Remove weak side shoots to direct energy to healthy stems.
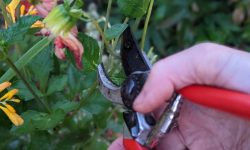
Monitor for pests like aphids, slugs, and earwigs throughout summer. Inspect leaves regularly and treat infestations early using organic methods. Support taller varieties with stakes or cages before they start flowering. Tie the stems loosely with soft string to prevent snapping in strong winds. Deadhead spent blooms often to encourage new buds. Regular care ensures strong, disease-free plants that reward you with months of continuous, vibrant flowering. Healthy dahlias always thank their gardener with color and grace.
Common Mistakes to Avoid When Overwintering Dahlias
Storing Tubers Before They Are Fully Dry
One of the most common overwintering mistakes is rushing the drying process. Many gardeners dig up the tubers, clean them, and store them immediately. Moisture trapped inside quickly turns into mold during storage. Always let the tubers dry for at least several days in a well-ventilated, shaded area. The outer skin should feel dry and firm before storage. This step prevents rot and allows the tubers to develop a natural barrier that protects them from decay during winter. Patience at this stage makes a huge difference.
Another mistake is drying them in sunlight or using heat sources like heaters. High temperatures damage the delicate tissues inside the tubers. Drying too quickly removes necessary moisture, making the tubers brittle and weak. Use natural airflow and cool temperatures instead. The goal is steady drying, not speed. Gentle drying preserves vitality, ensures healthy regrowth, and prevents unnecessary losses. Once the tubers feel dry to the touch, they are ready for long-term storage.
Storing in the Wrong Temperature or Humidity
Temperature and humidity play the most crucial roles in overwintering success. Storing dahlias in a space that is too warm triggers early sprouting. Excess heat confuses the plant, causing it to waste energy during dormancy. On the other hand, freezing conditions destroy the tubers completely. The ideal storage temperature stays between 40°F and 50°F. At this range, the tubers rest quietly until spring arrives. Stable humidity between 70 and 80 percent prevents shriveling or mold.
Avoid storing dahlias in areas that fluctuate often, such as uninsulated garages or near heaters. Sudden temperature changes stress the tubers and shorten their lifespan. If the air feels too dry, add a shallow tray of water nearby to balance humidity. If it feels damp, improve ventilation immediately. A thermometer and hygrometer help monitor the environment precisely. Correct climate control is the foundation of successful overwintering. Healthy tubers sleep soundly and awaken strong for a new season.
Forgetting to Check Tubers During Winter
Many gardeners make the mistake of storing dahlias and forgetting about them until spring. Even under ideal conditions, tubers can still rot or dry out over time. Check your stored dahlias every three to four weeks. Open the containers and inspect each tuber for softness, mold, or excessive dryness. Remove any damaged ones immediately to prevent spread. Quick action saves most of your collection from loss. These small inspections take only minutes but preserve months of work.
If tubers look shriveled, lightly mist the storage medium with clean water. If mold appears, increase airflow and lower humidity slightly. Never reseal the containers right away—let them air out for a few hours first. Regular monitoring helps maintain perfect balance inside storage boxes. This habit ensures that when spring returns, every tuber is healthy and ready to grow. Consistent winter care transforms overwintering from risky to reliable every single year.
FAQs About Overwintering Dahlias
When should I dig up my dahlias before frost?
Dig up your dahlias right after the first light frost blackens the leaves. Waiting too long risks frozen tubers. Work gently around each plant to avoid cutting roots. Early action ensures healthy tubers that survive winter and regrow beautifully next spring with strong blooms.
Can I leave dahlias in the ground all winter?
Yes, but only in mild climates where the soil never freezes. Cover the area with at least six inches of mulch for insulation. Check occasionally for moisture and remove excess water. In colder regions, digging and indoor storage remain the safest overwintering method for dahlias.
Why are my dahlia tubers rotting during storage?
Rot often happens when the tubers are stored too wet or too warm. Always dry them thoroughly before storage. Maintain temperatures between 40°F and 50°F with good ventilation. Remove soft tubers quickly to prevent spread. Correct moisture control ensures strong, healthy tubers through winter.
How do I wake up stored dahlia tubers in spring?
Bring the tubers to room temperature two weeks before planting. Place them in a bright but indirect light area. Mist lightly if they appear dry. Once eyes begin to sprout, plant them in warm, well-draining soil. Gradual warming prevents shock and encourages healthy early growth.
What is the best storage material for dahlia tubers?
Peat moss, wood shavings, and vermiculite all work well for overwintering. These materials keep humidity balanced and protect against rot. Avoid plastic containers since they trap moisture. Use breathable boxes or paper bags for the best results. Consistent temperature keeps dahlias safe and healthy.
Conclusion
Overwintering dahlias is the key to keeping their beauty alive for many seasons. With patience, timing, and the right care, every tuber can survive the cold months unharmed. Gentle handling, proper drying, and careful storage protect them from frost damage. When spring arrives, each healthy tuber rewards you with vibrant growth and dazzling blooms. Dahlias teach the gardener patience, rhythm, and renewal. Once you master overwintering, you gain not only thriving flowers but also a deeper connection with the cycle of life that every garden holds.