Amaryllis bulbs are a popular choice among flower enthusiasts for their striking trumpet-shaped blooms and ease of care. Whether you plan to grow them indoors during the winter months or outdoors in your garden, understanding how to properly plant and nurture these bulbs is essential for achieving vibrant, long-lasting flowers. Known for their bold red, white, pink, and striped varieties, amaryllis bulbs are especially loved for their ability to bloom when most other plants are dormant.
In this guide, you will learn everything you need to know about planting amaryllis bulbs successfully, both indoors and outdoors. We’ll walk you through timing, soil preparation, planting techniques, care routines, and troubleshooting to ensure you enjoy the most stunning blooms possible.
Understanding the Basics of Amaryllis Bulbs
How Amaryllis Bulbs Grow and Bloom
Each amaryllis bulb contains a complete package of growth potential: a compressed stem, flower buds, and embryonic leaves. Once planted and watered, the bulb begins to send up shoots, usually producing flower stalks before leaves emerge. Depending on the variety and environment, blooming can occur within 6 to 10 weeks. After flowering, foliage helps the bulb recharge by photosynthesizing and storing energy for the next blooming cycle. This cycle is why it’s important not to remove green leaves prematurely.
The Role of Dormancy in Amaryllis Health
Amaryllis bulbs go through a natural period of dormancy, especially when grown indoors. This rest phase is essential for encouraging repeat blooms. During dormancy, the bulb stops growing and should be kept in a cool, dark location for 8 to 12 weeks without watering. Afterward, a return to warmth and moisture awakens the bulb for another round of growth and flowering. Understanding this cycle is key to maintaining healthy, long-living amaryllis bulbs year after year.
Different Types of Amaryllis Blooms
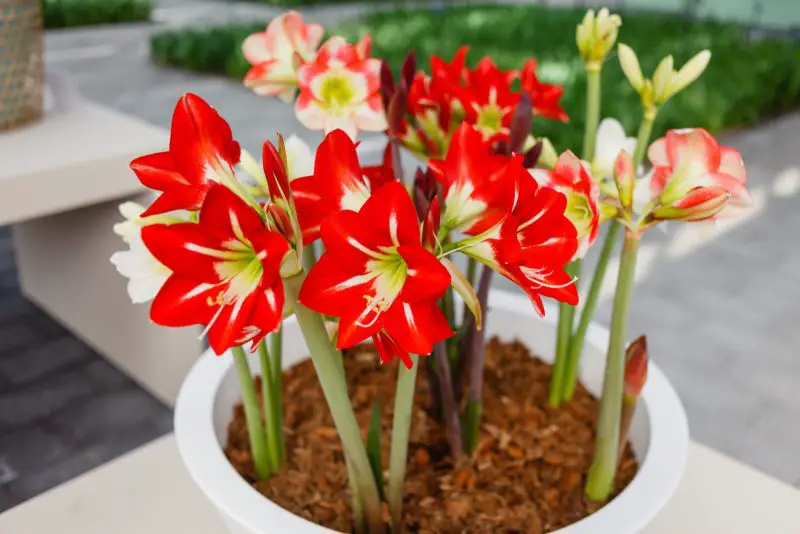
While the traditional red amaryllis is most popular during the holiday season, there are dozens of varieties available in colors such as white, pink, orange, salmon, and even striped or double-flowered forms. Choosing a mix of varieties can extend the blooming season and create visual interest. Some cultivars bloom earlier than others, so combining early and late bloomers allows for weeks of continuous display.
Preparing for Planting
Selecting the Right Container for Indoor Growing
When growing amaryllis indoors, selecting the right container is essential for strong root development and healthy blooms. Choose a pot that is approximately one to two inches wider than the bulb’s diameter. This ensures a snug fit, which amaryllis bulbs prefer, but still leaves enough room for roots to spread. Depth is just as important as width—the pot should be deep enough to allow several inches of root growth beneath the bulb. Ensure the container has at least one drainage hole to avoid stagnant water, which can quickly lead to bulb rot. Terracotta pots are a great choice because they allow for better airflow and moisture regulation. Before planting, sterilize the pot if it has been used before, to reduce the risk of fungal issues or pests.
Choosing the Best Spot Outdoors
To successfully grow amaryllis outdoors, location matters. Select a site that receives at least six hours of direct sunlight each day, especially in the morning. In hotter regions, providing some light afternoon shade can help prevent leaf scorching. The soil in your chosen spot should drain well—standing water or slow-draining areas can suffocate the bulb and promote fungal diseases. Elevating beds or planting on slight slopes can improve drainage. Additionally, choose a spot that offers some protection from strong winds, which can topple the tall flower stalks. If you’re in a region with frost, consider planting amaryllis in containers you can move indoors, or plant them as annuals in colder climates.
Preparing the Soil for Optimal Growth
Amaryllis thrives in soil that is both loose and fertile, offering ideal conditions for root expansion and nutrient uptake. For containers, select a lightweight, well-draining potting mix that includes ingredients such as peat moss, coconut coir, perlite, or coarse sand. Avoid heavy garden soil that may compact and hold too much moisture. If planting directly in the ground, test your soil’s texture and amend it accordingly. Clay-heavy soil should be loosened with compost, sand, or aged bark, while sandy soils benefit from additional organic matter to retain moisture and nutrients. Maintain a soil pH between 6.0 and 7.0, which is ideal for nutrient absorption. Refrain from adding chemical fertilizers at the time of planting; instead, mix in a slow-release organic fertilizer or compost for a gentler nutrient boost that supports root establishment.
How to Plant Amaryllis Bulbs Indoors
Positioning the Bulb Correctly
For successful indoor planting, use a pot that is about 1 to 2 inches wider than the bulb and has good drainage holes. Choose a high-quality, well-draining potting mix—ideally one containing peat, perlite, or composted bark. Place a layer of soil at the bottom before setting the bulb on top, then add more soil around the sides until only the top third of the bulb is visible. This planting depth encourages healthy root development while reducing the risk of rot. If planting multiple bulbs in one pot, leave about 2 inches of space between each to ensure adequate airflow and room for growth.
Watering After Planting
Once the bulb is planted, give it a deep watering until moisture drains from the bottom of the pot. This helps eliminate air pockets around the roots. Then, stop watering and wait until the top inch of the soil feels dry before watering again. Amaryllis bulbs are especially vulnerable to rot during this initial dormant-to-growth transition. As the green shoots emerge and leaves begin to develop, switch to a consistent watering schedule—usually once a week—adjusting as needed depending on your indoor environment. Avoid letting the pot sit in standing water, and always empty saucers after watering.
Providing the Right Temperature and Light
Temperature is a key trigger for amaryllis bulbs to break dormancy. Keep the pot in a warm spot with steady temperatures between 70–75°F (21–24°C). Avoid drafty windowsills or areas near heating vents that can cause sudden temperature changes. Once shoots are about 2–4 inches tall, relocate the pot to a spot with bright but indirect light, such as an east- or south-facing window. Rotate the pot every few days to prevent the stem from leaning toward the light. If natural light is insufficient—especially in winter—consider using a grow light to supplement brightness and encourage robust flowering.
How to Plant Amaryllis Bulbs Outdoors
Timing Your Outdoor Planting
Wait until all danger of frost has passed and the soil temperature is consistently above 60°F. In many regions, this means planting in late spring. In warmer climates, amaryllis bulbs can be planted directly in the garden year-round and may even naturalize over time. For gardeners in USDA zones 8 to 11, this is especially ideal, as the bulbs will remain dormant in winter and reemerge without lifting. In cooler zones, plant after the final frost and treat them as annuals or dig them up before winter. Timing is critical because cold-damaged bulbs may fail to bloom or rot underground.
Planting Depth and Spacing
Dig a hole deep enough so that one-third of the bulb remains above the soil surface. This helps prevent rotting and encourages strong root development. The pointed end should face up, and the basal plate (flat end) should rest securely on the soil base. Space bulbs about 12 to 15 inches apart to give them room to spread and prevent overcrowding. Crowding can restrict air circulation and increase the risk of disease. After placing the bulb, backfill with soil and press gently to eliminate air pockets. Firm but not compacted soil will support healthy growth and good drainage.
Watering and Mulching
Water well after planting, then monitor moisture regularly. The soil should stay evenly moist, especially during the growing season. Avoid waterlogged conditions, as they can lead to bulb rot. As the plant establishes, water only when the top inch of soil feels dry. Apply a light mulch layer around the base of the plants to help retain moisture and suppress weeds, but keep mulch away from the exposed part of the bulb. Organic mulches like shredded bark, compost, or leaf mold are excellent choices. Mulching also helps regulate soil temperature, protecting the bulb from sudden weather changes and promoting consistent growth.
Early Care and Encouraging Blooming
How Long It Takes to Bloom
Indoors, amaryllis bulbs generally take about six to eight weeks to bloom after planting, depending on factors like temperature, light, and bulb size. Warmer indoor temperatures (around 70–75°F or 21–24°C) typically encourage faster growth, while cooler conditions may slightly delay blooming. If you’re planning to time blooms for a specific occasion—such as Christmas or Valentine’s Day—count backward from your desired bloom date and plant accordingly.
For outdoor planting, the timeline shifts based on your USDA hardiness zone. In warmer climates (zones 9–11), amaryllis bulbs planted in fall may bloom by late spring. In cooler regions where bulbs are planted in spring after the danger of frost has passed, expect blooms by early to midsummer. Bulbs may take a bit longer to settle and bloom their first year outdoors, especially if they’re newly purchased or recently divided. Once established, they often follow a predictable annual bloom cycle.
Environmental conditions like inconsistent watering, poor soil drainage, or insufficient sunlight can delay blooming or reduce flower quality. Always monitor your plant’s progress and adjust care as needed to help the bulb reach its full potential.
Fertilizing for Better Blooms
Proper fertilization is essential to encourage strong stems, rich foliage, and vibrant flowers. Start feeding once the flower stalk begins to emerge from the bulb, as this signals the start of active growth. Use a balanced liquid fertilizer—such as a 10-10-10 or 20-20-20 formula—and apply every two to three weeks.
When fertilizing, water the soil first if it’s dry to prevent root burn. Avoid over-fertilization, which can lead to salt build-up and root damage. As the plant transitions from flowering to foliage growth, continue fertilizing to replenish the bulb’s stored energy. This is especially important if you plan to keep the bulb for future seasons.
Be cautious with high-nitrogen fertilizers, as they tend to encourage lush leaf development rather than flower production. A fertilizer with slightly higher phosphorus content may be more beneficial during the blooming stage. If you’re growing amaryllis outdoors in the ground, you can also incorporate a slow-release granular fertilizer into the soil at the time of planting, followed by supplemental liquid feeding during the growing season.
Once blooming has finished and the stalk is removed, continue fertilizing monthly while the leaves remain green and active. This helps the bulb recover and prepares it for a strong rebloom next season, whether indoors or out.
Supporting Tall Flower Stalks
Amaryllis plants are known for their dramatic height and striking blooms, but this elegance comes at a cost: tall flower stalks can become top-heavy and prone to tipping or snapping. Most indoor varieties grow between 18 and 24 inches tall, although some can reach up to 30 inches, depending on the cultivar and growing conditions.
To prevent leaning or breakage, it’s helpful to support the stalk early as it elongates. Insert a decorative plant stake or slim bamboo rod into the potting mix near the bulb, and loosely tie the stalk with soft twine or a plant clip. Choose materials that won’t cut into the stem as it grows. Stakes with gentle curves or spiral designs add both support and visual appeal, especially for display in living rooms or on holiday centerpieces.
In outdoor garden settings, wind and rain can also increase the risk of damage. Plant amaryllis in a sheltered spot, or use surrounding plants as natural support. For extra stability, consider growing the bulbs in clusters rather than isolating a single tall flower stalk.
Keep the pot or garden bed on a level surface to prevent tipping, especially as multiple blooms open and add weight. If you’re growing amaryllis in a container indoors, use a heavy-bottomed or ceramic pot that won’t easily fall over. Regularly rotate the pot so that the flower stalk grows evenly toward the light, reducing the chance of lopsided growth.
Post-Bloom Care and Long-Term Success
What to Do After Flowers Fade
After the last flower wilts, use sterilized scissors or pruning shears to cut the flower stalk down to about an inch above the bulb. This helps redirect energy to the bulb rather than seed production. Do not remove the leaves—they are vital for photosynthesis and energy storage. Continue to water moderately when the top inch of soil feels dry and apply a balanced liquid fertilizer every two to three weeks. Keep the plant in a sunny indoor location or protected outdoor space to encourage leaf growth and bulb development for the next season.
Transitioning Outdoor Plants Through the Seasons
If you grow amaryllis outdoors in mild zones (8–11), the bulbs can remain in the soil year-round with minimal winter protection. Apply a layer of mulch to insulate them during cooler months and ensure good drainage to prevent rot. In colder regions, dig up bulbs in early fall after the leaves yellow and die back naturally. Gently clean off excess soil, trim foliage to about two inches, and let the bulbs dry for several days. Store them in a cool (50–60°F), dark, well-ventilated area like a basement or garage for a dormancy period of 8 to 10 weeks before replanting in late winter or early spring.
Dividing and Repotting Over Time
As amaryllis bulbs mature, they often produce baby bulbs—called offsets—attached to the parent. Every few years, especially when the plant seems overcrowded or blooms are fewer, it’s a good idea to divide and repot. To divide, gently lift the bulb clump, separate the offsets once they are about one-third the size of the mother bulb, and plant them in their own pots. Repot the main bulb into fresh potting mix, keeping one-third of the bulb exposed above the soil. This revitalizes the plant, improves drainage, and gives new offsets room to grow into flowering bulbs within two to three years.
Troubleshooting Common Amaryllis Problems
Why Isn’t My Amaryllis Blooming?
If your amaryllis refuses to bloom, several factors could be at play. One of the most common reasons is a lack of adequate sunlight—amaryllis bulbs need bright, indirect light to generate the energy required for flowering. Another common issue is overcrowding. If the bulb is pot-bound or sharing space with other roots, it may not have enough room to develop flower stalks. Poor bulb quality or stress from previous seasons can also impact blooming.
Equally important is the dormant period. Amaryllis requires a rest phase of about 8 to 10 weeks without water or fertilizer to reset and initiate a new bloom cycle. If your bulb has been continuously growing without rest, try simulating dormancy by cutting back water, allowing the leaves to yellow and die, and storing the bulb in a cool, dark place.
Yellowing Leaves and What They Mean
Yellow leaves on amaryllis can mean different things depending on the timing and environmental conditions. If leaves start turning yellow during active growth, this often signals overwatering or poor soil drainage. Amaryllis bulbs are prone to rot if the soil remains soggy for extended periods. Always check that the pot has drainage holes and that you’re using a well-draining mix.
However, yellowing leaves at the end of the growing cycle are typically not a cause for concern. This natural dieback happens as the plant prepares for dormancy. In such cases, allow the leaves to wither completely before trimming them off—this helps the bulb absorb nutrients and store energy for the next blooming season.
Pests and Diseases to Watch For
Amaryllis is generally resistant to most pests and diseases, but problems can still arise. Common pests include mealybugs, aphids, spider mites, and fungus gnats. Mealybugs appear as white cottony clusters, often at the base of leaves or on flower stalks, while aphids and spider mites may cause leaf curling or a sticky residue known as honeydew. Use neem oil or insecticidal soap to control light infestations, and isolate affected plants to prevent spreading.
In terms of diseases, red blotch (also called “leaf scorch”) is one of the more serious fungal issues that affects amaryllis. It causes reddish streaks on leaves and flower stalks and may lead to bulb deterioration. Avoid overhead watering and always sterilize tools before pruning. If infection occurs, remove damaged tissue and consider applying a fungicide labeled safe for bulbs.
Creative Display Ideas for Amaryllis Blooms
Growing Amaryllis in Glass Vases
You can grow amaryllis bulbs in water-filled glass containers by suspending the bulb just above the water line. This hydroponic method allows for a unique decorative effect and makes it easy to monitor root development. Change the water regularly and add pebbles or marbles for stability. For best results, choose a tall, narrow vase that supports the stem as it grows. Place the vase in bright, indirect light and rotate it occasionally to encourage straight growth. This setup not only makes a stylish accent on tables or mantels but also eliminates the need for soil, making cleanup simple.
Creating a Festive Indoor Centerpiece
Combine amaryllis with evergreens, pinecones, and candles for a stunning winter centerpiece. Choose pots that complement your holiday decor and stagger planting times to ensure continuous blooming through the season. Add fresh moss or decorative stones on top of the soil for a polished look. You can also tie ribbons around the pots or insert glittery picks among the blooms for added holiday charm. This type of centerpiece works beautifully for Christmas dinners or New Year gatherings, offering both elegance and fragrance.
Incorporating Amaryllis Into the Garden Landscape
Amaryllis makes a beautiful focal point in mixed flower beds. Pair them with low-growing ground covers or seasonal annuals to highlight their tall, elegant blooms. Consider planting in clusters for a more dramatic impact in garden borders. Choose a sunny to lightly shaded spot with well-draining soil for best results. Amaryllis can also be used to line pathways or garden edges for a formal look. In warmer climates, they naturalize well and can be grouped beneath trees or shrubs, where their vibrant flowers pop against green backdrops. Their striking colors and towering stems draw attention and add vertical interest to any landscape.
FAQs About Planting Amaryllis Bulbs
How can I grow amaryllis bulbs in glass vases without soil?
You can grow amaryllis in clear glass vases using the water-growing (hydroponic) method. Place the bulb on top of decorative stones or pebbles, with the base just above the water line—never submerged. This allows roots to reach for water while keeping the bulb dry to prevent rot. Change the water every few days and place the vase in a bright, warm spot to encourage growth and blooming.
What are the best decorative elements to pair with amaryllis in a holiday centerpiece?
Amaryllis pairs beautifully with seasonal elements like evergreen branches, holly, red berries, cinnamon sticks, pinecones, and candles. Use a decorative pot or container in gold, silver, or red tones to match festive themes. You can also add fairy lights or ornaments to enhance the arrangement, making it the perfect table or mantelpiece centerpiece during the winter holidays.
How can I make sure my amaryllis blooms continuously through the season?
To stagger bloom times, plant bulbs at 2-week intervals. Start some bulbs in mid-fall and others later into winter. Use warm indoor temperatures (around 70°F or 21°C) and bright, indirect light to stimulate growth. Choose different varieties with varying bloom schedules to enjoy flowers from November through March.
Can I plant indoor-forced amaryllis outdoors after they bloom?
Yes, you can plant your amaryllis outdoors after the blooms fade, especially if you live in USDA zones 8–11. Allow the foliage to grow until late spring, then transplant the bulb into well-draining soil in a sunny spot. This gives the bulb time to regenerate energy for the next flowering cycle. In colder zones, wait until after the last frost and treat it as a summer bulb.
What plants pair well with amaryllis in garden borders?
In garden settings, amaryllis works well with lower-growing plants that won’t overshadow its tall stems and large flowers. Ideal companions include creeping Jenny, sweet alyssum, petunias, and dwarf snapdragons. Choose plants with complementary colors or foliage textures to make the amaryllis stand out as a vertical accent in your garden design.
Conclusion: Enjoying Amaryllis Year After Year
Planting amaryllis bulbs, whether indoors for holiday charm or outdoors for a garden display, is a gratifying and accessible way to enjoy dramatic floral beauty. With proper timing, good soil, and attentive care, you’ll be rewarded with bold, colorful flowers that brighten any setting. By understanding their growth cycle and needs, you can ensure your amaryllis bulbs rebloom year after year, providing lasting enjoyment and a striking display every season.