Love-in-a-Mist, also known by its botanical name Nigella damascena, is a charming, old-fashioned annual flower that brings a touch of whimsy to any garden. With its delicate, feathery foliage and uniquely structured blooms in shades of blue, white, pink, and purple, this flower thrives in cool weather and self-seeds effortlessly for years of enjoyment.
Native to southern Europe and North Africa, Love-in-a-Mist has long been cherished for cottage gardens, cutting gardens, and naturalistic planting schemes. Its papery seed pods add further interest after flowering, making it a popular choice among flower arrangers and seed collectors alike.
Discovering the Charm of Love-in-a-Mist
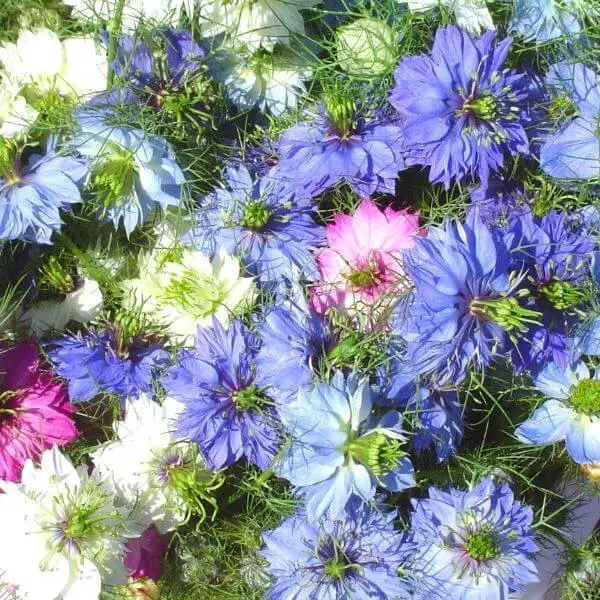
Love-in-a-Mist (Nigella damascena) is more than just a flower—it’s a poetic presence in any garden. With its finely dissected, airy foliage and delicate blossoms in shades of soft blue, white, lavender, and rose, this plant brings a dreamy, almost ethereal quality to flowerbeds and borders. The blooms seem to float among wisps of greenery, creating the illusion of mist—hence the name.
Beyond its visual beauty, Love-in-a-Mist holds historical and cultural charm. It’s been cultivated for centuries in European cottage gardens, where it symbolized delicacy and sweet entanglement. Gardeners love it not only for its romantic aesthetic but also for how effortlessly it grows from seed and fills gaps with color and texture.
What makes this flower truly magical is its ability to evolve through the seasons. After its blooms fade, Love-in-a-Mist produces ornate seed pods—pale green, balloon-like structures veined with burgundy or bronze—that add architectural interest to the garden and are highly prized in dried flower arrangements. With little maintenance and high ornamental value, this plant offers beauty from early bloom to late harvest, making it a must-have for any gardener seeking a soft, whimsical touch year-round.
Choosing the Ideal Location for Long-Lasting Blooms
To help your Love-in-a-Mist thrive and produce abundant, long-lasting blooms, selecting the right location is essential. This plant flourishes in spots that receive full sun for at least six hours a day. Adequate sunlight not only encourages vigorous growth but also promotes more prolific flowering throughout the season.
Although Love-in-a-Mist can tolerate partial shade, too much shade often leads to fewer blooms and leggy, weak stems. When choosing a site, prioritize open spaces with good air circulation to reduce the risk of mildew and other moisture-related issues that may occur in humid climates.
Well-drained soil is another critical factor. Love-in-a-Mist dislikes soggy or compacted soil, which can lead to root rot. If your garden tends to retain water, consider planting on raised beds or adding sand or compost to improve drainage. A location with light, fertile, and slightly alkaline to neutral soil (pH 6.5–7.5) is ideal for optimal root development and flowering.
Since this flower self-sows easily, choose a spot where it can naturalize year after year without disrupting the rest of your garden. Edges of flower beds, sunny cottage garden corners, and areas around vegetables or taller perennials all make excellent homes for this charming bloom. Proper placement from the beginning ensures that Love-in-a-Mist becomes a reliable, low-maintenance source of beauty season after season.
Preparing the Soil Before Planting
Start by thoroughly clearing the planting area of weeds, rocks, and plant debris to reduce competition and give Love-in-a-Mist seeds a clean environment to sprout. Remove any clumps of compacted soil, as these can hinder seed-to-soil contact and lead to patchy germination. Break up the top 6 to 8 inches of soil using a garden fork or spade to loosen it and promote better root development.
Next, incorporate rich organic matter such as well-aged compost or rotted manure into the loosened soil. This step improves both structure and moisture retention—two key elements in supporting early root growth. If your soil is heavy clay or poorly draining, consider blending in coarse sand, leaf mold, or even perlite. These additions will boost aeration and help prevent standing water, which can rot young seedlings.
Once amended, use a rake to smooth and level the soil surface. A fine, even texture makes it easier for seeds to settle and improves germination uniformity. About 24 hours before sowing, lightly water the area so the soil is moist but not soggy. This pre-watering technique ensures better seed-to-soil adhesion and creates an ideal micro-environment for seeds to take hold quickly after planting.
By preparing the soil with care, you set the stage for a healthy Love-in-a-Mist display that thrives from the very first sprout.
The Best Time to Plant for Extended Flowering
Timing your planting correctly is crucial if you want Love-in-a-Mist to bloom beautifully and continuously throughout the growing season. This cool-season annual thrives when sown directly into the garden in early spring, just after the last frost date has passed. The seeds germinate best in cool temperatures between 55°F and 65°F (13°C to 18°C), making early spring ideal for getting them started.
In regions with mild winters, you can also sow Love-in-a-Mist in the fall. Fall planting gives seeds a chance to establish and overwinter in the soil, which leads to earlier blooming the following spring. This technique is especially effective in USDA zones 8 and above, where winters are not harsh enough to damage dormant seeds.
For extended flowering, consider succession sowing. By planting seeds every 2 to 3 weeks from early spring into early summer, you can stagger bloom times and maintain color in your garden for months. Each sowing produces a fresh wave of blossoms, allowing you to enjoy the ethereal beauty of Love-in-a-Mist from late spring into mid-summer or even early fall.
Adjust your planting schedule based on your local climate and frost dates. Using a planting calendar or soil temperature guide can help you determine the optimal timing to ensure lush, prolonged flowering.
How to Sow Love-in-a-Mist Seeds Effectively
To achieve optimal results, sow Love-in-a-Mist seeds directly into the prepared garden bed, as they dislike transplanting. Scatter the seeds thinly over the soil surface, then gently press them down or lightly rake to ensure good contact—do not bury them deeply, as they need light to germinate.
Keep the soil consistently moist but not waterlogged during the germination period, which typically takes 10 to 14 days. Water with a gentle spray to avoid displacing the seeds. If sowing during a dry spring, use a light mulch to help retain moisture without blocking light.
Once seedlings emerge and reach a few inches tall, thin them to about 6 to 8 inches apart. This spacing ensures airflow and allows each plant enough room to develop strong stems and full blooms. By sowing in full sun and keeping conditions evenly moist, you’ll encourage healthy growth and vibrant, long-lasting flowers.
Thinning and Spacing for Stronger Growth
Once Love-in-a-Mist seedlings have developed their first set of true leaves, it’s essential to thin them to prevent overcrowding. Crowded plants compete for nutrients, light, and moisture, which can result in weak stems and fewer blooms.
Thin the seedlings so that each plant stands about 6 to 8 inches apart. Use small scissors or gently pinch off the weaker ones at soil level to avoid disturbing nearby roots. This spacing not only encourages robust growth but also allows for better air circulation, reducing the risk of fungal diseases like powdery mildew.
If you’ve sown your seeds successively every two to three weeks, repeat the thinning process as each new batch emerges. Consistent spacing helps each plant reach its full potential, producing strong upright stems, delicate foliage, and continuous waves of ethereal blue, white, or pink blooms throughout the growing season.
Watering and Feeding for Vibrant Blooms
Love-in-a-Mist thrives with consistent moisture, especially during germination and early growth stages. After sowing, gently mist the soil to keep it evenly moist without becoming soggy. As the plants mature, water deeply once or twice a week, depending on rainfall and soil drainage. Avoid letting the soil dry out completely during flowering, as this can shorten bloom time and reduce flower quality.
Feeding isn’t always necessary if your soil is already rich in organic matter, but applying a balanced, slow-release fertilizer at the start of the growing season can enhance flower production. For poor or sandy soils, a diluted liquid feed every 3 to 4 weeks during active growth will support vibrant blooms and healthy foliage.
Be mindful not to over-fertilize, as excessive nitrogen can lead to lush foliage at the expense of flowers. Aim for a balanced approach—consistent watering paired with light, well-timed feeding ensures your Love-in-a-Mist puts on a spectacular display all season long.
Protecting the Plants from Harsh Conditions
Love-in-a-Mist is relatively hardy, but protecting it from extreme weather will help maintain vibrant blooms and overall plant health. In regions with intense summer heat, provide light afternoon shade or plant near taller companions to shield delicate foliage and flowers from scorching sun. Overexposure to high temperatures can cause blooms to fade quickly and foliage to wilt.
During windy periods, support the plants with low stakes or plant them in clusters where they can support one another naturally. The fine, thread-like foliage is prone to damage in strong gusts, especially when the plants are tall and blooming heavily.
For areas with unexpected cold snaps in early spring or late fall, use floating row covers to protect young seedlings or late-blooming plants. Applying a thin mulch layer around the base also helps regulate soil temperature and prevent stress from rapid temperature swings.
Consistent monitoring and proactive protection ensure that your Love-in-a-Mist remains resilient, producing a reliable and long-lasting floral show even under fluctuating conditions.
Harvesting Flowers and Seed Pods
Love-in-a-Mist offers dual beauty—not only through its delicate blooms but also with its unique seed pods that are perfect for both fresh and dried arrangements. To harvest flowers at their peak, cut stems early in the morning when blooms are fully open but not yet starting to fade. Use clean, sharp scissors and place stems immediately in cool water to preserve freshness. These blooms can last several days in a vase if kept away from direct sunlight and heat.
For seed pods, allow the flowers to naturally fade on the plant. Once pollinated, they’ll form balloon-like green seed capsules that eventually dry to a papery texture and turn brown. Harvest them just before they begin to split open—typically four to six weeks after flowering. Cut the pods with a few inches of stem and hang them upside down in a dry, well-ventilated place to cure.
Once fully dry, you can gently crush the pods to collect seeds for next season or use the pods whole in dried floral arrangements. Proper timing in harvesting ensures seed viability and helps extend the enjoyment of Love-in-a-Mist long after the growing season ends.
Promoting Reseeding for Blooms Year After Year
Love-in-a-Mist (Nigella damascena) is an annual flower, but it readily reseeds itself when given the right conditions, allowing for natural, low-maintenance regrowth each year. To encourage this cycle, let some flowers remain on the plant until they form mature seed pods. Avoid deadheading all the blooms if you want self-sowing to occur naturally.
Once the seed pods dry out and begin to crack open, they release seeds that scatter into the surrounding soil. You can gently shake the pods or break them open and sprinkle seeds over bare patches to control where new plants grow. For best results, reseeding works most effectively when the soil is left undisturbed through fall and winter, giving seeds a chance to settle and go through natural stratification.
In colder regions, lightly mulching the area with straw or leaf litter helps protect the seeds while still allowing for germination in early spring. In warmer climates, ensure that the soil stays slightly moist in late winter to support sprouting. With minimal effort, this self-seeding habit can create a charming, ever-changing display of blooms season after season.
Troubleshooting Common Issues
Love-in-a-Mist is generally low-maintenance, but several issues may arise if growing conditions are less than ideal. Recognizing and addressing these early can help ensure healthy plants and abundant blooms.
Seeds Not Germinating
A common cause is planting seeds too deeply or letting the soil dry out. Love-in-a-Mist seeds require light to germinate, so they should be sown on the surface or lightly pressed into the soil without covering. Keep the soil consistently moist—but not soggy—especially during the first 7–14 days after sowing.
Weak, Spindly Seedlings
This usually happens when seedlings are overcrowded or not receiving enough sunlight. Thin seedlings as they grow to allow enough space between plants. Make sure to sow in a location that receives full sun so the plants grow sturdy stems and build natural resistance to stress.
Few or No Blooms
Excess nitrogen in the soil may lead to lush foliage but poor flowering. Avoid over-fertilizing, especially with high-nitrogen formulas. Love-in-a-Mist thrives in moderately fertile soil, which encourages more flower production over leafy growth.
Yellowing or Crispy Leaf Edges
Uneven watering or poor drainage often causes leaf tips to dry out or yellow. Ensure that the soil drains well and that watering is consistent. Avoid letting the soil dry out completely or remain waterlogged for too long. Applying a thin layer of organic mulch can help maintain balanced soil moisture.
Fungal Diseases or Root Rot
Fusarium wilt and root rot can develop in overly damp or crowded conditions. Improve air circulation by spacing plants properly and avoid watering directly at the base. Practice crop rotation and avoid growing Love-in-a-Mist in the same spot each year to reduce soil-borne pathogens.
Frequently Asked Questions About Planning Love-in-a-Mist
When should I plant Love-in-a-Mist seeds for the best results?
The ideal time to sow Love-in-a-Mist seeds is in early spring after the last frost or in fall in mild winter regions. Spring sowing provides summer blooms, while fall sowing allows the plants to establish and flower earlier the following year.
How long does it take Love-in-a-Mist to bloom after planting?
Typically, Love-in-a-Mist blooms 10 to 12 weeks after sowing. Once established, it produces delicate blue, white, or pink flowers continuously for several weeks, especially if deadheaded regularly.
Does Love-in-a-Mist reseed on its own?
Yes, this plant is an excellent self-seeder. If you leave some seed pods to mature and scatter naturally, Love-in-a-Mist will often return the following year without replanting, especially in well-drained soil and sunny spots.
Can I grow Love-in-a-Mist in containers?
Absolutely. Choose a container at least 8–10 inches deep with good drainage. Use a light, loamy potting mix and place the container in a sunny location. Water consistently, and be mindful that container soil dries out faster than garden beds.
Do I need to fertilize Love-in-a-Mist regularly?
Not necessarily. Love-in-a-Mist thrives in average soil without frequent feeding. If your soil is poor, incorporate compost before planting. Over-fertilizing can lead to more foliage and fewer flowers, so stick to light organic feeding if needed.
Final Tips for a Season-Long Display
Deadheading spent blooms can prolong the flowering period and keep the plants looking tidy. While not strictly necessary, this practice may delay seed pod formation and encourage additional blooms.
For continuous seasonal impact, plant Love-in-a-Mist alongside other cool-season flowers like calendula, sweet peas, or poppies. Their contrasting textures and colors complement Nigella’s airy form and extend garden interest from early spring through midsummer.