Introduction
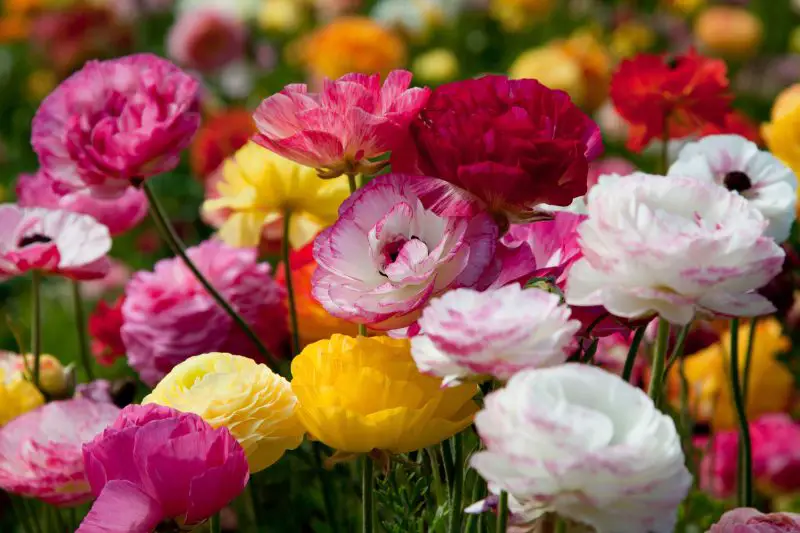
Imagine stepping into your garden in early spring and being greeted by a burst of lush, layered blooms in shades of soft pink, golden yellow, fiery orange, and deep crimson. Ranunculus flowers, with their delicate petals and painterly appearance, are among the most breathtaking sights of the season. But the true beauty lies in how easy it can be to bring these florals to life from just a small, knobby bulb.
In this guide, you’ll discover not just how to plant ranunculus bulbs, but how to do it confidently and successfully. Whether you’re a beginner hoping to add color to your space or a seasoned gardener looking to master this bloom, we’ll walk through everything from bulb preparation to aftercare. Get ready to transform your garden into a living canvas of springtime brilliance.
Understanding Ranunculus and Their Growth Cycle
What Makes Ranunculus Special
Ranunculus are cool-season perennials often grown as annuals in most climates. Native to the Mediterranean and parts of Asia, they thrive in mild temperatures and dislike extreme heat or humidity. Each plant produces multiple blooms on strong, upright stems, making them a favorite for cutting gardens and bouquets.
The Bulb Isn’t Really a Bulb
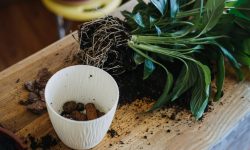
Ranunculus bulbs are technically called corms. They resemble small, brown octopuses with claw-like fingers. Once planted, these corms swell with moisture, then sprout roots and shoots that transform into showy spring flowers.
Choosing the Right Time and Location
When to Plant Ranunculus
Timing is everything. In warmer USDA zones 8–10, you can plant corms in the fall so they’ll bloom in late winter or early spring. In colder zones, plant them in late winter or very early spring, once the risk of hard frost has passed. For best results, pre-sprout your corms indoors if your growing season is short.
Where to Plant for Best Results
Ranunculus love full sun—at least six hours of direct sunlight per day. Choose a spot in your garden that offers excellent drainage. Raised beds, borders, or large containers with drainage holes are ideal. Avoid heavy clay soils, which can retain too much water and lead to rotting.
Preparing the Soil
Ideal Soil Conditions
Well-draining soil is non-negotiable for ranunculus. A light, sandy loam enriched with compost or aged manure offers the perfect growing environment. If your soil is heavy, amend it with coarse sand and organic material to improve aeration and drainage.
Checking pH and Nutrient Levels
Ranunculus prefer a slightly acidic to neutral soil pH between 6.0 and 7.0. Conduct a simple soil test to ensure the right conditions. You can also work in a balanced, slow-release fertilizer during bed preparation to give the plants a strong nutritional start.
Pre-Sprouting the Corms
Why Pre-Sprouting Helps
Soaking the corms in water for 3 to 4 hours before planting can jumpstart the growing process. You can also pre-sprout them by placing them in moist potting soil or vermiculite in a dark, cool place for about 10 days until they begin to develop small rootlets.
How to Handle the Corms
Handle the corms gently, avoiding damage to the newly forming roots. Be sure to plant them immediately after pre-sprouting to avoid stress or dehydration.
Planting Your Ranunculus Corms
Depth and Spacing
Plant the corms with their “claws” facing down, about 2 inches deep in the soil. Space them approximately 4 to 6 inches apart. This gives the plants enough room to grow without overcrowding, which helps improve air circulation and reduces disease risk.
Watering After Planting
Water well after planting to help settle the soil around the corms. Keep the soil lightly moist, but not soggy. Overwatering at this stage can cause the corms to rot.
Caring for Your Growing Plants
Managing Temperature and Light
Ranunculus thrive in cool conditions, ideally between 45°F and 65°F. Once they begin growing, they’ll need consistent sunlight to encourage healthy stems and large blooms. If you’re growing them in containers, move them to follow the sun as needed.
Fertilizing for Best Results
Once the plants have sprouted and developed a few inches of green growth, begin fertilizing every two weeks with a low-nitrogen liquid fertilizer. Too much nitrogen can lead to lush foliage but few flowers. Choose a fertilizer formulated for flowering plants for the best results.
Staking and Support
As ranunculus blooms become heavier, their long stems may benefit from light staking to prevent bending or breaking. You can use thin bamboo stakes or flower supports to gently keep them upright.
Managing Common Problems
Pests to Watch For
Aphids, thrips, and spider mites are common pests that may affect ranunculus. Inspect plants regularly, and use insecticidal soap or neem oil as needed. Slugs and snails can also be an issue in damp conditions, so keep mulch thin and dry.
Preventing Disease
Good air circulation and proper watering are key to avoiding fungal diseases like powdery mildew or crown rot. Always water at the base of the plant, and avoid wetting the foliage. If disease does appear, remove affected leaves promptly.
Blooming and Post-Bloom Care
Encouraging More Blooms
Deadheading spent flowers encourages the plant to produce new buds. Be sure to snip just above a set of healthy leaves. This not only improves appearance but also extends the blooming season.
After Flowering
When blooming stops, allow the foliage to die back naturally. This process feeds the corm for next year’s growth. In warm zones, you can leave the corms in the ground. In colder regions, dig them up once the leaves have yellowed and store them in a cool, dry place for replanting next season.
Growing Ranunculus in Containers
Choosing the Right Pot
Ranunculus grow well in containers, especially in areas with poor garden soil or limited space. Use pots at least 6 to 8 inches deep with good drainage. A high-quality potting mix combined with compost will provide nutrients and structure.
Container Care Tips
Keep container-grown ranunculus evenly moist and well-fertilized. Position pots in full sun and rotate them to ensure even growth. After flowering, follow the same post-bloom care instructions as for garden-grown plants.
Tips for Cutting and Arranging Ranunculus
Harvesting for Vase Life
Cut flowers early in the morning when buds are just starting to open. Use sharp, clean shears and place stems in cool water immediately. Ranunculus can last up to 10 days in a vase if cared for properly.
Floral Design Ideas
Their long, strong stems and vivid colors make ranunculus ideal for spring bouquets. Mix them with tulips, anemones, or eucalyptus for stunning arrangements. Their petal texture also adds visual depth to centerpieces and wedding florals.
FAQ About Planting Ranunculus Bulbs
When is the best time to plant ranunculus bulbs?
Ranunculus bulbs should be planted in the fall in mild-winter regions (zones 8–11), allowing them to develop roots and overwinter before blooming in early spring. In colder zones, plant them in late winter or very early spring once the threat of hard frost has passed, or start them indoors and transplant after the last frost.
Do ranunculus bulbs need to be soaked before planting?
Yes, soaking ranunculus bulbs (also called corms) for 3 to 4 hours in room temperature water before planting helps rehydrate them and jumpstarts their growth. Avoid soaking for longer than 6 hours to prevent rot.
How deep and far apart should I plant ranunculus bulbs?
Plant the bulbs about 2 inches deep with the claw-like fingers pointing down. Space them roughly 4 to 6 inches apart to give each plant enough room to grow a healthy root system and full flowers.
Can I grow ranunculus in containers?
Absolutely. Ranunculus do very well in containers with good drainage. Use a high-quality potting mix, keep the soil slightly moist, and place the container in a sunny location. Containers are ideal in colder climates where you can protect plants from extreme cold or heavy rain.
What kind of soil do ranunculus prefer?
Ranunculus thrive in loose, well-draining soil enriched with compost. Avoid heavy clay or poorly draining areas, as the bulbs are susceptible to rot. Adding perlite or coarse sand to garden beds can help improve drainage.
How much sun do ranunculus need?
These flowers love full sun. Aim for at least 6 hours of direct sunlight per day to encourage strong stems and more blooms. In extremely hot regions, a bit of afternoon shade may help prolong flowering.
How long do ranunculus flowers last?
Ranunculus typically bloom for 4 to 6 weeks in spring, depending on the climate and care. In cooler temperatures, blooms may last longer. They also have an excellent vase life, often lasting up to 10 days after being cut.
Can ranunculus bulbs be reused for the next season?
Yes, but with care. In zones with cold winters, dig up the bulbs after the foliage has died back. Allow them to dry, remove excess soil, and store them in a cool, dry place. In warmer climates, they may naturalize and return the following year, though replanting fresh bulbs often gives the best results.
Are ranunculus toxic to pets?
Yes, ranunculus plants are toxic to dogs, cats, and other pets if ingested. Keep bulbs and blooms out of reach of curious animals. Symptoms may include drooling, vomiting, or gastrointestinal distress.
Why aren’t my ranunculus blooming?
A few common reasons include planting too late or too deep, not enough sunlight, poor soil drainage, or overwatering. If started late in the season or exposed to high heat early, they may produce fewer flowers or skip blooming entirely.
Conclusion
Planting ranunculus bulbs is a rewarding way to add luxurious color and texture to your spring garden. With the right timing, soil preparation, and care, even beginner gardeners can enjoy a spectacular show of blooms. These elegant flowers are not only beautiful in the ground but also exceptional in containers and cut flower arrangements. By following these steps and giving your ranunculus a strong start, your garden will be bursting with radiant blossoms come spring.