African violets are beloved houseplants known for their velvety leaves and cheerful blooms that brighten up any indoor space. Propagating these charming plants is not only easy but also incredibly rewarding, allowing you to multiply your collection or share with friends and family.
With the right technique and care, even beginner gardeners can achieve beautiful results. This guide walks you through every essential step to successfully propagate African violets, ensuring lush growth and endless indoor beauty year-round.
Understanding African Violets and Their Growth Habits
African violets, known botanically as Saintpaulia, are compact, low-growing houseplants with velvety foliage and cheerful blooms that come in various shades of purple, pink, blue, and white. Native to the cloud forests of Tanzania, they thrive in consistently warm, humid conditions and bright, indirect light. Understanding their growth habits is essential before attempting propagation, as it helps you identify healthy leaves and know the right stage for cutting.
These plants grow from a central rosette, producing symmetrical leaves that form tight clusters. They don’t develop stems or woody branches, so all new growth emerges from the crown. Instead of producing long trailing vines, African violets expand gradually and vertically from the center, which makes them ideal candidates for propagation through leaf cuttings. New plantlets sprout from the petiole—the small stem that connects the leaf blade to the main plant—once placed in the right conditions.
Because African violets prefer consistency, any stress such as overwatering, underlighting, or abrupt temperature changes can slow their growth or cause problems. When cared for properly, however, they grow continuously year-round indoors and respond well to regular grooming and propagation. This growth habit not only makes them rewarding to propagate but also allows you to maintain or expand your collection easily from just one parent plant.
Why Propagate African Violets?
Propagating African violets offers many benefits beyond simply multiplying your plants. It allows you to grow new violets from a single healthy leaf, saving money while expanding your indoor garden with genetically identical copies of your favorite varieties. This is especially valuable for preserving rare or heirloom cultivars that may not be widely available in stores. Propagation also gives new life to aging or leggy plants by starting fresh, compact rosettes that are more vigorous and bloom more readily.
For many growers, propagation is a deeply satisfying process—watching a new plant slowly emerge and thrive brings a strong sense of reward. It also makes it easy to share your love of African violets with friends and family by gifting beautiful, homegrown specimens. Whether you’re a beginner or a longtime enthusiast, propagating African violets offers a practical, cost-effective, and emotionally rewarding way to enjoy these charming houseplants for years to come.
Best Time to Propagate African Violets
The ideal time to propagate African violets is during the warmer months of spring and summer when temperatures range between 70–80°F (21–27°C). During this period, the plants are actively growing, and the warm conditions support quicker root and shoot development. While propagation can technically be done year-round indoors, growth slows significantly in fall and winter due to lower light levels and cooler temperatures.
If you choose to propagate in the off-season, you can still succeed by providing supplemental grow lights and maintaining a consistent warm, humid environment. However, starting in spring gives your cuttings the strongest chance for fast, healthy establishment with minimal intervention.
Tools and Materials You’ll Need
To successfully propagate African violets, having the right tools and materials on hand will make the process smoother and increase your success rate. The most essential item is a healthy, mature African violet with strong leaves or suckers suitable for propagation. You’ll also need a clean, sharp blade or pair of scissors for taking cuttings—preferably sterilized to prevent disease transfer.
A shallow container or seed tray with drainage holes is ideal for starting leaf cuttings. Use a lightweight, sterile potting mix specifically designed for African violets or a blend of peat moss and perlite to ensure proper aeration and moisture retention. Small pots or seedling cells will be necessary for transplanting once roots develop.
To maintain high humidity and warmth, prepare a clear plastic bag, humidity dome, or a propagation tray with a lid. A spray bottle will help mist the soil and leaves gently without disturbing the cuttings. Optional but helpful tools include rooting hormone to encourage faster root development, plant labels for tracking cuttings, and a heating mat or grow light if you’re propagating in cooler or darker environments.
Having everything ready beforehand ensures you can focus on each step without delays, creating the most favorable conditions for your African violets to root and thrive.
Method 1: Propagating African Violets from Leaf Cuttings
Selecting the Right Leaf
Choosing the right leaf is key to successful African violet propagation. Always pick a healthy, mature leaf from the middle row of the plant—not too old from the bottom and not too young from the center. The leaf should be firm, unblemished, and deep green in color, as this indicates good energy reserves for root and plantlet development. Avoid leaves with spots, tears, or signs of disease. A strong leaf with a clean cut at the petiole (leaf stem) gives your propagation the best possible start.
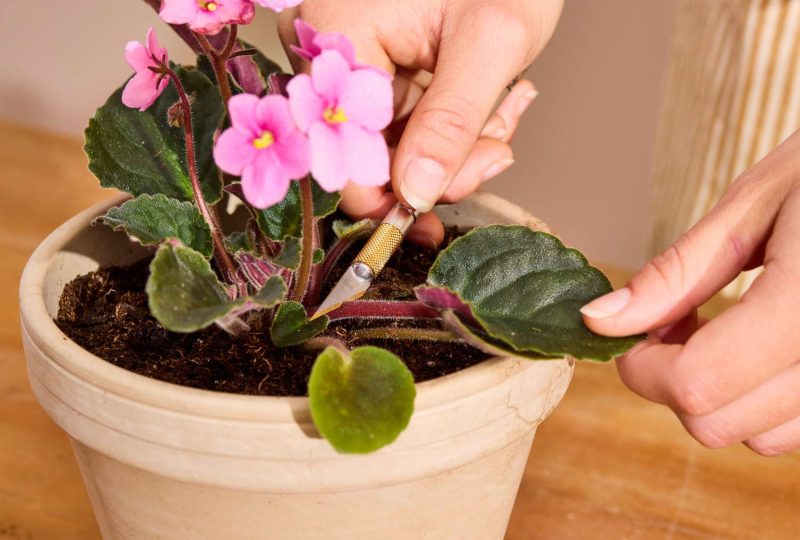
Preparing the Cutting
To prepare the cutting, use a clean, sharp blade or scissors to cut the selected leaf with about 1 to 1.5 inches of its stem (petiole) attached. Make the cut at a 45-degree angle to increase the rooting surface. Trim off any damaged edges, and allow the cutting to sit for about 30 minutes to let the cut end callous slightly—this helps prevent rot when planted. Proper preparation sets the stage for faster rooting and healthier growth.
Planting the Cutting
After the cutting has calloused, insert the stem into moist, well-draining soil or a lightweight propagation mix. Ensure the leaf stands upright and the stem is buried just deep enough to stay stable. Lightly firm the soil around the stem and mist gently to keep it moist. Place the pot in a warm, bright spot with indirect light to encourage root development.
Root Development and Transplanting
Roots typically begin forming within 3 to 6 weeks. During this time, keep the soil lightly moist and avoid direct sunlight. Once small plantlets emerge at the base of the cutting and have at least 2–3 leaves, they are ready for transplanting. Gently separate the new plantlets from the mother leaf and move them into individual pots with well-draining African violet soil. Keep them in a warm, bright area to encourage steady growth.
Method 2: Propagating African Violets from Offsets
Identifying Offsets
Offsets, also referred to as suckers or pups, are miniature growths that emerge at the crown or base of a mature African violet. They often appear when the plant is healthy and actively growing. These small shoots look like mini versions of the parent plant and typically have their own leaves and, sometimes, tiny root systems forming underneath. It’s best to wait until the offset has at least two to three mature leaves before attempting to remove it, as this ensures a stronger, more viable start.
Separating the Offset
To separate an offset, first gently remove the parent plant from its pot and carefully brush away some of the soil around the crown to expose the offset’s base. Using a sterile, sharp knife or your fingers, delicately cut or twist the offset away from the main plant, taking care to include any roots that may have already developed. If the offset has no visible roots, it can still be propagated, but its success will depend on careful aftercare. Try to avoid damaging the main crown or other offsets during the process.
Planting the Offset
After separation, plant the offset into a small pot filled with a lightweight, well-aerated African violet soil mix. Water the soil lightly so it’s evenly moist but not soggy. Place the pot in a warm, bright area with indirect sunlight. To increase humidity and encourage root development, you can loosely cover the plant with a clear plastic dome or bag, ensuring it has ventilation to prevent mold. Within a few weeks, the offset should develop a stronger root system and begin producing new growth. Once established, care for it like a mature African violet, including regular watering, proper lighting, and occasional feeding.
Method 3: Propagating African Violets in Water
Preparing the Leaf Cutting
Begin by selecting a healthy, mature leaf from the middle or lower section of the African violet plant—avoid using old or damaged leaves. Using a sterile, sharp blade or scissors, make a clean cut about 1 to 1.5 inches down the leaf stem (petiole) at a 45-degree angle. This angled cut increases the surface area for root development. Rinse the cutting gently under clean water to remove any residual soil or pests. Then, place the leaf cutting into a small glass or jar of room-temperature, distilled or filtered water. Ensure that only the stem is submerged—never the leaf itself—as contact with water can cause rot.
Monitoring and Rooting
Set the container in a warm, well-lit spot out of direct sunlight, such as on a bright windowsill or under grow lights. To maintain cleanliness and reduce the risk of bacterial growth, change the water every 2 to 3 days. Keep an eye on the stem for signs of root formation, which usually begins within 2 to 3 weeks. Tiny white roots will emerge first, followed by small plantlets forming near the base of the stem. Once the roots reach about an inch long and the plantlets are visible and developing leaves, it’s time to transplant the cutting into a pot filled with African violet soil. Gently plant the rooted cutting, water lightly, and place it in a warm, humid environment to help it adjust. With proper care, the new plant will begin growing steadily within a few weeks.
Caring for New African Violet Plants
Light and Temperature Requirements
New African violet cuttings and plantlets are sensitive and need consistent, gentle care to thrive. Provide them with bright, indirect light—placing them near an east or north-facing window is ideal. If natural light is limited, you can use fluorescent or LED grow lights for 12 to 14 hours a day. Direct sunlight should always be avoided, as it can cause scorching on the tender leaves. For temperature, maintain a stable environment between 65°F and 75°F (18°C to 24°C). Sudden temperature changes or cold drafts can shock the young plants and slow their development. A warm, stable spot encourages strong root growth and helps the plant acclimate more quickly to its new container.
Watering and Humidity
Young African violets require careful watering to prevent stress or rot. Keep the soil lightly moist but never saturated—overwatering is one of the most common causes of failure in young plants. Water from the bottom if possible, allowing the plant to absorb moisture through drainage holes, and discard any excess water after 30 minutes. It’s essential to avoid splashing water onto the crown or leaves, especially the center of the plant, which is prone to rot. To maintain ideal humidity—especially in dry indoor climates—place the pot inside a humidity dome, use a plastic bag tent, or set it on a tray filled with water and pebbles (ensuring the pot itself stays above the water line). This helps replicate the moist conditions African violets prefer during their early growth stages.
Fertilizing
Once your new African violet has formed a healthy root system and is producing new leaves—usually after 4 to 6 weeks—you can begin feeding it. Use a balanced, water-soluble fertilizer specifically formulated for African violets or houseplants, diluted to about one-quarter to one-half of the recommended strength. Apply fertilizer every 2 to 4 weeks to support healthy foliage and future blooming. Avoid fertilizing too early or too heavily, as this can burn young roots or lead to leggy, distorted growth. Gradually increase feeding as the plant matures and begins to develop a fuller shape.
Common Problems During Propagation
Propagating African violets can be rewarding, but even with careful attention, several common issues may arise that hinder success. Understanding these problems and their causes helps you troubleshoot effectively and increase your propagation success rate.
Leaf Rot
One of the most frequent issues is leaf rot, especially when the cutting is buried too deeply or the soil stays too wet. Leaf rot usually starts at the base of the petiole and spreads quickly, turning the tissue mushy and dark. To avoid this, make sure the leaf cutting is inserted at a slight angle and not too deeply. Use sterile tools, well-draining soil, and water sparingly during the early stages.
No Root Development
If your cutting fails to develop roots after several weeks, poor conditions may be to blame. This could be due to using an old or damaged leaf, low humidity, cool temperatures, or a lack of light. Make sure you select a healthy, medium-aged leaf, keep the growing environment consistently warm (around 70°F), and provide bright, indirect light. Placing a humidity dome or plastic cover over the container can also help stimulate rooting.
Mold or Fungal Growth
Excess moisture, poor airflow, and non-sterile conditions can lead to mold or fungal problems on the soil surface or cutting. If you notice white fuzz or discoloration, remove affected material and increase air circulation. Sterilize containers and tools before use, and consider sprinkling a bit of cinnamon on the soil surface as a natural antifungal remedy.
Leaf Wilting or Curling
Wilting leaves often indicate either too much or too little water. In some cases, it may also be a response to transplant shock or low humidity. Monitor moisture levels closely and avoid letting the soil dry out completely. Use a light, airy potting mix to support root development while maintaining proper hydration.
Offset Separation Failure
When propagating from offsets, one common challenge is damaging the roots during removal. If the offset lacks roots or is separated too harshly, it may fail to establish. Always wait until offsets are large enough to handle, and gently tease them away from the parent plant, preserving as many roots as possible.
By paying close attention to signs of stress and making small adjustments to the environment, you can prevent many of these common propagation pitfalls and enjoy strong, thriving new African violet plants.
When to Transplant New African Violet Plants
You should transplant new African violet plants when they show clear signs of strong root development and stable top growth. Typically, this occurs around 6 to 10 weeks after propagation, depending on growing conditions. A good indication that your plant is ready for transplanting is the presence of at least three to four healthy, mature leaves, along with visible roots either through the sides or bottom of the propagation container. Additionally, the plant should appear stable in its medium and not wobble when gently touched.
Transplanting too early can lead to transplant shock, as the roots may not yet be developed enough to support the plant in a larger environment. On the other hand, waiting too long may cause the plant to become root-bound, which can restrict future growth. When repotting, choose a container only slightly larger than the root ball, and use a light, well-draining soil formulated specifically for African violets. After transplanting, keep the plant in a warm, humid, and brightly lit location out of direct sun to reduce stress and promote healthy establishment in its new pot.
Long-Term Care for Propagated Violets
Once your propagated African violets are established, long-term care focuses on maintaining optimal conditions for healthy growth and frequent blooming. Place them in a location with bright, indirect light for at least 8 to 12 hours a day—north- or east-facing windows work well, or you can use grow lights indoors. Keep the temperature between 65°F and 75°F, and avoid exposing them to cold drafts or sudden changes in humidity.
Water consistently when the top inch of soil feels dry, using room-temperature water. Water from the bottom if possible to avoid wetting the crown, which can lead to rot. Maintain moderate humidity levels, around 50–60%, especially in dry climates or during winter months. Repot your violets every 6 to 12 months to refresh the soil and check for root health. Feed regularly with a diluted, balanced fertilizer every 2 to 4 weeks to support continuous flowering.
Remove faded flowers and damaged leaves to encourage new growth and maintain a tidy appearance. With the right attention and gentle care, propagated African violets can thrive for years and reward you with vibrant, long-lasting blooms.
Tips for Successful African Violet Propagation
Maintain Clean Conditions
Before starting propagation, always disinfect your tools, pots, and surfaces with rubbing alcohol or a mild bleach solution. African violets are highly sensitive to bacteria and fungi, which can quickly ruin healthy cuttings. A sterile setup minimizes the risk of disease and gives your new plants the best chance to thrive.
Keep the Soil Light and Airy
Use a specialized African violet soil mix or make your own using peat moss, vermiculite, and perlite. This ensures proper drainage and prevents root rot, which is a common issue in propagation. A loose, breathable medium encourages strong root formation and healthy plant development.
Don’t Rush the Process
Propagation is a slow but rewarding process. Leaf cuttings may take several weeks to root and longer to develop plantlets. Avoid disturbing them by digging around the base too often. Allow the plants to take their natural course, and they’ll reward you with healthy, vibrant growth.
Label Your Cuttings
When propagating multiple violet varieties, keeping track of each one is essential. Use plant tags or labels with the variety name and propagation date. This will help you monitor progress, maintain accurate records, and know which plants to share, sell, or showcase later on.
Provide Gentle Light and Consistent Warmth
Place your cuttings in a warm area with bright, indirect light. Avoid direct sunlight, which can scorch tender leaves. Consistent warmth (around 70°F) speeds up root development and keeps young plants from going into shock. Supplemental lighting may be helpful in low-light homes.
FAQ About Propagating African Violets
How long does it take for African violet cuttings to root?
Typically, leaf cuttings begin to develop roots within 3 to 4 weeks. However, the appearance of plantlets can take up to 8 to 12 weeks depending on growing conditions such as light, temperature, and humidity. Patience is key during this stage.
What is the best medium for propagating African violets?
A lightweight, well-draining medium is best. Most growers prefer a mix of peat moss and perlite or a specialized African violet potting mix. This ensures the roots have enough air circulation and helps prevent rot.
Can I propagate African violets in regular tap water?
Yes, but with caution. Tap water may contain chlorine or fluoride, which can harm sensitive plants. It’s best to let the water sit overnight to allow these chemicals to dissipate or use filtered water. Always use clean containers and change the water every few days.
Why are my African violet cuttings rotting instead of rooting?
Rotting is often caused by excess moisture or unsanitary tools and containers. Ensure the soil is lightly moist but not soggy, and always use sterilized scissors or knives when making cuttings. Avoid letting water sit on the leaves or crown.
When should I transplant new African violet plantlets?
You should transplant the new plantlets once they have at least 3-4 leaves and a visible root system. This usually occurs 2-3 months after propagation begins. Use a small pot with fresh African violet soil and provide gentle care as the young plant adjusts.
Conclusion
Propagating African violets is a delightful and accessible way to enjoy the beauty of these plants throughout your home. Whether you choose to use leaf cuttings, offsets, or water propagation, each method brings the joy of growing new life from your favorite plants. With patience and care, your indoor space can be filled with vibrant violets blooming in every corner—an everlasting source of indoor charm.