Aloe vera is a plant that rewards every gardener with strength, beauty, and remarkable resilience. Many people grow it for its healing gel, but few realize how easily it creates offsets that can become new, thriving plants. Propagating aloe vera gives you the chance to expand your collection without spending extra money. It also helps the mother plant stay healthy by reducing crowding in the pot. When you understand how aloe pups grow and what they need to survive, the process becomes simple and enjoyable. Every step reveals more about the plant’s natural growth rhythm and its impressive ability to regenerate.
Watching a small aloe pup develop into a strong, mature plant is deeply satisfying. The transformation begins with choosing the right offset and preparing the ideal environment for healthy roots. Proper timing also matters, because young pups struggle when removed too early. When each step is done correctly, the new aloe adapts quickly and continues growing with confidence. Learning this method lets you multiply your plants with ease. It also gives you more control over their long-term health. Propagation becomes more than a task. It becomes a rewarding ritual that keeps your aloe vera collection thriving.
Understanding How Aloe Vera Offsets Develop
Aloe vera produces offsets as part of its natural growth cycle. These small pups form near the base of the mother plant and connect through a shared root system. Each pup begins as a tiny shoot that slowly strengthens over time. When the mother plant receives proper light and moisture, it channels extra energy into producing new offsets. This process continues as the plant matures. The pups grow leaves, store water, and prepare to survive independently. Understanding this early development helps you recognize which pups are ready for separation and which still rely on the parent plant.
Healthy offsets follow a predictable growth pattern. They start as small green clusters and expand outward as they mature. Their leaves become thicker and firmer once they begin storing water efficiently. A pup that forms thick, stable leaves has reached a stage where it can handle transplant stress. Smaller pups may appear attractive, but they lack the root structure needed for long-term success. The mother plant usually supports several pups at once, but only some develop strong roots early. Identifying these strong candidates ensures higher survival rates during propagation. Observing leaf firmness and size offers valuable clues.
Root development is the final sign that an aloe pup is ready for propagation. A strong offset forms its own root cluster while still attached to the mother. These roots become visible when the plant grows in shallow soil or when the pot is slightly shifted. Pups with root systems separate easily and adapt faster to their new soil. If a pup has no roots, it relies entirely on the mother plant and should remain attached. Allowing roots to form naturally improves overall health and prevents shock after removal. Understanding these basic growth principles prepares you for successful aloe vera propagation.
Choosing the Right Aloe Vera Pups for Successful Propagation
Selecting the right aloe vera pups is one of the most important steps in successful propagation. Not every offset develops at the same pace, and some remain too small to survive on their own. A suitable pup should show clear, defined leaves that stand upright and feel firm when touched. These leaves indicate that the plant has begun storing water and developing internal strength. Size also matters. Pups that reach at least one third the size of the mother plant respond better after separation. Smaller offsets often lack the resilience needed to adjust to new soil conditions.
Roots play an even greater role in determining readiness. A pup with visible roots has already begun functioning independently. These roots anchor the plant and allow it to absorb moisture without relying on the mother. When a pup lacks roots, it will struggle after separation because it cannot take in enough water to maintain its leaves. Checking root development before removal prevents unnecessary stress. If the pup wobbles or feels loose when lightly nudged, the roots may not be established. Strong pups show resistance and feel anchored in the soil.
The health of the mother plant also influences your selection. A vigorous mother produces stronger pups with more stable root systems. If the mother plant appears crowded or stressed, its pups may be smaller or underdeveloped. Choosing offsets from a healthy plant improves overall propagation success. Look for pups that grow near well-lit areas of the pot because they usually develop faster. Avoid offsets with signs of discoloration, softness, or pest activity. These pups may carry hidden issues that affect long-term growth. Careful selection ensures your new aloe plants begin their journey with strength and stability, ready to thrive once transplanted.
Preparing Your Tools and Workspace Before Separating the Offsets
Preparing your tools and workspace is essential for a successful propagation process. Clean, sharp tools protect the aloe vera pups from infection and help you make smooth cuts. A disinfected knife or pruner prevents bacteria from entering fresh wounds. Dull blades crush tissue and delay healing. Before starting, wipe your tools with alcohol and allow them to dry completely. This simple step keeps the mother plant safe and improves the pup’s recovery rate. Good preparation reduces stress for both plants and makes each step more controlled and predictable.
Your workspace should be organized and well lit. Bright indirect light allows you to see the root system clearly without exposing the plant to strong heat. A clean table covered with cloth or paper prevents soil from scattering and keeps roots protected. Aloe vera often grows wide, so extra space helps you handle the plant without bending or damaging leaves. A stable surface prevents tipping during removal. Working in a calm area supports better focus and reduces the chance of accidental cuts or broken roots. Proper setup ensures you can remove the offsets smoothly and with confidence.
You should also prepare the planting materials in advance. Use pots with drainage holes and select a fast-draining mix designed for succulents. This type of soil allows air to reach the roots and prevents moisture buildup. Having the pots ready lets you move each pup quickly into its new environment. Delays cause roots to dry and weaken, especially in warm rooms. Preparing a small brush or soft cloth is also helpful for cleaning soil around the roots without damage. When both tools and workspace are fully ready, the entire propagation process becomes easier, faster, and more successful.
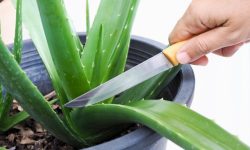
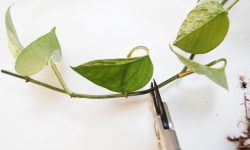
How to Safely Separate Aloe Vera Offsets from the Mother Plant
Separating aloe vera offsets requires careful handling to protect the roots and prevent unnecessary stress. Begin by removing the plant from its pot so you can access the entire root system. Hold the base firmly and tilt the pot until the soil loosens. Once removed, gently shake away loose soil to reveal the pups and their root connections. This step helps you see how deeply each pup is attached. Work slowly to avoid breaking fragile roots. When the roots are visible, identify the sections where the pup connects to the mother plant. A clear view makes separation far easier and safer.
Use your clean, sharp tool to make a precise cut between the mother plant and the pup. Aim for a smooth, single motion that keeps root damage minimal. Each pup needs its own root section to survive independently. If the pup has a strong root cluster, separation is quick. If the roots are intertwined, move gently and take your time. Tugging or pulling leads to breakage that slows recovery. Some pups may require trimming of weak or damaged roots. Removing these unhealthy parts prevents rot and encourages new root growth once planted. Gentle handling at this stage supports better long-term strength.
After separation, check the cut area on each pup. Fresh cuts should be clean and not crushed. Leave the pups on a clean surface for a few hours so the cuts can callus. This callusing step is crucial because it protects the plant from moisture-related rot once potted. While the pups rest, confirm that your pots and soil are ready. Once the callus forms, plant each pup into well-draining soil and press gently around the base for support. Water lightly and place the pots in bright indirect light. Careful, patient separation ensures that each offset adapts quickly and grows into a healthy, independent aloe vera plant.
Preparing the Perfect Soil Mix for Healthy Aloe Vera Growth
Aloe vera thrives in soil that drains quickly and allows air to circulate around the roots. The right mix protects the plant from excess moisture, which is the most common cause of root rot. A suitable blend usually contains coarse materials that prevent compaction. You can use a cactus or succulent mix as a base because it already offers the proper texture. Adding extra perlite improves drainage and keeps the mix light. The goal is to create an environment where water flows through smoothly while still holding enough moisture for early root development. Good soil structure helps new pups establish faster and grow with confidence.
Moisture balance matters even more during the early stages of propagation. Aloe vera pups need soil that stays lightly moist but never soggy. Heavy soil traps water and suffocates young roots. A loose, gritty mix keeps oxygen available and prevents buildup of harmful fungi. Sand can also improve texture, but it must be coarse rather than fine. Fine sand compacts easily and restricts airflow. When mixing soil, blend ingredients evenly so the texture stays consistent throughout the pot. This allows roots to spread freely and prevents weak spots where moisture collects. Consistency in the mixture creates a stable environment for growth.
You should also consider the container when preparing the soil. Pots with drainage holes are essential because they release excess water. Clay pots work especially well because they allow evaporation through the sides. Plastic pots retain more moisture, so adjusting the soil mix becomes even more important. Before planting, lightly moisten the soil to help it settle without becoming wet. This gives the pup a comfortable start without overwhelming its delicate roots. Preparing the right soil ensures that each aloe vera offset adapts quickly, grows steadily, and develops into a strong, healthy plant over time.
Planting Aloe Vera Offsets for Strong Early Root Development
Planting aloe vera offsets correctly gives them the foundation they need for steady growth. Begin by placing a small amount of well-prepared soil at the bottom of the pot. This layer supports the roots and prevents them from resting directly on the container. Position the pup in the center so the roots spread naturally. Avoid bending or twisting the roots because this slows early development. Once positioned, add soil around the base and press gently to remove air pockets. The pup should stand upright without leaning. Proper planting helps the root system settle and begin absorbing moisture at a steady pace.
Moisture control plays a major role during the first days after planting. Lightly water the soil until it becomes slightly moist but not saturated. Too much water causes stress because young roots cannot absorb large amounts at once. A gentle first watering also helps the soil settle around the roots, giving them full contact with the mixture. After watering, place the pot in bright indirect light. Strong sun at this stage may scorch the leaves or cause moisture loss. Indirect light provides enough energy for adaptation while keeping the pup comfortable and stable.
The environment should remain warm and calm while the pup adjusts. Avoid moving the pot frequently because aloe roots settle more quickly in still conditions. Airflow is helpful but should not be harsh or drying. Watch for signs of early stress, such as soft leaves or discoloration. These signs may indicate the pup needs more time to adjust or less water. As the plant becomes stable, its leaves grow thicker and stronger. Proper planting gives the offset a balanced start. With the right light, moisture, and stability, the young aloe vera begins forming firm roots and prepares for long-term growth.
Watering Newly Planted Aloe Vera Offsets the Right Way
Watering newly planted aloe vera offsets requires balance and patience. The roots are sensitive during the early stage, so they cannot handle heavy moisture. Begin with a light watering right after planting to help the soil settle around the roots. This first drink supports stability but should not saturate the soil. Aloe vera stores water in its leaves, so it prefers periods of dryness between waterings. Allow the soil to dry almost completely before watering again. This drying cycle encourages roots to grow deeper and stronger as they search for moisture. Proper timing helps the young plant adapt without stress.
Environmental conditions influence how often you should water the offset. Warm rooms dry the soil faster, while cooler spaces retain moisture longer. Always check the soil before watering by pressing the surface with your fingers. If it feels dry at least an inch deep, the plant is ready for the next watering. Overwatering leads to rot, especially in new roots that lack protective layers. Underwatering is less damaging, but it may slow early growth. A balanced schedule offers steady hydration without overwhelming the plant. Clear observation helps you understand how often your aloe needs water.
After a few weeks, the offset becomes more resilient and responds better to regular watering. At this stage, its leaves grow firmer and store more moisture. As the plant adapts, you can gradually increase the water volume while keeping long gaps between waterings. Always avoid letting water pool at the base because aloe roots require airflow to stay healthy. If the plant shows signs of stress, adjust your routine slightly. With consistent care, the watering process becomes easy to manage. Proper hydration allows the aloe offset to build strong roots and prepare for long-term, healthy growth.
Providing the Ideal Light and Temperature for Aloe Vera Propagation
Light plays a central role in helping aloe vera offsets adjust after separation. Young pups need bright indirect light that delivers steady energy without harsh heat. Direct sunlight can burn their tender leaves, especially during the first weeks when they are still adapting. A window with filtered light or a bright room corner works well for early growth. This gentle exposure encourages photosynthesis while protecting the plant from stress. As the offset becomes stronger, it can slowly adjust to brighter light. Gradual exposure prevents shock and allows the leaves to thicken naturally.
Temperature stability is just as important for successful propagation. Aloe vera thrives in warm conditions because warmth supports metabolic activity inside the leaves and roots. The ideal temperature range sits between 22°C and 27°C. Lower temperatures slow root development and reduce moisture absorption. Higher temperatures may cause excessive evaporation and leaf dehydration. Keeping the environment stable helps the plant focus its energy on establishing roots. Avoid placing the pup near drafts or heat sources that change temperature suddenly. Consistent warmth encourages predictable, steady growth.
Balancing light and temperature creates a supportive environment where the young aloe can adapt with ease. When these conditions remain stable, the offset develops firm leaves and begins forming strong roots. You can monitor progress by watching leaf texture and overall color. Healthy leaves look plump and steady, while thin leaves indicate stress. If the plant appears pale or slow, adjust the light slightly. If it begins drying too quickly, reduce heat exposure. With careful observation, you can find the perfect balance. Ideal light and temperature give aloe vera offsets the foundation they need to grow into strong, thriving plants.
Monitoring Root Growth and Early Development After Planting
Monitoring root growth helps you understand how well the aloe vera offset is adjusting to its new pot. During the first weeks, the roots work quietly beneath the soil, anchoring the plant and absorbing small amounts of moisture. You may not see immediate changes above the soil, but this is normal. The plant directs most of its energy toward root development during this stage. Healthy early growth shows through steady leaf firmness and stable color. If the leaves remain plump, the roots are adapting well. Soft or thinning leaves may signal moisture imbalance or slow root activity.
Light tug testing can help you track progress without disturbing the plant. After two or three weeks, gently pull the pup with minimal force. If you feel resistance, new roots have already formed. If the plant lifts easily, it needs more time. Avoid frequent testing because the roots remain delicate while adjusting. Observing overall posture also provides clues. A well-rooted offset stands upright with steady tension at the base. A weak or struggling offset may lean or wobble. Watching these signs helps you identify issues early and adjust care as needed.
Environmental consistency plays a major role in this period. The offset thrives when the temperature remains warm and the soil stays lightly dry between waterings. Avoid moving the pot too often because changes in light or airflow can interrupt early development. If you use clear containers, you may see root tips pressing toward the edges, which signals healthy progress. In opaque pots, rely on leaf health as your guide. With patience and steady care, the offset shifts from root establishment to active growth. Monitoring these early stages ensures the plant becomes strong, stable, and ready for long-term development.
When and How to Repot Your Growing Aloe Vera Offset
Repotting is an important step that supports long-term development once your aloe vera offset becomes stronger. The best time to repot is when the plant outgrows its starter pot or begins producing new leaves at a steady pace. A well-rooted aloe offset needs more space to expand its root system and store moisture efficiently. You can check readiness by observing leaf firmness and overall growth. If the plant remains upright, stable, and shows visible signs of expansion, repotting helps it continue developing without restriction. A slightly tight pot is fine, but overcrowding slows growth and affects leaf formation.
Choosing the right pot ensures the plant transitions smoothly. Select a container one size larger than the current pot. A pot that is too large retains extra moisture, which leads to rot. Clay pots provide better airflow, but plastic pots also work with correct soil mix. Fill the new pot with fresh, well-draining succulent soil and create a small hole at the center. Gently lift the plant from its old pot and place it in the new one without forcing the roots. Spread the roots naturally and add soil around the base. Press lightly to stabilize the plant but avoid compacting the soil too tightly.
After repotting, water lightly to help the soil settle. Avoid heavy watering because the roots need time to adjust. Place the aloe in bright indirect light and allow it to rest for several days. This calm period reduces stress and protects the plant from shock. Monitor the leaves for firmness and color as the roots settle into their new environment. When the plant resumes steady growth, you can gradually increase light exposure. A proper repotting routine keeps your aloe vera healthy, balanced, and strong enough to continue producing new offsets in the future.
Common Mistakes to Avoid During Aloe Vera Propagation
Separating Aloe Pups Too Early and Using the Wrong Soil Mix
Many growers fail because they separate aloe pups before they are ready. Young offsets that have not formed their own roots depend entirely on the mother plant for moisture and stability. When removed too early, they cannot absorb enough water to survive, even in ideal conditions. These early-separated pups often wilt, soften, or collapse within days. Checking for roots before removal is essential. A pup that sits firmly in the soil and resists gentle pulling usually has a stable root system. Removing it at this stage allows the plant to adapt smoothly and grow with confidence.
Another issue arises when the new pup is placed in soil that holds too much moisture. Aloe vera requires a gritty, fast-draining mix to protect its roots from rot. Heavy potting soil traps water, blocks airflow, and encourages fungal growth. This creates a stressful environment for young offsets that already need time to adjust. Using a succulent-specific mix with added perlite keeps the soil light and airy. A healthy soil structure allows roots to expand naturally and reduces the risk of rot. Choosing the right soil from the beginning prevents many long-term problems.
Overwatering, Underwatering, and Poor Light Placement
Watering mistakes are among the most common reasons aloe pups fail after planting. Many people water too frequently, thinking it helps the plant establish roots. Newly planted offsets cannot handle excess moisture because their roots remain fragile. Constant watering leads to soft leaves, mushy bases, and rapid decline. On the other hand, watering too little slows early development. Aloe vera tolerates dryness, but young pups still require occasional hydration to support growth. The best approach is letting the soil dry almost completely before watering again. This cycle encourages strong, deep root formation.
Light conditions also influence overall success. Placing a fresh offset in direct sunlight may scorch its tender leaves before it develops resilience. Harsh light removes moisture too quickly and forces the plant into stress mode. Deep shade creates the opposite problem by slowing photosynthesis and delaying root growth. Bright indirect light provides a stable, balanced environment where the pup can recover from separation. Monitoring leaf color helps you judge its needs. Plump leaves show comfort, while pale or thin leaves suggest stress. Correcting light placement early supports steady, healthy development.
Using Dirty Tools, Damaging Roots, and Ignoring Early Stress Signs
Clean tools are essential for safe aloe propagation. Dirty blades carry bacteria and fungi that enter fresh wounds during separation. These pathogens spread quickly and cause rot in both the pup and the mother plant. A simple wipe with rubbing alcohol removes harmful microbes and keeps the cut surfaces clean. Using dull tools also increases damage. A crushed or jagged cut heals slowly and becomes vulnerable to infection. Sharp, sanitized tools create smooth edges that dry properly and form a protective callus before planting.
Improper handling during separation can damage delicate root structures. Pulling or twisting pups forces roots to snap, slowing recovery and reducing plant stability. Gentle loosening of soil and careful lifting protect the root system. After planting, many growers overlook early warning signs. Yellowing leaves, leaning stems, or soft textures often appear before major damage occurs. Addressing these early clues with small adjustments in watering, light, or temperature prevents further decline. Careful observation ensures the pup grows strong and avoids preventable stress. Healthy handling and awareness play a major role in long-term success.
FAQs About Propagating Aloe Vera
How long does it take for aloe vera pups to root after planting?
Most aloe vera pups begin forming new roots within two to four weeks. The speed depends on temperature, soil drainage, and how well developed the pup’s original roots were before separation. Warm, stable conditions help the rooting process move faster, while cold environments slow the plant’s internal activity.
Can aloe vera pups survive without roots?
Young pups without roots rarely survive because they cannot absorb enough moisture to maintain their leaves. Aloe pups need at least a small, independent root cluster before separation. Removing them too early leads to dehydration, soft leaves, and slow decline.
How often should I water newly planted aloe pups?
Water lightly right after planting, then allow the soil to dry almost completely before watering again. Most pups need water every 10 to 14 days depending on temperature and pot size. Overwatering is dangerous because young roots cannot handle heavy moisture.
Why is my aloe pup turning soft after planting?
Soft leaves often signal excess moisture or poor drainage. Young roots need oxygen, and wet soil blocks airflow. Check if the pot drains well and ensure the soil is gritty and fast-draining. Reduce watering until the plant firms up again.
What type of soil is best for aloe vera propagation?
A fast-draining succulent or cactus mix works best. Adding perlite or coarse sand improves airflow and prevents moisture retention. Avoid regular potting soil because it compacts easily and holds too much water for aloe vera.
Final Thoughts
Propagating aloe vera becomes simple once you understand how pups grow, when to separate them, and how to support their early development. With the right soil, balanced watering, and steady light, each offset adapts smoothly and begins building strong roots. Over time, the small pup transforms into a healthy plant that continues the cycle by producing offsets of its own. This process not only expands your collection but also deepens your connection with the plant. With patience and consistent care, every propagation becomes a rewarding step in growing a vibrant, thriving aloe vera garden.