Amaryllis plants are famous for their breathtaking trumpet-shaped blooms that brighten up winter homes and gardens. These striking flowers symbolize beauty, determination, and renewal, making them a favorite among both beginner and expert gardeners. Yet, many enthusiasts only grow them from store-bought bulbs, unaware that amaryllis propagation can be a deeply rewarding way to multiply these stunning plants naturally.
Learning how to propagate amaryllis like a pro opens up endless possibilities for faster, healthier growth. Whether you prefer bulbs, offsets, or seeds, propagation gives you more blooms and a stronger understanding of your plants. With the right methods and care, you can transform one bulb into a thriving collection. This guide reveals professional techniques, expert tips, and little-known secrets that will help you master the art of amaryllis propagation and enjoy vibrant blossoms year after year.
Understanding Amaryllis Propagation

Amaryllis propagation is the process of creating new plants from existing ones, allowing gardeners to expand their collection without purchasing additional bulbs. Unlike many flowering plants, amaryllis can be propagated in several ways—through bulb division, offsets, or seeds. Each method has its own benefits, and understanding how they work helps you decide which approach best suits your needs and experience level. Successful propagation begins with recognizing the plant’s growth cycle, which includes a dormant period followed by a vigorous bloom phase.
The amaryllis bulb serves as the heart of propagation. It stores essential nutrients that fuel new growth, roots, and flower production. When the bulb reaches maturity, it often produces small baby bulbs known as offsets. These offsets can be separated and replanted to create new plants genetically identical to the parent. Meanwhile, propagation through seeds offers variety but requires patience, as seedlings can take several years to bloom. By identifying healthy bulbs and tracking their development stages, you can ensure each new plant has the best start possible.
Environmental conditions also play a major role in propagation success. Amaryllis prefers warm temperatures, indirect sunlight, and well-draining soil. Too much water can cause rot, while insufficient light leads to weak or elongated leaves. Monitoring these factors helps the plant conserve energy and direct it toward producing new bulbs or seeds. Understanding the science behind amaryllis propagation allows you to approach the process with confidence, turning a single bulb into a thriving, colorful display of blooms that can last for years.
Best Time to Propagate Amaryllis
Timing is one of the most crucial factors in successful amaryllis propagation. Choosing the right moment ensures that your plant has the strength and energy to produce healthy new bulbs or seeds. The best time to propagate amaryllis is typically right after the blooming season, when the flowers begin to fade and the foliage remains green. During this stage, the plant is still photosynthesizing and storing nutrients in its bulb, preparing for its next growth cycle. Propagating at this time allows the new bulbs or offsets to develop while the parent plant is still active.
In regions with warm climates, this usually occurs in late spring or early summer. For indoor growers, the timing can be slightly adjusted depending on the bloom cycle, which is often controlled by temperature and light. It’s essential to wait until the leaves naturally yellow and die back before removing or dividing the bulb. This indicates that the bulb has entered its dormant stage and can handle disturbance without losing too much energy. Attempting to propagate too early, while the plant is still flowering or growing leaves, can stress the bulb and reduce the chances of success.
If you are growing amaryllis indoors, you can manipulate the timing to suit your schedule by adjusting light exposure and temperature. Allowing the bulb to rest for eight to ten weeks in a cool, dry place encourages dormancy and prepares it for regrowth. Once new shoots appear, it’s an ideal signal to begin propagation. Proper timing ensures vigorous new plants, faster rooting, and more consistent flowering in the following seasons, setting the foundation for long-term success.
Preparing Soil and Containers for Propagation
Proper soil and container preparation are the foundation of successful amaryllis propagation. The quality of the growing medium directly impacts root health, moisture balance, and nutrient absorption. Amaryllis bulbs need a soil mix that drains well but still retains enough moisture for steady growth. A blend of peat moss, perlite, and coarse sand provides excellent results. This combination prevents waterlogging, promotes airflow, and ensures the roots stay healthy. Avoid clay-heavy garden soil, as it traps water and may suffocate the bulb. Using sterile soil is also essential, as it reduces the risk of fungus and insect infestation.
The container you choose plays a crucial role in bulb development. Pots with drainage holes are mandatory to avoid standing water, which can cause root rot. Ideally, select a pot that is about one to two inches wider than the bulb’s diameter. A pot that’s too large retains moisture too long, while a smaller one restricts root growth. Before reusing any pot, clean it thoroughly using a mild bleach solution or hot water to remove any pathogens. Fill the pot with your soil mix and position the bulb so that about one-third of it remains above the surface.
After planting, press the soil gently around the bulb to secure it and water lightly to settle the soil. Place the container in a warm, bright location with filtered sunlight. Avoid fertilizing immediately; let the bulb establish roots first. A healthy start ensures your amaryllis will grow faster, produce stronger leaves, and reward you with larger, more vibrant blooms in future seasons. Proper soil and container preparation are the first professional step to mastering propagation success.
Propagating Amaryllis from Bulbs
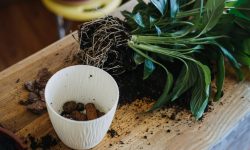
Propagating amaryllis from bulbs is one of the most efficient and reliable ways to multiply your plants. Mature amaryllis bulbs naturally produce smaller bulbs, known as offsets or daughter bulbs, that grow attached to the base of the parent. These can be separated and replanted to form new, identical plants. The process is straightforward, but timing and technique are vital. The ideal time to divide bulbs is after the plant has finished blooming and entered dormancy. This ensures that both the parent and offsets have stored enough nutrients to support new growth once replanted.
To start, gently remove the amaryllis bulb from its container or garden bed, taking care not to damage the roots. Brush off excess soil and inspect the bulb for healthy offsets—small, firm bulbs that are at least one inch in diameter. Carefully separate them using your hands or a clean, sharp knife, ensuring each offset has a portion of roots attached. After separation, treat the cut areas with fungicidal powder or cinnamon to prevent infection. Allow the bulbs to dry for a day before replanting them in well-draining soil. This short drying period helps minimize rot and encourages faster rooting.
When replanting, place each bulb so that one-third of its top remains above the soil surface. Keep the soil lightly moist but never waterlogged. Provide bright, indirect sunlight to stimulate root development, and avoid fertilizing until new leaves appear. Within a few months, the offsets will establish themselves and begin independent growth. This propagation method produces blooms much faster than seed propagation, allowing gardeners to enjoy vibrant flowers within one or two years. Proper care during this early stage ensures strong, long-lasting plants that will continue multiplying over time.
Propagating Amaryllis from Seeds
Propagating amaryllis from seeds is a fascinating and rewarding process for gardeners who enjoy experimenting with plant genetics. Unlike bulb propagation, which creates clones of the parent plant, seed propagation produces entirely new varieties with unique colors and flower shapes. The process begins after pollination, either naturally or through hand pollination. Once the flowers fade, seed pods will develop and mature over six to eight weeks. When the pods turn brown and begin to split open, it is time to harvest the seeds. Collect them carefully and plant them immediately for the best germination results, as amaryllis seeds lose viability quickly.
To sow amaryllis seeds, prepare a shallow container with a well-draining mix of peat and perlite or seed-starting soil. Spread the seeds evenly on the surface and lightly cover them with a thin layer of the mix. Keep the soil moist but not soggy and maintain a warm temperature between 70°F and 75°F. Bright, indirect sunlight helps encourage healthy seedling growth. Germination typically occurs within two to four weeks, producing small green shoots. Once the seedlings reach about two inches in height, they can be transplanted into individual pots to continue developing.
Patience is essential when propagating from seeds, as it may take three to five years for the plants to reach maturity and bloom. During this period, consistent watering, indirect light, and occasional feeding with diluted fertilizer promote strong root and leaf growth. Although this method requires time and care, it provides the excitement of discovering new flower variations that may differ significantly from the parent plants. Seed propagation is ideal for gardeners interested in hybridization and long-term cultivation projects.
Propagating Amaryllis Using Leaf Cuttings
While not as common as bulb or seed propagation, growing amaryllis from leaf cuttings is an innovative technique that can produce new plants faster under controlled conditions. This method involves using a healthy leaf section from a mature plant to stimulate new bulb formation. It works best when the plant is actively growing and the leaves are firm and green. Select a mature, disease-free leaf and cut it into sections about four to six inches long. Each cutting should have a clean, angled base to increase the rooting surface. Leaf propagation requires patience, precision, and consistent moisture to succeed.
To begin, prepare a tray filled with a mix of sand, perlite, and peat moss. Insert the cuttings vertically with the lower ends buried about one inch deep. Keep the growing medium slightly moist but never saturated, as excess water can cause rot. Place the tray in a bright area with indirect sunlight and maintain a temperature between 70°F and 75°F. Within six to eight weeks, small bulb-like swellings will begin to form at the base of each cutting. These tiny bulbs can later be transplanted into small pots to continue their development into full plants.
As the new bulbs grow, they will gradually develop roots and leaves of their own. During this stage, it’s important to provide balanced nutrients and maintain stable warmth. Although the success rate is lower compared to bulb propagation, the process is fascinating to observe. Once established, these plants behave just like those grown from bulbs, eventually producing the same spectacular flowers. Propagating amaryllis using leaf cuttings is a satisfying experiment for experienced gardeners who want to expand their skills and explore new growing techniques.
Dividing and Replanting Offsets
Dividing and replanting offsets is among the easiest and most dependable methods to propagate amaryllis successfully. Mature bulbs naturally produce smaller bulbs known as offsets or daughter bulbs, which develop near the base of the parent. These new bulbs are exact clones of the parent, ensuring identical flower color, size, and growth pattern. The best time to divide offsets is late spring or early summer, after the plant finishes blooming and the foliage begins to yellow. This stage indicates the bulb is entering dormancy and has completed nutrient storage, giving offsets the energy they need to thrive independently after replanting.
To begin the process, carefully lift the entire bulb cluster from the soil using a garden fork or trowel. Gently remove the soil from around the roots and identify the small bulbs growing beside the main bulb. Each offset should be plump, firm, and at least one inch in diameter for best results. Use a sterile knife to detach them cleanly, ensuring some roots remain attached. Dust any cut areas with fungicidal powder or natural cinnamon to reduce infection risk. Allow the bulbs to rest for a full day in a shaded, well-ventilated area before planting. This drying period helps heal small wounds and prevents moisture buildup that could lead to rot.
Plant each offset in nutrient-rich, well-draining soil with one-third of the bulb above the surface. Place pots or beds in a warm, bright spot with indirect sunlight. Water lightly at first, keeping the soil slightly moist until roots form. Within six to twelve months, offsets develop into independent bulbs and begin producing new leaves. Once mature, these plants will bloom beautifully and continue generating new offsets every few years, ensuring a lasting, self-sustaining amaryllis collection.
Watering and Light Requirements After Propagation
After propagation, amaryllis requires consistent care, especially with water and light. Newly divided bulbs or offsets are delicate and easily damaged by overwatering. The key is to keep the soil slightly moist but never soggy. Water thoroughly, then allow the top inch of soil to dry before watering again. Using lukewarm, non-chlorinated water is best because it prevents root shock and encourages steady growth. Excess water quickly leads to bulb rot, especially if the container lacks proper drainage. Gardeners often find that underwatering is safer than overwatering during the early growth stage.
Light exposure determines how fast and strong the new plants grow. Amaryllis thrives in bright, indirect sunlight for at least six to eight hours daily. Direct, harsh sunlight can burn the tender leaves, while low light results in weak, elongated growth. Indoors, a south-facing window with filtered light is ideal. Outdoors, choose a partially shaded area where the morning sun is gentle. You can gradually increase light exposure as the plant matures and develops stronger foliage. Balanced lighting not only enhances photosynthesis but also strengthens the bulb for future blooms.
Combining proper watering and lighting builds the perfect growing environment. Stable temperatures between 70°F and 80°F support fast root development, while cooler nights help regulate growth. Remember to rotate pots occasionally so that light reaches all sides of the plant evenly. Consistency is key—by providing even moisture and balanced light, you ensure your propagated amaryllis grows faster, remains healthy, and produces spectacular blossoms when the next flowering season arrives.
Fertilizing Young Amaryllis Plants
Feeding young amaryllis plants after propagation is essential for sustained growth and vibrant flowering in the future. Once new leaves begin to emerge, it’s a signal that the bulbs are ready to absorb external nutrients. A balanced fertilizer with equal parts nitrogen, phosphorus, and potassium (10-10-10 or 20-20-20) works well. Dilute it to half strength to avoid overwhelming the roots and apply it every four to six weeks during the growing period. Fertilization supports root expansion, thicker leaves, and stronger bulbs, all of which are necessary for the next blooming phase.
For a natural approach, organic fertilizers like compost tea, worm castings, or fish emulsion are excellent choices. They improve soil structure while providing a gentle, steady nutrient supply. Always fertilize after watering to prevent root burn, and avoid fertilizing during dormancy when the bulb is storing energy rather than actively growing. If you’re growing amaryllis indoors, ensure that the soil is flushed occasionally with clean water to remove any salt buildup from fertilizers, which can harm the roots over time.
A consistent feeding schedule is the key to developing a robust and long-lived amaryllis collection. Young plants that receive balanced nutrition grow faster, develop stronger bulbs, and bloom earlier. Proper fertilization also enhances resistance to pests and diseases. Over time, your plants will produce more offsets and healthier flowers. By feeding them thoughtfully, you’ll turn a few propagated bulbs into a thriving display of brilliant amaryllis blossoms year after year, embodying true expert-level plant care.
Common Mistakes When Propagating Amaryllis
Overwatering and Poor Drainage
Overwatering is one of the most frequent causes of failure when propagating amaryllis. Because gardeners often associate moisture with growth, they tend to keep the soil too wet. Unfortunately, this deprives the roots of oxygen and encourages fungal infections such as bulb rot. A healthy amaryllis prefers a consistent moisture balance—moist soil that never becomes soggy. When the soil stays saturated for too long, the bulb’s outer layers begin to soften, and decay quickly follows. This problem is even worse when using containers without proper drainage holes, as standing water around the bulb base creates ideal conditions for rot.
To prevent overwatering, always use a loose, well-draining soil mix containing perlite, peat, or coarse sand. Water deeply but allow the top inch of soil to dry before watering again. Avoid misting the foliage, as this can raise humidity and attract mold. Placing the pot in a bright, airy location encourages evaporation and prevents fungal growth. It’s also helpful to use clay pots, which naturally wick away excess moisture. Good drainage is vital not only for healthy roots but also for strong, long-lasting blooms in the next flowering cycle.
Using the Wrong Soil or Container Size
Selecting the wrong soil type or container size can seriously slow down the propagation process. Heavy soils that retain water for long periods suffocate the roots and block essential air circulation. Amaryllis bulbs require a loose, porous growing medium that allows moisture to flow freely while holding enough nutrients for development. Using compacted soil or reusing old potting mix introduces harmful bacteria and pests that can damage new bulbs. Likewise, the size of the container directly affects growth rate and bulb stability. A pot that’s too large traps excess water, while one that’s too small limits root expansion.
The ideal pot is about one to two inches wider than the bulb and includes several drainage holes. Before planting, sterilize the container with hot water or a diluted bleach solution to eliminate pathogens. Fill it with a clean bulb-specific soil mix enriched with organic matter for balanced nutrition. After planting, keep the bulb’s upper third above the soil line to improve airflow. The right soil texture and pot size create the perfect growing environment, helping the new amaryllis develop faster, form stronger roots, and produce healthier foliage that leads to vibrant, early blooms.
Ignoring Dormancy and Rest Periods
Many gardeners underestimate the importance of dormancy when propagating amaryllis, often treating the plant as if it should grow year-round. However, amaryllis bulbs naturally require a rest period to rebuild energy reserves and prepare for the next bloom cycle. When the foliage begins to yellow and die back, it’s a clear sign that the plant is entering dormancy. Continuing to water or fertilize during this phase disrupts the bulb’s recovery and can lead to softening, decay, or even total bulb failure. Neglecting dormancy also results in weak, delayed growth when the next season begins. Understanding and respecting this natural rhythm is essential for maintaining long-term vigor.
To manage dormancy correctly, reduce watering gradually until the soil becomes completely dry. Then, move the bulb to a cool, dark location such as a basement or closet with a temperature between 50°F and 60°F. Leave the bulb undisturbed for about eight to ten weeks to allow it to rest fully. During this time, avoid removing the dry leaves, as they help the bulb absorb remaining nutrients. Once new green shoots emerge, transfer the bulb to a bright location and resume watering. This period of rest strengthens the bulb, promotes larger blooms, and improves overall growth in future cycles. Recognizing and honoring dormancy is one of the most professional steps toward mastering amaryllis propagation.
Expert Tips for Faster Amaryllis Growth
Achieving faster and healthier amaryllis growth depends on mastering the balance between timing, environment, and proper care. One of the most effective secrets used by experienced gardeners is temperature control. Amaryllis grows best in warm conditions between 70°F and 80°F during the day, with slightly cooler nights around 60°F. This temperature range stimulates strong root growth while preventing weak, stretched foliage. Maintaining moderate humidity—about 50%—also helps prevent leaf dryness without encouraging mold or rot. Stable environmental conditions ensure bulbs grow steadily and prepare to bloom earlier than usual, even in less-than-ideal climates.
Another expert strategy involves consistent light exposure and plant rotation. Amaryllis needs bright, indirect light for at least six to eight hours daily. Turning the pot every few days ensures all sides receive even sunlight, which encourages balanced stem and leaf development. During winter or in low-light homes, supplement with grow lights to maintain brightness. Gentle pruning of any yellow or weak leaves helps the bulb conserve energy for new growth. These actions together enhance photosynthesis, increase nutrient absorption, and speed up bulb maturity, resulting in robust plants ready to flower sooner.
Fertilization and soil care also play vital roles in accelerating growth. Feed your amaryllis every four to six weeks using a balanced liquid fertilizer diluted to half strength. Adding organic matter like compost or worm castings once per season refreshes the soil and boosts microbial activity. Repotting every two years keeps the growing medium light and nutrient-rich. These professional techniques not only enhance bulb vitality but also produce larger, longer-lasting flowers. Consistent care following these expert tips transforms propagation into a rewarding process that delivers faster, stronger, and more beautiful amaryllis plants year after year.
Troubleshooting Amaryllis Propagation Problems
Identifying Bulb Rot and How to Fix It
Bulb rot is one of the most common issues faced during amaryllis propagation, often caused by excessive moisture or poor drainage. A rotting bulb typically feels soft to the touch and may emit a sour or unpleasant smell. If left untreated, the infection spreads quickly, destroying both the bulb and surrounding soil. The key to prevention is proper watering and the use of a well-draining soil mix containing perlite, peat, or sand. Avoid letting the bulb sit in standing water or compacted soil, as these conditions promote fungal growth. Early detection is crucial to saving the plant.
To fix mild cases, remove the affected bulb from the pot and trim away any mushy or discolored areas with a sterilized knife. Dust the cut surfaces with a fungicide or natural alternative like powdered cinnamon. Let the bulb dry in a shaded, ventilated area for one or two days before replanting it in fresh, sterile soil. Reduce watering frequency and ensure adequate airflow around the pot. With careful monitoring, the bulb can often recover and resume healthy growth. Consistent soil drainage and moderate watering remain the best defense against future rot.
Addressing Slow Growth or Weak Seedlings
Slow-growing or weak amaryllis seedlings are another common challenge for growers. This usually occurs due to insufficient light, compacted soil, or lack of nutrients. Amaryllis seedlings need plenty of bright, indirect light for at least eight hours daily to support photosynthesis. Without it, they become thin, pale, and fragile. Using heavy garden soil further limits oxygen flow to the roots, stunting growth. Inconsistent watering also plays a role—both underwatering and overwatering can disrupt seedling development and reduce their ability to produce healthy bulbs.
To resolve this, move the seedlings to a brighter location or use a full-spectrum grow light if natural sunlight is limited. Check the soil for compaction and replace it with a lighter, more aerated mix if necessary. Feed the young plants every four to six weeks with a diluted balanced fertilizer to promote stronger roots and leaves. Keep the soil evenly moist but never saturated. With improved light, nutrients, and moisture control, slow-growing seedlings will regain vigor and develop into healthy plants capable of flowering within a few seasons.
Dealing with Pests and Fungal Diseases
Pests and fungal infections can quickly undermine even the healthiest amaryllis propagation efforts. Common pests include aphids, spider mites, and mealybugs, which feed on sap and weaken leaves. These insects thrive in warm, humid environments and often appear when airflow is limited. Fungal issues like leaf spot or mold typically arise from overwatering or poor sanitation practices. Symptoms include yellowing leaves, black spots, or fuzzy white growths on the soil surface. Ignoring these signs allows infestations to spread and damage both new and mature plants.
To combat pests, wipe leaves gently with a damp cloth dipped in a mild soap solution or neem oil spray. Ensure the growing area remains well-ventilated to discourage insects. For fungal problems, remove infected leaves and treat the remaining plant with a fungicide or natural remedy such as a baking soda spray. Always sterilize tools before reuse to prevent cross-contamination. Avoid overcrowding pots, as this restricts airflow and increases humidity. Regular inspection, proper spacing, and clean growing conditions are the best ways to prevent pest and disease outbreaks in your amaryllis collection.
Frequently Asked Questions About Amaryllis Propagation
How Long Does It Take for Propagated Amaryllis to Bloom?
Propagated amaryllis from offsets usually bloom within one to two years, while seed-grown plants may take up to five years. Providing consistent warmth, bright light, and proper fertilization helps speed up growth and encourages earlier, stronger flowering cycles.
Can You Propagate Amaryllis in Water?
Yes, but it should be temporary. Place the bulb above the waterline so only the roots touch water. Change water frequently to prevent rot. Once roots form, transfer the bulb to well-draining soil for long-term healthy growth and blooming success.
What Is the Easiest Way to Propagate Amaryllis?
The easiest method is dividing offsets from the parent bulb. Offsets are clones that grow faster and bloom sooner. Separate and plant them in nutrient-rich, well-draining soil. With light and warmth, they’ll mature and flower within one or two seasons.
Why Isn’t My Propagated Amaryllis Growing?
Slow or stunted growth often results from overwatering, poor drainage, or insufficient light. Ensure the bulb sits above soil level, receives bright indirect sunlight, and rests during dormancy. Balanced care helps the bulb recover energy for faster, healthier growth.
How Often Should I Water Newly Propagated Bulbs?
Water only when the top inch of soil feels dry. Too much water causes rot, while dryness slows root development. Moderate, consistent moisture supports steady growth. Always use containers with drainage holes to maintain proper air circulation around roots.