Azaleas are among the most enchanting flowering shrubs in the garden, celebrated for their vibrant blooms, lush foliage, and long lifespan. Once established, they can live for decades, becoming cherished focal points in landscapes. But for gardeners who dream of having more of these stunning plants without buying new ones, propagation is the perfect answer. By learning how to propagate an azalea, you can create new plants from your existing shrubs, preserve rare varieties, and even share your favorite cultivars with friends and family.
While the process may seem intimidating at first, propagation is a skill any dedicated gardener can master. It begins with understanding the plant’s biology, recognizing the best timing, and applying the right technique for your specific conditions. Azaleas can be propagated in several ways, including stem cuttings, layering, seeds, and division. Each method has its own advantages and challenges, and choosing the right one depends on your goals, climate, and the variety you’re working with.
Understanding Azalea Propagation Basics
Before diving into specific techniques, it is important to understand how azaleas grow and why certain propagation methods work better than others. Azaleas belong to the Rhododendron genus, a group of acid-loving shrubs that thrive in well-draining, humus-rich soil. Their growth habits, root systems, and seasonal cycles all influence the success of propagation efforts.
Timing is one of the most critical factors. Azaleas generally produce new growth in spring and early summer, and this fresh growth is ideal for cuttings or layering. During this period, the stems are mature enough to hold their shape but still young enough to root successfully. Attempting propagation when plants are stressed by drought, extreme heat, or frost will significantly lower success rates.
It is also important to start with a healthy, disease-free parent plant. Any pest infestations, nutrient deficiencies, or fungal issues will carry over to the new plants or hinder rooting. Always choose strong, well-shaped azaleas that have demonstrated consistent flowering and growth over several seasons.
Propagating Azaleas from Stem Cuttings
Why Stem Cuttings Are the Most Popular Method
Stem cuttings are favored by gardeners and professionals alike because they reliably produce new plants that are genetically identical to the parent azalea. This is especially important for azaleas, which are commonly hybrids bred for specific flower colors, shapes, and growth habits. Growing azaleas from seed can result in unpredictable variations, as seeds combine genetic material differently, often producing plants that differ significantly from the parent. By using stem cuttings, you maintain the exact traits you love — whether that’s a particular flower shade, leaf texture, or overall shrub size. Additionally, stem cuttings require less time to reach flowering maturity compared to seed-grown plants, making this method more efficient for gardeners eager to expand their collection or replace aging shrubs.
Best Time to Take Cuttings
Timing your cuttings is critical for success. Late spring to early summer is the prime window because the azalea’s growth is in the semi-hardwood stage. At this point, stems have matured enough to be sturdy but retain enough moisture and flexibility to develop roots. Taking cuttings too early, when stems are too soft or herbaceous, often leads to rot and failure, while cutting too late with fully hardened wood slows rooting drastically or prevents it altogether. Furthermore, harvesting cuttings just after flowering ensures the plant’s energy is not overly invested in bloom production but is still actively growing, which supports root initiation. Weather conditions during this time also tend to be favorable, with warm temperatures and sufficient humidity, both vital for successful rooting.
Selecting and Preparing Cuttings
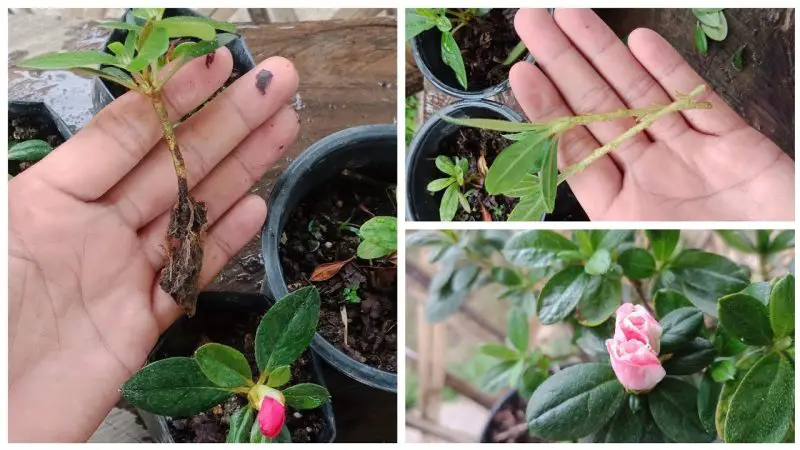
The quality of your cuttings directly impacts propagation success. Start by selecting healthy, disease-free stems that show no signs of pest damage or nutrient deficiencies. Avoid flowering stems because energy is focused on bloom development, which weakens root formation. A cutting length of 10 to 15 centimeters is ideal; it’s long enough to support several leaf nodes but not so long that it becomes difficult to keep hydrated. Use a clean, sharp pair of pruning shears or scissors to make a clean cut just below a leaf node—this is important because nodes are rich in meristematic tissue that promotes root growth. After cutting, remove leaves from the lower half of the stem to reduce moisture loss and prevent leaves from rotting when buried. Leaving some leaves on the upper half helps the cutting continue photosynthesis and sustain itself during rooting.
Creating the Ideal Rooting Environment
Rooting cuttings requires a consistently moist, well-aerated medium. A mixture of peat moss and perlite or coarse sand works well, as it holds moisture without becoming waterlogged. Insert the prepared cuttings about halfway into the medium, ensuring at least one node is buried.
Humidity is essential for preventing the cuttings from drying out. Cover the container with a clear plastic dome or loosely with a plastic bag to create a mini greenhouse. Keep the setup in bright, indirect light at temperatures between 20–24°C.
Rooting usually takes 6–8 weeks. During this time, avoid disturbing the cuttings. Check periodically for signs of rot or mold and remove any affected stems immediately. Once roots are about 2–3 centimeters long, the cuttings can be transplanted into pots filled with acidic potting mix.
Propagating Azaleas by Layering
Why Layering Works Well for Azaleas
Layering is a propagation method particularly suited to azaleas because it minimizes stress on the new plant. Unlike cuttings, where the stem is severed and must immediately support itself, layering keeps the branch attached to the parent plant. This connection allows the stem to continuously receive water, nutrients, and energy, significantly improving the chances of successful root development. The gradual rooting process means the new plant can establish itself in the soil without the shock of separation. This method is especially useful for gardeners who want a reliable way to propagate azaleas without sophisticated equipment or complex setups. Additionally, because the new plant develops roots naturally in its preferred soil environment, it often adapts better after transplantation.
Best Time to Try Layering
The timing of layering is critical to encourage root formation while ensuring the parent plant is healthy and actively growing. Early spring and late summer are optimal periods because the plant’s metabolic activity is high, promoting root initiation and growth. During these times, soil moisture is usually adequate, and temperatures are moderate—conditions that favor root development. Avoid mid-summer layering because excessive heat can stress the plant and dry out the buried stem. Similarly, layering in deep winter is ineffective because the plant is dormant, and root growth slows or stops altogether. Planning layering during these active growth windows increases success and speeds up the propagation process.
Steps for Successful Layering
To begin layering, select a flexible, low-growing branch that can easily reach the soil surface without damage. Flexibility is important to avoid snapping the stem during positioning. Once chosen, gently bend the branch to the ground and identify the spot where it will contact the soil. Carefully remove a small strip of bark about 2-3 centimeters long to expose the green cambium layer beneath. This wound encourages root formation by triggering the plant’s natural healing process. Next, press the wounded section into the soil, ensuring good contact between the exposed tissue and the moist earth. Secure the branch in place using a U-shaped pin, bent wire, or a small rock to prevent it from springing back up. Leave the tip of the branch free and exposed to allow continued growth and photosynthesis.
Maintain consistent moisture around the buried section throughout the rooting period. Avoid letting the soil dry out, as this can inhibit root development. In favorable conditions, roots usually begin to form within 3 to 6 months. Once a healthy network of roots is confirmed, the new plant can be carefully severed from the parent branch. Transplant the young azalea to a prepared location or pot with well-draining, acidic soil and continue nurturing it as it establishes independently.
Propagating Azaleas from Seed
Why Seed Propagation Is Rare
Growing azaleas from seed is possible but uncommon among home gardeners because it rarely produces plants identical to the parent. This is mainly due to the fact that most azaleas are hybrids, bred from multiple species and cultivars to achieve specific flower colors, shapes, and growth habits. Seeds carry mixed genetic information, so seedlings often vary widely in appearance, flower timing, and vigor. This unpredictability makes seed propagation less desirable when the goal is to replicate a beloved shrub. However, seed propagation remains valuable for breeders and enthusiasts interested in developing new azalea varieties or exploring unique traits. It allows genetic diversity and the potential for exciting discoveries, though it requires patience and careful selection over many years.
Collecting and Preparing Seeds
After azaleas finish blooming, they produce small seed capsules that take several months to mature fully. These capsules change from green to brown and begin to split open when ready. Collect seed capsules as soon as they start to dry and crack, to prevent seeds from dispersing naturally and getting lost. Once harvested, dry the capsules in a cool, well-ventilated area for a few days until they fully open. Carefully extract the tiny seeds, which are often dark and dust-like. Because azalea seeds are very small, they require special handling during sowing.
When sowing, use a fine, sterile seed-starting mix that retains moisture but drains well. Azalea seeds need light to germinate, so they should be spread evenly on the surface of the soil without covering them. Covering the seeds can block light and prevent germination. Maintain consistent moisture by misting the soil regularly or covering the container with plastic wrap to create humidity. Place the seed trays or pots in a location with bright, indirect light and stable temperatures, ideally between 18–22°C. Germination is slow and may take from several weeks to a few months, depending on the azalea variety and environmental conditions. Once seedlings develop several true leaves and are large enough to handle, they can be carefully transplanted into individual pots to continue growing.
Propagating Azaleas by Division
Division is a less common but effective method for propagating azaleas, especially for mature plants that have developed multiple stems or “clumps.” This technique involves carefully separating a larger azalea shrub into smaller sections, each with its own root system and shoots. Division is best suited for azaleas that naturally produce suckers or offshoots near the base, allowing gardeners to create new plants without waiting for rooting from cuttings or seeds.
The ideal time to divide azaleas is during early spring or immediately after flowering, when the plant is actively growing but before heat stress begins. Choose a healthy, vigorous parent plant and gently dig around the base to expose the root ball. Using a sharp, clean spade or garden knife, carefully separate the root mass into smaller sections. Each division should have several stems and a good portion of healthy roots to increase chances of successful transplanting.
Once divided, immediately replant each section into prepared soil with good drainage and acidic pH, similar to the parent plant’s preferred conditions. Water thoroughly and provide shade if the weather is hot or sunny, as newly divided plants are vulnerable to stress and dehydration. Division allows gardeners to rejuvenate older azaleas, control plant size, and multiply plants with minimal effort. With proper aftercare, divided azaleas establish quickly and resume healthy growth, producing beautiful blooms within one or two seasons.
Aftercare for Newly Propagated Azaleas
Proper aftercare is essential to help newly propagated azaleas establish strong roots and thrive. Whether propagated by cuttings, layering, seed, or division, young plants are vulnerable and need consistent attention. Start by keeping the soil evenly moist but not waterlogged. Azaleas prefer well-draining, acidic soil, so use a light mulch layer to retain moisture and regulate soil temperature while preventing weeds. Avoid letting the soil dry out completely, especially during the first few weeks after planting.
Place new azaleas in bright, indirect sunlight to protect tender foliage from harsh sun and reduce transplant shock. As the plants develop, gradually increase their exposure to morning sun or dappled light. Avoid intense afternoon sun, which can cause leaf burn. Fertilize sparingly during the first growing season using a balanced, slow-release fertilizer formulated for acid-loving plants. Over-fertilizing can harm roots and cause leaf burn.
Regularly inspect your young azaleas for signs of pests like lace bugs or diseases such as powdery mildew. Early detection allows for prompt treatment with appropriate organic or chemical controls. Prune sparingly in the initial months to encourage root establishment and avoid excessive stress. With careful watering, feeding, and protection, your newly propagated azaleas will grow vigorously, soon producing lush foliage and beautiful blooms to enhance your garden.
Troubleshooting Common Propagation Problems
Poor Rooting in Stem Cuttings
One of the most common issues when propagating azaleas from stem cuttings is failure to develop roots. This problem often arises from taking cuttings at the wrong time of year, using unhealthy or weak plant material, or failing to maintain proper moisture levels. Cuttings taken too early, when stems are still too soft, may rot before rooting, while overly woody cuttings root very slowly or not at all. To improve success, always select semi-hardwood stems during late spring or early summer. Keep the rooting medium consistently moist but avoid waterlogging, which can cause rot. Using a rooting hormone and a sterile, well-draining medium will significantly increase your chances of successful rooting.
Rot and Fungal Infections
Rot and fungal diseases are common problems in propagation caused by excessive moisture and poor air circulation. Overly wet soil or propagation mediums create ideal conditions for fungi such as damping-off, which can kill cuttings or seedlings quickly. To prevent rot, ensure your rooting medium drains well and avoid overwatering. Good air circulation around your propagation setup helps keep foliage dry and reduces fungal spores. If you notice signs of fungal infection—such as discoloration, soft spots, or a foul smell—remove affected material immediately and consider applying a mild fungicide if appropriate.
Slow or Uneven Seed Germination
When propagating azaleas from seed, slow or patchy germination is a frequent challenge. Azalea seeds are tiny and require specific conditions to sprout, including light exposure and stable moisture. Germination can take several weeks or even months depending on the variety and environmental factors. If seeds fail to germinate uniformly, ensure that the seeds are fresh and properly extracted. The seed-starting mix should remain evenly moist but not soggy, and the temperature should be kept consistent—ideally between 65°F to 72°F (18°C to 22°C). Patience is key, and sometimes pre-soaking seeds or stratifying (cold treatment) may improve germination rates.
Problems with Division
Division is a propagation method that requires careful handling of roots and stems. Problems often arise when divisions lack sufficient root mass or are damaged during separation. Dividing an azalea that is too large or old without adequate root sections can lead to poor establishment or plant death. To avoid this, gently dig around the plant and carefully separate clumps so that each new division has several healthy stems and a strong root system. After division, transplant immediately into well-prepared, acidic soil with good drainage. Keep divisions well-watered and shaded to reduce transplant shock until they re-establish.
Pests and Diseases on Newly Propagated Plants
Newly propagated azaleas are vulnerable to pest infestations and diseases due to their stressed and developing condition. Common pests include lace bugs, spider mites, aphids, and whiteflies. These pests can weaken plants by feeding on leaves and transmitting diseases. Fungal diseases such as powdery mildew and leaf spot are also common, especially in humid or poorly ventilated conditions. Regularly inspect your young plants and apply targeted treatments promptly. Organic options such as neem oil or insecticidal soaps can be effective and less harmful to beneficial insects. Maintaining good cultural practices—such as proper spacing, watering at the base, and ensuring good airflow—helps prevent many issues.
Long-Term Benefits of Propagation
Learning how to propagate an azalea offers long-term rewards beyond simply expanding your garden. It allows you to preserve the exact beauty of a prized plant, save money on new shrubs, and develop a deeper connection to your garden through hands-on involvement in every stage of plant life. Over time, propagated azaleas can mature into impressive, flowering specimens that bring color and joy for decades.
FAQ About How to Propagating an Azalea
When is the best time to propagate azaleas?
The best time to propagate azaleas depends on the method. For stem cuttings, late spring to early summer is ideal because the new growth is mature enough to root well. Layering works best in early spring or late summer when the plant is actively growing. If you’re propagating from seed, collect mature seeds in late summer or early fall and start them indoors. Timing your propagation with the plant’s natural growth cycle increases success rates.
How long does it take for azalea cuttings to develop roots?
Azalea cuttings generally take between 6 to 8 weeks to develop strong, healthy roots under optimal conditions. Maintaining consistent moisture, humidity, and warm temperatures during this period is crucial. Disturbing the cuttings too early can damage delicate new roots and reduce success. Patience is important — wait until roots are at least 2-3 centimeters long before transplanting.
Can all azalea varieties be propagated from cuttings?
Most azalea varieties can be propagated from semi-hardwood cuttings taken at the right time. However, rooting success can vary depending on the cultivar and overall health of the parent plant. Some hybrids root more easily, while others may require extra care or different techniques. Always select healthy, disease-free stems from vigorous plants to improve your chances.
What type of soil or rooting medium is best for azalea propagation?
A well-draining, acidic rooting medium is essential for successful propagation. A mixture of peat moss and perlite or coarse sand works well, as it retains moisture but prevents waterlogging. Avoid heavy garden soils or those that retain too much water, as soggy conditions can lead to rot and fungal infections. Using a sterile medium also reduces the risk of disease.
How should I care for newly propagated azaleas?
Newly propagated azaleas need gentle care to establish strong roots and healthy growth. Keep them in bright, indirect light, avoiding direct sun that can scorch tender leaves. Maintain consistent moisture but do not let the soil become soggy. Use an acid-loving plant fertilizer at half the recommended strength once roots are established. Mulch around the base to retain moisture and protect roots. Also, monitor for pests and diseases regularly, as young plants are more vulnerable during establishment.
Conclusion
Propagating azaleas is a rewarding way to grow your garden and deepen your connection with nature. Whether by cuttings, layering, seeds, or division, each new plant reflects your care and patience. With the right techniques, you’ll enjoy vibrant blooms that bring lasting beauty and joy. Start your propagation journey today and watch your garden flourish with the charm of azaleas for years to come.