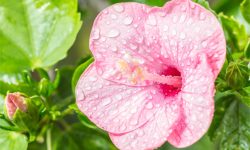
Begonias are beloved by gardeners for their vibrant blooms, lush foliage, and remarkable versatility in both indoor and outdoor spaces. Whether cascading from hanging baskets or brightening up a shaded garden bed, begonias bring color and life wherever they grow. But what makes them even more rewarding is how easily they can be propagated. With just a little knowledge and the right technique, you can multiply your collection without spending a dime.
Propagating begonias isn’t just practical—it’s also deeply satisfying. Watching a single leaf or stem grow into a flourishing plant offers a unique sense of accomplishment. Whether you’re a beginner looking to expand your indoor garden or an experienced grower aiming for healthier, faster-growing plants, this guide will walk you through every step of begonia propagation with clear instructions and expert tips. Let’s dive into the art of creating new begonias from the ones you already love.
Understanding Begonia Types and Propagation Suitability
Begonias come in a wide range of species and hybrids, but most fall into three main categories: fibrous, tuberous, and rhizomatous. Understanding the type of begonia you have is crucial to selecting the right propagation method and ensuring success.
Fibrous Begonias
Fibrous begonias have small, fibrous root systems and include popular varieties like wax begonias and angel wing begonias. These types are ideal for stem cutting propagation because their stems are firm and root easily in moist soil or water. They also respond well to leaf cuttings, making them a great choice for beginners.
Tuberous Begonias
Tuberous begonias grow from underground tubers and produce large, showy flowers. They can be propagated through tuber division when dormant or by leaf cuttings during active growth. However, stem cuttings can be more challenging because of the plant’s softer, more delicate stems. Proper timing and care are essential for successful propagation.
Rhizomatous Begonias
Rhizomatous begonias spread via thick horizontal stems, or rhizomes, that creep along the soil surface. These begonias are best propagated through rhizome division or leaf cuttings. Their foliage is often a major attraction, and propagation from leaves or rhizome sections helps retain unique characteristics of the parent plant.
Matching the Propagation Method
The best method depends not only on the begonia type but also on your growing conditions and goals. If you want quick results, stem or leaf cuttings are ideal. If you’re working with mature plants, dividing tubers or rhizomes may be more efficient. Knowing your plant’s natural growth habit helps you choose the propagation method with the highest success rate.
Why Propagate Begonias?
Propagating begonias offers a wide range of benefits that go beyond simply multiplying your plants. It’s a practical and deeply rewarding method for gardeners who want to expand their collection without constantly purchasing new specimens. Whether you’re trying to preserve a unique variety with striking foliage or vibrant blooms, propagation allows you to create exact genetic copies, ensuring you never lose a cherished plant. It’s also an economical solution—one healthy begonia can yield several new plants, making it easy to fill your garden beds, indoor pots, or give thoughtful gifts to fellow plant lovers. Additionally, propagation helps rejuvenate aging or leggy begonias, encouraging fresher, more vigorous growth. Many gardeners also find that propagating their own plants strengthens their connection to nature and provides a fulfilling hands-on experience. Watching new roots emerge and leaves unfurl from a single stem or leaf brings a sense of joy and accomplishment that only nurturing life can provide.
When to Propagate Begonias for Best Results
The best time to propagate begonias is during their active growing season, typically from late spring through early summer. This period offers the ideal balance of warmth, light, and humidity that encourages quick rooting and strong new growth. Attempting propagation during the cooler months, such as fall or winter, often results in slower root development or failure, as the plant naturally enters a semi-dormant state and diverts its energy away from growth.
Choosing a day when temperatures are consistently warm—above 65°F (18°C)—but not overly hot is optimal. Overcast mornings or early evenings are also great times to take cuttings, as the lower light and cooler conditions reduce stress on the parent plant and the cutting. Propagating in sync with the begonia’s natural rhythm not only increases the success rate but also ensures that your new plants have ample time to establish themselves before cooler seasons return.
Tools and Materials You’ll Need
To successfully propagate begonias, having the right tools and materials on hand will make the process smoother and increase your chances of success. Start with a pair of sharp, sterilized pruning shears or scissors for taking clean cuttings without damaging the plant. You’ll also need a small container of rubbing alcohol or a flame source to disinfect your tools between cuts, which helps prevent the spread of disease.
Next, prepare clean pots or trays with good drainage and fill them with a light, well-aerated rooting medium such as a mix of peat moss and perlite or seed-starting soil. A spray bottle filled with clean water is essential to keep the soil moist without overwatering. Depending on the method of propagation, you may also need rooting hormone to encourage faster root development, especially for cane or rhizomatous begonias.
Clear plastic bags or a humidity dome can help maintain high humidity during the rooting phase, while a warm, bright location with indirect sunlight ensures the cuttings get enough light without being scorched. Labeling materials can be useful if you’re propagating different begonia varieties at the same time. With these simple but essential tools and materials, you’ll be fully equipped to start propagating begonias successfully at home.
Method 1: Propagation by Stem Cuttings
Selecting Healthy Stems for Cutting
Choose healthy, non-flowering stems that are free from pests or disease. The stem should be firm, green, and ideally about four to six inches long. Make a clean cut just below a leaf node, as this is where roots will most likely emerge.
Preparing and Planting the Cuttings
Remove the lower leaves, leaving two to three leaves at the top. Dip the cut end into rooting hormone powder, then insert the stem into a moist propagation medium. Firm the soil around the base to provide support. Place the pot in a warm, brightly lit area but out of direct sunlight.
Encouraging Root Development
Maintain high humidity around the cutting by covering the pot with a plastic bag or placing it inside a propagation chamber. Open the cover occasionally to allow fresh air circulation and prevent mold growth. Keep the soil consistently moist but not soggy.
Method 2: Propagation by Leaf Cuttings
Choosing the Right Leaf
Select a mature but healthy leaf from the mother plant. Using a sharp blade, cut the leaf into sections, ensuring each section contains a main vein. You can also use an entire leaf with its petiole (leaf stem) attached.
Planting Leaf Sections
Lay the sections flat on moist propagation medium, vein-side down, and press them gently into the surface. Alternatively, insert the petiole into the soil if using the whole leaf. Cover with a humidity dome or plastic to retain moisture.
Monitoring for Growth
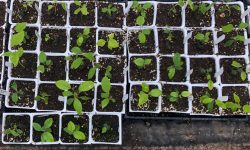
Place the tray in a warm, bright location with indirect light. After a few weeks, small plantlets will begin to emerge from the leaf veins. Once they have developed roots and a few leaves, they can be carefully transplanted into individual pots.
Method 3: Division of Tuberous Begonias
Lifting and Inspecting Tubers
Tuberous begonias should be lifted and divided during their dormant phase, usually in late winter or early spring. Gently remove the tubers from their soil and brush off any excess dirt. Inspect for healthy, firm tubers with visible eyes or buds.
Making the Cut
Use a clean, sharp knife to divide the tuber into sections, ensuring each piece has at least one growing eye. Dust the cut surfaces with fungicidal powder to prevent rot, then allow them to dry for a day before planting.
Replanting and Caring for Divisions
Plant the tuber sections in fresh, moist potting mix with the eyes facing upward. Keep the containers in a warm spot with indirect sunlight until new growth appears. Water lightly to avoid rotting the tubers.
Method 4: Propagating Rhizomatous Begonias
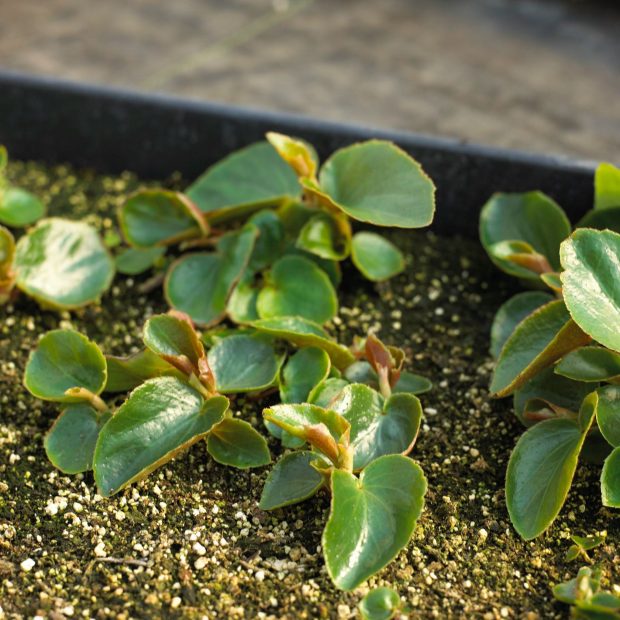
Rhizomatous begonias are prized for their striking foliage and creeping rhizomes, which make them easy to propagate through division. This method is simple, effective, and ideal for rejuvenating mature plants or expanding your collection.
To start, remove the plant from its pot and gently clean off the soil to expose the thick, horizontal rhizomes. Use a clean, sharp knife to divide the rhizome into sections, each with at least one visible bud or node. Let the cut pieces dry for a few hours to callous over, which helps prevent rot when replanted.
Plant each section just below the surface of a light, well-draining potting mix. Keep the soil slightly moist and place the container in a warm, humid spot with bright, indirect light. A humidity dome or plastic cover can speed up rooting, which usually begins within two to four weeks.
This method is especially useful for overgrown begonias, producing identical new plants while helping maintain compact, healthy growth. With minimal tools and care, you can easily multiply your rhizomatous begonias and enjoy lush new foliage in just a few weeks.
Caring for Newly Propagated Begonias
Caring for newly propagated begonias is a critical step in ensuring their healthy establishment and long-term growth. Once your cuttings or divisions have been planted, they enter a vulnerable stage where proper care makes all the difference. Begin by placing them in a warm, bright area with indirect sunlight. Direct sun can scorch their delicate leaves, so filtered light or a north- or east-facing window is ideal. Maintain consistent temperatures between 65–75°F (18–24°C), avoiding cold drafts or heat stress.
Humidity is essential during this early stage. Keep the surrounding air moist by misting the plants regularly or covering them with a clear plastic dome or bag to create a mini greenhouse effect. However, be sure to remove the cover for short periods daily to allow air circulation and prevent fungal diseases. The soil should remain slightly moist but never soggy. Overwatering can quickly lead to root rot, so always check the top inch of the soil before watering again.
As roots begin to develop—typically after 3 to 6 weeks—you can gradually reduce humidity support and increase light exposure. Watch for new leaf growth, a sign that your begonias have successfully rooted. At this point, consider feeding them with a diluted, balanced liquid fertilizer every 3 to 4 weeks to support healthy foliage development. Avoid moving or repotting the plants too soon; allow the root systems to strengthen first. With attentive, gentle care, your young begonias will transition into thriving mature plants ready to brighten your space or garden.
Common Challenges in Begonia Propagation
While begonias are generally easy to propagate, several common challenges can affect success, especially for beginners. One of the most frequent issues is rot, often caused by overwatering or poor drainage. When cuttings or divisions sit in soggy soil or overly humid environments without airflow, fungal infections can quickly set in. Using a sterile, well-draining medium and allowing cut surfaces to callous before planting helps prevent this.
Another challenge is low humidity or inconsistent moisture. Begonia cuttings, especially leaf or stem cuttings, need steady humidity to root well. If the air is too dry, they may wilt or fail to develop roots. A humidity dome, plastic bag cover, or frequent misting can create a stable microclimate during the critical rooting phase.
Improper light is also a common mistake. Too little light can lead to leggy, weak growth, while direct sunlight may scorch tender cuttings. Bright, indirect light is best for encouraging healthy root and foliage development without stressing the plant.
Pests like fungus gnats, mealybugs, or spider mites may also attack vulnerable cuttings, especially in humid environments. Monitoring your cuttings and keeping the growing area clean can reduce pest problems.
Finally, patience is key. Some types of begonias root quickly, while others take several weeks to show signs of new growth. Avoid the temptation to tug on cuttings too soon, and instead watch for subtle signs of progress like new leaves or firm resistance when gently touched.
When to Transplant Rooted Begonia Cuttings
Tips for Faster and Healthier Propagation
Start with Healthy Parent Plants
The success of begonia propagation begins with the quality of the parent plant. Always select a mother plant that shows no signs of disease, pest infestation, or stress. Look for vibrant, well-formed leaves and firm stems. Avoid plants that are drooping, discolored, or recently exposed to harsh sunlight or inconsistent watering. A strong parent plant provides cuttings with the highest potential for rooting and vigorous growth.
Use Clean, Sharp Tools
Propagation always requires precision and hygiene. Use sterilized scissors, pruners, or razor blades to take cuttings. A clean, sharp blade ensures a smooth cut that doesn’t crush plant tissue, which reduces the risk of rot and infection. Sterilize your tools with isopropyl alcohol or a diluted bleach solution before and after each use to prevent the spread of pathogens between plants.
Take Cuttings Early in the Day
Morning is the optimal time to take begonia cuttings. At this time, the plant’s water content is highest, which helps the cuttings stay turgid and reduces the risk of wilting. Cooler temperatures and lower evaporation rates in the early hours also create less stress for the cuttings during the transition.
Dip Cuttings in Rooting Hormone
Although many begonias can root without assistance, applying a rooting hormone can significantly improve success rates, especially with more delicate or slow-to-root varieties. Use a powdered or gel-based rooting hormone and lightly coat the cut end of the stem. This encourages faster root formation and increases the chances of healthy root development by stimulating cell division at the base of the cutting.
Maintain High Humidity Around Cuttings
High humidity prevents dehydration and supports root development. Use a humidity dome, plastic bag, or propagation tray with a clear lid to create a mini greenhouse environment. Be sure to allow for some air exchange—either by opening the cover briefly each day or poking a few ventilation holes—to prevent fungal growth and mold. Misting the inside of the dome periodically can also help maintain ideal humidity levels around 70–90%.
Provide Bright, Indirect Light
New cuttings are sensitive to harsh sunlight, which can cause scorching or dehydration. Place your cuttings in a location with bright, indirect light—such as a north-facing window or under a grow light placed a few inches above the tray. Consistent lighting encourages photosynthesis, which is vital for root development and leaf retention, but avoid full sun exposure until the cuttings are fully rooted.
Avoid Overwatering
Overwatering is a common mistake that often leads to rot before roots can form. Always use a well-draining propagation medium and ensure the container has drainage holes. Only water when the top layer of the medium feels slightly dry to the touch. Saturated conditions will deprive the stem of oxygen and encourage fungal pathogens. You want the medium moist, not soggy.
Use a Well-Draining Medium
The right rooting medium balances moisture retention and aeration. A mix of peat moss or coconut coir with perlite or vermiculite works well. This combination keeps the cutting moist without causing waterlogging. Avoid dense garden soil or compacted potting mixes that can hold too much moisture or harbor harmful fungi and bacteria.
Minimize Disturbance
Once you’ve planted your cuttings, resist the urge to check for roots by tugging on them or digging into the medium. Disturbing the cuttings too soon can damage developing roots and delay propagation. Instead, observe signs of growth like new leaf buds or increased firmness in the stem. Wait at least 3–4 weeks before checking for root development.
Be Patient and Observe Carefully
Begonia cuttings can take anywhere from two to six weeks to root, depending on the variety and environmental conditions. Keep a close eye on them without interfering too much. Watch for signs of mold, stem rot, or excessive wilting, and adjust watering or ventilation as needed. If a cutting fails, remove it promptly to prevent the spread of disease. Patience and attentive care often make the difference between success and failure in propagation.
Propagating Begonias Indoors vs. Outdoors
Both indoor and outdoor propagation can be successful for begonias, but each method suits different needs and conditions.
Indoor propagation offers better control over humidity, light, and temperature. It’s ideal for cool climates or winter months, and allows you to get a head start before the growing season. You can use grow lights, heat mats, and humidity domes to create a stable, nurturing environment for cuttings. This method is especially useful for sensitive or rare begonia varieties.
Outdoor propagation works well during late spring and early summer when temperatures are warm and stable. Natural light and airflow help promote healthy root development, but you’ll need to protect cuttings from harsh sun, wind, or heavy rain. A shaded spot like a covered patio is usually best.
Your choice depends on your local climate and available space. Indoors is more reliable in challenging conditions, while outdoors is great for larger-scale propagation during the right season.
Long-Term Care for Propagated Begonias
To keep propagated begonias healthy over time, focus on maintaining the right environment. Provide bright, indirect light to support growth without scorching leaves. Water only when the top inch of soil feels dry, and avoid wetting the foliage to prevent fungal issues.
Feed your begonias with a diluted balanced fertilizer every few weeks during the growing season, but reduce feeding in fall. Trim spent flowers and yellow leaves regularly to keep the plant tidy and vigorous. Pinch leggy stems to promote fuller growth.
Repot or divide begonias every couple of years to refresh soil and give roots more space. With consistent care, your propagated begonias will thrive and continue to brighten your home or garden for years.
FAQ: Frequently Asked Questions About Propagating Begonias
How long does it take for begonia cuttings to root?
Begonia cuttings typically take about 2 to 4 weeks to develop roots, depending on the variety, temperature, and humidity. Leaf cuttings may take slightly longer. You’ll know they’ve rooted when you see new growth emerging or resistance when gently tugged.
Do I need rooting hormone to propagate begonias?
Rooting hormone is not essential but can improve success rates, especially for stem and leaf cuttings. It helps stimulate faster root development and reduces the risk of rot. If you’re using a rooting hormone, apply a light dusting to the cut end before planting.
Can I propagate begonias in water?
Yes, many types of begonias, especially cane and wax begonias, can be propagated in water. Place cuttings in a clear container with clean water and ensure the leaves stay above the surface. Change the water every few days. Once roots are an inch or two long, transplant into soil.
What’s the best temperature for propagating begonias?
The ideal temperature for successful propagation is between 68–75°F (20–24°C). Avoid placing cuttings in cold or drafty spots, as lower temperatures can slow rooting or cause the cuttings to rot. Warmth and humidity speed up the rooting process.
Why are my begonia cuttings wilting or rotting?
Wilting or rotting is often due to overwatering, poor drainage, or high humidity without air circulation. Make sure you’re using a well-draining potting mix and don’t let the cuttings sit in soggy soil or stagnant water. Also, avoid covering them too tightly when using humidity domes. Remove any rotted or mushy cuttings immediately to prevent spreading.
Conclusion
Propagating begonias is a fulfilling way to expand your plant collection while gaining hands-on experience in plant care. By understanding the different methods, preparing properly, and providing the right environment, you can enjoy fast and healthy results. With patience and consistency, your propagated begonias will reward you with lush foliage and vibrant flowers season after season.