Bromeliads captivate plant lovers with their vibrant colors, striking shapes, and tropical flair. Whether displayed indoors or brightening up outdoor gardens, these unique plants add an exotic touch that’s hard to resist. The good news is you don’t need to buy new plants to expand your collection—propagating bromeliads at home is easier than you might think.
In this step-by-step guide, you’ll discover proven techniques to successfully propagate bromeliads and grow healthy, thriving plants. From separating pups to growing from seeds, we’ll cover everything you need to know to multiply your bromeliads and enjoy their stunning beauty for years to come. Let’s dive in and unlock the secrets to the best propagation results!
Understanding Bromeliad Propagation
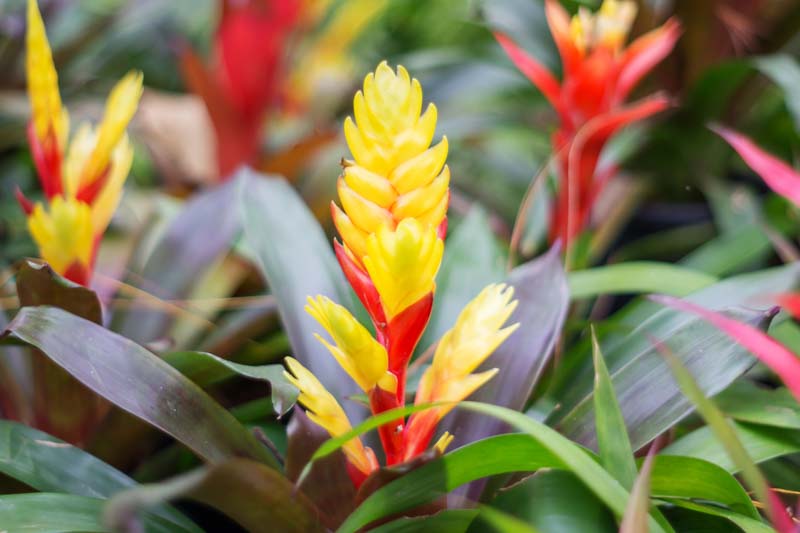
Bromeliads are fascinating plants with unique growth habits that influence how they can be propagated. Unlike many plants that spread primarily through seeds, bromeliads mainly reproduce by producing offsets called “pups.” These pups develop at the base of the mother plant and eventually grow into independent plants with their own root systems. This natural cloning process allows gardeners to propagate new plants that are genetically identical to the parent, preserving the exact colors, patterns, and growth forms.
While pup separation is the most common and reliable propagation method, bromeliads can also be propagated by seed. However, seed propagation is more complex and less predictable because bromeliads are often hybrids. Seed-grown plants may exhibit a wide range of characteristics, sometimes differing significantly from their parent. This makes seed propagation a favorite among breeders aiming to create new varieties rather than casual gardeners.
Another less common but commercially important method is tissue culture, which involves growing plants in sterile laboratory conditions. Although highly efficient for mass production, tissue culture is usually inaccessible to home growers.
Understanding these propagation methods and the biology behind bromeliads’ growth cycles is essential for success. Bromeliads typically flower once in their lifetime, and after flowering, the mother plant gradually declines while pups take over the role of the mature plant. Recognizing this cycle helps you know when and how to propagate your bromeliads to keep your collection thriving.
Choosing the Right Bromeliad Species for Propagation
Selecting the right bromeliad species is key to successful propagation. Some species, like Tillandsia, Guzmania, Neoregelia, and Aechmea, produce healthy pups easily and grow well indoors or outdoors.
For beginners, propagating from pups is the easiest and most reliable method. Species with thick leaves and sturdy stems, such as Aechmea, are often easier to separate and care for than delicate varieties like Tillandsia.
Consider your growing environment and goals when choosing species. Fast-growing, hardy bromeliads are ideal for beginners, while slower-growing or rare types may require more experience.
Choosing the right species saves time and increases the chance of healthy new plants.
When to Propagate Bromeliads
Timing is crucial for successful bromeliad propagation. The best time to propagate bromeliads is during the active growing season, usually spring and summer, when the plant’s energy is high, and environmental conditions favor root development.
Attempting to propagate during colder months or the plant’s dormant period can result in poor rooting and higher mortality. Warm temperatures, moderate humidity, and indirect bright light create ideal conditions for new bromeliads to establish.
Always wait until pups reach an appropriate size—typically about one-third to one-half the size of the mother plant—before separating them. This ensures they have enough stored energy and root development to survive independently.
Propagating Bromeliads by Separating Offsets (Pups)
Why Separating Pups Is the Best Method
Separating offsets, commonly called pups, is widely regarded as the most straightforward and dependable method for propagating bromeliads. This approach guarantees that each new plant is a true clone of the mother plant, preserving all the unique characteristics such as vibrant flower colors, leaf patterns, and growth habits. Unlike seed propagation, which can result in genetic variation, pup separation produces consistent and predictable outcomes.
Additionally, pups develop roots while still attached to the mother plant. This connection supplies them with nutrients and moisture, reducing stress and increasing their chances of survival once separated. Because they are already partially established, pups tend to adapt quickly to new environments with less transplant shock. For gardeners looking to multiply their bromeliad collection efficiently, this method is both time-saving and cost-effective, requiring minimal specialized equipment or effort.
How to Identify Healthy Pups
Identifying the right pups to separate is crucial for successful propagation. Healthy pups are usually at least one-third to one-half the size of the mother plant, ensuring they have developed enough energy reserves and roots to survive on their own. These pups should have several sturdy, vibrant leaves free of discoloration, spots, or damage.
Pups that are too small or weak may struggle to root properly and are best left attached to mature plants until they grow stronger. It’s also important to look for pups growing low on the plant’s base, where roots are more likely to have formed. Sometimes pups appear in clusters, and in such cases, separate each pup carefully to avoid damaging their developing roots. By choosing robust pups at the right size, you maximize the chances of successful propagation and healthy new bromeliads.
Step-by-Step Guide to Separating Pups
First, prepare a clean, sharp knife or pruning shears and disinfect them to prevent disease transmission. Water the mother plant the day before to soften the soil and reduce stress.
Carefully remove the mother plant from its pot or location to access the base. Gently separate the soil around the pups to expose their roots.
Using your knife, cut the pup away from the mother plant as close to the base as possible, ensuring it has some roots attached. Avoid tearing or pulling, which can damage the plant.
After separation, dust the cut area with a fungicide or cinnamon powder to prevent infection. Plant the pup in a well-draining potting mix designed for bromeliads or orchids.
Keep the newly potted pups in a warm, shaded area with high humidity and mist regularly until they establish.
Propagating Bromeliads from Seeds
When to Use Seed Propagation
Seed propagation is less commonly used by home gardeners because it requires more time, patience, and specialized care compared to separating pups. However, it offers unique opportunities for plant enthusiasts and breeders. Growing bromeliads from seeds allows you to explore genetic diversity and potentially develop new cultivars with varied colors, shapes, and sizes.
Because bromeliads grown from seed may show different characteristics than the parent plant, this method is ideal for hybridization projects or anyone interested in experimenting with unique traits. For casual growers seeking identical plants, pup propagation remains the preferred method. Seed propagation requires a longer commitment, often taking several years before flowering plants develop.
Collecting and Preparing Bromeliad Seeds
Bromeliads produce seeds after their flowering phase when seed pods develop and mature. It’s important to wait until the seed pods have fully ripened and started to dry out on the plant before harvesting to ensure seed viability.
Once harvested, carefully open the dried seed pods to extract the tiny seeds. Because bromeliad seeds are extremely small and delicate, they need to be handled with care. Clean the seeds gently to remove any debris or pulp, then allow them to dry in a cool, ventilated area before sowing.
Proper seed preparation improves germination rates and helps prevent mold or fungal growth during the early stages of propagation.
Best Growing Medium for Bromeliads
Bromeliads thrive in well-draining, airy growing mediums that mimic their natural tropical environment. A mix of orchid bark, peat moss, and perlite works well to provide good drainage and moisture retention without becoming soggy.
Avoid heavy garden soil, which retains too much water and can cause root rot. For potted bromeliads, use a commercial bromeliad or orchid mix, or create your own blend with equal parts bark, peat, and perlite.
Good airflow around the roots is essential to prevent fungal problems and support healthy growth. Regularly check that the medium drains well and doesn’t stay waterlogged.
How to Sow Bromeliad Seeds
To sow bromeliad seeds successfully, prepare a sterile, well-draining seed-starting mix such as a blend of fine peat moss and perlite or a specialized orchid mix. The seeds are very small and require light to germinate, so scatter them evenly on the surface of the medium without covering them with soil.
Maintain consistently high humidity by covering the container with plastic wrap or placing it inside a humidity dome. Keep the temperature warm, ideally between 70°F and 80°F (21°C to 27°C), and provide bright but indirect light. Avoid direct sunlight, which can dry out or overheat the seeds.
Germination is usually slow and can take anywhere from several weeks to a few months. During this period, keep the medium moist but not waterlogged to prevent fungal problems. Once seedlings develop several leaves and a healthy root system, carefully transplant them into individual pots with suitable bromeliad potting mix.
Caring for Newly Propagated Bromeliads
Watering and Humidity
Newly propagated bromeliads need consistent moisture to encourage root development and healthy growth. However, it’s crucial to avoid overwatering, as bromeliads are highly susceptible to root rot if their soil becomes waterlogged. The best approach is to water lightly, ensuring the growing medium stays evenly moist but well-drained.
Misting the plants regularly helps maintain the high humidity levels bromeliads thrive in, especially if you’re growing them indoors or in dry climates. This mimics their natural tropical environment where moisture in the air supports leaf and root health. Be cautious not to let water sit in the central cup, or “tank,” of the bromeliad until the pup is fully established. Excess water in the cup can lead to rot or fungal issues in young, vulnerable plants.
Light Requirements
Newly propagated bromeliads require bright, indirect light to develop strong foliage and roots. Too little light can cause slow growth and weak, leggy plants, while direct sunlight—particularly intense afternoon sun—can scorch their delicate leaves, causing brown tips or spots.
Place your young bromeliads in a location where they receive filtered sunlight, such as near an east-facing window or under a shade cloth if outdoors. This balance ensures they get enough energy to thrive without stress from harsh light.
Fertilizing Young Plants
Fertilizing is important but should be done with care when bromeliads are newly propagated. Use a balanced, water-soluble fertilizer formulated for bromeliads, orchids, or other tropical plants. Dilute the fertilizer to about half or even a quarter of the recommended strength to avoid burning the tender roots and leaves.
Apply fertilizer sparingly during the first few months after propagation, following a schedule of once every 4 to 6 weeks. Over-fertilizing can cause nutrient burn or lead to excessive, weak growth. As the plants mature and establish, you can gradually increase feeding frequency and concentration according to their growth needs.
Troubleshooting Common Propagation Problems
Slow or No Root Development
When newly separated pups fail to develop roots, several factors might be responsible. Low humidity is a common culprit because bromeliads naturally thrive in humid environments. Without sufficient moisture in the air, root growth can slow dramatically. Additionally, temperatures that are too cool can inhibit root formation, as bromeliads prefer warmth to stimulate active growth.
Improper planting depth is another issue; pups should be planted so that their base has good contact with the growing medium but not buried too deeply, which can cause rot or suffocation of the base. To encourage root development, maintain a warm, humid environment and ensure the pups are planted in a light, well-draining substrate that supports aeration and moisture retention.
Rot and Fungal Issues
Rot and fungal infections frequently occur due to overwatering or stagnant air circulation around the plants. Bromeliads need soil that drains quickly and allows excess water to flow away easily. Waterlogging creates an ideal environment for root rot and fungal pathogens to thrive, which can quickly damage or kill young plants.
To prevent these problems, always use a well-draining potting mix designed for bromeliads or orchids and water sparingly. Ensure your growing area has good airflow, either naturally or with the help of fans if indoors. If fungal infections appear—such as mold, black spots, or soft, mushy tissue—apply an appropriate fungicide promptly and remove any affected plant material to stop the spread.
Pest Problems
Pests like mealybugs and scale insects can be especially troublesome for young bromeliads. These pests feed on plant sap, weakening the plant and making it vulnerable to diseases. Because bromeliads often grow in clusters and humid environments, pests can spread quickly if not caught early.
Regular inspection is vital. Look closely at the leaves, especially near the base and in the leaf axils where pests like to hide. If you detect an infestation, treat immediately using insecticidal soap, neem oil, or horticultural oils. These treatments are effective yet gentle enough not to harm the delicate bromeliads. Repeat treatments may be necessary to fully eliminate the pests.
Common Mistakes to Avoid When Propagating Bromeliads
One common mistake is overwatering, which leads to root rot and fungal infections. Bromeliads need moist but well-draining soil to thrive. Avoid letting water sit in the plant’s central cup, especially for young pups.
Another error is separating pups too early, before they are strong enough. Pups should be at least one-third the size of the mother plant with some roots developed to ensure survival after removal.
Using dull or dirty tools can cause damage and introduce diseases. Always use sharp, sterilized tools when cutting or dividing bromeliads.
Failing to provide adequate humidity and warmth can slow rooting and stunt growth. Maintain a humid environment and keep temperatures between 70°F and 85°F (21°C–29°C) for best results.
Lastly, placing young bromeliads in direct, harsh sunlight can cause leaf burn. Provide bright, indirect light to help them establish well.
FAQ – Frequently Asked Questions About Propagating Bromeliads
What is the easiest way to propagate bromeliads at home?
The easiest and most reliable method is separating pups (offsets) from the mother plant. Pups are clones of the parent and usually have established roots, which increases survival chances.
How long does it take for bromeliad pups to root after separation?
Typically, pups start developing roots within 4 to 8 weeks after being separated, depending on environmental conditions such as humidity, temperature, and care.
Can bromeliads be propagated from seeds, and is it recommended for beginners?
While bromeliads can be grown from seeds, this method is slow and more complex. It’s not recommended for beginners because seed-grown plants may differ from the parent and take several years to bloom.
How often should I water newly propagated bromeliads?
Water young bromeliads lightly but consistently to keep the soil moist but not soggy. Mist regularly to maintain humidity, especially indoors or in dry climates. Avoid letting water sit in the central cup until the pup is established.
What are common problems during bromeliad propagation and how can I prevent them?
Common problems include rot from overwatering, slow root growth due to low humidity, and pest infestations like mealybugs. Prevent these by using well-draining media, maintaining warm humid conditions, and inspecting plants regularly.
Conclusion
Propagating bromeliads is a rewarding way to grow your collection and enjoy these beautiful tropical plants. Separating pups remains the most straightforward and successful method for home gardeners, while seed propagation offers exciting possibilities for enthusiasts. With the right timing, care, and attention to detail, you can ensure your new bromeliads thrive and bloom for years to come.

