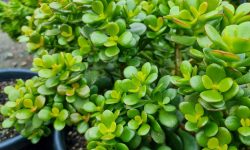
Camellias charm gardeners with their glossy green leaves and exquisite, rose-like blooms. These plants bring timeless beauty to gardens and patios. Learning how to propagate camellias allows you to grow new plants that mirror the charm of their parent shrubs. It’s also an easy way to expand your collection or share special varieties with friends. Propagation connects you to nature by letting you create life from a single stem.
This guide takes you through each step clearly and simply. You will learn how to choose healthy parent plants, prepare cuttings or seeds, and care for young camellias until they flourish. With patience and the right care, your efforts will result in strong, blooming shrubs that thrive season after season. Propagating camellias is both practical and deeply satisfying, giving you the joy of watching new growth unfold in your own garden.
Understanding Camellia Propagation
Camellias are evergreen shrubs admired for their glossy leaves and elegant flowers that bloom in shades of pink, white, or red. To successfully propagate camellias, you first need to understand how these plants reproduce and develop. Propagation allows gardeners to create new plants from a parent shrub while preserving its most desirable traits such as flower color, petal shape, and growth habit. By mastering this process, you can build a healthy collection of camellias that remain true to type.
Camellias can be propagated through several techniques, including seeds, cuttings, layering, and grafting. Each method has unique advantages. Seed propagation produces genetically diverse plants, which may result in new hybrids with unexpected beauty. Cuttings, on the other hand, produce identical copies of the parent plant, making them ideal for maintaining specific cultivars. Layering works slowly but is a reliable method that allows roots to form while the stem is still attached to the parent. Grafting is used mainly by professionals to combine strong rootstocks with attractive varieties.
The right timing and conditions are essential for success. Late spring to early summer is the ideal period because plants are actively growing. Moderate temperatures and consistent humidity help cuttings root faster and prevent stress. Good airflow and bright, indirect light are also vital. Healthy parent plants should be chosen, free from disease and pests. Using sharp, clean tools and applying rooting hormone can increase the chances of success. Understanding the biological rhythm of camellias and providing optimal conditions for growth will lead to strong, healthy plants that bloom beautifully for many seasons. Propagation is both a science and an art that deepens your connection with nature and rewards you with lasting beauty in your garden.
Choosing the Right Method to Propagate Camellias
Choosing the right method to propagate camellias is the key to achieving strong and healthy plants. Each technique requires different levels of time, patience, and experience. Understanding the nature of each method helps you decide which one best fits your gardening goals. The most common propagation techniques for camellias include growing from seed, taking stem cuttings, using air layering, and grafting. All these methods can produce beautiful new plants when done with care and precision.
Seed propagation offers an exciting way to create new hybrids and experiment with unique flower forms. However, it demands patience, as seed-grown camellias often take several years to mature and bloom. The resulting plants may vary in color, shape, and growth habit from their parents, which adds an element of surprise. Cutting propagation, on the other hand, guarantees identical offspring. By using semi-hardwood cuttings from healthy parent shrubs, you can produce true-to-type plants faster and more predictably. This method is ideal for gardeners who wish to replicate prized varieties.
Air layering and grafting are often used by more experienced growers or nurseries seeking consistent success. Air layering involves wounding a branch and encouraging it to root while still attached to the parent plant. This process produces well-established young plants with minimal risk of failure. Grafting joins two camellia parts—the scion and the rootstock—to combine strength with beauty. This method allows gardeners to grow delicate varieties on hardier roots, improving resilience and adaptability. Choosing the right propagation method depends on your climate, skill level, and the type of camellia you wish to reproduce. When chosen wisely, your method will reward you with vigorous plants and long-lasting floral beauty.
Preparing Materials and Tools for Propagation
Proper preparation is essential for successful camellia propagation. Before you begin, gather all the materials and tools you’ll need. Having everything ready ensures a smooth process and prevents unnecessary delays that could stress your cuttings or seeds. The basic items include clean pruning shears, a sharp knife, rooting hormone powder or gel, a misting bottle, and pots or trays filled with a well-draining propagation mix. It’s best to prepare these materials in advance and disinfect all tools with rubbing alcohol or a mild bleach solution to avoid spreading disease.
Choosing the right propagation medium is just as important as having the proper tools. Camellia cuttings root best in a mix that retains moisture but allows good air circulation. A recommended mixture includes equal parts of perlite and peat moss or coarse sand. This combination supports strong root formation and prevents fungal growth. Use small pots or trays with drainage holes to keep the soil from becoming waterlogged. If you plan to propagate multiple cuttings, label each container with the plant variety and date to track progress. Maintaining consistency and cleanliness will make a significant difference in root development.
Environmental control is also crucial during the propagation phase. Camellia cuttings require warm, humid conditions and indirect sunlight to form roots effectively. A humidity dome or plastic cover helps maintain moisture around the plants. Frequent misting keeps the leaves hydrated while preventing drying out. Keep the temperature between 68°F and 75°F for optimal results. Proper air circulation prevents fungal problems and strengthens the cuttings as they grow. By preparing your tools and setting up a clean, controlled environment, you create the perfect foundation for successful camellia propagation and healthy, thriving young plants.
Propagating Camellias from Cuttings
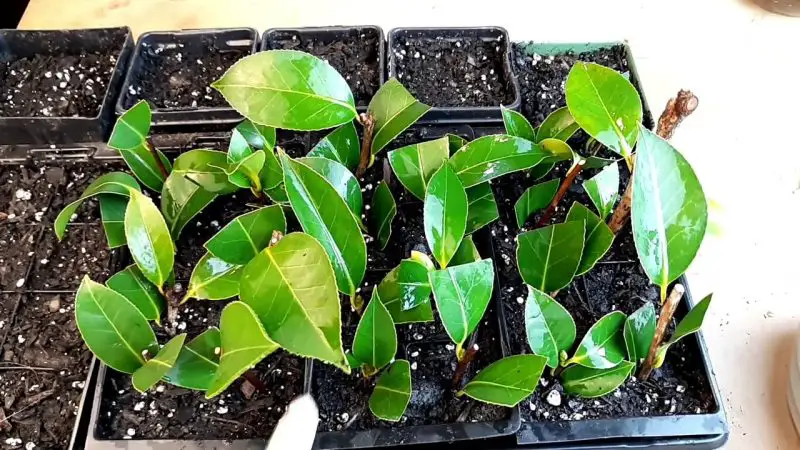
Propagating camellias from cuttings is one of the most effective and reliable methods for creating new plants. It allows you to clone your favorite camellia variety and maintain all of its desirable traits. The best time to take cuttings is in late spring through early summer when new growth begins to harden slightly. Select a healthy parent plant free from pests and diseases. Choose semi-hardwood stems that are mature enough to hold their shape but still flexible. Each cutting should be about 4 to 6 inches long, with at least two leaf nodes. Remove any flowers or buds so the plant focuses on root growth rather than blooming.
Once you’ve prepared the cuttings, trim the lower leaves to expose the nodes and slightly wound the bottom of the stem to encourage rooting. Dip the base in rooting hormone powder or gel to stimulate root formation. Insert the cuttings into pots filled with a moist, well-draining propagation mix made of peat and perlite. Firm the soil around each stem to keep it stable and water gently. Cover the pots with a plastic dome or clear bag to retain humidity, but ensure good air circulation to prevent fungal diseases. Keep the environment warm and bright but out of direct sunlight.
Rooting usually takes six to twelve weeks, depending on the variety and growing conditions. During this period, keep the soil consistently moist but never soggy. When new growth appears, it’s a sign that roots have formed. At this stage, gradually remove the cover to acclimate the young plants to normal conditions. Once the roots are well established, transplant them into larger pots or directly into the garden. With patience and consistent care, your camellia cuttings will develop into strong, flowering shrubs ready to enhance your landscape.
Propagating Camellias from Seeds
Propagating camellias from seeds is one of the most fascinating ways to expand your garden because it allows you to witness the full cycle of life, from seed to mature shrub. Although it takes more time than cuttings or layering, it rewards patient gardeners with unique plants that may differ in bloom color, size, or form from their parents. Each seed-grown camellia has its own charm, making this method ideal for those who enjoy experimentation and the excitement of discovering something new. It’s also an excellent approach for hybridizing and developing new varieties that thrive in specific climates or soils.
Camellia seed pods ripen in late autumn and gradually turn brown before splitting open. It’s best to harvest them as soon as they begin to crack to prevent seed loss. Fresh seeds germinate best, so avoid letting them dry out completely. After collecting, soak the seeds in warm water for twelve to twenty-four hours to soften the shell and speed up sprouting. Then plant them about one inch deep in a light, well-draining mix of peat, perlite, and coarse sand. Keep the soil evenly moist but not waterlogged, and maintain a temperature between 70°F and 80°F. Covering the pot with clear plastic or placing it in a propagation tray will retain humidity and promote faster germination.
Germination may take one to three months, and young seedlings must be handled carefully to avoid root damage. Provide them with bright, indirect light and consistent moisture. When the seedlings reach six inches tall, transplant them into individual pots with slightly acidic, fertile soil. Feed them with a diluted, balanced fertilizer every few weeks to encourage steady growth. Camellias grown from seed may take three to five years to bloom, but each blossom represents a new, one-of-a-kind creation born from your care and dedication. This slow yet rewarding process captures the true spirit of gardening—patience, curiosity, and the joy of nurturing life.
Propagating Camellias by Air Layering
Propagating camellias by air layering is an excellent method for gardeners who want strong, well-rooted plants with a high success rate. This technique allows a branch to develop roots while still attached to the parent plant, ensuring constant nourishment and moisture. It’s especially effective for mature camellias that are difficult to root from cuttings. The best time to perform air layering is in late spring or early summer when the plant is actively growing and the stems are flexible but sturdy. With patience and careful handling, air layering can produce healthy young plants that establish quickly once separated.
To begin, select a healthy branch about the thickness of a pencil. Make a shallow upward cut or remove a one-inch strip of bark around the stem. Apply rooting hormone to the exposed area to encourage root formation. Then, wrap moist sphagnum moss around the wound and cover it with clear plastic to hold moisture. Secure both ends tightly with string or tape to prevent drying. The moss must stay damp but not soaked, so check it periodically and mist it if necessary. A small window of condensation inside the plastic means conditions are perfect for rooting.
Roots usually begin to form within two to three months, depending on temperature and humidity. Once a healthy root system becomes visible through the plastic, carefully cut the new plant below the rooted section. Remove the plastic wrap and plant the rooted branch in a pot with well-draining, acidic soil. Keep it shaded and watered regularly until new growth appears. Air-layered camellias tend to establish faster and bloom earlier than those grown from seed or cuttings. This method is simple, reliable, and ideal for reproducing prized varieties that you want to preserve and enjoy for many years in your garden.
Aftercare for Newly Propagated Camellias
Caring for Rooted Cuttings and Layered Plants
After propagation, young camellias require consistent care to transition from a controlled environment to independent growth. Keep newly rooted cuttings or layered plants in bright, indirect light and avoid harsh midday sun that can scorch tender foliage. Maintain even soil moisture by watering when the top inch feels dry, and ensure the container drains well. Excess moisture can suffocate delicate roots. A light mulch of pine needles or compost helps regulate temperature and retain humidity. You can also use a humidity dome or mist regularly to prevent leaves from drying out. This stage demands gentle handling and stable conditions to prevent stress or transplant shock.
When you notice new shoots or leaves forming, it’s a sign the plant is establishing itself. Begin feeding with a diluted, balanced fertilizer rich in nitrogen and iron to strengthen foliage and root systems. Avoid using strong fertilizers that can damage young roots. Gradually expose the plants to more sunlight over several days to help them adapt to outdoor conditions. Once the roots fill the container, transplant them into larger pots or garden beds with slightly acidic soil. With steady care, your young camellias will develop firm stems, glossy leaves, and lasting vigor that supports abundant blooms in the coming seasons.
Watering and Feeding Young Camellias
Watering and nutrition are the foundation of healthy growth for newly propagated camellias. These plants prefer moist but not soggy soil, and consistency is vital during their first year. Check the soil often and water deeply when it starts to dry out, ensuring excess water drains freely. Morning watering is ideal, as it allows moisture to reach the roots while preventing nighttime dampness that encourages fungal growth. Use rainwater if possible since camellias thrive in slightly acidic conditions. Protect the young roots from temperature swings by maintaining an even layer of organic mulch.
Once your camellias begin to grow actively, feed them with a slow-release fertilizer designed for acid-loving plants such as azaleas or rhododendrons. Apply a light dose every month from spring through midsummer to encourage steady root and leaf development. Avoid fertilizing late in the season, as new growth can be damaged by cold weather. Combine feeding with gentle pruning to shape young shrubs and encourage branching. Consistent watering, balanced feeding, and protection from harsh sunlight will ensure your young camellias establish strong roots, lush foliage, and a resilient structure that supports years of vibrant flowering.
Transplanting and Long-Term Care
Transplanting camellias successfully requires patience, timing, and proper technique. The best time for this process is early spring or fall, when temperatures are cool and the plant is less stressed. Choose a new spot that offers bright, filtered light and protection from strong afternoon sun. The soil should be well-drained, rich in organic matter, and slightly acidic, ideally with a pH between 5.5 and 6.5. Before digging up your camellia, water it deeply a day ahead to keep the root system hydrated. When moving the plant, dig carefully around the root ball and lift it gently to prevent root damage. Replant it at the same depth as before, firm the soil gently, and water thoroughly to help roots establish.
After transplanting, consistent care will help your camellia recover and flourish. Keep the soil evenly moist but never soggy, as excessive water can cause root rot. Apply a layer of organic mulch such as pine needles or shredded bark to retain moisture, prevent weeds, and regulate temperature. Fertilize lightly in early spring with a slow-release formula for acid-loving plants to support steady growth. Avoid fertilizing late in the season, as new growth may be damaged by frost. Light pruning after flowering encourages branching and enhances airflow within the shrub.
Long-term success also depends on regular observation and gentle maintenance. Inspect leaves for pests like scale insects, aphids, or tea mites, which can weaken the plant over time. Remove affected leaves and apply natural remedies promptly. During winter, protect young camellias from frost by covering them with burlap or moving potted ones indoors. With steady attention and care, your camellia will thrive for decades, producing glossy foliage and radiant flowers that brighten your garden year after year.
Common Problems and How to Fix Them
Root Rot Issues
Root rot is one of the most dangerous problems camellia growers face, especially during the propagation and early growth stages. It develops when roots are deprived of oxygen due to soggy, poorly drained soil, creating the perfect environment for fungal pathogens such as Phytophthora cinnamomi. The first symptoms include drooping leaves, slow growth, and black or mushy roots. As the disease advances, the plant may wilt suddenly, even when the soil seems moist. Prevention is far easier than treatment. Always use a loose, well-draining mix made from pine bark, peat moss, and perlite. Water only when the top inch of soil feels dry, and ensure pots or beds have excellent drainage.
When treating root rot, carefully unpot the plant and inspect the entire root system. Trim off all damaged or discolored roots using sterilized shears, and rinse the healthy roots gently in clean water. Let the plant air-dry before replanting it in fresh, dry soil. Adding a thin layer of gravel or sand at the base of the container helps avoid future waterlogging. Reduce watering for several weeks while the plant recovers. Using a natural fungicide or a diluted hydrogen peroxide solution can help eliminate lingering pathogens. With patience and careful moisture management, your camellia will recover, develop stronger roots, and regain its natural vitality.
Leaf Yellowing and Pest Damage
Yellowing leaves are among the most common issues camellia growers encounter. This problem often signals stress caused by poor drainage, nutrient deficiency, or pH imbalance. Camellias prefer slightly acidic soil with a pH between 5.5 and 6.5. When soil becomes too alkaline, essential nutrients such as iron and magnesium become unavailable, leading to chlorosis. Overwatering can worsen the condition by suffocating roots, reducing their ability to absorb minerals. Regularly testing soil pH and using fertilizers formulated for acid-loving plants help prevent leaf yellowing and restore a healthy green hue. Adding organic matter such as leaf mold or compost improves both structure and fertility.
Pests can also cause significant leaf damage. Scale insects, aphids, and tea mites feed on the sap, weakening the plant and leaving behind sticky honeydew that attracts mold. Examine leaves frequently, focusing on the undersides where pests often hide. Remove affected parts and apply neem oil or horticultural soap to control infestations naturally. Encouraging beneficial insects like ladybugs provides long-term biological control. Keep foliage dry during watering and ensure good airflow to prevent fungal problems. With consistent monitoring, proper feeding, and eco-friendly pest control, your camellia will maintain glossy foliage, strong growth, and overall resilience throughout the growing season.
Encouraging Blooming in Young Camellias
Helping young camellias bloom requires patience, balanced care, and the right growing conditions. Newly propagated plants often focus their energy on root and leaf development during the first two years. To prepare them for flowering, ensure they grow in nutrient-rich, slightly acidic soil with good drainage. Position the plant in a location with bright, filtered light since too much direct sunlight can scorch leaves while too much shade can reduce flower formation. Consistent watering is essential, keeping the soil evenly moist but never waterlogged. Camellias also appreciate humidity, so misting leaves occasionally helps create an ideal environment for steady growth.
Proper feeding plays a vital role in encouraging camellias to produce buds. Use a slow-release fertilizer formulated for acid-loving plants in early spring, just before the growing season begins. Avoid high-nitrogen fertilizers, as they promote excessive foliage growth at the expense of blooms. Instead, look for blends rich in phosphorus and potassium to strengthen flower buds. During summer, reduce feeding to allow the plant to rest and direct its energy toward forming buds for the next blooming season. Regular mulching with pine bark or leaf mold helps conserve soil moisture and regulate temperature, providing steady nourishment for developing plants.
Pruning and consistent care also influence blooming success. Lightly prune after flowering to remove weak or crowded branches, which improves air circulation and light penetration. Avoid pruning too late in the season, as this may remove new buds forming for the next bloom cycle. Protect young plants from frost and strong winds, as both can damage buds and delay flowering. With patience and the right routine, your camellia will reward you with lush foliage and abundant, elegant blooms that last for weeks each year.
FAQ About How to Propagate Camellias
How long does it take for a propagated camellia to bloom?
A propagated camellia usually takes two to three years to produce its first blooms. During this period, the plant focuses on developing a strong root system and healthy foliage. With proper watering, balanced fertilization, and partial shade, your young camellia will reward your patience with beautiful flowers in its third growing season.
Can I propagate camellias from leaves?
Camellias cannot be propagated successfully from leaves alone. They require stem cuttings that include at least one node and a small section of woody stem. This part contains the necessary tissues for root development. Using a healthy cutting from semi-hardwood growth offers the best chance for successful propagation and vigorous plant growth.
Why is my camellia cutting not rooting?
If your camellia cutting fails to root, several factors may be responsible—such as excessive moisture, low temperature, or insufficient humidity. Make sure the soil mix drains well but stays slightly damp. Maintain a warm environment around 70°F (21°C) and cover the cutting with a plastic dome to retain humidity. Rooting hormone can also speed up root formation.
What is the best soil mix for growing camellias?
Camellias prefer light, acidic soil with excellent drainage. A good mix includes equal parts of pine bark, peat moss, and perlite. This blend keeps the roots moist without becoming soggy and maintains the ideal pH level between 5.5 and 6.5. Regular mulching with organic material also improves soil texture and encourages healthy growth.
When is the best time to propagate camellias?
The ideal time to propagate camellias is during late spring or early summer, when the plant is actively growing. Semi-hardwood cuttings taken during this period root more easily and establish quickly. Avoid winter propagation, as low temperatures slow root development and increase the risk of cutting failure.