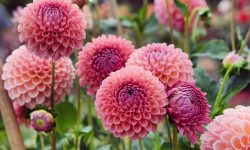
Dahlias are among the most breathtaking flowers you can grow, loved for their endless variety of colors, forms, and sizes. From small pompon blooms to large, dinner-plate varieties, these flowers bring unmatched beauty to any garden. But what makes them even more rewarding is how easy they are to propagate. With just a few simple techniques, you can multiply your favorite dahlias and fill your garden with even more vibrant blooms each summer. Whether you want to expand your collection or share with friends, propagation lets you turn a few plants into many while keeping their exact traits intact.
Learning how to propagate dahlias gives you complete control over your garden’s growth and design. Unlike growing from seed, which produces unpredictable results, propagation from cuttings or tubers ensures your new plants are identical to the parent. This process not only saves money but also preserves rare or beloved varieties year after year. With the right timing, care, and knowledge, you can enjoy a continuous cycle of color, from the first buds of spring to the last blooms of fall. This guide will show you step-by-step how to propagate dahlias successfully — for healthy plants, abundant flowers, and endless summer beauty.
Understanding Dahlia Propagation

Propagating dahlias means creating new plants from existing ones, allowing gardeners to expand their collection without relying on seeds. Unlike many flowers that reproduce only through seeds, dahlias can be propagated in several ways — by dividing tubers, taking stem cuttings, or occasionally growing from seed for hybrid varieties. Each method has its advantages, but the goal is the same: to produce strong, identical plants that will bloom beautifully during the growing season. Because dahlias are tender perennials, propagation also helps preserve them through changing climates, ensuring that favorite varieties survive year after year.
One of the most common and reliable ways to propagate dahlias is through tuber division. Each dahlia tuber contains a crown and small growth points known as “eyes.” When divided correctly, these tubers can each grow into a separate plant identical to the parent. This method is ideal for gardeners who already have mature plants stored from the previous season. However, propagation can also be done through stem cuttings, especially in early spring when the tubers begin to sprout indoors. Taking cuttings allows for rapid multiplication, often producing multiple plants from a single tuber.
Understanding how dahlias naturally grow is essential before starting propagation. Dahlias store energy in their tubers over winter, and once conditions warm, they use that energy to push out new shoots. Each new shoot can be separated, rooted, and developed into a new plant with identical characteristics. Timing is crucial: propagation should begin when growth is active but before flowering begins. When done correctly, these methods not only ensure survival but also produce vigorous plants that deliver abundant blooms throughout summer. Propagation transforms your dahlias from seasonal beauty into a sustainable garden treasure that keeps on giving.
Best Time and Conditions for Propagating Dahlias
Timing plays a vital role in the success of dahlia propagation. The best time to begin is in early to mid-spring, about six to eight weeks before the last expected frost. During this period, light levels increase, and temperatures start to warm, creating the perfect conditions for growth. Dahlias thrive when the soil temperature stays consistently above 60°F (15°C). Starting propagation too early, when the environment is still cold, slows down sprouting and increases the risk of rot. Starting too late, however, may delay flowering until mid or late summer. Understanding your climate zone ensures you start at just the right time for strong, healthy plants.
Equally important are the growing conditions. Dahlias need bright, indirect sunlight and moderate humidity during propagation. Whether starting from tubers, cuttings, or seeds, they prefer well-draining, nutrient-rich soil that remains lightly moist but never soggy. Consistent moisture is essential for root development, while too much water can drown young roots. Good airflow also reduces fungal risks, especially when propagating indoors. Keeping the temperature stable between 65°F and 75°F (18°C–24°C) encourages steady, even growth. A warm greenhouse, sunroom, or windowsill can provide an ideal environment for early propagation.
Understanding these environmental needs helps you fine-tune your propagation routine. If you’re working indoors, use grow lights to supplement natural light and heat mats to maintain soil temperature. In cooler regions, starting dahlias indoors gives them a head start before transplanting outdoors. When done correctly, timing and ideal growing conditions ensure that every propagated plant develops quickly and blooms abundantly once moved into the garden. The right start sets the foundation for a summer filled with endless dahlia color.
Propagating Dahlias from Tubers
Propagating dahlias from tubers is one of the most common and dependable ways to create new plants. Each dahlia tuber acts as a natural storage unit, holding nutrients and energy from the previous growing season. When spring arrives, these tubers awaken, producing new shoots that can grow into full, flowering plants. To successfully propagate from tubers, timing is key. Start the process in early spring, around six weeks before your area’s last expected frost. This gives your dahlias plenty of time to sprout strong, healthy shoots indoors before transplanting outdoors.
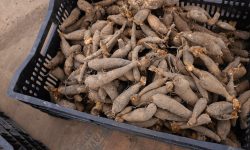
Begin by inspecting your stored dahlia tubers and selecting those that are firm, plump, and free of mold or decay. Place them in shallow trays filled with moist potting mix or sand, keeping the crown — the part where the eyes form — just above the surface. Position the tray in a warm, bright location with indirect sunlight. Over the next couple of weeks, small green shoots will begin to emerge. Once these shoots are about two to three inches tall, you can divide the clump or take cuttings from them to produce new plants. Proper moisture control is essential at this stage, as overly wet soil can cause rot.
When dividing, make sure each section of the tuber has at least one eye and part of the crown. Tubers without eyes will not sprout, no matter how healthy they appear. Use a clean, sharp knife to separate them, then allow the cut surfaces to dry for a few hours before planting. This prevents rot from forming in the soil. Each divided tuber can then be potted individually in fresh soil or planted directly outdoors once the weather is warm enough. Growing dahlias from tubers is simple yet rewarding — it preserves the parent plant’s exact qualities while producing a new generation of strong, reliable blooms.
Propagating Dahlias from Cuttings
Growing dahlias from cuttings is one of the fastest and most efficient ways to multiply your plants. This method is especially popular among gardeners who want to expand their dahlia collection quickly while maintaining the exact characteristics of a favorite variety. Taking cuttings allows you to produce many plants from a single tuber, and when done properly, the results are vigorous, identical clones of the parent plant. The best time to take cuttings is in early spring, when the stored tubers begin to sprout indoors. At this stage, the new shoots are soft, green, and ideal for rooting.
To begin, place your dahlia tubers in a tray of slightly moist compost or potting mix and keep them in a warm, bright place. Once the shoots are about three inches tall, use a clean, sharp knife to cut them just below a leaf node. Each cutting should include a short piece of the crown or stem base, which helps promote root growth. Remove the lower leaves and dip the cut end into rooting hormone powder to encourage faster root formation. Then, plant the cuttings into small pots filled with light, well-draining soil or a mixture of perlite and compost. Keep the soil consistently moist but not waterlogged to prevent rot.
In about two to three weeks, the cuttings will begin to develop roots. You can check by gently tugging on the stem — if you feel resistance, the roots have formed. Once the plants establish a healthy root system, they can be transplanted into larger pots or directly into the garden after the last frost. Dahlias propagated from cuttings often bloom the same year, rewarding you with lush foliage and bright flowers by midsummer. This method is perfect for gardeners looking to quickly multiply rare varieties or fill their garden with more color.
Propagating Dahlias from Seeds
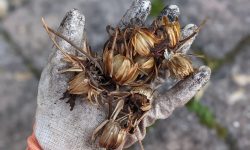
Propagating dahlias from seeds offers a completely different kind of reward — the chance to create unique, never-before-seen varieties. Unlike tuber or cutting propagation, which produces exact genetic copies of the parent plant, growing from seed combines genetic material from two parent dahlias. This means that every seed-grown plant is genetically distinct. The resulting flowers can differ in color, size, and petal shape, making this method a fascinating option for gardeners who enjoy experimentation and discovery. It’s the ideal approach if you’re seeking novelty, or simply want to witness the excitement of nature’s unpredictability in your own garden.
To begin, sow dahlia seeds indoors about six to eight weeks before the last expected frost. Use shallow seed trays or small pots filled with light, well-draining seed-starting mix. Moisten the soil lightly before planting and sprinkle the seeds evenly across the surface, covering them with a thin layer of soil. Keep the trays in a warm location where the temperature stays between 70°F and 75°F (21°C–24°C). Germination usually occurs within seven to ten days. Once the seedlings emerge, move them to a bright area or under grow lights to prevent them from becoming leggy. Keep the soil consistently moist but never soggy to ensure healthy root development.
When the seedlings are about three inches tall and have at least two sets of true leaves, they can be transplanted into individual pots. Gradually harden them off by placing them outdoors for a few hours each day before planting them in the garden after frost danger has passed. Although seed-grown dahlias typically produce smaller blooms in their first year, their vibrant diversity more than compensates. Each new flower is a surprise — your own unique creation of color and form. Growing dahlias from seed adds creativity and joy to gardening, turning your summer flower bed into a living canvas of natural art.
When and How to Divide Dahlia Tubers for Propagation
Dividing dahlia tubers is one of the most effective and reliable ways to propagate these stunning flowers while keeping them true to their original form. Each mature tuber clump contains multiple tubers that can be separated to create new plants. The best time to divide dahlia tubers is in early spring, just before planting, when small sprouts or “eyes” begin to appear on the crown. Dividing at this stage makes it easier to see which parts of the tuber are viable and ensures that each new division can develop into a strong, independent plant. Dividing too early, when the eyes haven’t formed, risks separating nonviable sections that won’t grow.
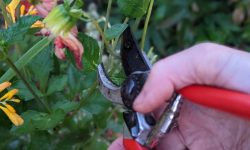
Start by carefully removing the tuber clumps from their storage containers and brushing away any packing material or dried soil. Inspect each clump and look for signs of life — the tiny buds at the base of the stem. These buds will become next season’s shoots. Using a sharp, sterilized knife or pruning shears, cut the clump into sections. Each division must include at least one eye and a portion of the crown, the woody stem base where the eyes are located. Tubers that lack eyes, or have soft or shriveled bodies, should be discarded, as they will not sprout. Handle the tubers gently, since their necks are delicate and easily broken.
After cutting, allow the divided tubers to rest for several hours in a shaded, airy location before planting. This helps the cut surfaces dry and form a protective layer that prevents rot. Some gardeners dust the cut ends with powdered sulfur or cinnamon as a natural antifungal precaution. Once dry, the tubers can be planted directly into pots or garden beds once the soil has warmed. Each healthy division will grow into a full plant identical to the parent, producing abundant blooms by midsummer. With practice, dividing tubers becomes one of the simplest ways to expand your dahlia garden year after year while maintaining strong, disease-free plants.
Caring for Newly Propagated Dahlias
Once your dahlias have been propagated — whether from tubers, cuttings, or seeds — proper care in the early stages will determine how strong and productive your plants become. The first few weeks after propagation are crucial because the plants are still developing roots and adapting to their growing environment. For young dahlias grown indoors, provide plenty of light without exposing them to harsh direct sunlight. A bright window or grow light placed six inches above the plants works perfectly. Keep the soil lightly moist but never waterlogged, as overwatering can quickly cause root rot. Gentle, consistent watering helps encourage deep root formation and stable growth.
As your new dahlias begin to grow stronger, you can start introducing them to outdoor conditions. This process, known as hardening off, helps them adjust to natural light, wind, and temperature changes. Gradually increase their time outdoors over a week or two, starting with a few hours each day. When the danger of frost has passed, transplant the young plants into garden beds or larger containers filled with rich, well-draining soil. Position them in a sunny location that receives at least six hours of direct light daily. Dahlias thrive on warmth and light, which fuels strong stems and abundant flowering later in the season.
Feeding your new plants properly is also key to healthy development. About two weeks after transplanting, begin using a low-nitrogen fertilizer every three to four weeks. Too much nitrogen encourages leafy growth at the expense of blooms, so choose a balanced or bloom-boosting formula instead. As the plants grow taller, consider staking or caging them early to prevent wind damage. Keep the area around the base weed-free to reduce competition for nutrients and water. With attentive care during their first growing phase, your propagated dahlias will establish quickly, producing vigorous plants that reward you with lush, colorful blooms all summer long.
Troubleshooting Common Problems During Dahlia Propagation
Rotting Tubers or Cuttings
Rotting tubers or cuttings can be devastating, especially for gardeners who have carefully stored or prepared their dahlias. The main culprit behind rot is excess moisture combined with poor airflow. Tubers that sit in overly wet soil or lack proper drainage quickly develop fungal infections that spread from the neck to the roots. To avoid this, always start propagation in a light, well-draining mix such as a combination of compost, perlite, and sand. Water sparingly — just enough to keep the soil slightly damp. It’s also best to use clean containers with holes to ensure good drainage and prevent standing water.
If you notice soft, discolored, or foul-smelling tubers, remove them immediately to protect the healthy ones nearby. You can dust the remaining tubers with powdered sulfur or cinnamon to stop fungal spread naturally. When working with cuttings, make sure your tools are sterilized before each use. Fungal spores can transfer easily between plants through unclean equipment. Proper ventilation, moderate watering, and temperature control prevent most rot-related issues. By keeping the growing environment clean and balanced, you’ll protect your dahlias from decay and ensure strong, healthy roots ready to burst into bloom.
Failure to Sprout
Failure to sprout can be discouraging, but it usually comes down to environmental factors or tuber health. Dahlias need warmth, light, and viable growth points — known as eyes — to start growing. Tubers that have been stored too long, frozen, or dried excessively often lose vitality and won’t sprout. Before planting, inspect each tuber closely and look for at least one visible eye near the crown. Place tubers in a warm, bright environment where temperatures stay between 65°F and 75°F (18°C–24°C). Consistent warmth signals the plant to wake up from dormancy and begin new growth.
If conditions are too cold or dark, growth will stall. Tubers started in cooler basements or garages may remain dormant for weeks until temperatures rise. For faster sprouting, try pre-sprouting them indoors in trays of damp compost before transferring to pots or garden beds. Cuttings may also fail if humidity is too low or if they weren’t dipped in rooting hormone before planting. Covering cuttings with a clear dome or plastic bag helps maintain moisture during early rooting. With patience, proper temperature, and gentle care, your dahlias will eventually push out healthy green shoots.
Weak or Leggy Growth
Weak or leggy dahlia growth often results from inadequate light or nutrient imbalance. When young plants don’t receive enough sunlight, they stretch toward the light source, forming thin, fragile stems that struggle to support flowers later. To correct this, move your dahlias to a brighter location with at least six hours of sunlight daily or supplement with grow lights. Keep the lights close but not touching the leaves to encourage compact, upright growth. Overcrowding can also contribute to weak stems, as competition for light and air makes each plant weaker overall. Space plants apart to ensure they receive even exposure.
Nutrient imbalance is another factor behind leggy growth. Too much nitrogen promotes lush foliage but weakens stem structure and delays blooming. Feed your plants with a balanced or low-nitrogen fertilizer, such as one with higher phosphorus and potassium. Regular pinching also helps strengthen dahlias. When the plants reach about eight inches tall, pinch off the top growth above a leaf node. This encourages branching, creating a fuller, bushier plant with multiple strong stems ready to produce abundant blooms. With balanced care, your propagated dahlias will grow sturdy, vibrant, and ready for a dazzling summer display.
Benefits of Propagating Dahlias
Propagating dahlias offers far more than just an economical way to expand your garden — it’s a deeply rewarding process that connects you with the natural rhythm of plant life. By multiplying your own plants, you gain complete control over your garden’s composition, from color schemes to bloom sizes. Each new dahlia you grow is a living continuation of the parent plant, allowing you to preserve your favorite varieties year after year. For collectors or hobbyists, propagation ensures that rare or heirloom dahlias stay alive, even if commercial sources discontinue them. It’s a satisfying way to build a personal collection filled with meaning and beauty.
Another major advantage of propagation is plant vitality. Dahlias propagated through tuber division or cuttings often grow stronger and adapt better to your local conditions than store-bought plants. They establish more quickly in the soil, bloom earlier, and produce a greater number of flowers. Propagation also gives you the freedom to experiment — mixing colors, testing new growing methods, or creating hybrid varieties through controlled pollination. On top of that, propagating your own dahlias saves money. Instead of purchasing new tubers each year, a single healthy plant can yield many offspring, each capable of producing its own blooms.
Perhaps the most profound benefit of propagation lies in the joy it brings. Watching a cutting root or a divided tuber sprout new life is one of gardening’s greatest pleasures. It turns the process into more than a routine — it becomes a creative journey. The act of propagating dahlias transforms gardening from seasonal maintenance into an ongoing cycle of renewal. Each plant you nurture becomes a personal success story, a reminder that with patience and care, beauty can always be recreated. Propagation not only multiplies flowers but also magnifies your connection to nature’s endless potential.
Creative Ways to Use Propagated Dahlias in Your Garden Design
Once your propagated dahlias have grown into strong, healthy plants, the possibilities for using them in your garden are endless. Because dahlias come in so many colors, shapes, and sizes, they are incredibly versatile for design. You can use them to create vibrant borders, color-themed flower beds, or dramatic focal points. Compact varieties such as pompon or single dahlias work beautifully along walkways or in front of taller plants. Larger, dinner-plate varieties make perfect statement pieces at the back of borders or as central features in garden beds. Mixing multiple varieties of propagated dahlias gives your space texture, contrast, and movement that change with the light of each day.
Propagated dahlias also shine in container gardens. Growing them in pots allows you to move and rearrange your displays throughout the season. This flexibility is perfect for small spaces like patios, balconies, or urban gardens. Use different container sizes to layer color and height, combining bright tones like coral, yellow, and red for summer vibrancy or pastel shades for a more elegant look. With proper care, dahlias in containers bloom just as impressively as those in the ground and make easy-to-manage showpieces for both novice and experienced gardeners.
For a more artistic touch, try grouping propagated dahlias by color families to create gradient or monochromatic designs. For instance, blending pinks into purples or oranges into reds can produce stunning visual harmony. You can also plant propagated dahlias alongside complementary species such as zinnias, salvia, or ornamental grasses to highlight their form and brightness. Every propagated plant gives you new creative opportunities, transforming your garden into a living canvas of color, texture, and design that evolves beautifully each summer.
Frequently Asked Questions (FAQ) About Propagating Dahlias
When is the best time to propagate dahlias?
The best time to propagate dahlias is in early to mid-spring, about six to eight weeks before the last expected frost. At this stage, tubers begin to sprout naturally, and the warm conditions encourage healthy new growth for cuttings and divisions.
Can I propagate dahlias from seeds?
Yes, you can propagate dahlias from seeds, but the results will vary. Seed-grown dahlias often produce unique flowers with different shapes and colors from their parent plants. It’s an exciting way to create new varieties, though it takes longer than propagation from tubers or cuttings.
How long does it take for propagated dahlias to bloom?
Dahlias propagated from tubers or cuttings typically bloom in the same growing season, usually within 8 to 12 weeks after transplanting. Seed-grown dahlias might take a little longer, often producing their first flowers in mid to late summer.
Why are my propagated dahlia cuttings wilting?
Wilting is often caused by overwatering, poor drainage, or too much heat. Ensure your cuttings are kept in lightly moist, well-draining soil and in bright but indirect sunlight. High humidity helps during early rooting, but excessive water will cause rot and stress.
How do I keep propagated dahlias from growing leggy?
Leggy growth happens when plants don’t get enough light. Place your propagated dahlias in a sunny window or under grow lights for at least six hours daily. Pinching the tips once they reach about eight inches tall encourages branching and fuller, bushier growth.
Conclusion
Propagating dahlias is more than a gardening skill — it’s an act of creation. With a bit of care and patience, one plant can become many, filling your garden with endless color and life. Whether you start from tubers, cuttings, or seeds, each new dahlia represents growth, renewal, and the joy of nurturing beauty. Watching your propagated plants bloom under the summer sun is a reward like no other. It’s proof that with the right touch, your garden can flourish year after year, becoming a living masterpiece filled with color, creativity, and the magic of your own hands.