Hibiscus is one of the most vibrant and easy-to-grow flowering plants, adding a touch of tropical charm and bold color to any garden or patio. If you’ve ever admired a healthy hibiscus bush and wondered if you could grow more from it, the good news is—you absolutely can, and it’s simpler than you might think.
In this guide, you’ll learn how to propagate hibiscus at home using straightforward, beginner-friendly methods. From choosing the right stem cuttings to nurturing them into strong, blooming plants, every step is clearly explained so you can enjoy more blossoms and fuller shrubs in your space.
Why Propagate Hibiscus?
Propagating hibiscus offers a practical and rewarding way to multiply your favorite plants without the need to buy new ones. Whether you grow tropical or hardy varieties, propagation allows you to create genetically identical clones of healthy, well-performing hibiscus bushes that you already love. This means if you have a plant that blooms profusely, resists pests, or thrives in your local climate, you can reproduce its best traits through cuttings.
Propagation is also an economical way to expand your garden. Instead of spending money at nurseries, you can generate new plants at home using simple tools and basic gardening skills. It’s especially satisfying for gardeners who want to fill borders with more shrubs, gift plants to friends, or experiment with landscaping ideas using their favorite hibiscus varieties.
Additionally, propagation helps preserve heirloom or unique hibiscus cultivars that may not be available commercially. If you’ve received a hibiscus plant from a loved one or nurtured a rare variety for years, taking cuttings ensures that those cherished characteristics live on. For eco-conscious gardeners, propagation also reduces the carbon footprint associated with commercial plant production and transportation.
By learning how to propagate hibiscus effectively, you’re not only growing more plants—you’re cultivating beauty, resilience, and a deeper connection to your garden’s life cycle.
Best Time to Propagate Hibiscus
Timing plays a crucial role in the success of hibiscus propagation. While hibiscus can technically be propagated at various times throughout the year in warmer climates, certain seasons offer a much higher chance of rooting success and healthy growth.
For most gardeners, the best time to propagate hibiscus is during late spring through midsummer, when the plant is in its active growing phase. During this period, hibiscus shrubs produce vigorous new growth with pliable stems that root more easily. The warmer temperatures and higher humidity levels also create the ideal environment for cuttings to develop strong root systems quickly. This window usually ranges from May to July, depending on your local climate zone.
In tropical or frost-free regions, propagation can be done almost year-round, though it’s still wise to avoid the extremes of heat or monsoon seasons, as excessive moisture or heat stress may compromise the health of cuttings. On the other hand, in temperate or cooler zones, you should avoid propagating during fall or winter. Cold temperatures slow down plant metabolism and reduce rooting potential, making it harder for cuttings to survive.
It’s also important to choose a day for taking cuttings when the weather is mild—preferably cloudy or early in the morning—so the stems don’t dehydrate quickly. Right before the plant begins producing flower buds is often considered the ideal moment, as energy is still focused on leafy growth rather than blooming.
By aligning your propagation schedule with the hibiscus plant’s natural growth cycle, you significantly increase your chances of producing strong, vibrant plants that will reward you with bigger blooms and bushier shrubs in the seasons ahead.
Understanding the Right Propagation Methods
Before diving into the propagation process, it’s important to understand that hibiscus can be propagated using different methods, each with its own advantages, challenges, and ideal conditions. Choosing the right method depends on your gardening goals, climate, and the specific variety of hibiscus you’re growing—whether tropical, hardy, or native.
The most common and reliable method is stem cuttings propagation, especially when working with tropical or hardy hibiscus. This technique involves taking a healthy section of a non-flowering stem and encouraging it to grow roots in either soil or water. It’s popular because it allows you to clone an exact replica of the parent plant, preserving the same bloom color, leaf shape, and growth habit. Stem cuttings are also ideal for home gardeners because they require minimal tools and offer high success rates when done during the growing season.
Another method, though more advanced, is air layering. This technique involves wounding a section of the stem while it is still attached to the parent plant, then wrapping it in moist material to promote root development. Once roots form, the section is cut and planted. Air layering is ideal for woody hibiscus or older shrubs where cuttings may not root easily. While it takes more time and patience, it produces strong, well-established new plants that adapt quickly after transplanting.
A less common method is seed propagation, mainly used for developing new hibiscus varieties or growing native species. However, growing hibiscus from seeds requires a lot more time and patience, as germination can be slow and the plants won’t always resemble the parent. It’s not the best choice if you want to preserve specific flower traits or colors.
Each method has its place in the garden, but for most home gardeners aiming for faster results and consistent blooms, propagating from cuttings remains the most effective and satisfying option. By selecting the right method based on your needs and environment, you can ensure a higher success rate and enjoy a flourishing hibiscus display for years to come.
Selecting Healthy Parent Plants
Choosing the right parent plant is one of the most important steps in successful hibiscus propagation. A strong, healthy mother plant ensures that your cuttings will root well and grow into vigorous shrubs with abundant blooms. Always select a hibiscus that is mature, pest-free, and actively growing.
Look for plants with lush, green foliage, firm stems, and no signs of disease such as yellowing leaves, black spots, or wilting. Avoid using stems that have already flowered heavily or are woody and brittle. Instead, choose semi-hardwood branches—these are flexible but firm and typically found on new season growth.
Also, take note of the flower quality of your chosen plant. If it consistently produces vibrant, well-formed blooms, you’re more likely to get the same impressive results from your propagated cuttings. By starting with a top-performing parent, you set the stage for healthier, more productive hibiscus plants.
How to Take the Perfect Hibiscus Cutting
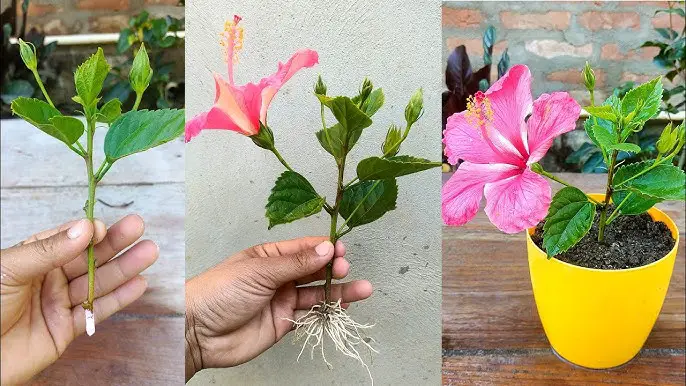
Taking the right cutting is essential to successful hibiscus propagation. Start by selecting a non-flowering stem that is about 4 to 6 inches long and shows signs of recent growth. The stem should be semi-hardwood—still slightly flexible but no longer soft like new shoots. This stage ensures the cutting has enough stored energy to root while being mature enough to avoid wilting quickly.
Using a clean, sharp pair of pruning shears, make a diagonal cut just below a node, where the leaf meets the stem. This angled cut increases the surface area for rooting and prevents water from pooling, which can cause rot. Strip off the lower leaves, leaving only two or three leaves at the top to reduce moisture loss through transpiration.
If the leaves are large, you can cut them in half to minimize stress on the cutting. For even better rooting success, consider dipping the cut end into a rooting hormone powder or gel. With the right technique, each cutting becomes a promising start for a new hibiscus plant.
Rooting Hormone and Its Role in Success
Rooting hormone plays a key role in increasing the success rate of hibiscus propagation, especially for gardeners in less-than-ideal conditions. This powder, gel, or liquid contains synthetic auxins—plant hormones that stimulate root development at the cut site.
By applying rooting hormone to the base of the cutting before planting, you help trigger faster root initiation and stronger root structures. This reduces the risk of rot or drying out, particularly in cuttings that might otherwise struggle to root naturally. While hibiscus can root without hormone, using it gives you a valuable boost—especially when propagating tougher, woody stems or during cooler months.
Choosing the Right Growing Medium
Selecting the proper growing medium is essential to ensure your hibiscus cuttings root quickly and develop into healthy plants. The ideal medium must provide a balance of moisture retention and drainage to prevent fungal rot while still encouraging root growth.
A common and effective choice is a mix of perlite and peat moss, which offers excellent aeration and moisture control. Coconut coir can also be used for its sustainability and water-holding capacity, often blended with coarse sand or vermiculite to lighten the mix. Avoid using heavy garden soil, as it may retain too much water and restrict oxygen flow to the cuttings.
Sterility is also important. Always start with clean containers and a fresh medium to avoid introducing harmful pathogens that could derail propagation. Whether you choose a store-bought seed-starting mix or create your own blend, the key is ensuring it supports the delicate balance young cuttings need to root successfully.
Providing the Right Environment for Rooting
Creating the optimal environment is critical for encouraging hibiscus cuttings to root successfully. Since cuttings do not yet have roots to absorb water, maintaining the right balance of warmth, humidity, and light helps reduce stress and promotes root development.
Temperature is a major factor. Hibiscus cuttings root best in consistently warm conditions, ideally between 70°F to 80°F (21°C to 27°C). If temperatures drop too low, rooting slows or stops entirely. Using a heat mat under your propagation tray can help maintain warmth, especially in cooler climates or during early spring.
Humidity must remain high during the rooting phase. Because cuttings cannot take up water through roots, they rely on ambient humidity to prevent drying out. A clear plastic dome, a plastic bag, or a mini greenhouse setup can trap moisture and create a humid microclimate around the cuttings. However, it’s important to ventilate periodically to avoid fungal buildup.
Light should be bright but indirect. Too much direct sunlight can overheat or scorch the tender cuttings, while too little light may weaken the plant and delay rooting. Placing your tray near an east-facing window or under grow lights for 12 to 14 hours a day works well.
Finally, air circulation plays a role in preventing mold and promoting healthy growth. While maintaining high humidity, ensure that air doesn’t become stagnant. Occasional airflow from a small fan or brief openings in the humidity cover can reduce the risk of fungal disease.
Balancing these environmental factors helps create ideal conditions for rooting, giving your hibiscus cuttings the best possible start.
Signs of Successful Root Development
Knowing when your hibiscus cuttings have developed roots is essential for timing the next steps, such as transplanting. While roots grow beneath the surface and aren’t immediately visible, several key signs indicate that rooting has begun and is progressing well.
One of the first indicators is new leaf growth. If you notice fresh green leaves emerging or existing leaves becoming firmer and more vibrant, it’s a strong sign that roots are developing below. Cuttings that remain stagnant or show yellowing without improvement may not have rooted successfully.
Another reliable sign is resistance to gentle tugging. After two to four weeks, you can lightly pull on the stem. If the cutting offers resistance, it usually means roots have anchored into the soil or growing medium. If it slips out easily, more time is needed.
Stem firmness also suggests healthy development. A firm, upright stem usually indicates that internal water transport is functioning well, which is possible only if roots are present. In contrast, a soft or wilting stem could suggest root failure or rot.
You might also see tiny roots emerging from the bottom of the container or drainage holes if you’re using a clear pot or one with good drainage. This visible evidence confirms that the root system is extending and ready for transplanting.
Lastly, overall vitality—including improved color, turgidity, and leaf orientation—indicates that the cutting is no longer dependent solely on humidity but is drawing nutrients and moisture from its new roots.
Recognizing these signs ensures you don’t transplant too early or leave the cutting in its original container for too long, helping it transition smoothly to continued growth.
Transplanting Your Rooted Cuttings
Once your hibiscus cutting has developed strong roots—often visible through drainage holes or the sides of the container—it’s time to transplant. Gently remove the cutting, being careful not to damage the delicate roots. Slightly moist soil can help ease this process.
Prepare a container or garden bed with well-draining, nutrient-rich soil. Dig a hole large enough to spread the roots without bending them, and plant the cutting at the same depth it was growing before. Water thoroughly to settle the soil and remove air pockets.
For the first week or two, place the plant in bright, indirect light or partial shade to reduce stress. Keep the soil evenly moist but not soggy. Once the plant begins producing new growth, you can gradually introduce more sunlight and begin a regular care routine.
Whether planting in-ground or in containers, ensure good drainage and protection from wind. With proper transplanting, your hibiscus will quickly establish and continue to thrive.
Encouraging Bushier Growth in Young Plants
To grow a hibiscus shrub that is full, lush, and bursting with blooms, encouraging bushier growth early on is essential. One of the most effective techniques is pinching back new growth. Once your propagated cutting has developed a few sets of leaves, use clean fingers or sharp shears to pinch or snip the growing tip above a leaf node. This small cut stimulates the plant to send out two or more side shoots from just below the cut, creating a fuller shape.
Regular pinching can be done every few weeks during the growing season. Each time you remove a tip, the plant redirects energy to lateral branches, increasing the overall density of the shrub. This process not only shapes the hibiscus but also encourages more flower buds to form along the side shoots, resulting in better flowering performance.
Another way to encourage bushiness is to ensure your young hibiscus receives ample sunlight. Full sun exposure promotes compact, vigorous growth, whereas insufficient light may lead to legginess. Complement this with balanced fertilization that’s not too high in nitrogen, which can encourage excessive vertical growth at the expense of branching.
Finally, monitor for pests and diseases that can stress the plant and stunt its development. Healthy, stress-free hibiscus are more likely to branch out robustly. With regular attention and gentle shaping, your young hibiscus can transform into a thick, blooming shrub that serves as a standout feature in your garden or patio.
Fertilizing for Stronger Blooms and Shrubs
Proper fertilization plays a crucial role in helping propagated hibiscus grow into vigorous shrubs with abundant flowers. Young plants benefit from a balanced fertilizer, such as one with an N-P-K ratio of 10-10-10 or 20-20-20, which supports root development, leafy growth, and flower production evenly. Apply this type of fertilizer every 2 to 4 weeks during the active growing season to establish strong foundational growth.
As your hibiscus matures, you can switch to a bloom-boosting formula that is slightly higher in phosphorus—like a 10-30-20 mix—to encourage prolific flowering. Phosphorus promotes the development of buds and blooms, while potassium strengthens the plant’s structure and disease resistance.
Always water your hibiscus before applying fertilizer to prevent root burn and help nutrients absorb more efficiently. Consider using slow-release fertilizers for a steady nutrient supply or liquid fertilizers for quick uptake during peak growth periods. With regular, well-timed feeding, your hibiscus will reward you with lush foliage and a steady display of vivid blooms throughout the season.
Protecting New Plants from Pests and Disease
Overwintering Young Hibiscus in Cooler Zones
Young hibiscus plants are highly sensitive to cold and must be protected in zones below USDA 9. When nighttime temperatures drop below 50°F (10°C), bring them indoors to avoid frost damage.
Place them in a bright, south-facing window to ensure they get at least 6 hours of light daily. If natural light is low, use grow lights to maintain healthy growth. Indoors, keep humidity around 50% by using a humidifier or placing a tray of water nearby, and avoid drafts or heat vents.
Water less frequently during winter—only when the top inch of soil is dry—to prevent root rot. If overwintering outdoors in borderline zones, use thick mulch and frost cloths, though this is less effective for young or potted plants.
By managing light, temperature, humidity, and watering, you can successfully overwinter young hibiscus and ensure healthy spring growth.
Common Mistakes When Propagating Hibiscus
One of the most frequent mistakes is using unhealthy or weak parent plants. Cuttings taken from stressed or diseased hibiscus often fail to root or produce weak, short-lived plants. Always choose vigorous, disease-free stock with active growth.
Another issue is cutting too long or too short. Ideally, hibiscus cuttings should be 4–6 inches with at least two leaf nodes. Cuttings that are too large may lose moisture too quickly, while very short ones may not have enough energy to root.
Skipping rooting hormone is another common misstep. While hibiscus can root without it, applying rooting hormone significantly improves the success rate, especially in more challenging conditions.
Poor growing medium also leads to failure. Dense, heavy soils retain too much water and cause rot. A fast-draining mix like perlite, vermiculite, or coarse sand is essential for root development.
Environmental control errors—such as overwatering, too much direct sun, or low humidity—can delay or prevent rooting. Hibiscus cuttings thrive in bright, indirect light and high humidity with just enough moisture to keep the medium damp but not wet.
Lastly, impatience can ruin the process. Roots can take several weeks to form, and disturbing cuttings too early can damage delicate root tips. Allow proper time and only transplant when roots are well established.
Long-Term Care for Propagated Hibiscus
Propagating hibiscus allows gardeners to expand their plant collection at no extra cost, turning one healthy plant into many. It’s a budget-friendly way to fill garden beds or pots with lush, tropical color.
Beyond saving money, propagation gives you control over plant quality. You can select only the most vigorous, pest-resistant, or vibrant flowering parent plants to reproduce. This ensures stronger offspring better adapted to your local conditions.
It also preserves rare or heirloom varieties that may not be available commercially, helping maintain genetic diversity. For many gardeners, propagation is not just practical—it’s deeply rewarding to watch a new plant grow from a simple cutting into a full-sized shrub that blooms year after year.
Frequently Asked Questions
What is the easiest method to propagate hibiscus at home?
The simplest and most effective method is stem cuttings. By cutting a healthy, non-flowering stem about 4–6 inches long, removing the lower leaves, and placing it in moist soil or water, you give the cutting the best chance to root. Many gardeners prefer this approach because it offers reliable success without complicated tools or setups.
Can I propagate hibiscus in water?
Yes, especially with tropical hibiscus. Simply place the prepared cutting in a jar of clean water, away from direct sunlight, and change the water every few days. Roots typically appear in two to four weeks. Once roots are 1–2 inches long, transplanting into soil helps the young plant establish quickly.
When is the best time of year to take hibiscus cuttings?
Late spring through mid-summer is ideal. During this time, hibiscus is actively growing, which supports quicker root development. Avoid propagating in winter or during dormancy, as rooting success significantly decreases during those periods.
How long does it take for hibiscus cuttings to root?
It usually takes between 2 to 6 weeks depending on the conditions. Warm temperatures, consistent moisture, and high humidity can speed up rooting. Using a rooting hormone can also improve success rates and help the plant establish stronger roots faster.
Why are my hibiscus cuttings not rooting?
Several issues could be the cause: overly dry or soggy soil, cuttings taken from unhealthy plants, or low humidity. Also, trying to root during cold weather or placing cuttings in direct sunlight can slow or halt rooting. Ensuring the right temperature, using clean tools, and choosing vigorous parent plants make a big difference.
Conclusion
Learning how to propagate hibiscus not only fills your garden with lush blooms and bigger shrubs but also empowers you to become a more skillful gardener. With the right timing, a healthy cutting, and careful aftercare, even beginners can multiply their plants and enjoy the rewards for seasons to come. Whether you dream of a hibiscus hedge or just want to revive an old favorite, propagation is your pathway to garden abundance.