Magnolia trees are loved for their stunning blooms and graceful shape. They can turn any yard into a lush, flowering retreat. You may adore the fragrant white flowers of southern magnolias. Or perhaps you prefer the bold pink and purple shades of saucer types. Either way, propagating magnolia trees lets you bring more beauty into your garden. It also helps you save money and keep rare varieties alive. Watching new trees grow from your care brings lasting joy.
Magnolia propagation is not only possible for home gardeners but also highly rewarding when approached with the right techniques. In this guide, you’ll learn the most effective ways to propagate magnolia trees, when to start, and how to ensure long-term success for a lush and flowering garden.
Understanding Magnolia Growth and Reproduction
Magnolia trees are slow-growing but develop into strong, long-lived trees with deep roots and wide, elegant canopies. Depending on the species, they can be evergreen—like Magnolia grandiflora—or deciduous, such as Magnolia × soulangeana. Their large, showy flowers often bloom before the leaves emerge, creating a striking display each season.
Magnolias reproduce in two main ways: by seed and by vegetative propagation. Seed-based reproduction creates genetic variation, meaning new trees may not look exactly like the parent. Seeds are found in cone-shaped fruits that ripen in late summer or fall. While this method is useful for preserving wild species, it takes years for seed-grown trees to mature and flower.
Vegetative or asexual propagation includes cuttings, layering, and grafting. These methods produce exact clones of the parent tree, making them ideal for replicating hybrids or ornamental cultivars. Cuttings are taken from young branches, while layering uses branches still attached to the tree. Grafting combines two plants into one for stronger growth or specific traits.
By understanding how magnolias grow and reproduce, you can choose the most effective way to propagate them. This knowledge helps ensure that your efforts lead to healthy, vibrant trees that thrive in your garden for decades to come.
Best Time to Propagate Magnolia Trees
Timing plays a crucial role in magnolia propagation. Most successful propagation techniques are season-dependent, meaning you must plan your efforts based on the growth cycle of the tree.
For softwood cuttings, late spring to early summer is ideal when new growth is still flexible but mature enough to root. For semi-hardwood or hardwood cuttings, aim for mid to late summer or early fall. Seed propagation is best started in fall after collecting mature seed pods, though you may store and stratify seeds for planting in late winter.
Layering and grafting are typically done in spring when sap flow begins, but some types may also respond well to fall efforts. Knowing the right season ensures your propagation process aligns with the tree’s natural rhythm for optimal success.
How to Propagate Magnolia Tree from Cuttings
Cuttings are one of the most common and effective methods to propagate magnolia trees, especially for preserving the characteristics of hybrid or cultivar trees. This method involves removing a segment of the tree and encouraging it to grow roots in a controlled environment.
Selecting the Right Cutting
Choose a healthy, disease-free branch from a magnolia tree that is at least one year old. For softwood cuttings, select new green stems from late spring growth. For semi-hardwood cuttings, wait until mid to late summer when the stem begins to harden but still retains flexibility.
The cutting should be about six to eight inches long, with several nodes and a few leaves attached. Avoid flowering branches, as they put more energy into bloom production rather than root development.
Preparing the Cutting for Rooting
Trim the cutting just below a node at a 45-degree angle using sterilized pruners. Remove the lower leaves, leaving only one or two at the top to reduce moisture loss. If the leaves are large, you may cut them in half to minimize transpiration without reducing photosynthesis entirely.
Dip the cut end in a rooting hormone to encourage root growth. This is especially important for magnolias, as they can be slow to develop roots naturally.
Creating the Ideal Rooting Environment
Plant the cutting in a container filled with a moist, well-draining rooting medium such as a mix of peat moss and perlite. Insert the cutting about two to three inches deep into the soil and gently firm it around the base.
Cover the pot with a plastic dome or place it inside a clear plastic bag to create a mini greenhouse. This helps retain humidity, which is essential for root formation. Keep the container in a warm, bright spot with indirect light and maintain even moisture without waterlogging.
Monitoring and Transplanting
Root development may take six to twelve weeks or longer. Gently tug on the cutting after a month to test for resistance, which indicates root growth. Once the cutting forms a strong root system, transplant it into a larger container or directly into the garden if conditions are suitable.
Introduce the young plant gradually to outdoor conditions over several days to harden it off. Continue watering regularly and protect it from extreme heat, wind, or pests during its early establishment phase.
How to Propagate Magnolia Tree from Seed
Propagating magnolia trees from seed is a rewarding but time-consuming process. Unlike cuttings or layering, growing from seed introduces genetic diversity, which can lead to new and unique variations. This method is best suited for species magnolias rather than hybrids, which may not grow true to the parent.
Collecting Magnolia Seeds at the Right Time
Seed collection typically takes place in late summer to early fall, once the magnolia’s cone-like fruits begin to split open. Inside are vibrant red or orange seeds, which attract birds but are also perfect for propagation. Harvest them as soon as they are visible and fully mature, as fresh seeds germinate more reliably than older ones.
Avoid collecting seeds too early, as immature seeds are less viable. If the pods haven’t opened naturally, wait until they begin to dry and crack. This is a sign that the seeds are ready to be gathered and prepared.
Cleaning and Preparing the Seeds
Once harvested, magnolia seeds must be cleaned to remove their fleshy coating. Soak the seeds in warm water for one or two days to soften the outer layer. Then gently rub the seeds between your fingers or a soft cloth to remove the red aril.
After cleaning, inspect the seeds for firmness and color. Healthy seeds are firm, dark, and plump. Discard any that are soft, discolored, or shriveled, as they are unlikely to germinate.
Stratifying the Seeds for Better Germination
Magnolia seeds have a natural dormancy that must be broken through cold stratification. This simulates winter conditions and improves germination rates. To stratify, place the cleaned seeds in a plastic bag filled with moist peat moss, sand, or vermiculite. Seal the bag and refrigerate it for 60 to 90 days.
Check the moisture level regularly. The medium should stay damp but not soggy. During this chilling period, the seeds undergo internal changes that prepare them to sprout once planted.
Planting and Germinating Magnolia Seeds
After stratification, sow the seeds in small containers filled with a light, well-draining potting mix. Plant each seed about half an inch deep and water gently to settle the soil. Place the pots in a warm, bright location with indirect sunlight.
Germination can take several weeks to a few months, depending on the species and conditions. Maintain consistent moisture, but avoid overwatering. Too much water can cause seeds to rot before they sprout.
Once the seedlings emerge, provide them with gentle light and regular watering. Keep them in a protected spot, away from direct midday sun or strong wind. As they grow, you can thin weaker seedlings or transplant them into larger pots to encourage stronger root systems.
Caring for Seedlings During Their First Year
Magnolia seedlings grow slowly, especially in their first year. Focus on developing healthy roots and foliage rather than pushing for fast growth. Avoid fertilizing heavily; a diluted, balanced fertilizer applied once every month during the growing season is enough.
If growing outdoors, wait until the seedlings are strong enough before planting them in the garden. This usually takes one to two years. In colder climates, keep them in containers through the first winter and protect them from frost.
Mulch around young trees to retain soil moisture and insulate the roots. Water deeply but infrequently to encourage deep rooting. Monitor for pests like snails or aphids, which may be attracted to tender new growth.
Advantages and Challenges of Seed Propagation
One of the greatest advantages of propagating magnolia from seed is the possibility of discovering a new variety with unique flowers, leaf shapes, or growth habits. It’s a great option for native species and ecological restoration.
However, seed propagation comes with challenges. It takes several years for seed-grown magnolias to reach flowering maturity—often five to ten years or more. Additionally, hybrids may not produce offspring with the same qualities as the parent, which is why this method is less common for cultivars.
Despite the time investment, growing magnolias from seed is deeply fulfilling. Each tree is genetically unique, and you’ll have the satisfaction of knowing you nurtured it from its very beginning. With care and patience, your seedling can grow into a magnificent specimen that enhances your landscape for generations.
How to Propagate Magnolia Tree by Layering
Layering is a simple and reliable method of propagation that works well for magnolia trees, especially those with low-hanging, flexible branches. This technique allows a branch to form roots while still attached to the parent tree, reducing the risk of transplant shock. It’s especially useful for gardeners who want to multiply trees without cutting them first.
When to Use Layering for Magnolia Trees
The best time to start layering is in early spring or late summer, when the tree is actively growing. This gives the branch time to develop roots before dormancy in winter. Layering works best on young, healthy trees with branches that can bend to the ground without snapping.
Step-by-Step Guide to Layering
Start by selecting a healthy, low-growing branch that is flexible enough to bend toward the soil. Remove any leaves along the section you plan to bury. Use a sharp, clean knife to lightly scrape off the bark on the underside of the branch where it will make contact with the soil. This wound encourages root formation.
Dig a shallow trench about two to three inches deep. Gently bend the wounded section of the branch into the trench and secure it with a landscape pin, wire loop, or even a small rock. Then cover the area with soil and water it well.
Leave the tip of the branch exposed and upright so it continues growing as normal. You may stake the exposed tip vertically to encourage upward growth and improve balance.
Caring for the Layered Branch
Keep the soil around the layered section consistently moist but not soggy. In hot or dry weather, consider mulching the area to retain moisture. Check every few weeks to ensure the branch remains securely buried and that the soil has not dried out.
Root development typically takes several months. In some cases, the branch may begin to root by fall; in cooler climates, you may need to wait until the following spring.
Separating and Transplanting the New Tree
Once roots have formed, gently dig around the layered section to inspect it. Look for healthy, white roots growing from the wounded area. When the root system is well developed, cut the new plant free from the parent branch using clean pruners.
Transplant the young tree into a container or directly into the ground in a well-draining, partially shaded location. Keep the soil evenly moist and protect the plant from harsh sun or wind while it becomes established.
Benefits and Challenges of Layering Magnolias
Layering is low-risk because the parent branch continues to support the new plant until it roots. It also avoids the transplant shock common with cuttings. However, it takes time and works best when the tree has branches close to the ground.
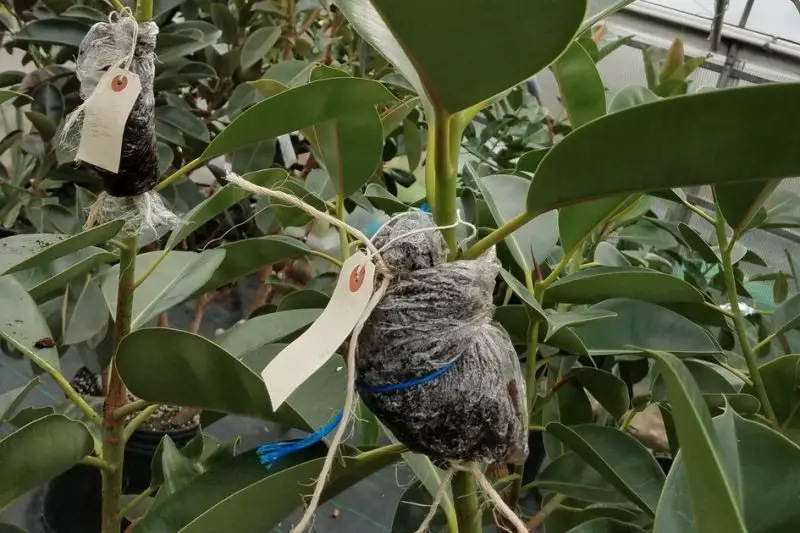
This method may not be suitable for upright or older magnolias with high, rigid limbs. In such cases, air layering—a more advanced technique involving wrapping a wounded branch in moist moss and plastic—can be used instead.
With patience and care, layering can yield strong, healthy magnolia trees that thrive in the garden and bloom for years to come.
How to Propagate Magnolia Tree by Grafting
Grafting is a valuable propagation method used for magnolia cultivars that do not root easily from cuttings or grow true from seed. This technique involves joining a scion (a branch from the desired magnolia variety) to a rootstock (the root system of a hardy magnolia seedling or compatible species). Grafting ensures that the new tree retains the exact traits of the parent, including flower color, size, and growth habit.
Though grafting requires skill and precision, it offers high success rates when done correctly and is widely used in nurseries to propagate hybrid magnolias or rare cultivars.
When to Perform Grafting
The best time to graft magnolias is in late winter to early spring, just before active growth resumes. During this period, the tree is still dormant, but sap will soon begin flowing, which supports the healing and fusion of grafted tissues.
Grafting is often done indoors or in a controlled greenhouse environment to avoid temperature extremes and ensure stable humidity during healing.
Choosing the Right Scion and Rootstock
Select a scion from a healthy, disease-free magnolia tree that exhibits the traits you wish to preserve. The scion should be about pencil-thick and taken from one-year-old wood with visible, dormant buds. Make sure it has not flowered recently, as flowering stems tend to be weaker.
The rootstock should be a vigorous, seed-grown magnolia species that is compatible with the scion. Compatibility ensures proper nutrient flow and long-term stability. Common rootstocks include Magnolia kobus, Magnolia acuminata, or other hardy native varieties suited to your climate and soil.
Both the scion and rootstock should be of similar diameter to ensure good contact and a successful union.
Preparing and Performing the Graft
There are several types of grafting methods used for magnolias, with whip-and-tongue and cleft grafts being the most common.
For a whip-and-tongue graft, make a diagonal cut on both the scion and rootstock, followed by a small vertical slit (the “tongue”) on each. Slide the two pieces together so that the cambium layers (the green tissue just under the bark) align as closely as possible. This alignment is critical, as it’s where the graft will heal and grow together.
Secure the graft tightly with grafting tape, rubber bands, or nursery clips. Seal the exposed area with grafting wax or tree sealant to retain moisture and protect the union from disease or drying out.
In a cleft graft, a V-shaped wedge is cut into the scion, and the rootstock is split down the center to accept the wedge. This type of graft is especially useful when the rootstock is slightly larger in diameter than the scion.
Caring for the Grafted Plant
After grafting, place the tree in a sheltered, well-lit location out of direct sunlight. Maintain consistent humidity and moderate temperatures to encourage healing. Avoid disturbing the graft union for at least three to four weeks.
Monitor the graft for signs of success, such as swelling buds and new growth. Once the scion begins to grow, remove any shoots or suckers that emerge from the rootstock, as these can divert energy away from the grafted portion.
Gradually acclimate the grafted plant to outdoor conditions once it is established. This process is called hardening off and helps reduce transplant shock when the tree is moved into the garden.
Long-Term Maintenance of Grafted Magnolias
Inspect the graft union regularly for weakness, cracking, or abnormal growth. In the first year, continue to remove any growth below the graft site to maintain focus on the desired variety.
Staking the young tree may help support it until the grafted section is strong enough to stand on its own. Water consistently but avoid overwatering, especially around the base of the graft.
Once the tree is established, care for it as you would any magnolia, providing well-draining soil, mulch to retain moisture, and light pruning as needed. With time, the graft will become a seamless part of the tree, delivering the desired traits with strength and longevity.
Benefits and Limitations of Grafting
Grafting magnolias offers several clear benefits. It allows you to replicate unique hybrids or ornamental cultivars that cannot be grown reliably from seed. It also ensures uniformity in growth habit and bloom quality, which is important for landscape design and commercial production.
However, grafting requires practice, precise timing, and attention to detail. Failed grafts may result from poor cambium alignment, desiccation, or disease. Additionally, not all magnolia species are graft-compatible, so careful rootstock selection is key.
Despite these challenges, successful grafting rewards the grower with a genetically identical magnolia tree that can flower in just a few years. For rare or treasured varieties, grafting is often the best—and sometimes only—way to preserve their beauty in your garden.
Tips for Successful Magnolia Propagation
Begin with strong, healthy plant material. Choose branches or seeds that are disease-free and show vigorous growth. This gives your propagation the best possible start.
Always clean and sterilize tools before making any cuts. This helps prevent fungal or bacterial infections, especially in cuttings and grafts.
Maintain high humidity around cuttings by covering them with a plastic dome or bag. However, ensure the soil stays moist—not soggy—to avoid root rot. Use a well-draining mix like perlite and peat for best results.
Label each cutting or seedling clearly if you’re propagating more than one variety. This helps track progress and identify successful techniques.
Root development in magnolias is slow. Avoid disturbing cuttings or layered branches too soon. Check gently after several weeks.
When transplanting, gradually expose young plants to outdoor conditions over several days. This hardening-off process prevents shock and improves survival.
Delay fertilizing until the plant shows clear signs of new growth. Overfeeding too early can damage tender roots.
Finally, shield new plants from harsh sun, wind, or frost until they’re well established. A little extra care in the early stages leads to stronger, more resilient magnolia trees.
Long-Term Care for Propagated Magnolia Trees
Grafting is one of the most reliable methods for propagating magnolia cultivars, especially hybrids that do not grow true from seed. This method involves joining a desired magnolia variety (the scion) to the rootstock of a hardy seedling. It ensures the new tree inherits the exact characteristics of the parent plant, including flower color, growth habit, and fragrance.
The best time to graft magnolias is in late winter or early spring, before active growth begins. Use a sharp knife to make clean cuts and align the vascular tissues of both scion and rootstock carefully. Common techniques include whip-and-tongue grafting and side veneer grafting, depending on the thickness of the materials.
After grafting, secure the union tightly with grafting tape or rubber bands. Keep the plant in a humid, shaded area while the graft heals. It may take several weeks before you see signs of success. Once new growth appears on the scion, and the graft is solid, you can begin acclimating the plant to outdoor conditions.
Though grafting takes some skill, it’s a dependable way to propagate magnolia trees with consistent, beautiful results.
Frequently Asked Questions (FAQ) About Propagating Magnolia
How long does it take for a propagated magnolia tree to grow and bloom?
Propagation success varies by method. Cuttings may take several months to root, while layering can take up to a year. Seed-grown magnolias are the slowest, often taking 10 to 15 years to bloom. Grafted magnolias, however, can flower within 2 to 3 years because the scion comes from a mature tree. Patience is key, but once established, magnolias are long-lived and rewarding.
What is the easiest method for beginners to propagate magnolia trees?
For beginners, layering is often the easiest and most successful method. It involves bending a low branch to the ground, wounding it slightly, and burying part of it under soil. Since the branch remains attached to the parent tree during root development, it gets constant nutrients and moisture. This reduces the risk of failure compared to cuttings or seeds.
Can I propagate magnolia trees in pots or containers?
Yes, you can start magnolia cuttings, seedlings, or even small grafts in pots. Use deep containers with excellent drainage to prevent root rot. Choose a well-aerated medium such as peat mixed with perlite. Keep the pots in a warm, bright, but indirect light location, and maintain humidity by misting or using a plastic dome. Once the plant has strong roots, it can be transferred to a larger pot or the garden.
Do I need rooting hormone for magnolia cuttings?
Using rooting hormone greatly increases your chances of success with cuttings, especially for hardwood or semi-hardwood types. Dip the cut end of the stem in rooting powder or gel before planting. The hormone stimulates root cell development and helps the cutting resist rot or fungal infection. While not absolutely required, it’s highly recommended.
When is the best time of year to propagate magnolia trees?
The ideal time depends on the propagation method.
Softwood cuttings: Late spring to early summer, when growth is fresh and flexible.
Layering: Early spring or early fall, when the plant is not under heat stress.
Grafting: Late winter or very early spring, before buds swell.
Seeds: Sow in fall or after stratification in spring.
Timing affects success, so plan according to your climate and method.
Conclusion: Multiply Beauty in Your Garden with Magnolia Propagation
Propagating a magnolia tree is more than just a gardening project—it’s a deeply rewarding journey that allows you to bring new life into your garden, preserve cherished cultivars, and expand your landscape with elegant blooms. Whether you choose to propagate by cuttings, seed, layering, or grafting, each method offers a different window into how magnolias grow and flourish.
With careful attention, the right timing, and a nurturing hand, you can turn a single magnolia into a lush and flowering garden centerpiece. As the years pass and your propagated trees bloom with fragrant beauty, you’ll know the effort was well worth it.