Pothos, often referred to as devil’s ivy, is one of the easiest and most rewarding houseplants to propagate. Known for its trailing vines and heart-shaped leaves, pothos can transform any space with lush greenery. If you love your current plant and want more of it—whether to fill your home with vibrant foliage or to share with friends—learning how to propagate pothos from a single cutting is both satisfying and simple.
Propagation not only saves you money but also gives you control over the growth process. With a little patience and the right technique, you can create multiple new plants from a single vine. This guide will walk you through every step of pothos propagation, from choosing the perfect cutting to nurturing your new plant to maturity.
Why Propagate Pothos at Home?
Propagating pothos at home offers a simple, satisfying way to multiply one of the easiest and most forgiving houseplants. For plant lovers, it’s a rewarding and low-cost method to expand your indoor garden or share greenery with friends and family. Instead of purchasing new plants, you can create several thriving vines from just a few healthy cuttings, making it both budget-friendly and sustainable.
Beyond cost savings, propagation allows you to rejuvenate older or leggy pothos by trimming them back and starting fresh growth. It’s also a great learning experience for beginners, offering hands-on practice with plant care, root development, and transplanting. Watching roots form from a simple cutting brings a special kind of joy and builds your confidence as a home gardener. Whether you’re decorating a new room or gifting a living piece of nature, propagating pothos at home is a practical, rewarding, and deeply enjoyable process.
Choosing the Right Mother Plant
The journey to successful pothos propagation begins with selecting a healthy and thriving mother plant. A strong parent vine not only increases your chances of rooting success but also ensures that your new plants grow with vigor and resilience.
When choosing your cutting source, look for a pothos vine that’s full of life—lush green leaves, firm stems, and no signs of pests or disease. Steer clear of plants with yellowing leaves, dark spots, or anything that looks wilted or stressed. You’ll also want to make sure the plant has several clear nodes along the vine, as these are the points where new roots will form.
Timing plays a role too. Choose a plant that’s actively growing, ideally during spring or early summer, when pothos are naturally more responsive to propagation. If your plant is long and leggy, taking cuttings can actually help rejuvenate its shape while giving you new vines to grow. With just a bit of care in your selection, you’re setting the stage for healthy, happy pothos plants to thrive in your home.
Best Time to Propagate Pothos
While pothos can technically be propagated year-round indoors, there’s a best time to give your cuttings the strongest chance to thrive—and that’s during the active growing season, typically from early spring through late summer. During these warmer months, your plant is naturally producing new leaves and roots, making it far more responsive to propagation efforts.
In spring, the longer daylight hours and rising temperatures signal to the plant that it’s time to grow. If you take cuttings now, they’ll root faster, develop more vigorously, and adapt more quickly once transplanted. Summer also works well, though extreme heat can sometimes stress young roots, so be sure to keep them in a stable, well-lit, but not scorching-hot environment.
Fall and winter, on the other hand, are generally less ideal. Pothos enters a semi-dormant phase, where growth slows and rooting can take several weeks longer—or may even stall entirely. If you must propagate during colder months, consider using a warm, humid spot indoors or a heat mat to simulate spring-like conditions.
By timing your propagation right, you’re giving your pothos cuttings the natural boost they need to root quickly and grow strong.
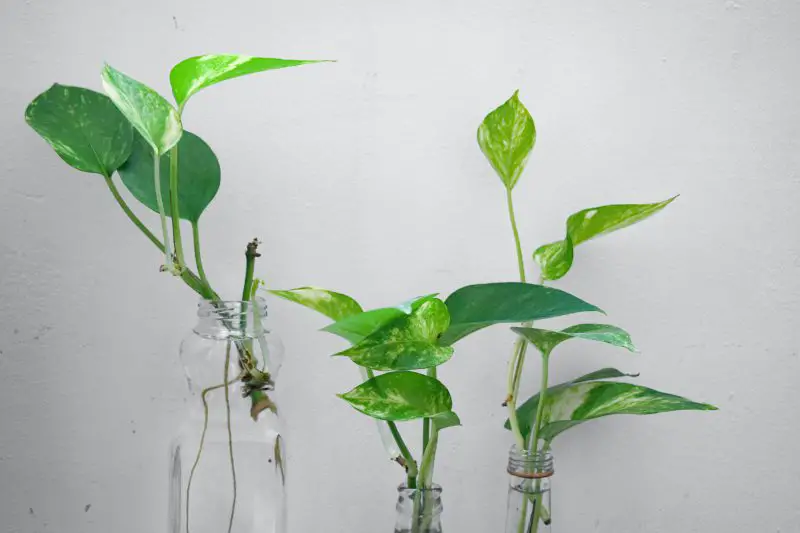
Method 1: Propagating Pothos in Water
Water propagation is one of the most popular and visually satisfying methods to propagate pothos. It’s beginner-friendly, allows close monitoring of root development, and requires minimal tools—yet to ensure success, understanding the technical nuances of the process is key.
Selecting and Preparing Cuttings
Start with healthy stems featuring at least 2–4 leaves and several nodes (the small bumps on the stem where roots will form). Always cut just below a node using a sterile, sharp blade or scissors. Nodes are biologically active sites where meristematic tissue rapidly generates new root cells. Removing leaves that would be submerged in water is essential to prevent rot and bacterial growth.
Water Quality and Container Choice
Use clean, room-temperature, chlorine-free water, as chemicals like chlorine or chloramine can inhibit root cell division. Distilled or filtered water is ideal. The container should be transparent glass to monitor root progress, but if algae becomes an issue, switch to an opaque vessel or place the glass out of direct sunlight.
Change the water every 3–5 days to provide adequate oxygenation and prevent microbial buildup. As oxygen levels drop in stagnant water, root tissue may begin to brown or die back.
Light and Temperature Conditions
Place your cutting in bright, indirect light, ideally near an east- or north-facing window. Avoid direct sunlight, which can overheat the water and damage the delicate root tips. Aim for a stable temperature between 65–80°F (18–27°C), mimicking the plant’s tropical native environment. Cooler temperatures slow root development, while excessive heat can lead to stem rot.
Root Development Timeline and Indicators
Visible roots usually begin to emerge from the node within 7–14 days, though environmental conditions can influence the timeline. Optimal roots for transplanting into soil should be 2–4 inches long, typically forming over 3–5 weeks. Wait until secondary root hairs begin branching, indicating readiness for potting.
Technical Considerations for Transitioning
One common technical issue is transplant shock when moving water-rooted cuttings to soil. Roots developed in water tend to be more fragile and structurally different than those formed in soil. To ease the transition:
Choose a well-draining potting mix with added perlite or coco coir.
Water the newly potted cutting gently and consistently for the first few weeks.
Maintain humidity levels around 50–70% to support acclimation.
With careful technique and environmental control, propagating pothos in water becomes not only rewarding but also a highly reliable method for expanding your indoor plant collection.
Method 2: Propagating Pothos in Soil
Why Choose Soil Propagation?
Propagating pothos in soil mimics natural rooting conditions and helps the plant acclimate to its growing medium from the beginning. Unlike water propagation, which often leads to transplant shock when roots transition to soil, this method fosters a more seamless development. It’s particularly ideal for gardeners aiming for quicker establishment and minimal handling post-rooting.
Soil-grown cuttings also tend to produce thicker, more fibrous root systems that support better nutrient and water uptake long-term. Though slightly less visible than water propagation, it’s more sustainable for creating healthy, permanent houseplants.
Preparing the Right Cuttings
Choose healthy stems from a mature, disease-free mother plant. Each cutting should be 4–6 inches long with at least one node (the small bump where roots emerge) and one healthy leaf. Using a sterile, sharp tool, make a clean cut just below a node to ensure maximum rooting potential.
Avoid cuttings with yellowing leaves, signs of pests, or stems that feel too woody or soft. For best results, choose vigorous green growth with signs of active photosynthesis. Let the cuttings air-dry for 30 minutes to form a callus, which reduces the risk of rot once inserted into the soil.
Choosing the Best Soil Medium
The soil mix must offer excellent drainage while retaining enough moisture for root development. An ideal blend includes 50% peat moss or coco coir for water retention, and 50% perlite or pumice for aeration and drainage. You may also add a small amount of worm castings or compost to encourage microbial activity.
Avoid using heavy garden soil, clay-rich mixes, or compost alone, as these can become waterlogged and suffocate the developing roots. Sterilizing the mix beforehand can help prevent fungal or bacterial infections during this vulnerable stage.
Potting the Cutting for Success
Use a small container (2–4 inches wide) with drainage holes to minimize excess moisture and promote root growth in a compact space. Fill the pot with your prepared soil mix, moisten it lightly, and insert the cutting so that at least one node is buried beneath the surface.
Gently firm the soil around the base to ensure the cutting stands upright without wiggling. Label the container if you’re propagating multiple varieties or testing different conditions. Proper contact between the node and moist soil is essential to trigger rooting.
Creating the Right Rooting Conditions
To replicate a greenhouse-like environment, cover the pot with a clear plastic bag, a reused produce container, or a propagation dome. This retains humidity levels around 60–80%, which supports moisture absorption before roots form. Ensure that the plastic doesn’t touch the leaf—use small sticks to keep it elevated.
Maintain a consistent soil temperature of 70–80°F (21–27°C), using a heat mat if needed. Avoid placing the cutting in a drafty area or near cold windows, as temperature swings can stall rooting.
Providing Light and Air Circulation
Place the cutting in bright, indirect light such as near an east- or north-facing window. Avoid direct sun exposure, which can overheat the cutting and dry out the top layer of soil. If natural light is limited, a grow light with a 12–14 hour cycle can be used to ensure photosynthesis continues.
Good air circulation is also important. Leave a small gap in your humidity cover to prevent fungal growth and allow gas exchange. Use a small fan on a low setting if necessary, but avoid direct airflow that may dry out the cutting.
Monitoring Root Growth
Root development generally takes 3 to 5 weeks, depending on conditions and cutting health. Avoid tugging on the cutting frequently, as this can disturb or break fragile new roots. Instead, look for signs such as new leaf growth or resistance when gently pressing the stem.
If the soil dries out too quickly, mist it with distilled water rather than overwatering. Using a moisture meter or your finger to test soil dampness can help maintain the ideal environment.
Transitioning to Normal Care
Once the cutting has rooted (indicated by new growth and resistance), begin gradually acclimating it to normal indoor conditions. Remove the humidity cover over the course of a week to allow the plant to adjust to lower humidity.
Start a light watering routine—watering when the top inch of soil feels dry. Introduce diluted liquid fertilizer (¼ strength) after two weeks to encourage stronger root and foliage development. Monitor for signs of transplant stress such as drooping leaves or slowed growth.
Soil propagation offers a robust and natural method for multiplying your pothos collection. While it requires more attention to humidity and soil composition, the long-term payoff includes healthier, more resilient root systems. With patience and care, this method gives you a beautiful new vine that’s already rooted where it’s meant to grow.
Method 3: Propagating Pothos by Division
What Is Division and When Should You Use It?
Division is a propagation technique that involves physically separating a mature pothos plant into multiple self-sufficient sections, each with its own root system. Unlike cuttings, which require time to root, division offers an immediate way to expand your pothos collection with minimal recovery time.
This method is best used when the parent plant has become root-bound, overly dense, or outgrowing its pot. It’s particularly effective for older plants with multiple trailing vines and a robust root network. Division also rejuvenates the original plant, promoting new growth and reducing overcrowding.
Preparing the Mother Plant for Division
Start by selecting a healthy, vigorous pothos with a well-established root system. Water the plant 24 hours before division to reduce root stress and make removal easier. Remove the plant from its container gently, supporting the base and tipping the pot sideways to avoid damage.
Once out of the pot, shake off excess soil to expose the root system. Identify natural separation points—areas where individual stems or clusters of vines emerge with their own root mass. These are your division targets.
Dividing the Root System with Precision
Using clean, sharp scissors or pruning shears, carefully separate the plant into two or more sections. Each division should include:
At least one healthy stem or vine
Several leaves (for energy production)
A solid cluster of roots
Avoid tearing or breaking roots by hand, as this can lead to infection or transplant shock. If roots are tightly entangled, soak them in lukewarm water for 10–15 minutes to loosen the mass before separating.
Preparing New Containers and Soil
Choose pots that match the size of each divided section. A pot that’s slightly larger than the root ball is ideal, as too much extra space can lead to overwatering and root rot. Ensure the containers have good drainage.
Use a lightweight, well-draining potting mix—typically a blend of peat moss or coco coir, perlite, and pine bark. Pre-moisten the soil to help with settling and root contact. Avoid overly compacted mixes that can suffocate the newly divided roots.
Transplanting the Divided Sections
Plant each divided pothos section at the same depth it was growing before. Firm the soil gently around the roots and water thoroughly until excess drains out. This initial deep watering helps eliminate air pockets and improves root-to-soil contact.
Place the newly potted divisions in a warm, bright spot with indirect sunlight. Avoid direct sun and drafts during the first 7–10 days as the plant adjusts to its new environment.
Post-Division Care for Healthy Growth
For the first 2–3 weeks, keep the soil lightly moist—not soggy—to support root recovery. Avoid fertilizing until new growth appears, which indicates successful adaptation. You can then start a light feeding routine using a balanced, diluted liquid fertilizer.
Monitor leaves for signs of stress such as wilting or yellowing. These are normal in the early days post-division but should subside within two weeks. Ensure humidity remains moderate (50–60%) to support transpiration and reduce leaf drop.
Advantages of Division Over Cuttings
Division offers immediate plantlets with mature roots, eliminating the rooting phase required by cuttings. This results in faster growth, quicker establishment, and less overall risk of failure.
It also allows for a cleaner, more organized plant structure, especially useful when a mother plant has become leggy or unbalanced. Gardeners who want a quick, full-looking pothos without waiting for cuttings to develop roots may find division the most efficient method.
Ideal Scenarios for Using Division
Division is the preferred method when:
The mother plant is overcrowded or root-bound
You want instant foliage without rooting wait times
You’re repotting and want to refresh the plant’s growth
You’re creating several new plants from one large specimen
For pothos owners seeking the most efficient, no-fuss propagation with guaranteed success, division stands out as a high-reward option with minimal technical complications
Providing the Right Conditions for Rooting
The Importance of a Stable Environment
Creating an ideal environment for rooting is crucial to ensure that your pothos cuttings or divisions establish quickly and grow into healthy plants. Rooting is a sensitive phase where consistent warmth, humidity, and moisture balance determine success. Stress or fluctuations in temperature and light can delay root development or lead to failure.
Temperature and Humidity Requirements
Pothos roots best in warm temperatures between 70–80°F (21–27°C). Avoid exposing cuttings to drafts, sudden cold snaps, or overly hot windowsills. Humidity should remain moderate to high—above 50% is ideal—to prevent cuttings from drying out before roots form.
If your indoor air is dry, use a humidity dome, plastic bag, or place the cuttings in a mini greenhouse. Just make sure there’s some airflow to prevent mold or fungal buildup.
Choosing the Right Light Level
Indirect, bright light is essential during the rooting stage. Too little light will slow the process, while direct sun can scorch leaves or overheat the cuttings. A north or east-facing window or a filtered south-facing spot works well.
If natural light is limited, consider using a grow light for 10–12 hours per day, positioned 6–12 inches above the cuttings.
Moisture Management for Healthy Root Growth
For water propagation, change the water every 2–3 days to prevent bacteria and provide oxygen to developing roots. Use room-temperature, dechlorinated water, and ensure the node is always submerged.
In soil propagation, keep the medium consistently moist but not soggy. Overwatering can cause rot, while underwatering slows or halts root formation. A light misting every day or two can help maintain surface moisture without waterlogging.
Enhancing Rooting with Optional Additives
You can encourage faster rooting by dipping the cutting ends into rooting hormone powder or gel, especially when propagating in soil. This gives a hormonal boost that stimulates root cell division and reduces disease risk.
Some gardeners also use natural boosters like cinnamon (antifungal) or diluted willow water (contains natural rooting compounds).
Monitoring Progress and What to Expect
Roots typically begin forming in 7–14 days, depending on conditions and method. White root nubs will appear first, gradually extending over time. Avoid disturbing the cuttings—only tug very gently after two weeks to test for resistance, which indicates successful rooting.
By carefully managing temperature, light, humidity, and moisture, you create the optimal environment for new roots to develop strong, fast, and healthy.
Transplanting Rooted Cuttings
When to Transplant
Once your pothos cuttings develop roots that are at least 2–3 inches long, they’re ready to be transplanted. Roots should appear white, firm, and well-branched. This typically happens after 2–4 weeks, depending on conditions.
Choosing the Right Pot and Soil
Use a small pot with good drainage holes to prevent root rot. Fill it with a well-draining potting mix, such as a blend designed for houseplants or made from peat moss, perlite, and coco coir. Avoid compacted or soggy soil.
Transplanting Steps
Gently remove the cutting from water or propagation tray. If using water propagation, rinse the roots briefly and avoid damaging them. Make a small hole in the soil, insert the cutting, and lightly firm the soil around the base to hold it upright.
Immediate Aftercare
Water the transplanted cutting thoroughly, letting excess water drain out. Keep the plant in bright, indirect light and maintain moderate humidity for the first 1–2 weeks to help it adapt. Avoid fertilizing until new growth appears, signaling successful transplanting.
Caring for New Pothos Plants
After transplanting, your new pothos plant will need proper care to thrive. Continue to provide bright, indirect light and maintain moderate humidity. Water when the top inch of soil feels dry.
Avoid fertilizing immediately after propagation. Wait at least 4 to 6 weeks until the plant shows signs of new growth. Then, use a diluted, balanced houseplant fertilizer to support continued development.
Monitor your plant for any signs of stress, such as yellowing leaves or root rot. These symptoms can often be corrected with proper watering and environmental adjustments.
Common Mistakes to Avoid
Using Dull or Dirty Tools
Cutting pothos with dull or unsterilized scissors can crush the stem or introduce bacteria and fungi, leading to rot.
Solution: Always use sharp, sterilized pruning shears or scissors. Clean them with rubbing alcohol before and after each use to prevent contamination.
Leaving Cuttings Without a Node
Roots only form from nodes on pothos vines. Cutting above the node or using a leaf-only section won’t produce roots.
Solution: Ensure each cutting includes at least one healthy node, preferably with a visible aerial root nub, for reliable rooting success.
Overcrowding in Water or Soil
Placing too many cuttings in one jar or pot restricts airflow and increases the risk of fungal infections or rot.
Solution: Space cuttings out adequately. In water, use a wide-mouth jar; in soil, give each cutting room to breathe and grow without competition.
Allowing Leaves to Sit in Water
If pothos leaves touch the water surface, they can rot, contaminating the water and harming the stem.
Solution: Trim the bottom leaves to keep them above the waterline. Only the node and a bit of stem should be submerged.
Using Poor Quality Water
Tap water high in chlorine or fluoride can damage sensitive roots or slow propagation.
Solution: Use filtered, distilled, or rainwater, especially for water propagation. If using tap water, let it sit out overnight to allow chlorine to evaporate.
Placing Cuttings in Poor Lighting
Low light slows down root development, while direct sun can overheat or burn the cuttings.
Solution: Place cuttings in bright, indirect light—near a north- or east-facing window is ideal. Avoid harsh midday sun.
Overwatering Soil Cuttings
Cuttings in soil are vulnerable to root rot if the soil stays too wet for too long.
Solution: Use a well-draining potting mix and water only when the top inch of soil feels dry. Make sure pots have proper drainage holes.
Impatience During Rooting
Checking too often or transplanting too soon can damage fragile roots.
Solution: Be patient—wait 2–4 weeks before checking root growth. Transplant only when roots are at least 2 inches long and visibly strong.
How Long Does Propagation Take?
Propagation timelines vary depending on the method and conditions. In water, you may see roots form in as little as 7 to 10 days, with transplant readiness around 3 to 4 weeks. In soil, rooting can take slightly longer, often around 4 to 5 weeks.
Propagation by division is immediate since you’re planting already-rooted sections. However, it may still take a couple of weeks for the plant to adjust and show new growth.
Benefits of Propagating Pothos at Home
Cost-Effective Way to Expand Your Collection: Propagating pothos at home allows you to grow new plants without spending money on store-bought options. From just one healthy vine, you can produce multiple new plants, making it an economical way to green up your space.
Personalized Gifting and Sharing: Home-propagated pothos make thoughtful, eco-friendly gifts. Each cutting carries a personal touch and can be shared with friends, family, or coworkers — spreading both greenery and joy.
Easy and Rewarding Experience for Beginners: Pothos is one of the easiest houseplants to propagate, making it an ideal choice for those new to plant care. Watching roots form and leaves grow is deeply satisfying and builds confidence in your gardening skills.
Encourages Sustainability and Waste Reduction: Instead of throwing away overgrown or pruned vines, propagation turns them into new life, reducing plant waste and supporting a sustainable indoor garden.
Boosts Indoor Greenery and Air Quality: More plants mean more oxygen. Propagating pothos at home helps you increase indoor greenery, which can enhance mood, reduce stress, and even improve air quality over time.
Frequently Asked Questions About Propagating Pothos
How do I know when a pothos cutting is ready to be propagated?
A pothos cutting is ready when it has at least one healthy node—the small bump on the vine where leaves and aerial roots emerge. Ideally, cuttings should be 4–6 inches long with a few leaves attached. Avoid using damaged or weak stems, as they may not root successfully.
Can I propagate pothos in low light?
Yes, but propagation is slower in low light. For best results, place your cuttings in bright, indirect sunlight, which encourages faster and healthier root growth. If you’re using water propagation, change the water regularly to prevent rot, especially in dim conditions.
How long should pothos roots be before transplanting?
Wait until the roots are about 2–3 inches long, which usually takes 2–4 weeks in water. At this length, the roots are strong enough to handle the transition to soil. Transplanting too early may cause stress and reduce survival rates.
Do I need rooting hormone to propagate pothos?
No, pothos roots easily without rooting hormone, especially in water. However, if you’re propagating directly in soil, rooting hormone can speed up the process and improve the chances of successful rooting, especially for weaker cuttings.
Why are my pothos cuttings not rooting?
Slow or no root growth could be caused by poor lighting, dirty water, cuttings without nodes, or extremely low temperatures. Ensure the node is submerged in water, change the water every few days, and keep the jar in a warm, well-lit area to improve your success rate.
Conclusion
Propagating pothos from a single cutting is a rewarding way to grow your indoor garden. Whether you choose water, soil, or division, the process is simple and accessible to plant lovers of all experience levels. With proper care and a bit of patience, you can turn one vine into a flourishing network of vibrant, leafy pothos plants. Not only will your space feel greener, but your connection to the plant world will deepen with every new sprout.