Rhododendrons are among the most stunning flowering shrubs, admired for their vibrant blooms and lush foliage. Learning how to propagate Rhododendron not only allows you to expand your garden at little cost but also preserves the beauty of your favorite varieties. By mastering the right techniques, you can enjoy healthy, thriving plants that continue to enhance your outdoor space year after year.
Propagation requires patience, timing, and proper care, but the reward is a garden bursting with color and life. In this guide, you will discover proven methods for multiplying Rhododendrons successfully, whether through cuttings, layering, or seeds, along with expert tips to ensure strong growth and abundant flowering.
Understanding Rhododendron Propagation
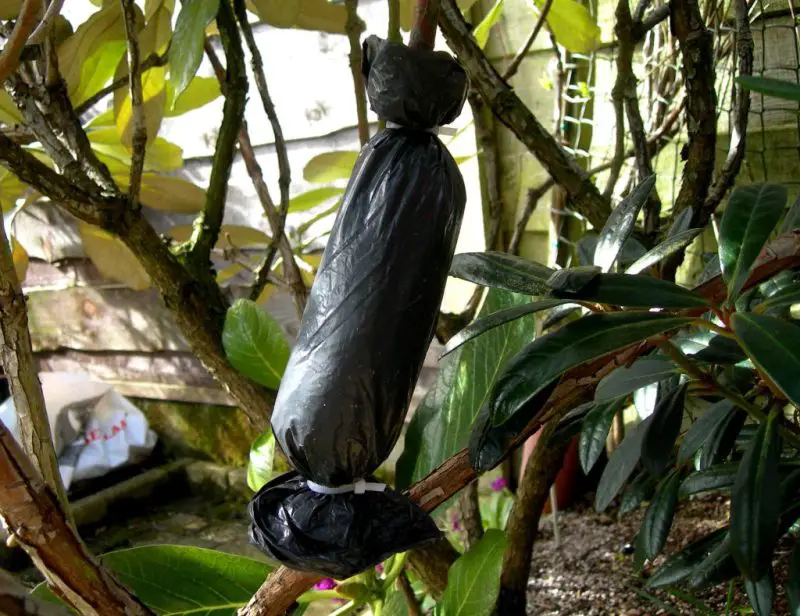
Propagating Rhododendrons is the process of creating new plants from an existing parent. This method allows gardeners to preserve desired traits and grow more shrubs without buying new ones. Learning how to propagate Rhododendron can save money while expanding the beauty of your garden.
Different propagation methods suit different needs. Cuttings are ideal for producing clones of a favorite plant. Layering offers high success rates with minimal disturbance. Seed propagation is slower but introduces genetic variation. Each method requires specific care to ensure the young plants develop strong roots and healthy foliage.
Timing plays a major role in success. Most gardeners start in late spring or early summer, when plants are actively growing. However, some methods work better in autumn when the plant is semi-dormant. Selecting the right time helps ensure rapid root development and healthy growth in the following season.
Choosing the Right Propagation Method
Selecting the best propagation method depends on your goals, time, and resources. Rhododendrons can be propagated by cuttings, layering, or seeds. Each approach offers unique benefits and challenges, making it important to match the method to your needs.
Cuttings are the most popular choice for consistent results. This method produces exact copies of the parent plant, keeping the same flower color and growth habit. Layering works well for beginners, as branches remain attached to the parent plant while rooting. Seed propagation takes longer and may produce plants with varied traits, adding diversity to your garden.
Your climate, plant variety, and available space also influence the choice. Gardeners in mild regions may have more flexibility with timing, while those in colder areas must work within a shorter growing season. Considering these factors ensures healthy, strong plants that will thrive for years after propagation.
Propagating Rhododendrons from Cuttings
Cuttings are the most reliable method for producing identical rhododendrons. This technique preserves the color, shape, and growth habit of the parent plant. It also allows you to multiply your favorite varieties without waiting for seeds to mature. Success depends on using healthy parent plants, selecting the right type of cutting, and providing the proper rooting environment.
Cuttings should be taken during the plant’s active growth period, usually in late spring or early summer. The material should be semi-ripe, meaning the stems are firm but still flexible. Using sharp, clean tools is essential to prevent damage and disease transmission. Once prepared, cuttings require a rooting medium with good drainage, such as a mix of peat moss and perlite.
Monitoring moisture and humidity levels is crucial during rooting. Covering cuttings with a clear plastic dome or bag can help maintain high humidity. Rooting often takes several weeks, and patience is key. Once roots are strong, the young plants can be transplanted into pots or the garden.
Selecting Healthy Cuttings
Selecting the right cuttings is the foundation of successful rhododendron propagation. Always choose stems from strong, healthy plants. The parent plant should show vibrant leaf color and no signs of disease. Avoid stems that are weak, overly woody, or producing poor growth. Semi-ripe stems, firm yet slightly flexible, are the most suitable for rooting. These stems balance vigor with readiness to form roots.
Each cutting should measure between 4 and 6 inches in length. Remove the lower leaves to expose the nodes, which encourage root formation. Keep at least two healthy upper leaves intact to continue photosynthesis. Examine the cutting for pests, especially aphids or spider mites, and treat before planting.
It’s best to take cuttings early in the day when moisture levels are higher. This helps preserve freshness and reduces stress on the stem. Use sharp, sterilized pruning shears to make clean cuts, preventing bruising and disease spread. Place the cuttings in a moist paper towel if not planting immediately.
Proper selection ensures stronger root development and healthier growth in the future. A carefully chosen cutting has a far greater chance of becoming a thriving, blooming rhododendron in your garden.
Preparing and Planting Cuttings
Preparation is just as critical as selection in rhododendron propagation. Start with sharp, sterilized pruning shears to avoid contamination. Cut just below a leaf node, where rooting is most likely to occur. Ensure the cut is clean, not crushed, to prevent tissue damage.
Dip the cut end into rooting hormone powder or gel. This step stimulates faster root development and reduces the risk of rot. Prepare a rooting medium of equal parts peat moss and perlite for drainage and moisture balance. Pre-moisten the mixture, but avoid waterlogging.
Insert the cutting deep enough so at least one node is under the surface. Firm the medium gently around the stem for stability. Place the pot or tray in a bright location with indirect light. Direct sunlight can overheat and stress the cutting.
Cover the container with a clear plastic bag or dome to maintain humidity. Ensure the covering does not touch the leaves to avoid fungal problems. Open the cover briefly each day to allow airflow. Maintain consistent moisture, checking the medium often.
With patience and steady care, roots will form within six to twelve weeks. Healthy rooted cuttings can then be potted up for further growth.
Rooting and Caring for the Cuttings
After planting, water the cuttings thoroughly to settle the soil around the stems. Keep the medium consistently moist but not soggy. Overwatering can cause rot.
Maintain a humid environment to prevent the leaves from drying out. You can cover the pot with a clear plastic dome or bag to retain moisture. Place the cuttings in bright, indirect light to encourage growth. Avoid direct sunlight, which can scorch tender foliage.
Rooting may take several months. Check for resistance when you gently tug on the stem. This indicates root formation. Once roots are well established, transfer the young plants into individual pots.
Gradually harden them off before moving them outdoors. With proper care, these cuttings will develop into strong rhododendrons ready to grace your garden with abundant blooms.
Propagating Rhododendrons by Layering
Layering is one of the easiest ways to propagate rhododendrons. It uses a stem still attached to the parent plant. This method allows the cutting to receive nutrients while it develops roots. Many gardeners prefer layering because it has a high success rate.
Rhododendrons respond well to this technique, especially in spring or early summer. New growth is active, and soil temperatures are ideal. Layering is slower than cuttings but requires less maintenance. Once rooted, the new plant can be separated and transplanted. This method works best with flexible, low-growing branches.
Layering is ideal for gardeners who want to expand their plants without buying new ones. It is also less stressful for the plant compared to other methods. Proper preparation and patience will produce healthy, independent rhododendrons ready to enhance your garden.
Choosing the Right Branch for Layering
The branch you select will determine the success of layering. Look for a branch that is healthy and flexible. Avoid stems that are too woody or too young. Healthy leaves and strong buds indicate good growth potential.
The branch should be low enough to bend toward the ground easily. Ideally, it should be at least one year old. Younger branches may lack the strength to survive after separation. Avoid branches damaged by pests or disease, as they may not root well.
When selecting, also consider the position on the plant. A branch closer to the base often has better access to soil contact. Choose one with minimal shading to ensure enough light for photosynthesis.
Mark the branch before you begin preparation. This helps maintain orientation during bending and prevents unnecessary twisting. A well-chosen branch will root faster and grow stronger once transplanted. Thoughtful selection increases your chances of producing a healthy, long-lasting rhododendron.
Preparing and Securing the Layer
Preparation begins by gently bending the chosen branch toward the ground. Do this slowly to avoid breaking it. Once positioned, locate a section that will touch the soil.
Using a sharp, sterilized knife, make a shallow cut in the bark. This encourages root formation by exposing the cambium layer. Dust the wound lightly with rooting hormone for faster development. Rooting hormone also helps protect against fungal infection.
Dig a shallow trench where the wounded section will rest. Place the wounded part into the trench and cover it with soil. Leave the tip of the branch exposed above the ground. Secure the branch in place using a U-shaped pin or a small rock.
Water the area thoroughly and maintain consistent moisture. Avoid overwatering, which can cause rot. Check the site regularly to ensure the branch stays in place. Roots typically form within six to twelve months.
When strong roots are visible, cut the new plant from the parent. Transplant it carefully to its new location. Proper preparation and securing will give your layered rhododendron the best start in life.
Propagating Rhododendrons from Seed
Growing rhododendrons from seed offers a unique gardening experience. This method allows you to create new hybrids and rare varieties. It also gives you full control over the plant’s early development.
However, this process requires patience and careful attention. Rhododendrons grown from seed may take several years to flower. Despite the wait, the reward is worth it. Watching a seed transform into a mature shrub is satisfying.
Seed propagation is ideal for gardeners interested in experimentation. It allows the exploration of natural variation in flower color and form. This method can also help preserve rare or endangered species. With proper care, seed-grown rhododendrons can thrive for decades.
Collecting and Storing Rhododendron Seeds
The first step is to collect seeds from mature, healthy plants. Wait until the seed pods turn brown and begin to split. This usually happens in late summer or early autumn.
Carefully remove the pods and place them in a paper bag. Store them in a cool, dry location for several days. Once completely dry, gently break open the pods to release the seeds. Rhododendron seeds are very small, so handle them with care.
For long-term storage, place seeds in an airtight container. Keep them in a refrigerator at around 4°C to maintain viability. Avoid moisture, as it can cause mold or early germination. Proper storage ensures the seeds remain viable for up to two years.
Label your containers with the plant variety and collection date. This helps keep track of different batches. Good seed collection and storage practices will give you the best starting point for successful germination later.
Sowing and Caring for Seedlings
Prepare a shallow tray filled with a sterile, well-draining seed mix. Rhododendron seeds require light to germinate. Do not cover them with soil. Instead, press them gently onto the surface.
Mist the surface lightly to keep it evenly moist. Place the tray in a bright, indirect light location. Maintain a temperature between 18°C and 21°C for optimal germination. Avoid direct sunlight, which can dry out the delicate seeds.
Germination may take several weeks, so patience is important. Once seedlings appear, continue to keep the soil lightly moist. Avoid waterlogging, which can cause damping-off disease.
When seedlings develop their first true leaves, transplant them into individual pots. Use an acidic, well-draining mix to support healthy root growth. Gradually acclimate young plants to outdoor conditions before planting them in the garden.
Regular monitoring, gentle watering, and proper light exposure will help seedlings grow strong. With steady care, your seed-grown rhododendrons will become thriving shrubs ready to bloom in the coming years.
Caring for Young Rhododendrons After Propagation
Once your rhododendrons have rooted and begun new growth, their care becomes critical. Young plants are more sensitive than mature shrubs. They require consistent moisture, protection from extreme temperatures, and nutrient-rich soil.
Providing the right conditions during this stage sets the foundation for long-term health. Newly propagated plants need slightly more attention to prevent stress or disease. Your goal is to encourage strong root development and steady top growth.
Avoid sudden changes in environment. Shifting from a humid indoor space to the outdoors too quickly can shock the plant. Gradual acclimation is essential.
Watering and Moisture Control
Young rhododendrons need evenly moist soil, but not waterlogged conditions. Overwatering can cause root rot, while underwatering slows growth.
Check the soil regularly by feeling the top few centimeters. If it feels dry, water thoroughly until moisture reaches the roots. Always water at the base to keep foliage dry and reduce fungal risks.
Using mulch helps retain moisture and regulate soil temperature. Organic mulch like pine needles or shredded bark also improves soil acidity over time. Maintain a 5–8 cm mulch layer, but keep it away from direct contact with the stem.
Providing the Right Light and Shelter
Freshly propagated plants benefit from bright, indirect light. Too much sun can scorch tender leaves, while deep shade slows growth.
Place young rhododendrons in a sheltered location, protected from strong winds. If planting outdoors, choose a site with morning sun and afternoon shade. For potted plants, you can move them as needed to maintain ideal conditions.
As the plant matures, it will tolerate a wider range of light conditions. However, consistent shelter during the first growing season helps establish a robust, healthy structure.
Seasonal Care for Rhododendrons
Rhododendrons thrive when their care changes with the seasons. Each period of the year brings different needs for water, nutrients, and protection. By adjusting your care routine, you help the plant remain healthy, resilient, and full of vibrant blooms year after year.
Spring Growth and Feeding
Spring marks the start of active growth for rhododendrons. As temperatures rise, buds swell and prepare to bloom. This is the perfect time to check soil health, remove winter mulch, and refresh it with a fresh layer.
Applying a slow-release, acidic fertilizer in early spring supports both flowering and leaf development. Water deeply during dry spells to keep the soil evenly moist. Avoid high-nitrogen fertilizers, which promote excessive leaf growth at the expense of blooms.
Inspect plants regularly for pests such as lace bugs or weevils. Early detection allows for quick treatment before infestations can weaken the shrub.
Summer Maintenance and Protection
Summer can stress rhododendrons with heat and dry conditions. Consistent watering is essential, especially for young or newly transplanted plants. Always water at the base to keep leaves dry and prevent fungal issues.
Mulching during summer helps retain moisture and keeps roots cool. Monitor plants for signs of sun scorch on leaves, and provide shade cloth if necessary. Deadheading spent flowers at this time directs energy toward root and foliage health.
Light pruning after flowering encourages balanced growth while preserving next year’s buds. This keeps the shrub tidy and ready for its next bloom cycle.
Autumn and Winter Care
Autumn is a preparation period for rhododendrons. As the weather cools, the plants shift energy from active growth to root strengthening. Reduce fertilization in early autumn to allow new growth to harden before winter arrives.
Check the mulch layer and add fresh material if needed. A 5–8 cm layer of pine bark or leaf mold protects roots from temperature fluctuations. Avoid piling mulch against the trunk to prevent rot. Keep soil moist until the ground freezes to help plants withstand winter dryness.
During winter, rhododendrons may suffer from desiccation caused by cold winds and frozen soil. In exposed locations, consider using burlap screens as windbreaks. These barriers shield foliage from harsh winds without trapping excess moisture.
If snow accumulates, gently remove heavy piles from branches to prevent breakage. Avoid pruning in winter, as cold damage can harm new cuts. By focusing on protection and moisture management, you ensure that the plant enters spring healthy and ready for another vibrant bloom season.
Common Rhododendron Mistakes to Avoid
Planting in the Wrong Location
One of the most common mistakes is planting rhododendrons in unsuitable locations. These shrubs prefer partial shade and protection from harsh midday sun. Too much direct sunlight can burn their leaves and shorten bloom duration.
On the other hand, planting in deep shade limits flowering and encourages weak, leggy growth. Rhododendrons need bright but filtered light to produce abundant blooms. A location with morning sun and afternoon shade usually works best.
Before planting, observe your garden at different times of the day. Identify areas with gentle light and good airflow. Avoid low-lying spots where water collects after rain. The right site selection ensures long-term health and better flowering.
Planting Too Deep
Planting rhododendrons too deep is one of the most common errors. The root ball should sit slightly above the soil surface to allow proper air circulation. When buried too deeply, roots can suffocate and rot due to poor oxygen exchange.
Deep planting also increases the risk of waterlogging. Excess moisture trapped around the crown creates ideal conditions for fungal diseases. Always ensure the planting hole is wide rather than deep, giving roots room to spread horizontally.
Correct depth planting promotes healthy root development and vigorous growth. Observing this simple principle prevents long-term health issues and supports consistent blooming.
Neglecting Soil Acidity
Rhododendrons require acidic soil with a pH between 4.5 and 6.0 for healthy growth. Soil outside this range disrupts nutrient absorption. Plants in neutral or alkaline soil often suffer from chlorosis, yellowing leaves, and reduced vigor.
Ignoring soil acidity also weakens root systems. Without proper pH, essential minerals like iron and magnesium become unavailable. Over time, leaves fade, growth slows, and flowering declines significantly. In severe cases, plants may fail to survive.
To maintain proper acidity, test your soil regularly using a home kit or professional service. If the pH is too high, amend with organic matter like pine needles, peat moss, or leaf mold. These materials slowly acidify soil while improving moisture retention and texture.
Seasonal monitoring is important because factors like rainfall, irrigation water, and fertilizers can change soil chemistry. Even well-established rhododendrons may decline if acidity is not maintained. By keeping the pH within the ideal range, you create the perfect environment for root health, lush foliage, and abundant blooms year after year.
Overwatering or Poor Drainage
Many gardeners think rhododendrons love constant watering, but excessive moisture is harmful. Overwatering suffocates roots and leads to fungal diseases. Plants in waterlogged soil may develop yellow leaves and wilt despite having enough water.
Poor drainage worsens the issue. Clay-heavy soils trap water around the roots, creating ideal conditions for root rot. This damage is often irreversible.
To prevent problems, amend heavy soil with compost or pine bark to improve drainage. Water deeply but less frequently, allowing the topsoil to dry slightly between waterings. Always ensure pots or beds have adequate drainage holes or outlets.
Improper Pruning Timing
Pruning at the wrong time can drastically reduce next year’s blooms. Rhododendrons set flower buds soon after the current blooms fade. Cutting at the wrong stage removes these buds before they open.
The safest pruning time is immediately after flowering ends. This timing preserves developing buds while still allowing shaping of the plant. Deadheading spent flowers also encourages energy to flow into healthy growth instead of seed production.
Use clean, sharp tools to make precise cuts without damaging nearby buds. Remove only what is necessary for shaping and health. Regular, well-timed pruning maintains both the structure and blooming potential of your rhododendron.
Indoor Care and Container Rhododendrons
Choosing the Right Container
Selecting the proper container is crucial for healthy rhododendrons. A wide, deep pot allows roots to spread comfortably without crowding. Rhododendrons have shallow, fibrous roots that need space to absorb nutrients efficiently.
Use a pot made of materials like ceramic, terracotta, or sturdy plastic. These materials help regulate soil temperature and moisture levels. Always ensure the container has multiple drainage holes to prevent water accumulation and root rot.
The soil mix plays a major role in plant health. Choose a well-draining, acidic blend with peat moss, pine bark, and perlite. This combination supports root aeration while maintaining the correct pH level. Avoid using regular garden soil, as it often retains excess moisture.
Repot your rhododendron every two to three years. This refreshes the soil, prevents compaction, and encourages continuous healthy growth. During repotting, check the roots for signs of rot or pests. Healthy roots should be light-colored and firm. A carefully chosen container creates the foundation for a thriving plant.
Light and Water Needs
Light conditions directly affect indoor rhododendron health. Place the container in a location with bright, indirect sunlight. Direct light for extended periods can scorch leaves, while too little light reduces flower production.
East-facing windows often provide the perfect balance. Morning sun is gentle, and afternoon shade prevents overheating. If natural light is insufficient, use grow lights designed for flowering plants. Keep lights about a foot above the foliage.
Watering must be consistent but not excessive. Keep the soil slightly moist at all times, avoiding soggy conditions. Overwatering can suffocate roots, while underwatering leads to stress and reduced blooms.
Use rainwater or distilled water whenever possible. Tap water may contain minerals that raise soil pH over time. Mist leaves occasionally to boost humidity, especially in winter when indoor air is dry. Maintaining proper light and water conditions ensures your container rhododendron thrives year-round.
Monitoring Bud Development
Regularly observing bud growth is essential for ensuring healthy rhododendron blooms. Buds form several months before flowering, often in late summer. They remain dormant through winter before opening in spring. Recognizing these stages helps you anticipate flowering times and plan care accordingly. Healthy buds are plump and firm, while damaged ones may appear shriveled or discolored. Catching problems early allows for quick intervention to save future blooms.
Seasonal changes greatly affect bud development. Cold snaps, drought, or excessive heat can stress plants and damage buds. Mulching in autumn protects the root zone and moderates soil temperature. During winter, shielding plants from harsh winds prevents desiccation of delicate bud tissues. In spring, monitor for pests like weevils or aphids that may feed on developing buds. Prompt action reduces the risk of losing an entire season’s flowers.
Watering and fertilization also influence bud quality. Consistent moisture supports steady growth, while nutrient-rich, acidic soil encourages strong bud formation. Use a balanced fertilizer after flowering to promote bud initiation for the next year. Avoid high-nitrogen formulas, which stimulate leafy growth at the expense of buds. Regular inspection combined with proper cultural practices ensures your rhododendrons remain vigorous and produce abundant, vibrant blooms year after year. Careful bud monitoring transforms a good flowering season into a spectacular one.
Caring for Young Propagated Rhododendrons
Young rhododendrons from cuttings, layering, or seed need special attention to establish strong growth. These plants have limited root systems, making them more sensitive to environmental fluctuations. Keep the soil consistently moist but never soggy, as excessive water can cause root rot. Provide dappled sunlight or morning sun with afternoon shade to avoid leaf scorch.
Mulching is essential for moisture retention and temperature regulation. Organic mulch such as pine needles or shredded bark works well. Spread a layer two to three inches thick but keep it a few inches away from the stem to prevent rot. This also helps maintain the acidic soil conditions rhododendrons prefer.
Avoid fertilizing too early, as tender roots can burn. Wait until you see healthy new growth, then use a gentle, acid-formulated fertilizer. Protect the young plants from heavy winds, frost, or intense heat until they are better established. With careful watering, mulching, and monitoring, these young rhododendrons will develop into strong, blooming shrubs that enhance your garden for years to come.
Transplanting Your Propagated Rhododendrons
The best time to transplant propagated rhododendrons is early spring or early autumn. Cooler weather reduces stress and helps the plant recover more quickly. Select a planting site with partial shade, acidic soil, and good drainage to replicate the plant’s ideal growing conditions.
Before transplanting, prepare a hole twice as wide as the root ball but only as deep. This encourages horizontal root spread, which rhododendrons naturally prefer. Loosen surrounding soil to reduce resistance for new roots. Gently lift the plant from its pot or propagation bed, keeping as much of the root system intact as possible.
Once placed in the hole, backfill with soil and gently press it down to remove air pockets. Water thoroughly to settle the soil around the roots. Continue regular watering during the first growing season, as transplanted rhododendrons can dry out quickly. A light mulch layer can help maintain soil moisture and protect roots from temperature swings. With proper site selection and aftercare, your transplanted rhododendrons will thrive and reward you with vibrant blooms in future seasons.
Companion Plants for Extended Garden Color
Pairing rhododendrons with complementary plants extends the beauty of your garden beyond their bloom season. Selecting companions with staggered flowering times ensures constant color. Spring bulbs like daffodils and tulips emerge early, filling the garden with vibrant shades before rhododendrons open. These early blooms create a cheerful backdrop for the shrub’s spectacular display.
Summer perennials, such as astilbes, hostas, and daylilies, take over after rhododendrons fade. Their varied textures and colors keep the garden lively through warmer months. Shade-loving groundcovers like ferns or heucheras add foliage contrast while protecting soil moisture around rhododendron roots. Combining plants with different leaf shapes also adds visual interest, even when flowers are absent.
Fall interest can be achieved with shrubs and trees that develop colorful foliage. Maples, dogwoods, and viburnums offer brilliant reds, oranges, and yellows. Evergreens maintain structure and greenery during winter, framing the garden’s design year-round. Thoughtful plant combinations not only extend seasonal appeal but also enhance biodiversity, attracting pollinators and beneficial insects. With smart companion planting, your garden remains captivating in every season, not just during the rhododendron bloom period.
Frequently Asked Questions About How to Propagate Rhododendrons
How long does it take to propagate rhododendrons?
Layering can take 12 to 18 months before roots form. Cuttings may root in four to six months under ideal conditions. Patience is essential for strong, healthy plants. Avoid disturbing new growth until roots are well-developed and ready for transplanting.
Can I propagate rhododendrons from seeds?
Yes, but seed propagation is slow and less predictable. Seedlings may take several years to flower. It’s better for hybridizing rather than cloning specific cultivars. Keep seeds in moist, acidic soil and protect them from direct sunlight during early growth.
What’s the best season to take rhododendron cuttings?
Late summer to early autumn is ideal. The plant’s semi-hardwood stage produces better rooting success. Ensure cuttings are healthy, pest-free, and taken from recent growth. Maintain high humidity and consistent moisture during the rooting period.
Do rhododendrons in containers propagate differently?
No, but container plants may dry faster. Monitor moisture closely when using them as parent plants. Choose a container large enough for healthy root development. Use well-drained acidic soil to match in-ground conditions for better propagation results.
How do I know if propagation was successful?
Look for new leaf growth and root resistance when gently tugging the stem. Avoid pulling too hard, as roots are delicate. If growth is steady and foliage is vibrant, your propagated rhododendron is ready for gradual acclimatization outdoors.
Conclusion
Propagating rhododendrons is more than a gardening task—it’s an act of creation. Each new plant carries the promise of more color, fragrance, and beauty in your garden. With patience, care, and the right techniques, you can transform a single shrub into a vibrant display that blooms year after year. Whether you choose cuttings, layering, or seeds, every step brings you closer to a richer, more colorful landscape. Let your garden grow with your love, and watch your rhododendrons reward you in breathtaking ways.

