Russian sage is a beloved perennial known for its silvery foliage and fragrant lavender-blue blooms. Gardeners appreciate its drought tolerance, ability to thrive in poor soil, and striking beauty that lasts throughout summer and into fall. Propagating Russian sage allows you to expand your garden at little cost while enjoying more of this hardy plant’s charm.
Learning how to propagate Russian sage is not only rewarding but also surprisingly simple. Whether you choose cuttings, division, or seeds, each method offers a unique way to create new plants. With the right timing and care, even beginner gardeners can succeed. This guide will walk you through expert tips and detailed steps to ensure your propagated plants grow strong, healthy, and full of blooms. By following the right approach, your garden will soon be filled with fragrance and color.
Understanding Russian Sage: Growth and Characteristics
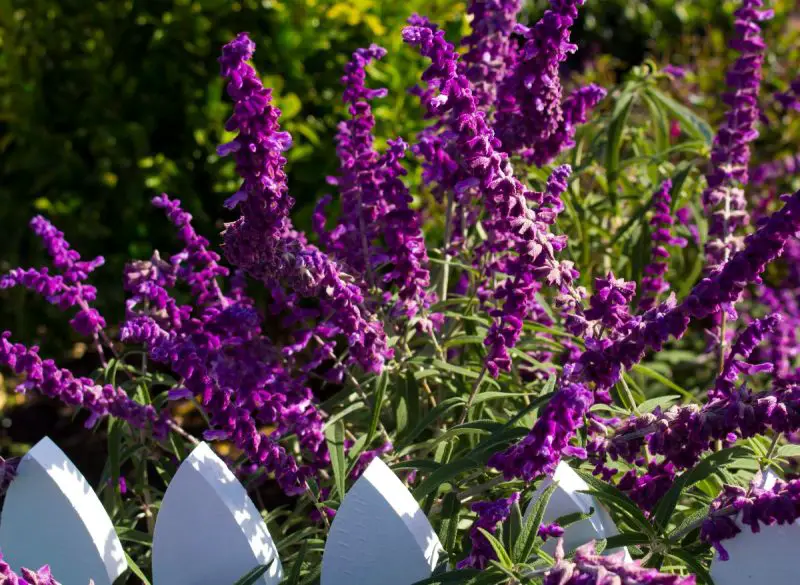
Russian sage, scientifically known as Perovskia atriplicifolia, is a hardy perennial that thrives in sunny, dry conditions. Its tall, airy stems are covered with silvery-green foliage, and during summer, they burst into lavender-blue flowers that attract bees, butterflies, and other pollinators. The plant’s unique texture and fragrance make it a standout in both cottage gardens and more formal landscapes. Its resilience against drought and poor soil conditions has made it a favorite among gardeners who seek low-maintenance beauty.
One of the defining features of Russian sage is its long blooming period. Flowers typically appear in midsummer and last until the first frost, providing consistent color throughout the season. The plant grows in upright clumps, often reaching three to five feet in height, which gives it an architectural quality in the garden. Its aromatic leaves release a pleasant scent when brushed, adding an extra sensory layer to the gardening experience. This combination of structure, scent, and flower power makes Russian sage versatile in borders, mass plantings, or as a focal point.
Understanding its growth habits is important before attempting propagation. Russian sage spreads slowly through its root system, and older stems can become woody if not pruned regularly. While the plant tolerates neglect, it performs best with occasional maintenance. Knowing how it responds to different propagation methods ensures higher success rates. Its semi-woody stems are ideal for cuttings, while its clumping roots make division possible. Seeds are also viable but require patience. By learning these traits, gardeners can choose the propagation method that aligns with their goals and resources.
Why Propagate Russian Sage for Your Garden
Propagating Russian sage offers gardeners a rewarding way to expand their landscapes without purchasing new plants. Since this perennial thrives in tough conditions, creating additional plants ensures that its beauty spreads throughout your outdoor space. Propagation also helps preserve the unique fragrance and color that Russian sage brings to summer and fall gardens. By multiplying your plants, you can design borders, fill empty patches, or create a unified theme across different areas of your yard.
Another benefit of propagation is its cost-effectiveness. Instead of buying multiple plants, you can generate new growth from an established mother plant. This process is especially useful for large gardens or community landscapes where uniformity and consistency are important. Propagation also allows gardeners to share Russian sage with friends and neighbors, making it a meaningful and sustainable way to beautify more spaces. Healthy cuttings or divisions often root quickly, giving you strong plants for little effort.
Beyond aesthetics and cost savings, propagation supports ecological benefits. Russian sage attracts pollinators, including bees and butterflies, which are essential for maintaining healthy ecosystems. Expanding the number of plants means increasing food sources for these beneficial insects. This practice contributes to biodiversity while making your garden more vibrant and full of life. By learning how to propagate Russian sage, you are not just multiplying plants but also enriching your environment with fragrance, color, and ecological value.
Best Time to Propagate Russian Sage
Timing plays a critical role in the success of propagating Russian sage. The ideal period for most propagation methods is late spring to early summer, when the plant is actively growing but not yet stressed by extreme heat. During this stage, stems are semi-soft, which makes them easier to cut and root successfully. The warmer soil and consistent moisture of spring also support healthy development of new roots, giving young plants the best start. Propagation during this window takes advantage of the plant’s natural energy for expansion and growth.
Division, on the other hand, is best carried out in early spring before significant new growth appears. At this point, the plant is still conserving energy, and dividing the clumps puts less stress on its root system. Once replanted, the divided sections can establish themselves quickly as the growing season progresses. By contrast, seed propagation can be done in either spring or fall, depending on whether you prefer indoor sowing or direct seeding into the garden. Both times provide suitable conditions for germination, but indoor sowing often offers more control over temperature and moisture levels.
Late summer is generally not recommended for propagation, as the plant is often focused on flowering and preparing for dormancy. Cuttings taken too late in the season may not have time to establish strong roots before frost arrives, leaving them vulnerable to damage. Similarly, dividing plants in autumn risks exposing tender new roots to winter stress and rot. While Russian sage is hardy, it benefits from propagation that aligns with its natural growth rhythm. By selecting the right season for each method, gardeners greatly increase their chances of success. Timing not only ensures strong establishment but also supports healthier, more fragrant blooms in the seasons ahead.
Propagation Methods for Russian Sage
Propagating from Cuttings
Cuttings remain the most popular method of propagating Russian sage because of their reliability and speed. Softwood cuttings taken in late spring or early summer root more easily, as they contain enough flexibility and energy to establish quickly. Choose stems that are young, green, and free from flowers, since flowering shoots tend to use up too much energy. Each cutting should be about four to six inches long, with the lower leaves removed to expose nodes for rooting. Dipping the base in rooting hormone increases success, though it is not always necessary if conditions are ideal.
After preparation, insert the cuttings into a potting mix made of sand, perlite, or a light soil blend that drains well. Place the container in a warm and bright location with indirect sunlight. Covering the pot with a plastic dome or clear bag helps maintain humidity, which speeds up root development. Water sparingly but consistently to keep the soil slightly moist. In four to six weeks, you will see roots forming, and once they are strong enough, the young plants can be hardened off before transplanting into the garden.
Propagating by Division
Division is especially helpful when older Russian sage plants become woody in the center and less productive. By dividing these clumps, you can rejuvenate the parent plant while gaining several healthy new sections to grow elsewhere. Early spring before active growth begins, or early fall when temperatures cool, are the best seasons for this task. Use a garden fork or spade to carefully lift the entire clump from the soil, trying to keep the root mass intact. Remove any dead or woody parts, and prepare to split the healthy sections.
With a clean, sharp spade or knife, cut the root ball into two or more portions, ensuring each division has both shoots and roots. These sections should be replanted immediately into prepared soil that drains well. Water generously to help the roots settle, and add a light mulch to conserve moisture during establishment. Divisions adapt quickly to their new environment, usually producing strong growth the following season. This method is ideal for gardeners who want instant, established plants and also serves as a long-term maintenance practice.
Propagating from Seeds
Seed propagation may be slower than other methods, but it offers a unique satisfaction for patient gardeners. Russian sage seeds often benefit from stratification, which mimics winter conditions. To improve germination, place seeds in a damp paper towel inside a plastic bag and refrigerate them for three to four weeks. Once prepared, sow the seeds indoors in seed trays during late winter, pressing them lightly into the surface without covering them too deeply. Consistent light and moderate warmth encourage better sprouting results.
Keep the soil moist but not soggy, as too much water can cause seeds to rot. Seedlings usually appear within two to three weeks, though germination can sometimes take longer. Once young plants develop two or three sets of true leaves, they can be transplanted into individual pots to continue growing. Full maturity may take two to three years, but seed-grown Russian sage is often very hardy and slightly variable, adding diversity to your garden design. While this method requires patience, the end result is a resilient plant that thrives in many conditions.
Preparing Soil and Growing Conditions for Successful Propagation
Russian sage is a hardy perennial, but proper soil preparation is essential for propagation success. This plant naturally thrives in rocky hillsides and open plains, which means it prefers conditions that are lean and well-drained. Gardeners should aim for sandy or loamy soils that allow excess water to flow away easily. If the soil is heavy clay, incorporating sand, gravel, or organic matter can improve texture and reduce the risk of root rot. Young cuttings, divisions, and seedlings are particularly sensitive to poor drainage, so taking time to amend the soil makes a noticeable difference in long-term growth.
Beyond soil, sunlight is equally important for successful propagation. Russian sage is a sun-loving plant that requires at least six to eight hours of direct sunlight daily. In shaded areas, new plants often grow thin and weak, producing fewer flowers and less fragrance. Positioning propagated plants in bright, open areas ensures strong stems and vibrant foliage. Temperature also plays a role in early development. Warm conditions promote steady root formation, while exposure to late frost can damage or kill young plants. For gardeners in cooler regions, it is often best to start propagation indoors or in sheltered outdoor spots until the weather stabilizes.
Water management is another key factor for creating the right growing environment. Although Russian sage becomes drought-tolerant when mature, propagated plants need consistent but moderate moisture during establishment. Overwatering can suffocate fragile roots, while drought stress can halt growth before plants are fully established. A balanced approach—watering only when the top inch of soil is dry—encourages deep root development. Mulching lightly around young plants helps retain moisture and regulate soil temperature, but thick layers should be avoided to prevent fungal issues. By focusing on these growing conditions, gardeners give their Russian sage the strongest possible start after propagation.
Caring for Young Russian Sage Plants After Propagation
Once your Russian sage has been successfully propagated, the next step is providing attentive care during its early growth stages. Young plants are more delicate than mature ones and need the right balance of water, sunlight, and protection. Regular monitoring ensures that roots establish firmly, giving the plant a strong foundation for years of growth. With consistent care, propagated Russian sage will soon adapt to its environment and begin producing the silvery foliage and fragrant blooms that make it so desirable.
Watering is one of the most important aspects of aftercare. While established Russian sage can withstand long dry spells, young plants cannot. Keep the soil consistently moist, especially during the first growing season. However, avoid overwatering, as soggy soil encourages root rot. Providing deep but infrequent watering helps roots grow downward, making the plant more resilient in the long run. Adjust watering frequency depending on rainfall and temperature, always checking soil moisture before adding more water.
Sunlight exposure and protection from harsh conditions are equally crucial. Place young plants in full sun, giving them six to eight hours of light daily. Too much shade results in weak stems and poor flowering. At the same time, protect them from strong winds, which can damage tender growth before the plant matures. Light mulching helps regulate soil temperature and moisture but should not touch the base of the plant. By carefully managing these factors, gardeners can nurture propagated Russian sage into strong, thriving plants that will fill the garden with color and fragrance for many seasons.
Transplanting Propagated Russian Sage into the Garden
Transplanting is a key step in the propagation journey, as it allows young Russian sage plants to settle into their permanent home. Timing plays a critical role in this process. The best moment to transplant is either in early spring after the risk of frost has passed or in early fall when temperatures are mild. These seasons reduce stress on the plants and provide time for roots to establish before extreme weather arrives. Choosing the right spot is also important, as Russian sage performs best in open, sunny areas with excellent drainage.
When preparing the planting site, loosen the soil and amend it if necessary to improve aeration and drainage. Dig holes slightly larger than the root balls of the young plants, spacing them about two to three feet apart to allow for their mature spread. Gently remove the propagated plant from its container or propagation bed, taking care not to damage fragile roots. Place it into the hole at the same depth it was growing before, then backfill with soil and press down lightly to remove air pockets. Water thoroughly after planting to help the roots settle into place.
After transplanting, consistent care ensures successful establishment. Continue watering regularly during the first growing season, particularly in hot or dry periods. Mulching lightly around the base helps conserve moisture and suppress weeds, but avoid piling mulch directly against the stems. Monitor the plants closely for signs of stress, such as wilting or yellowing leaves, and adjust care as needed. With the right transplanting practices, propagated Russian sage adapts quickly, rewarding you with healthy growth, sturdy stems, and abundant blooms in the seasons ahead.
Common Mistakes to Avoid When Propagating Russian Sage
Overwatering Young Plants
Overwatering is one of the most frequent mistakes when propagating Russian sage. Although newly propagated plants need consistent moisture to develop roots, too much water can quickly turn harmful. Russian sage is a drought-tolerant perennial that naturally grows in dry, rocky areas where excess water drains away quickly. When placed in soggy soil, its roots cannot breathe, leading to decay and diseases such as root rot. Many gardeners assume that young plants require daily watering, but this practice only creates a waterlogged environment that prevents strong root development.
To avoid this mistake, water deeply but less frequently, allowing the soil to dry slightly between watering sessions. Checking the top inch of soil before watering is an effective way to gauge moisture levels. It is also important to use well-draining soil or containers with drainage holes to prevent water from pooling at the bottom. As the plant matures, it will become increasingly tolerant of drought, but during early establishment, balance is key. Proper watering habits help young Russian sage plants develop strong roots and prepare them to thrive in the long term.
Planting in Poor Soil
Planting Russian sage in soil that is too heavy or poorly drained is another common error. This plant naturally thrives in sandy or rocky ground, where roots stay dry and healthy. When gardeners try to establish propagated plants in dense clay or nutrient-heavy soil, problems arise quickly. The roots become suffocated by compacted particles and remain vulnerable to fungal infections caused by excess moisture. Instead of producing strong growth and vibrant foliage, the plant often turns yellow, wilts, or struggles to survive. This mistake usually comes from underestimating how much drainage Russian sage requires.
The solution lies in preparing the soil carefully before planting. Mixing sand, gravel, or coarse compost into the planting site greatly improves aeration and allows water to move through freely. Raised beds or elevated planting areas can also help when natural soil conditions are poor. Testing drainage by watering and observing how quickly it disappears provides valuable insight before transplanting. Creating a soil environment that mirrors the plant’s native habitat ensures that propagated Russian sage develops healthily and resists common stress factors. With this preparation, gardeners enjoy higher success rates and longer-lasting plants.
Choosing the Wrong Location
Location plays a crucial role in the success of propagated Russian sage. One of the biggest mistakes gardeners make is planting it in areas that receive too little sunlight. Russian sage requires at least six to eight hours of direct sun daily to grow properly. When placed in shaded or partially shaded locations, the plant becomes weak and leggy, with thin stems that flop over easily. Bloom production is also greatly reduced, and the signature fragrance of the plant is less pronounced. This poor performance can be discouraging after the effort put into propagation.
To prevent this, always select a planting site that offers full sun and open space. Good air circulation is just as important because it helps prevent fungal diseases by keeping foliage dry. Avoid planting Russian sage in crowded beds where taller plants may overshadow it. Since this perennial thrives in tough, exposed areas, a sunny border, slope, or rock garden often provides ideal conditions. By giving propagated plants a location that suits their natural needs, gardeners ensure strong growth, abundant flowers, and long-lasting beauty that enhances the garden year after year.
Benefits of Growing Russian Sage in Your Garden
Growing Russian sage offers numerous benefits that go beyond its ornamental value. This hardy perennial is well-loved for its airy lavender-blue blooms and silvery foliage that bring texture and color to any garden. Its long blooming season, stretching from mid-summer into fall, ensures continuous beauty when many other plants begin to fade. The distinctive fragrance adds another sensory layer, making Russian sage both a visual and aromatic highlight. Because it thrives in tough conditions, it is also a reliable choice for low-maintenance landscapes.
Another major benefit is its ecological contribution. Russian sage is a magnet for pollinators such as bees, butterflies, and hummingbirds, all of which play essential roles in supporting biodiversity. By planting and propagating more Russian sage, gardeners create an environment that sustains these beneficial species while enhancing the overall health of the garden. Its drought tolerance also makes it a sustainable choice, particularly in regions with hot summers or limited rainfall. Once established, the plant requires little supplemental water, reducing strain on resources and making it environmentally friendly.
Finally, Russian sage adds remarkable versatility to garden design. It can serve as a striking border plant, a backdrop for shorter flowers, or a mass planting that creates a sea of color and texture. The tall, airy stems sway gracefully in the wind, adding movement and elegance to outdoor spaces. Russian sage pairs well with perennials such as coneflowers, black-eyed Susans, and ornamental grasses, offering endless opportunities for creative combinations. With its resilience, ecological value, and aesthetic appeal, this plant truly enriches gardens in both form and function.
Seasonal Care Tips for Russian Sage
Spring Care
Spring marks the awakening of Russian sage after its winter dormancy, making it one of the most crucial times for care. Newly propagated plants, whether from cuttings, division, or seeds, benefit from a gradual introduction to stronger sunlight and warmer temperatures. Gardeners should prune back any winter-damaged stems to encourage new, vigorous shoots. This is also the ideal season to check for soil conditions, ensuring that drainage is sufficient and the plant is not sitting in overly wet ground. Adding a layer of compost or slow-release fertilizer at the base can boost nutrient availability for healthy root and foliage growth.
As the days lengthen, regular watering becomes important to support the establishment of propagated plants. However, Russian sage does not thrive in soggy conditions, so watering should be balanced—deep and occasional rather than frequent and shallow. Mulching lightly around the plant helps maintain soil moisture without smothering new shoots. With the right spring care, propagated Russian sage develops strong roots and sets the foundation for abundant summer growth and future flowering.
Summer Care
Summer is the peak growing season for Russian sage, when propagated plants expand rapidly and begin to show their signature silvery foliage. During this time, consistent watering is vital, especially for young plants, though established Russian sage is quite drought-tolerant. For newly propagated ones, aim to water deeply once a week to help roots penetrate deeply into the soil. Applying a thin mulch layer can protect the soil from excessive heat and evaporation, but avoid piling mulch directly against stems. Fertilizer is generally not necessary in summer, as too much can cause floppy growth, but a mid-season application of balanced feed may help weaker plants catch up.
Pruning light tips during summer can encourage bushier growth and prevent legginess. Another key task is keeping an eye out for overcrowding; if propagated plants are placed too close, thin them slightly to improve air circulation. This reduces the risk of fungal problems in humid climates. Supporting tall, young stems with stakes may also be helpful until they fully harden. With thoughtful summer care, propagated Russian sage transitions smoothly into its flowering phase, rewarding gardeners with abundant blooms that last well into fall.
Fall Care
Fall is a transitional season when propagated Russian sage begins to slow its growth but still requires attention to prepare for winter. This is the best time to reduce watering gradually, allowing plants to harden off before colder temperatures arrive. Gardeners can also lightly prune spent flower stalks to tidy up the plant, though major pruning should be avoided until spring. For propagated plants that are still young, consider adding a thin layer of compost around the root zone to improve soil fertility and support energy storage in the roots.
Fall is also the season to monitor spacing and overcrowding. If multiple propagated plants were started in the same area, thinning them before winter helps avoid competition for nutrients and water. In colder climates, mulching around the base can provide insulation and protect shallow roots from frost damage. However, avoid heavy mulching that traps moisture, as this may cause root rot. Proper fall care ensures that propagated Russian sage enters dormancy strong and healthy, ready to re-emerge with renewed vigor the following spring.
Winter Care
Winter is a period of dormancy for Russian sage, and special care is needed for newly propagated plants to ensure survival. In mild climates, little is required beyond monitoring soil drainage to prevent roots from sitting in standing water. In colder regions, however, protecting propagated plants is essential. Applying a loose but insulating layer of mulch, straw, or leaves around the base shields roots from freeze-thaw cycles that can damage young plants. Containers should be moved to a sheltered location if propagation was done in pots.
While Russian sage is hardy, its newly propagated forms are more vulnerable. Avoid watering frequently in winter, as the plant requires very little moisture during dormancy. Instead, water sparingly only during prolonged dry spells when the soil is not frozen. Do not prune in winter, as stems help insulate the crown and provide protection against frost. By minimizing disturbance and shielding the plant, gardeners ensure that propagated Russian sage survives winter and awakens in spring ready to thrive again.
Conclusion
Propagating Russian sage is a rewarding way to expand your garden with this resilient and elegant perennial. Whether grown from cuttings, division, or seeds, success depends on timing, proper care, and seasonal adjustments. By following the right techniques and nurturing each stage, you can enjoy thriving plants that fill your landscape with silvery foliage and long-lasting blooms year after year.

