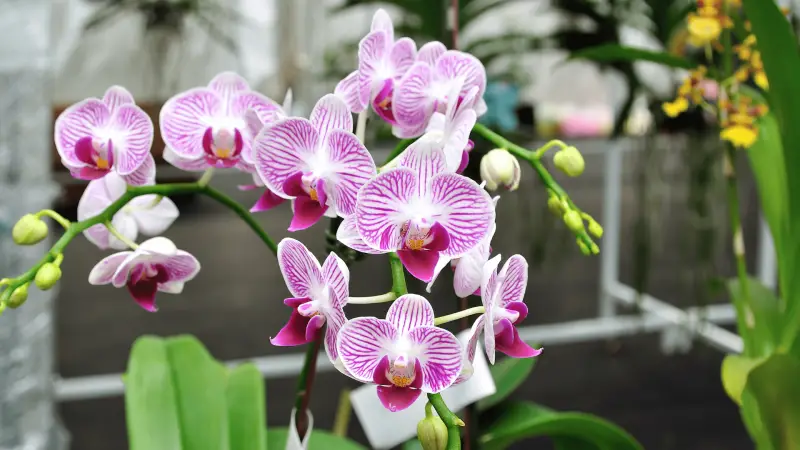
Orchids are some of the most exquisite and intriguing flowering plants in the world, cherished for their elegant structures, vibrant hues, and long-lasting blossoms. They are symbols of beauty, sophistication, and patience, often admired by gardeners and plant enthusiasts alike. Yet, even the healthiest orchids can sometimes appear to be on the brink of death. Drooping leaves, shriveled roots, and faded flowers can make you think the plant is beyond saving. However, orchids are surprisingly resilient when given proper care.
Understanding how to revive an orchid plant is crucial if you want to restore its health and bring back those stunning blooms. Many orchids only look dead when they are actually just dormant or stressed. With patience and the right techniques, you can help your plant recover, produce new leaves and roots, and bloom more beautifully than ever.
In this detailed guide, you will learn why orchids decline, how to identify their specific problems, and what steps to take to nurture them back to life. By following these steps, you can enjoy a thriving orchid for many years.
Why Orchids Decline and How to Recognize Stress
Common Causes of Orchid Decline
Orchids are tropical plants that thrive in stable, humid environments with bright but filtered light. When grown indoors or in unsuitable conditions, they often experience stress. Overwatering is the most common mistake that leads to root rot, a condition where roots become brown, mushy, and unable to absorb nutrients. On the other hand, underwatering deprives the plant of moisture, resulting in shriveled, brittle roots and limp leaves.
Light exposure is another critical factor. Orchids need bright, indirect sunlight, and without it, they will stop producing flowers and grow weak, dark green leaves. Too much direct sunlight can scorch the leaves, causing yellowing and burn spots. Additionally, orchids dislike sudden temperature changes, low humidity, or poor air circulation, all of which can cause them to weaken or stop blooming.
Understanding Natural Dormancy vs. True Decline
Not every orchid that looks unhealthy is truly dying. Many orchids, especially Phalaenopsis varieties, enter a dormancy period after flowering. During this rest phase, flowers fall off, and the plant focuses its energy on storing nutrients for the next blooming cycle. A dormant orchid may appear lifeless, but it is still healthy.
The key is to observe the roots and leaves. Healthy orchids, even when dormant, have firm green or silvery roots and thick, green leaves. If the roots are mushy, blackened, or dried out, and the leaves are wrinkled or yellowing, the plant is stressed and requires immediate attention.
Assessing Your Orchid’s Health Before Reviving
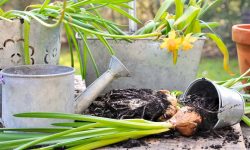
Checking the Roots
The roots are the best indicators of an orchid’s overall health. Carefully remove the plant from its pot and examine the root system. Healthy roots are firm, green when wet, and silvery white when dry. Rotten roots will feel soft and appear brown or black, while dehydrated roots will look papery and shriveled.
Cut away all unhealthy roots using sterilized scissors or pruning shears. This prevents further infection and helps the plant focus on growing healthy new roots.
Examining the Leaves and Crown
The leaves reveal much about the orchid’s condition. Firm, glossy green leaves mean the plant is absorbing enough nutrients and moisture. Wrinkled or limp leaves indicate dehydration, while yellowing can signal overwatering, poor light, or natural aging.
The crown—the central growing point of the plant—must be firm and free from rot. If the crown is soft or blackened, the chances of recovery decrease significantly. However, if at least part of the crown and some healthy roots remain, revival is still possible.
Adjusting Watering Practices for Recovery
Correcting Overwatering
If your orchid suffers from overwatering, remove it from the pot immediately and trim away all rotting roots. Repot it in fresh, well-draining orchid mix, and water sparingly. Overwatered orchids need time to dry out before new roots can form. Always let the potting medium dry slightly between waterings to prevent future root rot.
Treating Dehydration
For underwatered orchids, rehydration should be gradual. Place the pot in a basin of lukewarm water for 15–20 minutes to allow the roots to absorb moisture. Do this two to three times per week until the leaves begin to plump up. Never leave the orchid sitting in water for long periods, as this can lead to rot.
Establishing a Proper Watering Routine
Once your orchid starts recovering, establish a consistent routine. Water early in the morning to give the plant time to dry out before night. The frequency depends on the environment, but typically orchids need watering once a week in cool weather and twice a week in warmer months. Always check the potting medium before watering—if it feels damp, wait another day.
Providing Ideal Light for Recovery and Blooming
Light is essential for reviving an orchid and stimulating new blooms. Orchids do best in bright, indirect sunlight. East-facing windows are ideal, as they provide gentle morning sun. South-facing windows work as long as you use sheer curtains to filter harsh rays.
Observe the leaves for clues. If they are dark green, your orchid might need more light; if they turn yellowish, it may be receiving too much. The goal is a medium green with a slight yellow tint, which signals perfect light exposure.
If natural light is insufficient, consider using artificial grow lights. Position the light 6–12 inches above the plant and provide 12–14 hours of light daily to encourage healthy growth.
Repotting for a Fresh Start
Orchids should be repotted every one to two years, but if your plant is stressed, repotting may be necessary immediately. Old potting medium tends to break down, holding excess moisture and encouraging fungal growth. Choose a fresh, airy mix containing bark, sphagnum moss, or perlite to ensure good drainage.
When repotting, handle the roots gently. After trimming away dead roots, place the orchid in a slightly larger pot, ensuring the crown stays above the potting medium to prevent rot. Hold off on heavy watering for the first week after repotting, giving the roots time to heal.
Improving Humidity and Temperature for Faster Recovery
Orchids are native to tropical regions, so they thrive in humidity levels between 50% and 70%. Dry indoor air slows recovery and may cause leaf shriveling. To increase humidity, use a humidity tray filled with water and pebbles, place a humidifier nearby, or group orchids together to create a humid microclimate.
Maintaining the right temperature is equally important. Most orchids prefer daytime temperatures between 65°F and 75°F and slightly cooler nights. Avoid placing orchids near air vents, heaters, or drafty windows, as sudden temperature shifts can shock the plant and stunt its recovery.
Fertilizing for Recovery and New Blooms
Once your orchid shows signs of recovery, provide nutrients to encourage new growth. Use a balanced orchid fertilizer (20-20-20) diluted to half strength every two weeks. Always water the plant lightly before fertilizing to prevent root burn.
As new roots and leaves develop, switch to a bloom-stimulating fertilizer higher in phosphorus to encourage flower spike production. Fertilize regularly during the growing season, but reduce feeding during dormancy.
Encouraging Reblooming After Recovery
Getting your orchid to rebloom after revival requires patience. Many orchids need a slight temperature drop to trigger flowering. Lower the nighttime temperature by 8–10°F for several weeks while maintaining bright, indirect light. Continue providing consistent watering and fertilizer during this time.
New flower spikes can take weeks or even months to appear. Once spikes develop, avoid moving the plant, as sudden environmental changes can cause buds to drop before they open. With proper care, your orchid will reward you with vibrant blooms that last for weeks.
Maintaining Long-Term Orchid Health
Reviving an orchid is only the first step. To keep it healthy long-term, maintain stable environmental conditions. Clean the leaves regularly with a damp cloth to remove dust, which can block photosynthesis. Inspect the roots every few months, repot every one to two years, and continue providing proper light, humidity, and nutrition.
Healthy orchids can live for decades, blooming multiple times a year if cared for correctly. By observing their natural growth cycle and adjusting care routines as needed, you can enjoy their beauty for many seasons.
FAQs About Reviving Orchids
How long does it take to revive an orchid?
The recovery time depends on how stressed the plant is. Mildly stressed orchids can recover within a month, while severely damaged ones may take several months before showing noticeable improvement.
Can a dead orchid be revived?
If the crown and some healthy roots remain, there is hope. However, if the crown and all roots are completely rotted, the plant cannot be revived.
Should I cut off all dead roots and leaves?
Yes. Removing dead roots and leaves helps prevent infection and encourages the plant to focus on producing new healthy growth.
Will my orchid bloom again after recovery?
Most orchids will bloom again if given proper light, nutrients, and a brief cool period to stimulate flowering. Patience is key, as reblooming can take time.