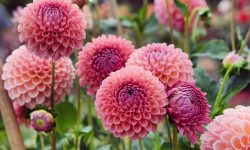
Dahlias are among the most dazzling flowers in any garden, known for their brilliant colors, intricate petal forms, and long-lasting blooms. Yet, as autumn approaches and temperatures begin to drop, even the most vibrant dahlia plants start to fade. What many gardeners don’t realize is that the beauty of their dahlias doesn’t have to end with the first frost. Beneath the soil, dahlia bulbs — often called tubers — hold the potential for next year’s garden display. By learning how to save and store them properly through winter, you can enjoy the same healthy plants and even more abundant blooms season after season.
Saving dahlia bulbs is both simple and rewarding, allowing you to preserve your favorite varieties without having to buy new ones each spring. The key lies in timing, technique, and careful storage. When handled correctly, these bulbs rest safely during the cold months and awaken again when warmth returns. This guide will take you through every step, from digging and cleaning to curing and storing, ensuring your dahlia bulbs remain healthy all winter long. Whether you’re a beginner or an experienced gardener, mastering this process guarantees years of breathtaking blooms from the same beloved plants.
Understanding Dahlia Bulbs and Their Life Cycle
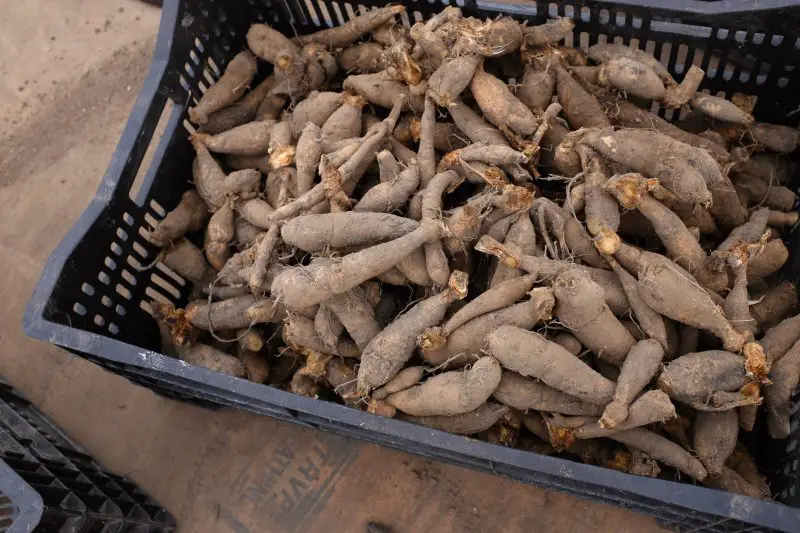
To save dahlia bulbs successfully, it’s important to understand what they are and how they function throughout the year. What gardeners often call “bulbs” are actually tubers, which act as underground food storage structures. Each dahlia tuber has a central stem base and several swollen roots attached, containing stored starches and nutrients. These reserves give the plant enough energy to sprout again after winter. Tiny growth points, known as “eyes,” are located near the crown, and each one can grow into a new dahlia if properly preserved. Because of this, even a single healthy clump can produce multiple new plants when divided in spring.
During the growing season, dahlias invest their energy in building both their above-ground foliage and their underground tubers. As the plants flourish in summer sunlight, photosynthesis drives carbohydrate storage within the tubers, strengthening them for dormancy. When the days shorten and temperatures begin to cool in autumn, the plant shifts focus from blooming to conserving energy. The stems start to yellow, and nutrients flow back into the tubers. By the time the first frost arrives, the plant above ground has completed its cycle, but below the surface, the tubers have ripened and hardened, preparing for their winter rest.
Dahlias are native to warmer climates, meaning their tubers are not frost-tolerant. In regions where the ground freezes, they must be dug up and stored indoors to prevent decay or frost damage. Leaving them in frozen soil can cause the tubers to rot and lose viability. However, in mild climates with frost-free winters, they can remain underground with a thick layer of mulch for protection. Understanding this natural rhythm — growth, dormancy, and renewal — allows gardeners to time their harvest and storage perfectly. With proper handling, these tubers can live for years, producing stronger, more vibrant blooms with every growing season.
When to Dig Up Dahlia Bulbs
The right timing for digging up your dahlia bulbs can make the difference between healthy, plump tubers and ones that rot or fail to sprout next year. The best moment to begin is shortly after the first light frost, when the foliage and flowers start to blacken. This visual cue signals that the plant has entered dormancy and that the nutrients have fully transferred from the stems and leaves back into the tubers. Digging too early can interrupt this natural process, leaving the bulbs underdeveloped and weak. However, waiting too long after a hard frost risks damage from frozen soil, which can ruin the tubers entirely.
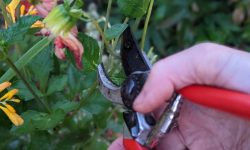
Once the foliage has darkened and wilted, cut the stems back to about six inches above the ground. This makes handling easier and prevents rot from spreading down into the crown. Before lifting the tubers, choose a dry day to avoid muddy soil, which can make cleaning and curing more difficult later. Use a garden fork or spade to gently loosen the soil in a wide circle around the plant. Insert the tool about a foot away from the main stem to prevent piercing the tubers. Carefully lift the entire clump, keeping the crown and roots intact. Handle them gently, as the necks of the tubers are fragile and can easily break.
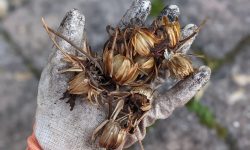
After digging, shake off loose soil but don’t wash the tubers immediately. Instead, let them air-dry for a few hours in a shaded area. Washing too soon can force water into small crevices, making them more prone to rot during storage. The goal is to allow the outer skin to toughen slightly before cleaning and curing. By timing your dig carefully — after a light frost but before the ground freezes — you give your dahlia bulbs the best chance to survive winter and return even stronger in spring.
Cleaning and Preparing Dahlia Bulbs After Digging
Cleaning and preparing dahlia bulbs properly after digging is one of the most crucial steps in ensuring their survival through winter. Once the clumps have been lifted from the soil, gently remove as much dirt as possible using your hands or a soft brush. Avoid pulling or twisting the tubers, as their necks are delicate and can easily snap. Broken necks often mean that particular tuber will not sprout the following spring. If the soil is heavy or clings tightly, allow the bulbs to sit for a few hours in a dry, shaded place before cleaning. This brief drying period makes the soil easier to remove without damaging the skin of the tubers.
When the clumps are mostly free of dirt, rinse them carefully with cool water to wash away any remaining soil. This helps prevent bacteria and pests from overwintering in the crevices of the tubers. Inspect each clump closely as you clean. Remove any damaged, mushy, or rotten sections using sterilized pruning shears. Discard any tubers that feel soft or smell sour — these are signs of rot that could spread to healthy ones in storage. Also, trim away any fine feeder roots and cut the remaining stems to about two inches above the crown. Healthy tubers should feel firm, smooth, and slightly heavy for their size, indicating they’re full of stored nutrients.
Once cleaned, it’s essential to label each variety before drying. Many dahlia tubers look nearly identical, so labeling ensures you can replant your favorite colors and forms accurately in spring. Use waterproof tags or write directly on the stem base with a permanent marker. Keeping your varieties organized will save time and effort when dividing and replanting later. Cleaning and preparing your dahlia bulbs with patience and care not only prevents disease but also ensures a smoother curing and storage process, setting the foundation for healthy, vibrant blooms next year.
Curing Dahlia Bulbs Before Storage
Curing is a vital stage that allows dahlia bulbs to dry and toughen their outer skin before long-term storage. This process helps seal small cuts, reduces moisture content, and prevents mold or decay during the winter months. Once your bulbs are cleaned, place them in a single layer on newspaper, mesh trays, or cardboard boxes lined with paper. Keep them in a dark, dry, and well-ventilated location with temperatures around 60°F (15°C) and moderate humidity. Avoid direct sunlight, which can cause the tubers to dry too quickly and shrivel. Over the course of seven to ten days, the outer skin of the bulbs will gradually become firm and slightly leathery — a sign that curing is complete.
During this period, check your tubers daily and turn them occasionally to ensure even drying. If you notice any signs of rot or mold, remove the affected bulbs immediately to prevent it from spreading. In humid climates, you can improve airflow by using a small fan or dehumidifier in the curing area. Be careful not to overdry them; tubers that lose too much moisture may become lightweight and wrinkled, which reduces their vigor. Proper curing strikes a balance — firm on the outside but still retaining some internal moisture for spring regrowth.
Labeling during the curing stage is also essential. It’s easy to mix up varieties once the stems have been trimmed short. Write the name or color directly on the stem base using a waterproof marker, or attach a label to the clump. Once curing is complete, your dahlia bulbs are ready for storage. Skipping this step often leads to premature rotting or shriveling during winter. Taking time to cure properly ensures your tubers remain healthy, vibrant, and full of life when planting season returns.
Best Storage Methods to Keep Dahlia Bulbs Healthy All Winter
Storing dahlia bulbs correctly during the winter months is the key to keeping them healthy and ready to bloom again next season. After curing, your tubers should be placed in a controlled environment where temperature, humidity, and airflow are carefully balanced. The ideal storage temperature is between 40°F and 50°F (4°C–10°C), cool enough to prevent sprouting but warm enough to keep the tubers from freezing. Basements, insulated garages, or cool closets often provide the perfect setting. Avoid damp basements or heated rooms, as excess moisture or warmth can cause premature sprouting or mold growth.
For best results, pack your bulbs in breathable materials that help regulate humidity. A common and reliable method is to place the tubers in shallow boxes or crates filled with peat moss, vermiculite, or wood shavings. Arrange them in a single layer and ensure they don’t touch one another. These materials help retain just enough moisture to prevent the bulbs from drying out completely while also allowing airflow to minimize mold. If you live in a particularly dry climate, a light misting of the packing medium once a month can keep the bulbs from shriveling. Conversely, in humid areas, it’s important to monitor for excess moisture and remove any bulbs that start to feel soft or show signs of decay.
Check your stored dahlias every few weeks throughout the winter. Healthy tubers should remain firm and plump, not dry or spongy. Remove any that appear rotten to prevent the spread of mold to neighboring bulbs. If the storage environment becomes too dry, lightly rehydrate the medium with a misting bottle. Keeping an eye on your bulbs during the cold months ensures they stay in top condition. When spring arrives, they’ll be ready to sprout strong, vibrant shoots — proof that your careful winter storage has preserved their energy and beauty for another spectacular growing season.
Dividing Dahlia Bulbs Before Replanting
Dividing dahlia bulbs is an essential step to ensure strong growth, prevent overcrowding, and multiply your plants for the next growing season. Each tuber cluster, called a clump, develops multiple bulbs over time, and dividing them helps maintain their vigor. The best time to divide your dahlia bulbs is in early spring, just before planting. At this stage, the bulbs are still firm but beginning to show small eyes or sprouts, making it easier to identify viable divisions. Dividing before replanting allows each section to grow independently, producing more robust plants and a greater number of blooms throughout the summer.
To begin, gently remove your stored tubers from their packing material and inspect them closely. Select clumps that are firm and free from mold or decay. Using a clean, sharp knife or pruning shears, carefully separate each tuber from the crown — the thick stem base where the eyes are located. Every divided piece must include at least one visible eye and a portion of the crown; otherwise, it will not sprout. Tubers without eyes, or those that appear shriveled or soft, can be discarded. Once divided, allow the cut surfaces to dry for a few hours before planting to prevent rot from forming in the soil.
Dividing also provides an excellent opportunity to rejuvenate your dahlias by removing older, less productive tubers from the clump. Younger, firmer tubers typically yield stronger plants with more abundant blooms. If you have several varieties, label each division clearly to avoid confusion during replanting. Gardeners who regularly divide their dahlias every one to two years often find that their plants grow more evenly, resist disease better, and produce larger, longer-lasting flowers. With proper technique, a single healthy clump can supply many new plants, ensuring that your garden bursts into vibrant color season after season.
Troubleshooting Common Problems When Storing Dahlia Bulbs
Mold and Rot During Storage
Mold and rot are the most common problems gardeners face when storing dahlia bulbs through winter. These issues usually occur when the bulbs are stored with excess moisture or inadequate airflow. Mold often appears as white or gray fuzz, while rot causes the tubers to feel soft, slimy, and develop an unpleasant odor. Once decay begins, it can spread quickly to nearby bulbs, destroying entire batches if not addressed promptly. To prevent this, ensure the bulbs are thoroughly cured and dry before placing them into storage. Residual moisture trapped inside the tubers encourages fungal growth.
If mold or rot appears during storage, remove the affected bulbs immediately. Light mold can sometimes be treated by wiping the surface with a cloth dipped in diluted rubbing alcohol or a weak bleach solution. Allow the bulbs to dry completely before returning them to storage. For severe rot, discard the damaged tubers to protect the healthy ones. Adjust humidity levels by improving airflow or reducing excess moisture in the packing medium. Prevention is always the best defense — proper curing, clean storage materials, and regular inspections are the keys to keeping your dahlia bulbs disease-free and healthy until spring.
Bulbs Drying Out or Shriveling
While too much moisture causes rot, too little humidity can make your dahlia bulbs dry out or shrivel during winter. When stored in an overly dry environment, the tubers lose their internal moisture reserves, becoming lightweight and wrinkled. Severely dehydrated bulbs often fail to sprout in spring or produce weak, stunted plants. This problem is common in heated indoor spaces where the air is warm and dry. To prevent it, maintain moderate humidity by using a breathable packing material such as peat moss, vermiculite, or sawdust, which helps retain a balanced level of moisture.
If you notice your bulbs beginning to shrivel, you can lightly mist the storage medium with water or place a small, barely damp cloth in the container for a few days. Avoid direct watering, as this can lead to mold. Always check the bulbs after adjusting humidity to ensure they remain firm, not soft or damp. Keeping the storage temperature between 40°F and 50°F (4°C–10°C) also helps reduce moisture loss. Regular monitoring and minor humidity adjustments throughout the season ensure your dahlia bulbs stay plump and ready to grow vigorously when spring returns.
Premature Sprouting
Premature sprouting can occur if dahlia bulbs are stored in a location that’s too warm or receives indirect light. Once temperatures rise above 55°F (13°C), the bulbs may interpret this as spring and begin to grow shoots prematurely. These early sprouts are weak and often break when handled, leaving the bulbs vulnerable to disease and poor growth later. To prevent this, keep your storage area consistently cool and dark. Ideal locations include unheated basements, garages, or refrigerators dedicated to plant storage. Avoid rooms that fluctuate in temperature, such as kitchens or utility spaces.
If you notice small sprouts forming, gently pinch them off and move the bulbs to a cooler spot immediately. In some cases, premature sprouting is mild and won’t affect the bulb’s long-term health, but repeated occurrences can weaken it. Monitor storage temperatures regularly and ensure containers are well-sealed to block light. When properly stored in cool, stable conditions, dahlia bulbs remain dormant until planting time. Preventing premature sprouting ensures your bulbs save all their energy for healthy, strong shoots once they’re replanted in spring’s warm soil.
Replanting Dahlia Bulbs in Spring for the Best Results
When spring arrives and the soil begins to warm, it’s time to bring your overwintered dahlia bulbs back to life. Timing is essential — wait until all danger of frost has passed and the soil temperature consistently reaches at least 60°F (15°C). Planting too early in cold, wet soil can cause the tubers to rot before they have a chance to sprout. Begin by carefully removing your bulbs from storage and inspecting each one. Discard any that feel soft or show signs of mold. Healthy tubers should be firm, plump, and slightly heavy. If the bulbs appear a bit dry, you can mist them lightly a few days before planting to help rehydrate them.
Prepare your planting site in full sun with rich, well-draining soil. Dahlias thrive best in locations that receive at least six hours of sunlight each day. Work compost or aged manure into the soil to improve fertility and texture. Plant each clump or divided tuber about six inches deep, placing the crown just below the surface. Position the tubers horizontally with the eyes facing upward, then cover them with soil and water thoroughly. Avoid overwatering at first; too much moisture can encourage rot before the roots establish. Once new shoots appear, water regularly to keep the soil evenly moist but never soggy.
As your dahlias begin to grow, provide support for taller varieties by inserting stakes or cages early to avoid damaging the roots later. Fertilize every three to four weeks with a balanced, low-nitrogen formula to promote strong stems and abundant flowers. Throughout the summer, remove spent blooms to encourage continuous flowering. By following these careful replanting steps, your stored dahlia bulbs will awaken with vigor, rewarding you with a season full of brilliant blooms. Each year of proper storage and replanting not only preserves your favorite varieties but also strengthens them, resulting in larger, more radiant flowers that return with even greater beauty.
Tips for Labeling and Organizing Dahlia Bulbs for Easy Replanting
When you grow multiple dahlia varieties, keeping them properly labeled and organized can save you from confusion when planting season returns. Once bulbs are dug and cleaned, many varieties look nearly identical, so losing track of which is which can be frustrating. The best time to label your dahlias is immediately after digging, while the flowers are still fresh in your memory. Write the variety name, color, or size directly on the stem base using a waterproof garden marker. Alternatively, attach weatherproof tags with soft ties that won’t damage the necks of the tubers. Clear labeling ensures you’ll know exactly what you’re replanting in spring.
When storing multiple dahlia varieties, organization is just as important as labeling. Group bulbs by color, size, or bloom type and place each collection in its own labeled box or crate. Separating them not only keeps things tidy but also prevents accidental mixing if one batch develops mold or rot. You can even include small notecards or photos showing each flower’s appearance to help you plan garden layouts later. Detailed labeling and record-keeping are especially valuable for collectors who grow dozens of types each season.
During spring replanting, your organized storage system will make it easy to design balanced, colorful flower beds. You’ll know which dahlias grow tall enough for the back of the border and which compact types belong near the front. Consistent labeling also helps you track performance from year to year, identifying which varieties thrive best in your soil and climate. This careful organization transforms dahlia gardening from guesswork into a smooth, rewarding process that results in stunning, coordinated displays every summer.
Why Saving Dahlia Bulbs Each Year Is Worth the Effort
Saving dahlia bulbs every year is more than just a practical gardening habit — it’s a way to preserve beauty, heritage, and personal creativity. Each tuber you dig, cure, and replant represents a living connection between seasons. Dahlias grown from stored bulbs often produce larger, stronger plants compared to those started from new stock each year. Over time, they adapt to your garden’s unique soil and climate, becoming hardier and more reliable. For gardeners who grow rare or heirloom varieties, saving bulbs is also the only way to ensure these precious plants continue to thrive.
Financially, saving bulbs is a smart choice. High-quality dahlia tubers can be expensive, and by overwintering your own, you can expand your collection without added cost. A single healthy clump can yield multiple divisions in spring, multiplying your plants year after year. Many gardeners even share or trade divided tubers with friends, creating a sense of community and joy that goes beyond the garden. It’s a sustainable, cost-effective way to enjoy stunning blooms without relying on store-bought replacements.
Perhaps the greatest reward comes from the sense of accomplishment that follows successful winter storage. Watching your dahlias reawaken each spring, knowing they survived because of your care, brings immense satisfaction. The process connects you to the rhythm of nature — growth, rest, and renewal. Saving dahlia bulbs transforms gardening into a tradition rather than a task, allowing you to carry the brilliance of one season into the next. With time, patience, and consistency, your efforts will reward you with vibrant, thriving flowers that tell the story of your dedication year after year.
Frequently Asked Questions (FAQ) About saving Dahlia Bulbs
When should I dig up my dahlia bulbs for winter storage?
You should dig up your dahlia bulbs right after the first light frost, when the foliage turns black and begins to wilt. This indicates the plant has entered dormancy and that nutrients have moved into the tubers. Avoid waiting until a hard frost, as frozen soil can damage or kill the bulbs.
How should I clean my dahlia bulbs before storing them?
After digging, gently brush away loose soil, then rinse the bulbs with cool water to remove any remaining dirt. Trim the stems to about two inches and discard any damaged or soft tubers. Allow them to dry for a few hours before curing in a warm, airy space for seven to ten days.
What’s the ideal temperature for storing dahlia bulbs?
Dahlia bulbs store best in a cool, dark, and dry environment with temperatures between 40°F and 50°F (4°C–10°C). Basements, insulated garages, or cool closets are ideal. Avoid areas with temperature fluctuations or excess humidity to prevent sprouting or mold.
Why do my stored dahlia bulbs rot or grow mold?
Rot and mold typically occur when bulbs are stored too wet or without proper air circulation. Always dry and cure bulbs thoroughly before storage. Check them monthly, and remove any that feel soft, smell sour, or show signs of mold to prevent it from spreading.
Can I leave dahlia bulbs in the ground over winter?
Only in mild, frost-free climates. If your region experiences freezing temperatures, the bulbs will rot in the soil. In warmer zones, you can leave them underground with a thick layer of mulch for protection, but always inspect them in spring to ensure survival.
Conclusion
Saving dahlia bulbs is more than a gardening task — it’s a promise of beauty renewed each year. With patience, care, and proper technique, you can protect these living treasures through winter and watch them return stronger every spring. Each bulb carries the memory of past blooms and the potential for even greater ones ahead. By learning how to dig, cure, and store them correctly, you preserve not just flowers but a cycle of color, joy, and life in your garden. The reward is simple yet profound — a garden that blooms brighter because of your dedication.