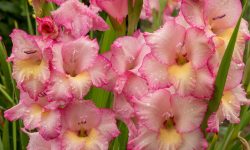
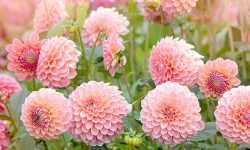
Gladiolus flowers bring a burst of color and elegance to every garden. Their tall, graceful spikes make summer landscapes glow with vibrant hues. But when the season ends and the cold months approach, proper bulb storage becomes essential. Without the right technique, gladiolus corms can rot, dry out, or fail to bloom the next year. Storing them correctly protects your investment and ensures a fresh, colorful display each season.
Learning how to store gladiolus bulbs is simpler than it seems, even for beginners. With just a few careful steps, you can preserve their strength and prepare them for replanting. This guide covers everything from lifting the bulbs at the right time to curing, cleaning, and storing them safely. Once you master these methods, your gladiolus will return stronger and more beautiful each year, transforming your garden into a brilliant summer showcase again and again.
When and Why to Store Gladiolus Bulbs
Gladiolus bulbs, also called corms, are sensitive to cold weather and must be stored properly if you want them to bloom again next year. These flowering plants thrive in warm climates, where soil temperatures stay above 50°F (10°C). Once frost arrives, the bulbs can rot or freeze underground, leading to irreversible damage. Storing them during the cold months protects them from harsh conditions and helps preserve their vitality. Gardeners living in regions colder than USDA Zone 8 should always dig up their gladiolus bulbs once the flowering season ends. Even in milder climates, lifting and storing bulbs occasionally rejuvenates the plants and prevents disease accumulation in the soil.
The right time to lift gladiolus bulbs is about six weeks after the last bloom fades. During this time, the green leaves gradually turn yellow and brown. This is a natural signal that nutrients are returning to the corm, strengthening it for dormancy. Cutting the foliage too soon weakens the bulb, reducing its ability to produce strong spikes the following year. Wait until the leaves detach easily with a gentle tug. Choose a dry day when the soil is not wet or compacted. Working in damp soil increases the risk of fungal infection and makes cleaning the bulbs more difficult.
Storing gladiolus bulbs correctly serves multiple purposes beyond frost protection. It allows gardeners to clean, inspect, and organize their collection efficiently. Damaged corms can be separated to prevent disease spread, while smaller offsets can be saved for propagation. Properly handled bulbs reawaken stronger, producing taller stems and more vivid flowers in the next growing season. This simple habit ensures your gladiolus continues to bring elegance and color to your garden year after year.
How to Lift and Prepare Gladiolus Bulbs for Storage
Lifting gladiolus bulbs requires patience and gentle handling to prevent damage. Start this process after the leaves turn yellow and begin to dry out, which indicates that nutrients have fully returned to the corm. Cut the remaining foliage to about four inches above the soil surface. This reduces moisture retention and allows better air circulation. Use a spade or garden fork to loosen the soil at least six inches away from the base of the plant, lifting the bulbs carefully. Never pull the stems directly from the soil, as this can detach the bulb or damage its base. After lifting, gently shake off the loose soil instead of washing it, because excess moisture can delay the drying process and promote fungal growth.
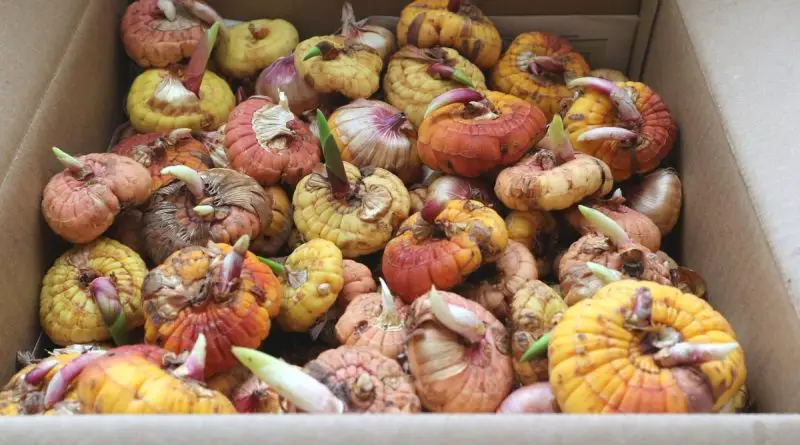
Once removed, inspect each bulb carefully. The new corm forms above the older, shriveled one, which should be discarded since it no longer provides nutrients. Detach small cormels—tiny offspring attached near the base—and store them separately for propagation. They may take one or two years to bloom but will eventually produce healthy, mature plants. Check for signs of mold, rot, or soft spots and set aside any affected bulbs. Cleaning also includes trimming the remaining stem close to the corm to minimize moisture retention during storage. Labeling varieties at this stage is helpful, especially if you grow multiple colors or types.
After inspection, spread the bulbs in a single layer on newspaper, cardboard, or mesh trays in a dry, shaded place. Avoid stacking, as poor airflow increases the risk of mold. Let them cure for ten to fourteen days, allowing outer skins to harden and minor wounds to heal naturally. The bulbs should feel firm and dry to the touch before storage. This careful preparation process ensures your gladiolus bulbs remain healthy, disease-free, and ready to bloom again next spring.
Curing and Cleaning Gladiolus Bulbs Before Storage
Curing is the most critical step in preserving gladiolus bulbs for the next growing season. It allows excess moisture to evaporate while toughening the outer layers, preventing rot and fungal infections during storage. After lifting, spread the bulbs in a single layer on a clean surface such as mesh trays, cardboard, or newspaper. Choose a dry, shaded, and well-ventilated location—such as a porch, shed, or garage—with temperatures around 70°F (21°C). Avoid direct sunlight, which can overheat or scorch the bulbs. Leave them to cure for about two weeks, turning them occasionally to ensure even drying. The bulbs are ready once the outer skins become papery and the stems feel completely dry to the touch.
Once curing is complete, cleaning the bulbs properly ensures long-term health and prevents disease spread. Gently remove any remaining soil by hand, brushing rather than washing to avoid reintroducing moisture. Peel away the loose outer husks, but be careful not to remove the protective layers that help retain moisture balance. Check the base for any remaining old corm tissue and remove it, as it can harbor rot. Trim the dried stem stubs close to the top of the corm. A clean, smooth bulb surface reduces the chance of fungal infection during storage and makes inspection easier later.
Labeling the bulbs during cleaning helps you keep track of colors and varieties for the next planting season. If multiple types are mixed together, sorting them now saves confusion in spring. After cleaning, inspect again for soft spots, mold, or damage. Discard any unhealthy bulbs to prevent contamination. Cleaned and fully cured gladiolus bulbs are resilient, lightweight, and ready to rest through winter until conditions are right for replanting. Proper curing and cleaning ensure strong, early growth and brilliant blooms in the following year.
How to Store Gladiolus Bulbs Over Winter
Once your gladiolus bulbs are fully cured and cleaned, it’s time to store them in a safe, stable environment. Gladiolus bulbs require cool, dry conditions during winter dormancy to prevent sprouting or rotting. The ideal temperature range for winter storage is between 35°F and 50°F (1°C–10°C). Choose a well-ventilated area such as a basement, root cellar, or unheated garage. Avoid warm, damp spaces like kitchens or laundry rooms, as humidity promotes decay. To maintain airflow, store bulbs in mesh bags, paper sacks, or shallow boxes lined with peat moss, vermiculite, or dry sawdust. This medium absorbs extra moisture and keeps the bulbs evenly dry throughout the season.
Proper monitoring is essential to ensure bulbs remain healthy during storage. Every few weeks, check for soft spots, mold, or signs of shriveling. Remove any damaged bulbs immediately to prevent spreading disease to healthy ones. If bulbs appear slightly dry, lightly mist the storage medium—not the bulbs themselves—to restore minimal moisture. Overly dry conditions can cause bulbs to shrink and lose vitality, while excess humidity leads to fungal problems. Maintaining the right balance between dryness and ventilation helps keep gladiolus corms firm and dormant until replanting time.
Storing bulbs separately by variety is also beneficial, especially if you grow multiple colors or flower types. Labeling each batch prevents confusion during replanting and makes it easier to plan garden designs next spring. In regions with mild winters, gardeners can leave bulbs in the ground by covering them with thick mulch for insulation. However, indoor storage remains the most reliable method. With careful temperature control and regular inspection, your gladiolus bulbs will stay strong, disease-free, and ready to burst into bloom again once the warmth of spring returns.
Checking and Maintaining Stored Gladiolus Bulbs
Regular Inspection During Winter
Checking your stored gladiolus bulbs regularly is vital to prevent problems before they spread. Even under ideal conditions, bulbs can develop rot, mold, or shriveling over time. Inspect them every three to four weeks throughout winter. Gently open storage containers and examine each corm by hand. Healthy bulbs should feel firm and dry with no soft spots or discoloration. If you notice any signs of decay, remove the affected bulbs immediately. This quick action prevents diseases from spreading to the rest of your collection. Early detection is the key to keeping your gladiolus bulbs in good condition until spring.
While inspecting, also check the temperature and humidity levels in your storage area. Conditions that are too warm can trigger premature sprouting, while excess moisture causes fungal growth. Keep air flowing freely around your bulbs and avoid sealing containers tightly. If you use peat moss or sawdust as a medium, replace it if it becomes damp or moldy. Maintaining a stable, cool environment ensures that your bulbs remain dormant and healthy. Consistent monitoring gives you confidence that your gladiolus will reawaken strong when planting time arrives.
Preventing Dryness and Rot
Maintaining the right moisture balance is essential to prevent gladiolus bulbs from drying out or rotting during storage. Air that is too dry causes the bulbs to shrink and lose vitality, while overly humid air encourages fungus. The goal is to create a stable, moderately dry environment. If your storage space feels very dry, place a small bowl of water nearby—not touching the bulbs—to add minimal humidity. In contrast, if you notice condensation or musty smells, improve ventilation immediately to remove excess moisture.
Rotting often begins at the base of the corm, so inspect that area closely during checks. Remove any bulbs that feel soft or spongy. Always handle bulbs gently to avoid bruising, as damaged tissue rots quickly. Using breathable containers like mesh bags or perforated boxes prevents moisture buildup. Storing bulbs off the floor, on shelves or racks, also reduces exposure to cold or damp surfaces. This balance between airflow and moisture control keeps gladiolus corms firm and alive throughout winter dormancy, ready to deliver vibrant flowers when replanted in spring.
When and How to Replant Stored Gladiolus Bulbs
Best Time to Replant Gladiolus Bulbs
Timing is everything when replanting gladiolus bulbs. The right moment depends on your local climate, but the general rule is to wait until all danger of frost has passed. Soil temperature should reach at least 55°F (13°C) before planting. Cold soil delays sprouting and increases the risk of rot. In most regions, this happens in late spring, around April or May. Gardeners in warmer zones can begin earlier, while those in cooler areas may need to wait until early summer. Planting too soon is one of the most common mistakes that weakens bulbs and reduces flowering performance.
Before replanting, inspect each bulb once more for firmness and color. Discard any soft, discolored, or moldy ones that deteriorated during storage. It’s also helpful to sort bulbs by size since larger ones tend to produce stronger spikes and earlier blooms. You can pre-sprout the bulbs by placing them in a warm, bright room for a week before planting. This gentle start helps speed up sprouting once they reach the garden. Proper timing gives your gladiolus bulbs the best chance to produce strong, healthy shoots and abundant summer flowers.
Proper Technique for Planting Gladiolus Bulbs
The planting process greatly affects how well gladiolus bulbs bloom. Choose a sunny location with well-drained soil rich in organic matter. Dig planting holes about four to six inches deep and space bulbs six inches apart for optimal growth. Place the bulbs with the pointed ends facing upward, ensuring they are stable in the soil. Cover gently and press down lightly to remove air pockets. Water thoroughly after planting to settle the soil and encourage root development. Consistent moisture during the first few weeks is essential for healthy sprouting.
For continuous blooms, plant new bulbs every two weeks through late spring. This staggered schedule creates waves of color that last throughout summer. Adding a balanced fertilizer high in phosphorus promotes strong root growth and vibrant flowers. Mulching around the base keeps soil moisture even and protects bulbs from temperature fluctuations. Once shoots appear, stake taller varieties to prevent bending or breakage in the wind. By planting carefully and maintaining consistent care, your gladiolus bulbs will reward you with bright, elegant blooms that mark the true beauty of the warm season.
Common Mistakes to Avoid When Storing Gladiolus Bulbs
Storing Bulbs Before They Are Fully Dry
One of the biggest mistakes gardeners make is storing gladiolus bulbs before they are fully dry. Any leftover moisture trapped inside the corm quickly leads to mold, decay, or fungus. When bulbs are stored too soon, they often develop soft spots or discoloration within weeks. Even if they appear healthy at first, the moisture inside can rot the core during winter dormancy. To avoid this, always cure gladiolus bulbs for ten to fourteen days in a shaded, ventilated area after digging. The curing process allows the outer layers to harden and reduces the internal moisture content, creating a natural barrier against disease.
The ideal curing environment maintains warm, dry air with consistent circulation. Avoid drying bulbs under direct sunlight, which can overheat and damage them. Instead, place them on mesh trays or newspapers where air can flow freely underneath. Turn the bulbs every few days to ensure even drying. When properly cured, the skins should feel papery and the stems brittle. Never store bulbs in sealed containers or plastic bags, as they trap humidity. Taking time to dry bulbs completely is the single most important step in successful storage and guarantees healthy blooms in the next growing season.
Using the Wrong Storage Temperature or Location
Temperature control plays a vital role in gladiolus bulb storage. Many gardeners accidentally keep bulbs in spaces that are too warm or too cold, both of which can be fatal. When stored above 60°F (15°C), bulbs may break dormancy too early, sending up weak shoots that waste energy. Conversely, freezing temperatures below 32°F (0°C) can destroy the corm’s inner tissues, rendering it lifeless. The best storage range is 35°F to 50°F (1°C–10°C). Maintaining this consistent coolness allows bulbs to rest naturally without decaying or sprouting prematurely.
Storage location is just as critical. Ideal places include basements, cellars, or unheated garages with good ventilation. Avoid closed closets or attics that trap heat or humidity. Keep bulbs in breathable containers like mesh bags, paper sacks, or shallow boxes lined with peat moss or sawdust. Elevate them off the ground to avoid cold concrete and condensation. Check the temperature regularly using a simple thermometer to prevent fluctuations. By choosing the right location and maintaining stable conditions, you create a safe environment where gladiolus bulbs remain firm, dormant, and ready for replanting once spring arrives.
Ignoring Regular Checks During Storage
Neglecting stored gladiolus bulbs is another common mistake that leads to major losses. Even when stored under perfect conditions, bulbs can change over time due to natural respiration, slight humidity shifts, or hidden disease. Gardeners often pack them away in autumn and forget them until spring, only to find shriveled or moldy corms. To prevent this, inspect your bulbs every three to four weeks throughout winter. Examine them gently by hand and remove any that appear soft, damp, or discolored. Early removal stops the spread of mold or decay to nearby bulbs.
During each check, stir or turn the bulbs to refresh air circulation inside storage containers. If your storage medium, such as peat moss or sawdust, feels damp, replace it with dry material. For bulbs that begin to look too dry, lightly mist the air nearby—not the bulbs directly—to restore a small amount of humidity. Keep the storage area clean and pest-free at all times. Regular monitoring takes only minutes but can save your entire collection. With consistent care, your gladiolus bulbs will stay healthy and produce strong, colorful spikes when replanted in spring.
Tips for Successful Gladiolus Bulb Storage
Proper gladiolus bulb storage depends on attention to detail and consistency. Even small adjustments can make a huge difference in bulb survival. Always begin with clean, fully dried bulbs that have been cured for at least two weeks. Label each variety before storage to keep track of color and blooming time for the next season. Use breathable containers that allow air movement, such as mesh bags or cardboard boxes lined with peat moss or sawdust. Avoid plastic containers, which trap humidity and cause rot. Place the bulbs in a single layer whenever possible, as stacking can reduce airflow and encourage mold growth during dormancy.
Monitoring temperature and humidity is equally important. Keep bulbs in a cool, dry, and stable location between 35°F and 50°F (1°C–10°C). If you live in a humid climate, add silica gel packets or dry rice to absorb excess moisture. Check bulbs monthly to detect any early signs of decay, dryness, or sprouting. Remove affected bulbs immediately to protect the healthy ones. If bulbs begin to look shriveled, slightly increase humidity by misting the air near the storage area—not the bulbs directly. Maintaining this delicate balance helps keep corms dormant, healthy, and ready for replanting.
Lastly, store gladiolus bulbs away from fruits or vegetables, especially apples or potatoes. These foods release ethylene gas, which can damage dormant bulbs and shorten their lifespan. Keep your storage area dark to prevent premature growth. A small fan or vent nearby can help maintain air circulation. Following these simple but effective tips ensures your gladiolus bulbs stay firm, disease-free, and full of life, guaranteeing strong, beautiful blooms when the next growing season arrives.
How to Propagate Gladiolus from Cormels
Propagating gladiolus from cormels is a simple, cost-effective way to expand your garden with healthy, genetically identical plants. Cormels are the small, round offsets that develop at the base of mature gladiolus corms during the growing season. They act as miniature bulbs, storing nutrients and energy for future growth. When lifting your gladiolus bulbs in fall, separate the cormels carefully by hand. Choose plump, firm, and disease-free ones for propagation, as these have the highest survival rate. Allow them to dry for a few days, then store them in paper bags or mesh sacks in a cool, dry location over winter until planting season arrives.
In early spring, prepare a sunny planting bed with loose, well-drained soil rich in organic matter. Plant cormels one to two inches deep and two inches apart. Water gently after planting to help them settle, but avoid waterlogging. Cormels grow slower than full-size bulbs, producing grassy foliage during their first year while developing stronger root systems underground. By the second or third season, these young bulbs will reach blooming size and produce tall spikes of colorful flowers. During the growing period, feed them lightly with a balanced fertilizer to encourage steady, healthy development.
For gardeners in cold regions, starting cormels indoors speeds up the growth cycle. Place them in trays filled with moist, sandy soil and keep them in a bright, warm area until frost danger passes. When the seedlings grow several inches tall, transplant them outdoors. Labeling helps keep track of varieties and colors as they mature. Propagating gladiolus from cormels takes patience but offers lasting rewards, ensuring a continuous supply of beautiful flowers year after year.
How to Protect Gladiolus Bulbs from Pests and Diseases During Storage
Keeping gladiolus bulbs safe from pests and diseases during storage is essential for ensuring healthy growth next season. The most common threats include thrips, mites, and fungal infections like botrytis and fusarium rot. Thrips are tiny insects that can hide between bulb layers, feeding on the corm and leaving silver streaks or small holes. Fungal spores thrive in humid, poorly ventilated storage spaces and spread quickly through contact. Preventing these problems begins before storage by curing bulbs thoroughly, inspecting them for any signs of damage, and removing debris or old corm tissue that can harbor insects or pathogens.
To protect bulbs from pests, you can apply a mild insecticidal dust or natural treatment before storing. Dusting bulbs lightly with garden sulfur or diatomaceous earth helps eliminate hidden insects without using harsh chemicals. If thrips are a recurring problem, soaking bulbs in warm water (about 110°F or 43°C) for 30 minutes before drying can kill larvae and eggs effectively. Always let bulbs dry completely before placing them in containers. Maintaining proper airflow and a cool, dry environment further discourages both pests and mold from developing. A stable storage temperature below 50°F (10°C) slows pest activity naturally.
Regular inspection during winter is another key defense. Check bulbs every few weeks for mold spots, soft areas, or signs of insect movement. Remove any infected bulbs immediately to prevent contamination. Replace damp storage material with dry peat moss or vermiculite if necessary. Avoid stacking bulbs too closely to improve ventilation. Clean storage boxes thoroughly before reuse, and never mix old and new bulbs together. By combining good hygiene, preventive treatment, and consistent monitoring, you can keep your gladiolus bulbs safe, vibrant, and ready for a strong start in the coming growing season.
FAQs about Gladiolus Bulb Storage
How long can you store gladiolus bulbs?
Gladiolus bulbs can be stored for about six months in a cool, dry, and dark location. Keep temperatures between 35°F and 50°F (1°C–10°C) and check them monthly to ensure they remain firm, healthy, and free from mold before replanting in spring.
Can gladiolus bulbs stay in the ground over winter?
Gladiolus bulbs can stay in the ground only in warm climates where frost does not occur. In cold areas, dig them up after blooming, dry thoroughly, and store indoors. Leaving them outside in freezing soil will cause rot and kill the bulbs.
Why do stored gladiolus bulbs rot?
Bulbs usually rot because of excess moisture, poor air circulation, or being stored while still damp. Always cure bulbs for two weeks before storage and use breathable containers. Keep them dry and cool to prevent mold, fungal growth, and decay during the dormant period.
Should I remove the old corm before storing?
Yes. Always remove the old, shriveled corm attached to the base of the new bulb. The old corm attracts mold and pests, which can infect healthy bulbs during storage. Keeping only the fresh, firm corm ensures stronger, disease-free growth next season.
What’s the best way to store gladiolus bulbs?
Store gladiolus bulbs in mesh bags or ventilated boxes lined with dry peat moss, sawdust, or vermiculite. Maintain a temperature between 35°F and 50°F (1°C–10°C). Keep the environment dark, cool, and dry to prevent premature sprouting or rotting until spring planting.
Conclusion
Storing gladiolus bulbs correctly ensures their survival and beauty for seasons to come. With proper timing, careful drying, and cool storage, these bulbs remain healthy through winter dormancy. Regular inspection and balanced humidity protect them from rot or shrinkage. When replanted in spring, well-preserved gladiolus bulbs produce stronger shoots, taller spikes, and brighter flowers. Each year, this simple storage routine rewards your effort with a renewed burst of color and elegance. By understanding their needs, you can keep your gladiolus thriving and enjoy their magnificent blooms season after season without fail.