Hydrangeas are beloved for their large, colorful blooms that brighten any garden. Moving them to a new location can refresh your landscape or improve growth, but transplanting requires careful planning. These plants have delicate root systems and varying bloom habits, making timing and technique essential for success. Understanding the specific variety and its needs ensures the bush recovers quickly and thrives in its new spot.
Proper preparation can make the difference between a thriving hydrangea and one that struggles. From selecting the ideal planting site to protecting roots during the move, every step matters. With thoughtful care, your hydrangeas can establish quickly and produce full, vibrant blooms. This guide provides detailed, practical tips to help gardeners confidently transplant hydrangeas and enjoy a flourishing garden season after season.
Choosing the Right Time to Transplant Hydrangeas
Timing is crucial when moving hydrangeas. The ideal period depends on the plant type. Bigleaf hydrangeas bloom on old wood, so transplanting them just after flowering prevents cutting off next season’s buds. Panicle and smooth hydrangeas bloom on new wood, making late winter or early spring the best time for relocation. Choosing the right season reduces stress and supports strong growth. Transplanting at the wrong time can delay flowering or cause leaves to wilt. Gardeners should avoid extreme heat or frost, as these conditions increase the risk of transplant shock.
Preparing the plant before transplanting also improves success. Prune any dead or weak stems to focus energy on healthy growth. Water the plant thoroughly a day before moving to keep roots hydrated. Mark the direction of sunlight if necessary, so you can orient the plant correctly in its new location. Protecting exposed roots with damp burlap during the move prevents drying. Using a sharp spade ensures clean root cuts and reduces trauma. Taking these precautions helps the hydrangea recover quickly and resume growth.
The environment at the new site matters just as much as timing. Hydrangeas prefer partial shade and protection from harsh afternoon sun. Soil should be rich in organic matter, well-draining, and slightly acidic for optimal bloom color. Amending the soil with compost or peat moss helps roots establish quickly. Mulching after planting retains moisture and keeps roots cool. With careful timing and preparation, hydrangeas can thrive after transplantation, rewarding gardeners with lush, vibrant blooms throughout the season. Paying attention to sunlight, soil, and watering ensures a smooth transition and healthy growth for years to come.
Preparing the Plant and Site for Transplanting
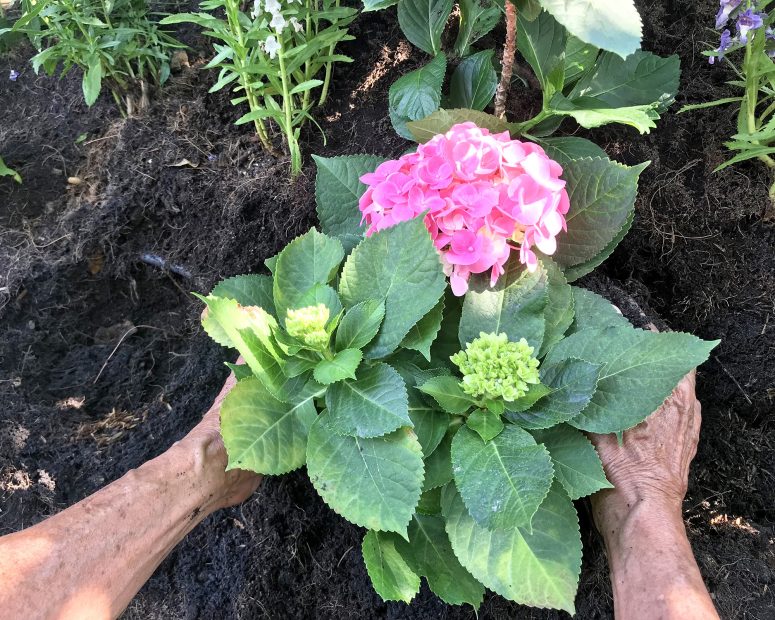
Proper preparation ensures hydrangeas survive and thrive after relocation. Start by selecting a healthy plant with no signs of disease or pest damage. Remove dead or weak branches to reduce stress on the root system. Water the plant deeply a day before digging to keep roots hydrated. If possible, gently loosen the soil around the base to minimize root disturbance. For older or larger hydrangeas, consider digging a wider area to capture more roots. These steps prepare the hydrangea for a smooth transition and reduce the risk of transplant shock. Planning in advance also helps you avoid rushing the process, which can harm the plant.
The new planting site should meet the plant’s light and soil requirements. Hydrangeas prefer partial shade and protection from strong afternoon sun. Soil should be rich in organic matter, slightly acidic, and well-draining. Test the soil and amend it with compost or peat moss if necessary. Dig a hole large enough to accommodate the root ball without crowding. Ensuring adequate space around the roots promotes healthy growth. Preparing the site in advance allows the roots to settle quickly and encourages faster establishment after transplanting.
Protecting the roots during the move is also critical. Wrap the root ball in damp burlap or place it in a container to prevent drying. Handle the plant carefully to avoid breaking stems or compacting the soil around roots. After placing the hydrangea in the new hole, backfill with amended soil and water thoroughly. Mulching around the base helps retain moisture and regulates soil temperature. Checking soil moisture regularly during the first few weeks supports recovery. With careful preparation of both plant and site, hydrangeas can adapt quickly and reward gardeners with abundant, vibrant blooms in the following season.
Transplanting Techniques for Different Hydrangea Types
Different hydrangea varieties require slightly different transplanting approaches. Bigleaf hydrangeas bloom on old wood, so extra care is needed to protect buds. When moving them, dig around the root ball carefully, keeping as many roots intact as possible. Avoid cutting branches that will bear flowers next season. Supporting the plant with stakes during relocation prevents damage to delicate stems. Ensuring the root ball remains firm during the move reduces shock. Gardeners should also monitor soil moisture closely after planting to help roots establish. These precautions ensure the plant recovers and blooms successfully in its new spot, producing vibrant flowers season after season.
Panicle and smooth hydrangeas bloom on new wood, making them more flexible to transplant at various times. Pruning before moving encourages vigorous growth and abundant blooms. When digging, create a wide root ball to protect smaller feeder roots. Keep the soil around roots moist and handle the plant gently to prevent breakage. Placing the bush in the prepared hole immediately and backfilling carefully reduces stress. Providing temporary shade and consistent watering supports root development. With careful handling, these hydrangeas quickly adapt to their new environment and continue healthy growth.
Mophead and lacecap hydrangeas require special attention to maintain their unique blooms. Covering flower heads during the move can prevent damage from wind or sun. Ensure the new site provides adequate shade, and orient the plant as it was previously for consistent bloom quality. Adding mulch after planting conserves moisture and protects roots from temperature fluctuations. Avoid over-fertilizing immediately after transplanting, as young roots are sensitive. Following these techniques tailored to each hydrangea type maximizes the chances of a successful transplant, allowing gardeners to enjoy lush, vibrant flowers year after year.
Watering and Mulching After Transplanting
Watering Hydrangeas After Transplanting
Proper watering is essential for hydrangeas after moving them. Newly transplanted plants rely on sufficient moisture to recover from root disturbance. Water deeply immediately after planting to help soil settle around roots. Keep the soil consistently damp, especially during the first two to three weeks. Avoid overwatering, as soggy soil can cause root rot or fungal problems. Checking soil moisture daily ensures the plant receives adequate hydration. Using a soaker hose or drip irrigation system delivers water slowly and evenly, reducing stress on delicate roots. For larger plants, water in multiple stages to ensure all roots are moist. Monitoring the soil’s texture and adjusting watering prevents both drying and oversaturation.
Gradually reduce watering frequency as the plant establishes. Early morning watering is ideal to minimize evaporation and reduce the risk of fungal diseases. Mulching around the base further helps retain moisture, reducing the need for frequent watering. Observing leaf turgor, soil moisture, and general plant vigor helps determine if hydration is sufficient. Maintaining consistent watering supports strong root growth, reduces transplant shock, and encourages abundant blooms in the following season. Proper hydration ensures hydrangeas adapt quickly, stay healthy, and produce vibrant flowers throughout the year.
Mulching for Root Protection and Soil Health
Mulching plays a vital role in transplant success. Apply a 2–3 inch layer of organic mulch, such as shredded bark, wood chips, or compost, around the base of the plant. Keep mulch a few inches away from the stem to prevent rot. Mulch retains soil moisture, regulates temperature, and suppresses weeds, creating a stable environment for shallow hydrangea roots. It also improves soil structure over time as it decomposes, allowing roots to grow freely and access nutrients more effectively.
In addition, mulch protects roots from extreme temperature fluctuations in summer and winter. Organic mulch slowly releases nutrients into the soil, enhancing plant health and supporting stronger blooms. Replenish mulch as needed, especially after heavy rain or windy conditions that displace it. Combining mulching with consistent watering encourages rapid establishment and reduces stress. Properly mulched hydrangeas maintain better hydration, resist soil compaction, and develop a robust root system. This foundation ensures healthy growth, abundant flowering, and a thriving garden for years to come.
Fertilizing Hydrangeas After Transplanting
Fertilizing is essential to help hydrangeas recover and thrive after being moved. Newly transplanted plants are sensitive, so choose a balanced fertilizer that provides nitrogen, phosphorus, and potassium. Avoid high-nitrogen formulas at first, as they can encourage leafy growth at the expense of flowers. Applying fertilizer too soon can stress the roots, slowing recovery. Wait until the plant shows clear signs of new growth before feeding. Using slow-release fertilizer ensures nutrients are available gradually, supporting steady development, strong stems, and healthy blooms. Proper fertilization helps plants establish quickly and reduces the risk of transplant shock.
In addition to commercial fertilizers, organic options like compost, well-rotted manure, or fish emulsion improve soil structure and provide essential nutrients. Mixing organic matter into the top layer encourages microbial activity, which benefits root establishment. Fertilize around the drip line, where most feeder roots are located, rather than directly at the stem. Water thoroughly after applying fertilizer to help nutrients penetrate the soil and reduce the risk of root burn. Regular monitoring allows adjustment of fertilization depending on plant health and soil conditions.
Regular feeding throughout the growing season promotes vigorous growth and abundant flowering. Monitor the plant for signs of nutrient deficiency, such as yellowing leaves, weak stems, or small flowers, and adjust fertilization accordingly. Avoid over-fertilizing, as it can harm the plant, promote excessive leafy growth, and reduce flower production. By providing the right nutrients at the right time, gardeners can help transplanted hydrangeas establish quickly. This ensures full, vibrant blooms for years to come, maintaining healthy, thriving hydrangeas in any garden environment.
Dealing with Transplant Shock
Transplant shock is common when hydrangeas are moved. Signs include wilting leaves, yellowing, slowed growth, or leaf drop. These symptoms occur because the roots are disturbed and cannot take up water efficiently. Understanding and identifying transplant shock early allows gardeners to take corrective action and improve plant recovery. Monitoring the plant closely for the first few weeks is crucial to prevent long-term damage.
Minimizing stress during the transplant process reduces the severity of shock. Watering thoroughly before and after moving the plant ensures roots remain hydrated. Avoid pruning excessively immediately after transplanting, as the plant needs leaves for photosynthesis. Providing temporary shade in hot weather and maintaining consistent moisture helps the hydrangea regain strength. Using a light layer of mulch around the base protects roots from temperature extremes and reduces water evaporation.
Additional care can help the plant recover fully. Fertilize lightly only after the plant shows signs of new growth to encourage strong roots and blooms. Support weakened stems with stakes if necessary. Avoid harsh chemicals or heavy pruning during the first growing season. With careful observation, proper watering, mulching, and timely feeding, hydrangeas can overcome transplant shock. Healthy plants will resume vigorous growth and reward gardeners with vibrant, abundant flowers in the next season, ensuring a beautiful and thriving garden.
Pruning Hydrangeas After Transplanting
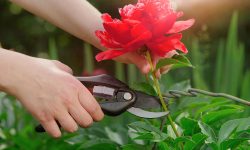
Pruning hydrangeas after transplanting is essential to encourage healthy growth and abundant blooms. Begin by removing any dead, damaged, or diseased branches. This reduces stress on the plant and allows energy to focus on new root and stem development. Avoid heavy pruning immediately, especially for bigleaf varieties that bloom on old wood, as cutting too much can remove next season’s flower buds. Light shaping improves airflow, prevents fungal problems, and supports balanced growth. Carefully removing crowded stems also helps sunlight reach inner branches, promoting uniform leaf development and stronger blooms.
For panicle and smooth hydrangeas, which bloom on new wood, pruning can be more extensive. Cutting back up to one-third of the plant encourages strong, vigorous shoots that produce larger blooms. Always use clean, sharp tools to make precise cuts and minimize damage. Pruning also helps manage the plant’s size, making it easier for roots to establish and absorb nutrients efficiently. Timing is critical; prune during late winter or early spring when the plant is dormant. For newly transplanted bushes, light pruning in the first season is sufficient to avoid excessive stress.
After pruning, monitor the plant for stress signs such as wilting or leaf discoloration. Maintain consistent watering and consider adding a light layer of mulch to protect roots. Fertilize carefully once new growth appears to support recovery. Regular pruning in subsequent seasons keeps the plant healthy, encourages strong branching, and maximizes flower production. Following these steps ensures transplanted hydrangeas adapt quickly, establish a robust root system, and produce vibrant, abundant blooms year after year, providing lasting beauty and color in the garden.
Common Problems After Transplanting and How to Solve Them
Wilting and Leaf Drop
Wilting and leaf drop are common signs of stress in transplanted hydrangeas. These symptoms often appear when roots cannot take up enough water due to disturbance during the move. Overly dry soil, high temperatures, or compacted roots can worsen the problem. Checking soil moisture daily and watering deeply ensures that the roots remain hydrated. Avoid shallow or infrequent watering, which can leave the plant stressed. Newly transplanted hydrangeas are particularly sensitive in the first few weeks and require consistent care.
To address wilting, provide temporary shade during hot weather to reduce water loss and protect leaves from sunburn. Mulching around the base helps maintain soil moisture and keeps roots cool. Avoid fertilizing a stressed plant immediately, as this can further damage delicate roots. Pruning minimal leaves or damaged stems allows the plant to conserve energy. Over time, with consistent watering, shading, and proper soil care, the hydrangea will recover. Once roots establish, leaves regain their vigor, and the plant resumes healthy growth, eventually producing vibrant, abundant blooms in the following season.
Pest and Disease Issues
Transplanted hydrangeas may become more vulnerable to pests and diseases due to stress. Aphids, spider mites, scale insects, or fungal infections like powdery mildew can appear more readily on weakened plants. Inspect the plant regularly for any signs of infestation or disease. Early detection is key to effective management and prevents widespread damage. Using insecticidal soap, neem oil, or horticultural oils can help control pests safely.
Preventive measures are equally important to minimize risks. Avoid overhead watering to limit fungal growth and maintain good air circulation around branches. Remove any diseased or infested leaves promptly and dispose of them properly. Keeping the soil well-drained and maintaining proper plant spacing reduces fungal and bacterial issues. With careful monitoring, timely intervention, and proper post-transplant care, hydrangeas can overcome pest and disease challenges. Healthy plants quickly regain strength, establish a robust root system, and produce strong, colorful blooms, ensuring long-term garden beauty.
Long-Term Care for Transplanted Hydrangeas
Long-term care is crucial to ensure transplanted hydrangeas thrive and produce abundant blooms year after year. After the initial recovery period, maintaining consistent watering is key. Hydrangeas prefer evenly moist soil, but avoid waterlogging, which can lead to root rot. Regularly check soil moisture, especially during hot or dry periods. Mulching around the base continues to conserve water, regulate soil temperature, and suppress weeds. Proper watering supports healthy root growth and ensures the plant remains vigorous throughout the growing season.
Pruning, fertilizing, and monitoring the plant’s overall health are equally important. Prune after flowering to remove spent blooms and maintain shape. For varieties that bloom on new wood, light pruning in early spring encourages strong branches and more flowers. Apply a balanced fertilizer during the growing season to promote growth and flower production. Observe the plant for signs of nutrient deficiency, pest infestations, or disease, and act promptly to correct issues. Routine maintenance ensures the hydrangea continues to flourish after transplantation.
Finally, consider environmental factors for long-term success. Hydrangeas thrive in partial shade with protection from harsh afternoon sun. Shelter them from strong winds, which can damage stems and flowers. Adjust soil pH if necessary to maintain bloom color for varieties affected by acidity. With careful attention to watering, pruning, fertilization, and site conditions, transplanted hydrangeas establish robust root systems. Over time, they develop into healthy, vibrant shrubs, rewarding gardeners with lush foliage and stunning, full blooms season after season. Long-term care transforms a transplanted hydrangea into a lasting centerpiece in any garden.
Adjusting Soil pH for Optimal Bloom Color
Hydrangeas are unique because bloom color can be influenced by soil pH. For bigleaf hydrangeas, acidic soil (pH below 6) produces blue flowers, while alkaline soil (pH above 7) encourages pink blooms. Adjusting soil pH after transplanting ensures the desired flower color and supports healthy growth. Testing the soil with a reliable pH kit before planting provides an accurate baseline. Knowing the starting pH allows gardeners to apply the right amendments and avoid overcorrection, which can stress the plant.
To lower pH and promote blue flowers, gardeners can add elemental sulfur or aluminum sulfate according to package instructions. For pink blooms, gradually incorporate lime or wood ash. Mix amendments thoroughly into the soil and water deeply to help nutrients penetrate the root zone. Avoid sudden, extreme pH changes, as they can harm roots, slow growth, and reduce flower production. Consistent, moderate adjustments provide safer results and help the plant adapt smoothly to its new environment.
Maintaining the desired soil pH throughout the season is key to consistent bloom color. Monitor pH annually and make minor adjustments as needed. Organic mulches, such as pine needles or shredded leaves, help slightly acidify the soil over time and conserve moisture. Combined with proper watering, balanced fertilization, and careful pruning, effective pH management ensures vibrant, healthy flowers. Gardeners can enjoy a dynamic range of bloom colors while helping transplanted hydrangeas establish strong roots and flourish in any garden setting, creating a long-lasting, colorful display.
Companion Planting with Hydrangeas
Companion planting can greatly enhance both the beauty and health of transplanted hydrangeas. Selecting plants with similar light and moisture requirements creates a harmonious garden environment. Ferns, hostas, astilbes, and shade-tolerant perennials make excellent companions, as they thrive in partial shade and help retain soil moisture around hydrangea roots. Companion plants not only improve visual appeal but also encourage biodiversity, attracting beneficial insects and supporting natural pest control.
When planning companion planting, consider using low-growing ground covers near the base of hydrangeas. These plants help retain soil moisture, reduce erosion, and suppress weeds without competing aggressively for nutrients. Avoid deep-rooted or highly competitive species that may interfere with hydrangea root development. Pairing flowering plants with complementary colors enhances garden aesthetics and highlights the unique blooms of hydrangeas. Varied textures, foliage shapes, and seasonal interest create a layered, visually appealing landscape while supporting the overall health of the garden ecosystem.
Proper maintenance of companion plants ensures they do not overshadow or crowd hydrangeas. Regular pruning, mulching, and watering for all plants in the bed help maintain balance. Monitor for pests and diseases that may spread between plants and address issues promptly. When carefully planned, companion planting strengthens transplanted hydrangeas, providing a supportive environment for root establishment and growth. This strategy allows gardeners to enjoy a vibrant, resilient garden where hydrangeas flourish alongside complementary plants, resulting in a lush, colorful display year after year.
FAQ – How to Transplant Hydrangeas
How soon can I transplant hydrangeas after purchase?
It’s best to transplant hydrangeas as soon as possible after purchase. Delaying can stress the plant and reduce blooming potential. Keep the roots moist until planting. If waiting more than a day, place the plant in a shaded area and water regularly to maintain hydration.
What is the best time of year to transplant hydrangeas?
The ideal time to transplant hydrangeas is early spring or late fall when the plant is dormant. Cooler temperatures reduce stress, and the roots can establish before the growing season. Avoid transplanting during extreme heat or frost to prevent damage to both roots and foliage.
How do I prevent transplant shock in hydrangeas?
Transplant shock can be minimized by watering thoroughly before and after moving the plant. Mulch around the base, provide temporary shade, and avoid heavy pruning immediately. Ensure the plant is not exposed to harsh sun or wind during recovery to allow roots to establish successfully.
How should I adjust soil pH for bloom color?
For bigleaf hydrangeas, acidic soil (pH below 6) produces blue flowers, and alkaline soil (pH above 7) encourages pink blooms. Test the soil before planting and gradually adjust pH using sulfur, aluminum sulfate, lime, or wood ash. Avoid sudden changes to prevent root stress.
What ongoing care do transplanted hydrangeas need?
After transplanting, maintain consistent watering, mulching, and proper fertilization. Prune lightly when needed, monitor for pests and diseases, and adjust soil pH if required. Seasonal care ensures strong root establishment, healthy growth, and abundant blooms year after year.
Conclusion
Transplanting hydrangeas successfully requires careful planning, proper techniques, and attentive aftercare. From selecting the ideal planting site and adjusting soil pH to watering, mulching, and seasonal maintenance, each step contributes to healthy root establishment and vibrant blooms. Monitoring for pests, diseases, and transplant shock ensures the plant adapts smoothly. Incorporating companion plants and following long-term care practices further enhances growth and garden aesthetics. With consistent care, gardeners can enjoy lush foliage, stunning flower colors, and resilient hydrangeas that thrive year after year, creating a beautiful and flourishing garden centerpiece.