Orchids are among the most elegant and exotic houseplants. Their long-lasting blooms and intricate shapes bring a touch of the tropics to any home. However, even the most experienced gardeners can sometimes face a common and concerning issue—orchid leaves turning yellow. While it’s easy to panic at the sight, yellowing leaves do not always signal the end of your plant. With the right knowledge and prompt care, you can identify the cause and restore your orchid’s health.
This comprehensive guide will walk you through the most frequent causes of yellowing orchid leaves, how to distinguish between normal and problematic yellowing, and most importantly, expert-approved strategies to treat and prevent it. Whether you’re a new orchid enthusiast or a seasoned grower, you’ll find valuable insights to help your plant thrive.
Understanding Why Orchid Leaves Turn Yellow
Orchid leaves are typically thick, glossy, and vibrant green. When they begin to lose their color and turn yellow, it’s a sign that something is affecting your plant’s health. Yellowing is not a diagnosis but a symptom of an underlying issue.
Natural Leaf Aging vs. Problematic Yellowing
Before taking any drastic action, it’s important to assess whether the yellowing is part of the natural life cycle of your orchid. Like all plants, orchids shed their oldest leaves as new ones grow. If only one or two lower leaves are yellowing and the rest of the plant appears healthy, there may be no cause for alarm.
However, if multiple leaves—especially upper or newer ones—are turning yellow, or if the yellowing is accompanied by spots, mushy areas, or wilting, it’s likely due to an environmental stressor or disease. Catching the root cause early is crucial to save your orchid.
Common Causes of Yellowing Orchid Leaves
A range of factors can trigger yellowing leaves. Some relate to water and light, while others may involve pests or nutrient imbalances. Each cause leaves clues, and understanding them can help you act quickly.
Overwatering and Root Rot
Among the most common reasons for yellow orchid leaves is overwatering. Orchids prefer to dry out slightly between waterings. Constantly moist roots can lead to rot, preventing the plant from absorbing water and nutrients effectively.
Root rot damages the orchid’s ability to support itself. As the roots deteriorate, leaves begin to yellow and drop. In severe cases, they may turn black or develop a foul odor.
Underwatering and Dehydration
At the opposite extreme, underwatering deprives the orchid of essential moisture. The leaves may become leathery, shriveled, and eventually yellow as the plant struggles to survive. This usually occurs when orchids are neglected or exposed to excessive heat or sunlight.
Poor Light Conditions
Light plays a critical role in an orchid’s health. If the plant is not receiving enough indirect sunlight, photosynthesis slows down, leading to pale or yellow leaves. On the other hand, too much direct sunlight can cause leaf burn, which often starts with yellowing.
Assessing the lighting conditions of your orchid’s environment is key. Bright, filtered light is ideal, such as from an east-facing window or through sheer curtains.
Temperature Stress
Orchids thrive within specific temperature ranges. Sudden fluctuations or prolonged exposure to cold or hot temperatures can shock the plant. Cold drafts, in particular, can cause rapid yellowing. Ensure that your orchid stays in a stable environment with daytime temperatures between 65°F to 80°F and slightly cooler at night.
Nutrient Deficiency or Fertilizer Burn
Improper feeding can also lead to yellow leaves. A lack of nitrogen, magnesium, or iron affects chlorophyll production, resulting in chlorosis—or leaf yellowing. Conversely, over-fertilizing can burn the roots and cause yellow patches.
Balanced, diluted orchid-specific fertilizers applied on a regular schedule support healthy growth without overwhelming the plant.
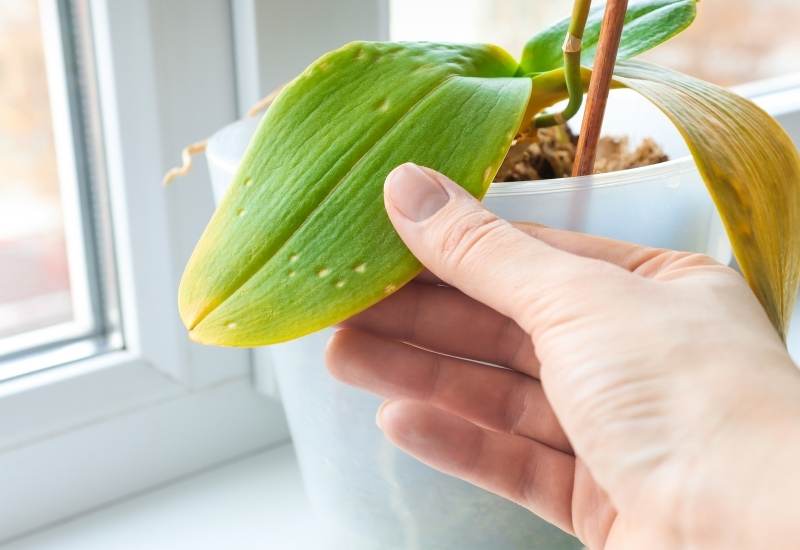
Pests and Disease
Pests such as spider mites, aphids, and scale insects suck sap from orchid leaves, causing damage and yellowing. Fungal or bacterial infections may also cause soft, yellow, or brown-spotted areas.
Inspect the underside of leaves and root zones regularly. Sticky residue, webbing, or discolored patches can indicate an infestation or infection.
How to Treat Yellowing Orchid Leaves
Once you’ve identified the likely cause of yellowing, the next step is implementing the appropriate treatment. Acting quickly can prevent further damage and restore your orchid to health.
Adjusting Your Watering Routine
If overwatering is the issue, the first step is to inspect the roots. Healthy orchid roots are firm and white or green. Rotted roots appear brown, mushy, and may fall apart when touched.
Remove the orchid from its pot, trim away all affected roots using sterilized scissors, and allow the plant to air dry. Repot it in fresh, well-draining orchid bark. In the future, ensure the pot has drainage holes and water only when the potting medium is dry to the touch.
For underwatered orchids, increase the frequency slightly. Water thoroughly, allowing excess to drain, but avoid letting the plant sit in standing water.
Improving Light Conditions
Relocate your orchid to a brighter spot if it’s not receiving enough light. East or south-facing windows with filtered light are ideal. If natural light is insufficient, consider using grow lights designed for indoor plants.
To prevent sunburn, avoid placing your orchid in direct midday sunlight. If you see scorched or sunburned leaves, move the plant immediately and trim damaged areas once healed.
Stabilizing Temperature and Humidity
Avoid placing orchids near heating vents, drafty windows, or air conditioners. Use a thermometer to monitor ambient temperatures, and consider a humidity tray or humidifier to maintain ideal moisture levels around the plant.
Orchids generally prefer humidity levels of 50–70%. If you live in a dry climate, misting the leaves or using pebble trays can help.
Rebalancing Fertilization
If you suspect a nutrient deficiency, begin using a balanced orchid fertilizer with essential micronutrients. A diluted 20-20-20 formula applied every two weeks during the growing season is generally effective.
To prevent fertilizer burn, flush the potting medium with water once a month to remove salt buildup. Always follow label directions and avoid over-fertilizing.
Addressing Pest and Disease Problems
Treat pests using insecticidal soap or neem oil. For fungal or bacterial issues, prune away affected areas and apply an appropriate fungicide or antibacterial treatment. Always isolate infected plants from others to prevent spreading.
Clean all tools before and after use to avoid introducing pathogens during care or repotting.
Preventing Future Leaf Yellowing in Orchids
Prevention is the best strategy for long-term orchid health. Once your plant recovers, maintaining consistent care will reduce the risk of recurrence.
Choose the Right Potting Medium
Orchids are epiphytes, meaning they grow on trees in nature. They require a loose, breathable medium like bark, coconut husk, or sphagnum moss. Avoid regular potting soil, which retains too much moisture and suffocates the roots.
Repot your orchid every one to two years to refresh the medium and inspect root health.
Maintain a Consistent Care Schedule
Keep a simple orchid care log to track watering, fertilizing, and repotting dates. Being consistent helps you catch early warning signs and prevents overcorrection.
Observe your orchid closely each week for any color changes, texture differences, or spotting. Early intervention makes all the difference.
Understand Your Orchid Species
Different types of orchids—like Phalaenopsis, Cattleya, or Dendrobium—have unique care requirements. Learn about your specific variety’s preferred environment, watering frequency, and light tolerance. Tailoring your care increases your chances of long-lasting blooms and vibrant foliage.
When to Let Yellow Leaves Be
In some cases, especially when only older lower leaves are yellowing, it’s best to let them fall off naturally. Forcing removal can create wounds that invite bacteria or fungi. As long as the rest of the plant is thriving, a little yellowing is just part of the natural cycle.
If a leaf becomes mushy, infected, or unsightly, you can prune it using sterile scissors. Always cut close to the base and disinfect your tools afterward.
Frequently Asked Questions About Orchid Leaves Turning Yellow
What is the most common cause of yellow orchid leaves?
The most common cause is overwatering. When orchid roots remain too wet for too long, they start to rot, which disrupts the plant’s ability to absorb water and nutrients. This often results in yellowing leaves, especially at the base of the plant.
Is it normal for orchid leaves to turn yellow?
Yes, but only to a certain extent. It is normal for older, lower leaves to yellow and drop off as part of the natural growth cycle. However, if multiple leaves—especially newer ones—turn yellow, it’s usually a sign of stress or a health issue that needs attention.
Can yellow orchid leaves turn green again?
In most cases, no. Once an orchid leaf has turned yellow, it will not return to its original green color. The best course of action is to identify and resolve the underlying issue so the rest of the plant remains healthy and continues producing new green growth.
Should I remove yellow leaves from my orchid?
Only remove yellow leaves if they are soft, mushy, or clearly infected. If a leaf is simply aging and yellowing naturally, it’s better to let it fall off on its own. Forcefully removing a leaf can damage the plant and expose it to infection.
How often should I water my orchid to prevent yellow leaves?
Watering frequency depends on the type of orchid, potting medium, and environment. As a general rule, water once every 7 to 10 days and allow the potting medium to dry out slightly between waterings. Always use pots with good drainage to prevent standing water around the roots.
Can too much sunlight cause orchid leaves to turn yellow?
Yes. Excessive direct sunlight can lead to sunburn, which causes yellow or even white patches on orchid leaves. Orchids do best in bright, indirect light. If your plant is exposed to harsh afternoon sun, move it to a shadier location or use a sheer curtain to diffuse the light.
What kind of fertilizer helps prevent yellow leaves in orchids?
A balanced orchid fertilizer with equal parts nitrogen, phosphorus, and potassium (such as 20-20-20) is ideal. It should also contain trace elements like magnesium and iron. Apply it every two weeks during the growing season and dilute it to half strength to avoid burning the roots.
Can pests make orchid leaves turn yellow?
Yes. Pests such as spider mites, scale, and mealybugs can damage the leaves by sucking out the plant’s sap. This weakens the plant and often results in yellowing or stippled leaves. Regular inspection and treatment with neem oil or insecticidal soap can help control infestations.
What should I do if my orchid’s roots are brown and mushy?
Brown, mushy roots indicate root rot, often caused by overwatering. Remove the plant from its pot, trim off all affected roots with sterile scissors, and allow the healthy roots to dry slightly. Repot the orchid in fresh, well-draining orchid bark and adjust your watering schedule.
Final Thoughts: Your Orchid Can Recover
While orchid leaves turning yellow can be alarming, it’s rarely a death sentence for your plant. Most causes—from overwatering to nutrient imbalances—can be corrected with attentive care. By observing your orchid, adjusting your routine, and making informed decisions, you can bring it back to health and enjoy its blooms once again.
Remember that patience and consistency are your greatest allies in orchid care. Even seasoned gardeners learn from each yellow leaf, turning mistakes into deeper understanding. With the expert tips shared here, you’re well-equipped to revive your orchid fast and keep it thriving for years to come.