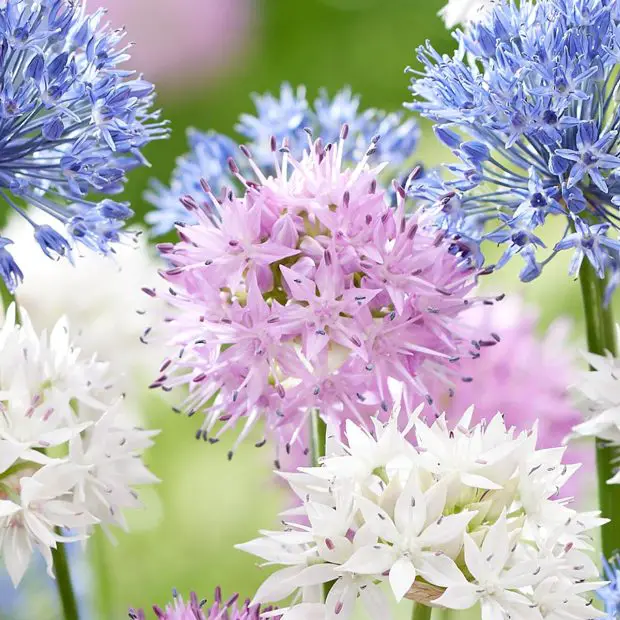
Alliums are among the most captivating and elegant flowering bulbs you can grow. Known for their striking globe-shaped blooms that rise above slender stems, these flowers bring a touch of drama and sophistication to any garden. They bloom in shades of purple, pink, white, and even blue, creating a breathtaking display that lasts from late spring through early summer. But to enjoy those stunning blooms, timing is everything. Planting allium bulbs at the right moment determines how well they grow, how long they last, and how vibrant their colors become once they emerge.
Understanding when to plant allium bulbs is more than just marking a calendar date. It’s about learning how soil temperature, climate, and seasonal changes influence growth. Too early, and bulbs may rot before winter; too late, and they won’t have time to establish roots. With careful timing and proper preparation, you can ensure your alliums grow strong, bloom beautifully, and return year after year. This guide reveals everything you need to know to master the art of planting allium bulbs for perfect timing and healthy growth.
Understanding Allium Bulbs and Their Growth Cycle
Allium bulbs belong to the same botanical family as onions, garlic, and chives, yet they are prized for their ornamental value rather than their flavor. These bulbs store nutrients and energy that fuel the plant’s growth during the following season. Each bulb contains everything it needs to produce tall, sturdy stems and spherical clusters of star-shaped flowers. Understanding how allium bulbs grow helps gardeners choose the right planting time and create ideal growing conditions. Their cycle includes a resting phase, a rooting phase, and finally, an active growing period leading to bloom.
The growth cycle begins underground during autumn or early winter when the bulbs start developing roots in cool, moist soil. This rooting stage is crucial because it prepares the plant to withstand winter temperatures and ensures strong growth in spring. When warmer weather arrives, the bulbs use stored energy to push up shoots and form blooms. After flowering, the plant redirects energy back into the bulb, replenishing it for the next year. This natural rhythm makes timing essential, as bulbs need several months of cool soil to root properly before sprouting.
By understanding this pattern, gardeners can predict how the bulbs respond to different planting conditions. Planting too early may expose them to excessive warmth, causing premature growth that later dies back. Planting too late can limit root development, leading to weak blooms. Knowing when the bulb transitions between dormancy and activity helps synchronize planting with natural cycles. With the right timing and care, alliums become dependable perennials that return each spring with renewed strength and dazzling beauty.
Best Time of Year to Plant Allium Bulbs
The best time to plant allium bulbs depends on climate and soil temperature. In most regions, autumn is ideal. Plant when soil cools to about 50°F, or slightly lower. Cool soil encourages roots and prevents premature shoots. Early planting into warm ground risks tender growth that frost damages. Planting after ground freeze limits rooting and weakens stems. Aim for firm, well-draining beds before sustained cold. As winter arrives, bulbs rest safely underground. Spring warmth then triggers steady sprouting and strong stems. Proper timing sets the stage for tall, vibrant blooms.
Northern gardeners should target late September through early November. Southern or maritime areas can plant into December, sometimes January. The soil must remain workable and drain freely. Wet clay promotes rot during winter dormancy. Warm autumns demand patience before planting. Use a soil thermometer to confirm cooling trends. Night lows often reveal the seasonal shift. Mulch lightly after planting to stabilize temperature. Avoid heavy mulch that traps excess moisture. Consistent cool conditions build a dense root plate. That foundation supports larger flower heads in spring.
Timing also syncs bloom windows with companion plants. Autumn-planted alliums flower after tulips and before summer perennials. This bridges seasonal gaps with architectural spheres and rich color. Microclimates can shift your schedule by weeks. Urban courtyards stay warmer longer. Exposed hillsides cool earlier in fall. High elevations advance the planting window. Coastal zones delay it due to mild nights. Containers cool and warm faster than ground beds. Adjust timing for pots by watching soil temperatures closely. With these cues, you’ll plant at peak readiness and ensure reliable, repeatable displays.
Factors That Influence Planting Time
Soil Temperature
Soil temperature determines whether allium bulbs can form roots successfully before winter. The optimal range for planting is between 45°F and 55°F (7°C to 13°C). Within this range, bulbs begin developing roots without triggering visible shoots. If planted while soil remains above 60°F, bulbs risk sprouting too early and becoming vulnerable to frost burn. Conversely, soil colder than 40°F slows root activity, leaving bulbs unanchored through winter. This temperature balance is crucial for strong establishment and survival during dormancy. Measuring soil temperature over several days provides an accurate picture of when to plant.
Different soil types affect how quickly temperatures cool. Sandy soil loses heat faster, making it ready for planting earlier in autumn, while clay retains warmth longer, requiring gardeners to wait. Mulching too early traps heat and moisture, delaying cooling. It’s best to plant first, then apply mulch once temperatures drop steadily. Consistent cool soil encourages the bulb to store energy efficiently, strengthening its core before growth resumes in spring. By focusing on soil temperature rather than just the calendar, gardeners can achieve ideal timing and healthier, more reliable allium blooms.
Regional Climate
Regional climate defines the timing window for planting alliums more accurately than any single date. In northern areas with harsh winters, bulbs must go into the ground earlier—typically from late September through October—to allow roots to develop before frost hardens the soil. These early plantings help bulbs withstand freezing conditions underground. In warmer southern climates, however, the soil remains warm longer, allowing planting to extend into December or even early January without harm. Coastal regions with mild winters can adjust planting by observing consistent cool nights rather than relying on fixed months.
Gardeners should also consider yearly variations, as temperature shifts affect bulb behavior. Sudden early frosts can damage bulbs planted late, while unseasonably warm autumns delay cooling. Paying attention to regional trends and local weather forecasts helps fine-tune timing. In transitional climates, planting in raised beds promotes faster soil cooling and drainage. Matching your planting schedule to your region’s climate ensures strong, even root growth, healthier bulbs, and robust flowering in the spring season ahead.
Moisture Levels
Moisture levels influence bulb health as much as temperature. Alliums prefer evenly moist but well-draining soil that allows roots to form without rotting. Soggy soil deprives bulbs of oxygen, leading to fungal decay before growth begins. The best planting conditions occur when soil feels damp but not sticky. A simple way to test is by pressing a handful of soil—it should crumble rather than clump. Balanced moisture ensures healthy roots that absorb nutrients efficiently before winter dormancy sets in.
Gardeners in rainy regions should delay planting after heavy downpours, allowing the ground to dry slightly. Raised beds, sandy loam, or gravelly mixes help prevent excess moisture accumulation. In drier climates, watering lightly after planting helps settle the soil around the bulbs and triggers root development. Overwatering during cool months can harm bulbs as evaporation rates drop. Consistent, moderate moisture supports early establishment and enhances bloom quality in spring. Managing water carefully creates the right environment for vigorous, disease-free allium growth.
Elevation and Microclimate
Elevation and microclimate conditions significantly affect planting schedules. At higher elevations, where temperatures drop sooner, gardeners must plant bulbs earlier—often by mid-September—to allow root establishment before freezing. In lowland or valley regions, milder conditions extend the planting window by several weeks. Even within the same garden, microclimates alter timing. Areas near walls, fences, or stone surfaces retain warmth, delaying soil cooling, while shaded or open spaces cool faster. Recognizing these variations ensures bulbs receive the conditions they need for healthy development.
Urban gardens often experience “heat island” effects, where soil stays warm longer due to surrounding pavement or buildings. In such environments, planting later prevents premature sprouting. Meanwhile, rural or exposed gardens cool quickly, making early planting necessary. Observing frost patterns helps identify which spots cool faster. Gardeners can adjust depth and timing based on these observations for consistent results. Understanding elevation and microclimate differences fine-tunes planting precision, helping allium bulbs establish evenly, resist stress, and bloom spectacularly each spring.
Preparing Soil Before Planting Allium Bulbs
Healthy, well-prepared soil is essential for growing strong and vibrant alliums. These bulbs prefer light, well-draining soil that prevents excess water from accumulating around their roots. Poor drainage can lead to bulb rot, which is one of the most common problems gardeners face. The best soil structure for alliums combines sandy loam with moderate organic matter to hold moisture without becoming compacted. Before planting, loosen the soil to a depth of about twelve inches to encourage proper root expansion. This ensures that bulbs can anchor securely and absorb nutrients efficiently throughout their growth cycle.
Soil pH also plays a vital role in the plant’s overall health. Alliums thrive in slightly alkaline to neutral soil, ideally between 6.0 and 7.5 on the pH scale. Testing soil before planting helps determine whether adjustments are necessary. If your soil is too acidic, adding garden lime can help balance it. Mixing in compost or aged manure improves nutrient content and soil texture, allowing better aeration and drainage. Avoid using fresh manure, which can introduce excess nitrogen that weakens bulb structure. Balanced soil nutrition promotes sturdy stems, vibrant flowers, and healthy bulb formation for future growth cycles.
Timing soil preparation correctly contributes to successful planting. Prepare the bed at least a week before inserting bulbs to allow soil amendments to settle and moisture levels to stabilize. Remove stones, roots, and weeds that could interfere with bulb development. For heavy clay areas, incorporate coarse sand or fine gravel to enhance drainage. In regions prone to rain, raised beds or slightly mounded soil prevent standing water around the bulbs. Once the soil is properly conditioned and aerated, your alliums will have the ideal environment to root deeply and emerge with vigor when spring returns.
How to Plant Allium Bulbs Correctly
Planting allium bulbs the right way ensures healthy development and long-lasting blooms. The process begins by choosing firm, disease-free bulbs with no soft spots or mold. Select a sunny location where the soil drains freely and receives at least six hours of sunlight daily. When placing bulbs in the ground, the general rule is to plant them at a depth about three times their diameter. This depth provides protection from temperature fluctuations and helps support the tall stems that will emerge in spring. Proper spacing—usually six to eight inches apart—prevents overcrowding and allows each bulb to access sufficient nutrients and air circulation.
Position the bulbs with their pointed ends facing upward and roots downward. Cover them gently with soil, pressing lightly to remove air pockets. Once planted, water thoroughly to settle the soil and encourage root initiation. After the first watering, reduce moisture until signs of growth appear in spring, as excessive winter wetness can cause rot. Applying a thin layer of mulch helps regulate soil temperature and conserves moisture during dry periods. However, avoid heavy mulching that traps too much humidity, especially in mild winter regions. A well-drained environment with moderate protection supports strong early rooting.
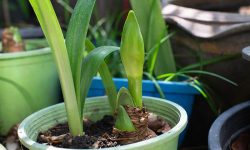
If you’re planting in containers, ensure each pot has drainage holes and a loose, airy mix of garden soil, coarse sand, and compost. Container-grown alliums may require slightly earlier planting to compensate for cooler soil temperatures. In both pots and garden beds, labeling the planted area prevents accidental disturbance during winter. Patience is essential, as bulbs remain dormant until conditions become favorable. By spring, you’ll see strong green shoots emerging, signaling the success of proper planting technique and careful preparation. Each bulb will then produce its iconic, globe-shaped flower, a reward for precise timing and attention to detail.
Post-Planting Care and Maintenance for Allium Bulbs
Caring for allium bulbs after planting is essential to help them establish strong roots and produce healthy, colorful blooms in spring. Once planted, water the soil lightly to keep it evenly moist but never soggy. Consistent moisture during the initial weeks encourages root growth, while overwatering can lead to rot, especially in compact or poorly drained soil. In cooler climates, rainfall often provides enough water, so additional watering should be minimal. Once established, alliums prefer drier conditions and rarely need watering during their dormancy. Monitoring moisture levels throughout winter ensures the bulbs remain healthy until growth resumes in spring.
Mulching the planted area with a thin layer of straw, shredded bark, or compost helps regulate temperature and retain moisture without suffocating the soil. In regions with harsh winters, mulch also protects bulbs from freezing and thawing cycles that can push them upward. As temperatures rise in spring, remove most of the mulch to allow sunlight and warmth to reach the soil. When shoots begin to emerge, apply a balanced, slow-release fertilizer to provide nutrients for strong stems and rich color development. Avoid high-nitrogen fertilizers, as they encourage leaf growth over flower formation.
Post-bloom care is equally important for ensuring future flowering. After the blossoms fade, allow the foliage to die back naturally. This process helps the bulb replenish stored energy for the next season. Cutting leaves too early weakens the plant and reduces bloom potential. During this stage, reduce watering gradually, letting the soil dry out as the bulbs enter dormancy. In container-grown plants, move pots to a sheltered location during heavy rain or frost. With consistent care and protection, allium bulbs will multiply over time, rewarding you with increasingly abundant and spectacular displays every spring.
Common Mistakes When Planting Allium Bulbs
Planting Too Early or Too Late
Planting allium bulbs too early in the season exposes them to warm soil, which encourages premature sprouting. These tender shoots cannot handle sudden frosts and will die back, wasting the bulb’s stored energy. Once damaged, the bulb often struggles to reestablish in spring, resulting in weak or no blooms. Planting too late, after the ground has frozen, prevents roots from forming before dormancy. Without this early root growth, the bulb lacks stability and nutrient access when temperatures rise. Timing the planting window based on soil temperature—around 45°F to 55°F—is the key to preventing these issues.
Gardeners sometimes rely solely on calendar dates, overlooking local weather variations. Soil in shaded or coastal areas cools slower than in exposed inland gardens, affecting planting schedules. Using a soil thermometer ensures accuracy. In milder climates, bulbs can go into the ground in late fall or early winter, while colder regions require earlier planting before frost sets in. A few days of planning and observation make a lasting difference. Proper timing aligns bulb physiology with the natural cooling cycle, producing sturdy stems, healthy leaves, and large, vivid flower heads when spring returns.
Overwatering or Poor Drainage
Allium bulbs naturally evolved in arid, well-drained environments, so excess water is their greatest enemy. Overwatering prevents oxygen from reaching the bulb, causing decay long before growth begins. Even moderate overwatering in cool autumn soil can foster fungal growth, resulting in soft, discolored bulbs that never sprout. For this reason, ensuring good drainage before planting is critical. Raised beds, sandy loam, or gravelly soil types replicate the dry, breathable conditions alliums prefer. Once planted, bulbs only need light watering to settle soil and initiate root growth.
During dormancy, the bulbs rely on stored moisture and should not be watered regularly. Overly damp winters, especially in clay-rich soil, suffocate roots and encourage mold. To prevent this, mix coarse sand or perlite into planting areas. Containers also need drainage holes and a light, airy soil blend. Avoid saucers that trap water beneath pots. Gardeners in rainy climates can apply gravel mulch around bulbs to deflect excess moisture. By maintaining a dry, oxygen-rich environment, bulbs stay firm through winter, emerging vigorous and disease-free when spring warmth arrives.
Planting at the Wrong Depth
Depth plays a decisive role in allium bulb health and stability. Planting too shallow leaves bulbs exposed to temperature swings, frost heave, and garden pests. It also leads to top-heavy blooms that topple easily in wind. On the other hand, burying bulbs too deeply restricts shoot emergence and delays growth, resulting in weak stems and smaller flowers. The ideal depth equals roughly three times the bulb’s height—usually between six and eight inches for most species. This depth allows insulation from cold while keeping the emerging stems within reach of sunlight as spring arrives.
Soil type influences how deep to plant. In sandy soils that drain quickly, planting slightly deeper retains more moisture and protects from drought. In heavy clay or compacted soil, planting shallower improves airflow and drainage. Level the soil gently without pressing too hard, as compaction limits root expansion. A consistent planting depth across the bed ensures synchronized sprouting and balanced flower height. Measuring accurately with a hand trowel or depth gauge produces uniform growth and stronger visual appeal. When properly buried, bulbs remain anchored, stable, and capable of producing tall, symmetrical blooms.
Neglecting Post-Bloom Care
Allium bulbs continue their life cycle long after the flowers fade, and neglecting this period can reduce next year’s blooms. After flowering, the green leaves photosynthesize, storing energy back into the bulb. Cutting them too early deprives the plant of vital nutrients. Always wait until the foliage turns completely yellow before removal. This natural dieback indicates the bulb has reabsorbed what it needs to regenerate. Removing the stalks prematurely weakens the bulb, resulting in fewer or smaller blooms in the following season. Patience during this stage ensures long-term vitality and consistent flowering performance.
Another overlooked aspect of post-bloom care is nutrient replenishment. A light feeding with a low-nitrogen fertilizer supports bulb recovery without encouraging excess leaf growth. Gradually reduce watering as the foliage fades, allowing the soil to dry and the bulb to enter dormancy. If the bulbs are in containers, move them to a dry, sheltered location for the rest of the season. Regular inspection for pests or rot keeps them healthy. By respecting the plant’s natural rhythm, gardeners encourage stronger bulbs that multiply over time, delivering even grander floral displays each spring.
Seasonal Tips for Growing Healthy Alliums
Spring Care
Spring marks the beginning of active growth for allium bulbs, making it a crucial time for proper care. As shoots emerge, remove any remaining mulch to allow sunlight to reach the soil and warm it naturally. Ensure the area remains free of weeds that compete for nutrients and moisture. Moderate watering supports healthy foliage development, but be cautious not to overwater—soggy conditions can cause rot even during growth. Applying a balanced, slow-release fertilizer in early spring provides essential nutrients for developing stems and flower buds. The goal during this period is to encourage steady, upright growth leading to vibrant blooms.
Once flower buds appear, consistent light exposure helps the plant maintain its strength and color. Keep surrounding soil slightly moist but well-aerated to promote continuous nutrient absorption. In windy areas, taller varieties may need light staking to prevent bending. After flowering, deadhead faded blooms to direct the plant’s energy back into the bulb instead of seed production. Allow leaves to remain until they naturally yellow and wilt. By maintaining balanced watering, sunlight, and nutrition during spring, your alliums will reach their full bloom potential with strong stems and radiant flower globes.
Summer Maintenance
Summer is the season when allium bulbs complete their blooming cycle and begin storing energy for the next year. Once the flowers fade, it’s vital to let the foliage die back naturally. The green leaves continue photosynthesis, replenishing nutrients within the bulb. Avoid removing them prematurely, as doing so interrupts this process. Water sparingly during this stage, allowing the soil to dry slightly between watering. Overly wet conditions during warm months can weaken or rot bulbs that are transitioning to dormancy. Good airflow around the plants helps prevent mildew and fungal problems in humid climates.
If your garden receives intense summer heat, adding a thin layer of mulch protects the bulbs from excessive soil temperature fluctuations. After the leaves fully dry, they can be trimmed at the base. At this point, bulbs may be lifted and divided if they have become crowded. Store lifted bulbs in a cool, dry, and ventilated space until autumn replanting. For those remaining in the ground, check soil drainage and avoid watering during dormancy. With mindful summer maintenance, bulbs rest undisturbed, retaining strength for another cycle of lush growth and bloom.
Autumn Preparation
Autumn is the most strategic season for planting and repositioning allium bulbs. As temperatures cool, soil conditions become perfect for root formation. Before planting, clear debris and loosen soil to improve aeration and drainage. Adding compost or organic matter replenishes nutrients lost during the previous growing season. Plant bulbs at the proper depth—about three times their height—and water lightly to settle the soil. Avoid heavy watering, as cool weather slows evaporation. Mulching after planting stabilizes soil temperature and protects bulbs from sudden frosts.
For existing allium beds, autumn is also the time to inspect bulbs for signs of disease or overcrowding. Dividing clumps every few years rejuvenates growth and prevents competition for nutrients. Early autumn rain often provides enough moisture, reducing the need for additional watering. Monitor for pests like bulb mites or rodents that might disturb newly planted bulbs. As the season progresses, reduce watering further, allowing bulbs to prepare for winter dormancy. Proper autumn preparation builds resilience and ensures strong root systems, leading to more abundant and uniform flowering when spring returns.
Winter Protection
Winter care focuses on protecting dormant allium bulbs from extreme cold, frost heave, and excessive moisture. In regions with mild winters, bulbs can remain undisturbed underground. However, in colder climates, apply a light mulch layer after the ground cools to prevent temperature fluctuations that cause bulbs to shift upward. Use organic materials like straw, pine needles, or shredded leaves for insulation. This protective layer also helps retain soil moisture at a stable level. Avoid thick mulch that traps excess humidity, as it can promote rot during wet winters.
If bulbs are grown in containers, move them to sheltered spots such as an unheated garage or covered porch to prevent freezing. Check periodically to ensure the soil remains slightly damp but not waterlogged. In areas with heavy snowfall, snow cover often provides natural insulation. As winter ends, gradually remove mulch to let sunlight warm the soil. This transition prepares bulbs for active growth once temperatures rise. With careful winter protection, bulbs survive harsh conditions, emerging strong and healthy for another spectacular spring display.
FAQs About Planting and Growing Alliums
When is the best time to plant allium bulbs?
The best time to plant allium bulbs is in autumn when soil temperatures reach around 50°F. This allows strong root growth before winter dormancy. Planting too early encourages premature sprouting, while planting too late prevents proper root establishment, leading to weaker stems and smaller spring blooms.
How deep should I plant allium bulbs?
Allium bulbs should be planted at a depth three times their height—usually between six and eight inches. This depth insulates bulbs from frost and prevents toppling. Shallow planting exposes bulbs to cold damage, while planting too deep delays emergence and reduces flower size and strength.
Do alliums need full sunlight?
Yes, alliums thrive in full sunlight, needing at least six hours daily. Bright light ensures sturdy stems, compact growth, and vivid flower color. While some species tolerate partial shade, prolonged low-light conditions result in weaker stems, pale blooms, and shorter flowering periods throughout the season.
Can I grow alliums in containers?
Alliums grow well in containers if provided excellent drainage and a sunny location. Use sandy, well-draining soil and plant bulbs slightly earlier since pots cool quickly. Water sparingly, avoid soggy soil, and protect containers from frost. Allow foliage to die back naturally after blooming.
What to do after alliums bloom?
After blooming, cut off faded flower heads but keep green leaves until they yellow naturally. This helps bulbs recharge for the next season. Gradually reduce watering during dormancy. In midsummer, remove dead foliage, divide crowded bulbs if needed, and store them in cool, dry conditions.
Conclusion
Planting allium bulbs at the right time and giving them proper care ensures spectacular spring displays that return year after year. Success depends on cool soil, good drainage, and balanced light exposure. Each step—from preparation to post-bloom care—supports strong roots and vibrant blooms. By planting in autumn, maintaining healthy soil conditions, and protecting bulbs through seasonal changes, gardeners create the perfect environment for growth. With patience and consistency, alliums reward you with tall, graceful stems topped by dazzling globes of color—symbols of resilience and timeless beauty in every garden landscape.