Gladiolus, often called the “sword lily,” is celebrated for its tall, elegant spikes and vibrant, eye-catching blooms. Perfect for garden beds or cut flower arrangements, these striking flowers can transform any outdoor space into a colorful showcase. Timing and proper care are essential to ensure healthy growth, strong stems, and a full season of spectacular flowers.
In this guide, you’ll discover expert tips on when to plant gladiolus bulbs, how to prepare soil, provide optimal sunlight and watering, and manage pests. Following these practical strategies guarantees a flourishing garden with continuous blooms, creating a stunning display that will impress both visitors and garden enthusiasts alike.
Understanding Gladiolus Growth Cycle
Gladiolus Life Stages
Gladiolus develops in three main stages: sprouting, leaf and stem growth, and flowering. During the sprouting stage, bulbs need moderate moisture and indirect sunlight. Strong roots form at this time, ensuring stability and future flower production.
After sprouting, leaves and stems grow rapidly. Healthy leaves are crucial for photosynthesis, which generates energy for flowering. Damaged or diseased leaves reduce bloom size and weaken the plant. Regular maintenance and monitoring are essential to maintain foliage health.
The flowering stage lasts two to three weeks, with blooms opening sequentially along the spike. Understanding this growth cycle allows gardeners to plant bulbs at the optimal time. This knowledge ensures maximum bloom production and a consistent floral display throughout the growing season. Proper care during each stage guarantees healthy, vibrant flowers that enhance your garden’s visual appeal.
Factors Affecting Growth
Several environmental factors affect gladiolus growth, including temperature, sunlight, and soil moisture. Bulbs need soil temperatures between 60–70°F for successful sprouting. Planting too early in cold soil can damage the corms.
Adequate sunlight strengthens leaves and fuels flower development. Excessive direct sunlight can scorch foliage, while insufficient light produces weak stems. Consistent soil moisture is also critical; overly dry or wet soil affects bulb health and bloom size.
Choosing the right variety is equally important. Early varieties bloom in late spring, while mid or late-season types need warmer soil. By combining the correct temperature, light, and water conditions, gardeners ensure healthy plants and abundant blooms. Understanding these factors supports strong growth and a spectacular floral display for weeks.
Choosing the Right Gladiolus Varieties
Early, Mid, and Late Bloomers
Gladiolus varieties bloom at different times. Early varieties flower in late spring, mid-season types bloom in early to mid-summer, and late varieties produce flowers in late summer or early fall. Selecting a mix of varieties ensures continuous color throughout the season.
Consider the climate and growing conditions when choosing varieties. Early bloomers are ideal for cooler regions, while late varieties thrive in warmer areas. Mixing varieties also creates a visually dynamic garden with staggered flowering and diverse colors.
By planning for variety and bloom time, gardeners can enjoy a vibrant display for months. A thoughtful selection of gladiolus types maximizes garden aesthetics and provides extended enjoyment of flowers for cutting or display.
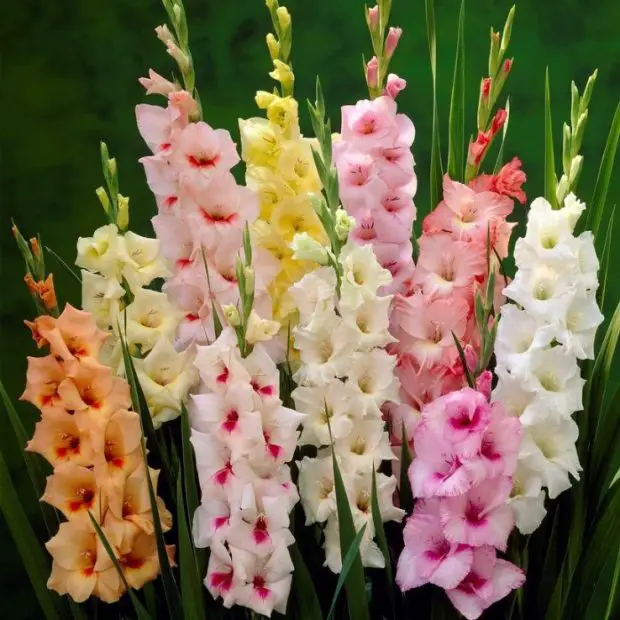
Color and Flower Type
Gladiolus flowers come in a wide range of colors, from pastels to bold shades. Choosing complementary colors enhances garden design, while contrasting colors make individual spikes stand out.
Flower shape and size also vary among varieties. Some have ruffled petals or large spikes, while others are more compact. Selecting types according to your garden’s style and space ensures harmony and a visually striking arrangement.
Careful selection of both color and bloom type contributes to an impressive gladiolus display, keeping your garden attractive for weeks while offering plenty of options for bouquets and arrangements.
Best Time to Plant Gladiolus Bulbs
Spring Planting
Spring is the most popular time to plant gladiolus bulbs. Soil temperatures between 60–65°F promote sprouting and rapid growth. Early spring planting allows blooms to appear in summer, making it ideal for decorative garden displays.
Proper soil preparation is crucial. Mix compost or well-rotted fertilizer into the soil to enhance nutrients. Space bulbs 6–8 inches apart to prevent overcrowding, which can weaken stems and limit bloom potential. Prepared soil and spacing provide the foundation for healthy growth and vibrant flowers.
Spring planting also benefits from moderate rainfall, which helps maintain soil moisture. For containers, ensure proper drainage to prevent rot. Checking for late cold snaps is important, as frost can damage young sprouts. When timed correctly, spring planting produces strong, healthy plants and a colorful garden display.
Summer Planting for Extended Blooms
Planting in early summer extends the flowering season. Summer planting allows blooms to continue into late summer or early fall. Sequential flowering creates a longer visual display and maintains the garden’s appeal.
Summer planting requires careful water management. Soil should remain moist but not waterlogged. Partial shade or sun protection during the hottest hours prevents leaf scorch. Adequate watering and protection support strong, healthy bulbs throughout the season.
Choose mid-season or late-blooming varieties for summer planting. Fertilizing with potassium-rich feed encourages robust flower development. Combining proper timing with attentive care ensures extended flowering, producing a vibrant, colorful garden for weeks.
Preparing the Soil for Gladiolus
Soil Requirements
Gladiolus prefers well-draining, nutrient-rich soil. Sandy loam or light clay is ideal, with a pH of 6.0–7.0. Heavy or waterlogged soil increases the risk of bulb rot and weak plant growth.
Before planting, loosen the soil and remove rocks, weeds, or debris. Mixing in compost enhances fertility and soil structure, promoting healthy root development. Well-prepared soil encourages bulbs to sprout quickly and grow strong stems.
Healthy soil supports robust leaves and tall flower spikes. Poor soil results in weak stems and smaller blooms. Investing time in soil preparation guarantees better plant health and a longer, more vibrant flowering period, ensuring a visually appealing gladiolus display throughout the season.
Fertilizing Tips
Fertilizing before planting provides essential nutrients for early growth. Use balanced NPK or organic fertilizer to support bulb development. Avoid overusing chemical fertilizers, which can damage bulbs and slow growth.
After planting, apply liquid fertilizer every two weeks. Nitrogen promotes healthy leaves, while potassium improves flower size, color, and longevity. Always apply fertilizer around the bulbs, not directly on top, to prevent burning.
Consistent fertilization combined with proper soil preparation ensures tall stems, lush foliage, and vibrant blooms. This approach maximizes the flowering potential of gladiolus bulbs and contributes to a healthy, flourishing garden throughout the growing season.
Planting Techniques for Healthy Growth
Depth and Spacing
Plant gladiolus bulbs at a depth of 3–4 inches for optimal growth. Bulbs planted too shallow are prone to drying out, which can stunt sprouting or even kill the corm. Conversely, planting too deep delays sprouting and forces the plant to expend more energy reaching the surface, weakening stems and reducing flower size. The right planting depth ensures a strong foundation for tall, vibrant spikes.
Spacing is equally important. Place bulbs 6–8 inches apart to allow sufficient air circulation and light exposure. Proper spacing reduces competition for nutrients and prevents fungal diseases caused by overcrowded conditions. Straight rows are ideal for organization and make garden maintenance, watering, and fertilizing much easier.
Marking rows during planting also helps with future tasks such as staking and pest control. Adequate spacing encourages each plant to reach its full potential, producing strong stems and abundant blooms. Well-planned depth and spacing are the foundation for a flourishing gladiolus garden that displays consistently vibrant and healthy flowers.
Planting Steps
Begin by digging holes or shallow trenches according to the size of each bulb. Place bulbs with the sprout facing upward to ensure proper growth direction. Cover bulbs lightly with soil and gently press down to settle the soil around them. This prevents air pockets that can dry out the roots.
For multiple rows, leave 12–16 inches between rows. This spacing allows easy access for watering, weeding, and staking as the plants grow. Applying an organic mulch such as straw or bark helps retain moisture, suppress weeds, and maintain a stable soil temperature. Mulch gradually decomposes, adding nutrients and improving soil structure over time.
Before planting, inspect each bulb carefully and remove any that are soft, shriveled, or diseased. Healthy bulbs grow into stronger plants, producing taller stems and more flowers. Following these planting steps ensures a well-organized, productive gladiolus garden that thrives throughout the growing season, with consistent blooms and minimal plant stress.
Watering and Sunlight Requirements
Optimal Watering
Gladiolus bulbs require consistent moisture from the time they sprout until flowering. Soil should remain evenly moist but never soggy, as waterlogged soil can cause corm rot and fungal diseases. Too little water slows growth, reduces flower size, and can stunt the plant completely.
Water in the early morning to allow leaves and soil to dry during the day, reducing the risk of fungal infection. During hot or dry periods, increase watering frequency to ensure strong stems and large blooms. Containers and raised beds may require more frequent watering than in-ground plantings.
Pay attention to rainfall and adjust irrigation accordingly. Proper watering not only supports healthy growth but also prolongs bloom life. Maintaining consistent soil moisture is key for robust gladiolus, helping them produce tall spikes and vivid flowers throughout the season.
Sunlight Exposure
Gladiolus thrives with at least six hours of direct sunlight each day. Adequate sunlight promotes strong leaf growth, essential for photosynthesis, which fuels flower production. Insufficient light results in weak, spindly stems and smaller flowers.
Protect plants from intense midday sun, which can scorch leaves and dry soil quickly. Morning sunlight combined with afternoon shade is ideal, especially for container plantings. Partial shading helps maintain leaf health and prevents heat stress during peak summer.
Strategically positioning gladiolus in the garden ensures consistent light exposure. Combined with proper watering, sufficient sunlight encourages vigorous growth, tall stems, and vibrant blooms, making your gladiolus display more dramatic and long-lasting.
Caring for Gladiolus After Planting
Fertilizing and Mulching
After planting, fertilizing is crucial to promote strong growth. Use a balanced liquid fertilizer every two weeks. Nitrogen encourages leafy growth, while potassium strengthens stems and enhances flower development. Avoid over-fertilizing, as excessive nutrients can burn bulbs.
Mulching around plants offers multiple benefits. Organic mulch, like straw or bark, helps retain soil moisture, suppress weeds, and moderate soil temperatures. As it decomposes, mulch gradually adds nutrients, improving soil structure and supporting healthy root systems.
Regular feeding and mulching together maintain plant vigor, produce tall stems, and encourage large, colorful blooms. These practices are essential for sustaining a thriving gladiolus garden that continues to bloom beautifully throughout the season.
Staking and Support
Gladiolus stems are tall and delicate, often unable to support heavy flower spikes on their own. Use stakes, trellises, or bamboo supports to keep stems upright and prevent breakage. Tie stems loosely to avoid damaging the plant.
Begin staking when stems reach about 12 inches tall. Tie at intervals along the stem for extra stability, particularly in windy areas. For larger plantings, mesh or trellis systems can provide uniform support across multiple rows.
Proper staking maintains a neat appearance, protects blooms from wind or rain damage, and ensures flowers remain upright for cutting or display. Supported plants produce more robust flowers and contribute to an organized, visually appealing garden.
Dealing with Pests and Diseases
Common Pests
Gladiolus is susceptible to aphids, thrips, and spider mites, which feed on sap and weaken plants. Infested plants may show yellowing leaves, distorted growth, and reduced flower size. Regular inspection is essential to catch problems early.
Organic control methods like insecticidal soap or neem oil are effective against these pests without harming blooms. Hand-picking larger insects can also reduce damage. Avoid harsh chemical pesticides that could harm beneficial insects or compromise flower quality.
Maintaining strong plant health helps resist pests naturally. Adequate watering, fertilization, and sunlight boost plant vigor, reducing susceptibility to infestations. Clean garden practices, such as removing debris and weeds, further minimize pest habitats.
Common Diseases
Fungal and bacterial infections can affect gladiolus leaves, stems, and corms. Common problems include corm rot, leaf spot, and powdery mildew. Proper drainage and air circulation reduce the risk of infection.
Remove infected bulbs and foliage promptly. Treat mild fungal infections with organic fungicides when necessary. Avoid overhead watering in the evening, which increases leaf moisture and encourages fungal growth.
Spacing bulbs correctly and maintaining healthy soil help prevent disease. Vigilant monitoring and preventive care ensure that gladiolus plants remain strong, producing vibrant flowers throughout the growing season.
Harvesting and Storing Gladiolus Bulbs
Cutting Flowers
Gladiolus blooms should be harvested when the first flowers on a spike open. Cutting at the bud stage prolongs vase life. Use a sharp knife or scissors for a clean cut to prevent stem damage.
Place cut flowers immediately in clean water, changing it daily to maintain freshness. Sequential flowering allows multiple harvests from the same spike, ensuring continuous enjoyment of blooms.
Morning is the ideal time to cut gladiolus, when plants are cool and turgid. Avoid harvesting in the heat of midday, which can cause wilting. Proper harvesting practices maximize the beauty and longevity of gladiolus flowers both in the garden and indoors.
Storing Bulbs
After flowering, wait until foliage turns yellow before digging up bulbs. Remove excess soil and dry them in a cool, ventilated, shaded area. This step prevents rot and prepares bulbs for storage.
Trim leaves to about one inch and store bulbs in a dry, well-ventilated container. Sorting bulbs by size simplifies future planting schedules. Avoid damp or overheated storage areas, which increase the risk of fungal infection or bulb decay.
Well-stored gladiolus bulbs will sprout vigorously in the next season. Proper storage ensures strong growth, abundant flowering, and a long-lasting, healthy garden year after year.
Companion Planting for Gladiolus
Enhancing Garden Aesthetics
Companion planting helps gladiolus thrive and improves overall garden beauty. Low-growing plants, like marigolds or petunias, fill gaps at the base of gladiolus spikes, creating a layered visual effect.
Tall companions, such as hollyhocks or delphiniums, add texture and complement gladiolus height. Pairing plants with different bloom times maintains continuous interest in the garden throughout the season.
Strategic placement also creates focal points, making gladiolus the centerpiece while enhancing surrounding plants. Companion planting turns a simple flower bed into a full, colorful display.
Pest and Soil Benefits
Some companion plants naturally deter pests that target gladiolus. Marigolds, for instance, repel nematodes and certain insects that can damage corms. Herbs like basil, thyme, and oregano help reduce aphid infestations, keeping plants healthier and reducing the need for chemical treatments. Planting these companions nearby creates a protective barrier around your gladiolus, minimizing pest pressure throughout the season.
Companion plants also contribute to improved soil quality. Deep-rooted plants bring up nutrients from lower soil layers, making them available to neighboring gladiolus. Nitrogen-fixing plants, such as clover or beans, enrich the soil with essential nutrients, promoting stronger root development and healthier growth.
By carefully selecting companions, gardeners achieve dual benefits: natural pest control and enhanced soil fertility. This thoughtful planting strategy supports stronger gladiolus plants with taller stems and more vibrant flowers. The combination of aesthetics, soil improvement, and pest prevention leads to a more productive and visually stunning garden that thrives season after season.
Overwintering Gladiolus in Cold Climates
Lifting and Storing Corms
In regions with freezing winters, gladiolus corms must be lifted after the foliage dies back. Carefully dig up bulbs, shake off excess soil, and inspect for damage or rot. Damaged corms should be discarded.
Dry the bulbs in a shaded, ventilated area for several days. This hardens the corms and prepares them for storage. Proper drying reduces the risk of fungal or bacterial infection during the winter months.
Store corms in a cool, dry, and dark location. Containers filled with peat moss, sand, or sawdust help maintain dryness and prevent shriveling. Well-stored corms will remain viable and ready to plant next season.
Preparing for Replanting
Before replanting gladiolus in spring, carefully inspect all stored corms. Check for signs of softness, mold, or shriveling. Any damaged or diseased corms should be discarded to prevent infecting healthy ones. Firm, healthy corms are more likely to sprout vigorously, producing tall stems and robust flowers that will enhance your garden display.
Sorting corms by size is a useful strategy. Plant the largest corms first, as they tend to bloom earlier and produce taller, more impressive spikes. Medium and smaller corms can be planted later or interspersed among the larger ones to create a staggered blooming schedule. This approach ensures continuous color in the garden and maximizes the overall impact of your gladiolus display.
In addition to inspection and sorting, consider soaking corms in water for a few hours before planting. This helps rehydrate them after winter storage and encourages quicker sprouting. Following these preparation steps ensures a successful start to the growing season, even in regions with harsh winters, allowing gardeners to enjoy strong growth, abundant blooms, and a spectacular gladiolus garden year after year.
Frequently Asked Questions (FAQ) About When to Plant Gladiolus Bulbs
When is the best time to plant gladiolus bulbs?
The optimal planting time depends on your climate. In most regions, spring is ideal when soil temperatures reach 60–65°F. Early planting ensures summer blooms. In warmer climates, mid-season planting can extend flowering into late summer or early fall. For staggered blooms, plant bulbs every two weeks from early spring to early summer.
How deep should gladiolus bulbs be planted?
Plant bulbs 3–4 inches deep. Shallow planting risks drying out the bulbs, while planting too deep delays sprouting and weakens stems. Maintain 6–8 inches spacing between bulbs for air circulation and healthy growth. Proper depth and spacing promote strong stems, large blooms, and reduce disease risk.
How do I care for gladiolus after planting?
Gladiolus requires consistent watering and at least six hours of sunlight per day. Fertilize every two weeks with a balanced feed to support leafy growth and flowering. Mulch around bulbs to retain moisture, suppress weeds, and moderate soil temperature. Stake tall stems to prevent bending or breaking.
What pests and diseases affect gladiolus, and how can I prevent them?
Common pests include aphids, thrips, and spider mites. Fungal issues like corm rot or leaf spot may occur in poorly drained soil. Prevent problems by spacing bulbs properly, maintaining consistent watering, and using organic pest controls such as neem oil. Removing diseased leaves promptly also reduces infection risk.
How should I store gladiolus bulbs for the next season?
In cold climates, lift corms after foliage dies. Dry them in a ventilated, shaded area, then trim leaves to one inch. Store bulbs in a cool, dry, well-ventilated container with peat moss, sand, or sawdust. Inspect before replanting, discarding soft or moldy bulbs to ensure strong growth and abundant flowers next season.
Conclusion
Timing, care, and attention to detail are the keys to a thriving gladiolus garden. By planting bulbs at the correct depth, providing consistent watering, ample sunlight, and proper fertilization, gardeners can enjoy tall stems and vibrant blooms. Supporting plants, preventing pests, and storing bulbs carefully ensures long-term success year after year. With these expert tips, your garden will burst with color, transforming outdoor spaces into a stunning floral display. Celebrate the beauty and elegance of gladiolus with each flourishing spike.