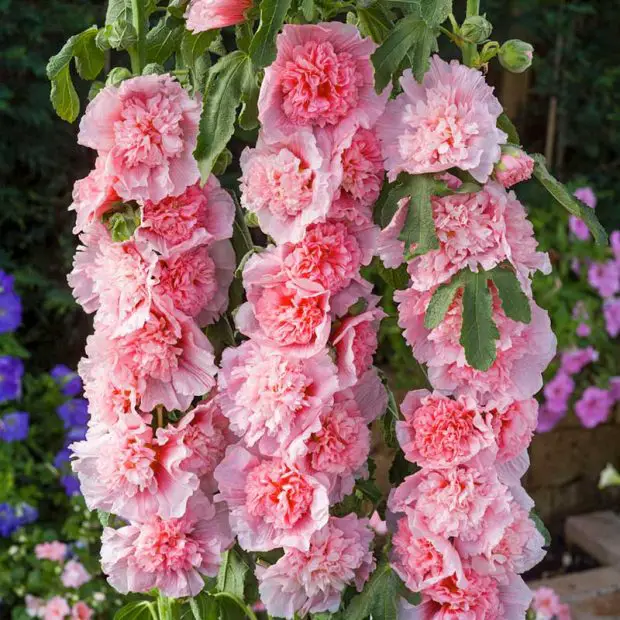
Hollyhocks are the timeless charmers of cottage gardens, standing tall with colorful blooms that bring height, drama, and old-world beauty to any outdoor space. If you’ve ever dreamed of a garden filled with towering spires of pinks, purples, and buttery yellows swaying in the breeze, timing your planting is the key to turning that vision into reality.
Knowing exactly when to plant hollyhock seeds can make the difference between a thriving floral display and stunted growth. In this guide, you’ll discover how seasonal timing, climate conditions, and planting methods work together to ensure your hollyhocks burst into vibrant spring color and stay healthy all season long.
Understanding the Hollyhock Growth Cycle

To plant hollyhock seeds at the right time, it’s essential to understand their natural growth cycle. Hollyhocks are typically biennial, which means they complete their life cycle over two growing seasons. In the first year, the plant focuses on building a strong root system and producing a low-growing rosette of leaves. During this stage, there are no flowers, but energy is stored below ground to support next year’s blooms.
In the second year, hollyhocks send up tall flower stalks that can reach up to eight feet high, covered in large, showy blossoms. After blooming and setting seed, the plant usually completes its life cycle. However, some hollyhocks behave like short-lived perennials, especially in warmer climates or when grown in ideal conditions. Understanding this timeline helps gardeners decide whether to start seeds indoors, sow them outdoors in spring or fall, or plan ahead for future flowering seasons.
Ideal Climate and Zones for Hollyhocks
Hollyhocks thrive in USDA hardiness zones 3 through 9, adapting well to a wide range of climates but preferring full sun and well-drained soil. In zones 3 to 5, which experience cold winters, it’s best to start seeds in late spring after the last frost or sow in summer for blooms the following year. These colder climates often require hollyhocks to grow as true biennials.
In zones 6 to 7, with milder winters and longer growing seasons, gardeners can sow seeds in spring or fall. Fall planting gives the roots time to establish before winter, often resulting in stronger, earlier blooms the next season.
For zones 8 to 9, where winters are mild and frost is rare, hollyhocks can act more like short-lived perennials. Seeds sown in fall may bloom in spring, and some plants may survive multiple years if protected from humidity-related diseases. These warmer zones allow for more flexibility in planting time and a longer blooming window.
When to Plant Hollyhock Seeds in Spring
Spring is one of the most favorable times to sow hollyhock seeds, especially for gardeners aiming to establish strong first-year growth that leads to vibrant blooms the following season. In most regions, seeds should be planted outdoors once the danger of the last frost has passed and soil temperatures consistently remain above 50°F (10°C). This timing typically falls between mid-April and late May, depending on your USDA zone.
Sowing in early spring allows hollyhocks to take full advantage of the growing season, building robust roots and healthy leaf rosettes. This strong vegetative growth is crucial for the plant’s overwintering success and sets the stage for dramatic flower spikes in the second year. For those in warmer climates (zones 7–9), an earlier start—sometimes as soon as late March—is possible, particularly if using row covers or cold frames to protect seedlings.
Gardeners starting hollyhock seeds indoors should do so about 6 to 8 weeks before the last expected frost. Transplanting hardened-off seedlings into the garden in spring ensures a head start on development, which is especially useful in shorter growing seasons.
Advantages of Spring Sowing for Spring Flowers
Sowing hollyhock seeds in spring offers several important advantages for gardeners aiming to establish vibrant, healthy plants that produce stunning blooms. One of the primary benefits is giving seedlings ample time to develop a strong root system during the full length of the growing season. This early development is especially critical for hollyhocks, which are biennials or short-lived perennials and rely on their first year to build the energy reserves needed for flowering in the second year.
Spring sowing also allows for better control over soil conditions and weed competition. As the garden awakens, the soil is easier to work with, and gardeners can prepare planting beds with ideal moisture and fertility levels. The warmer temperatures and longer daylight hours promote faster germination and consistent growth, resulting in sturdier, more resilient plants.
Additionally, spring-sown hollyhocks are more adaptable to transplanting. Whether direct-sown or started indoors and moved outside, these young plants tend to adjust more easily to their environment, reducing transplant shock and encouraging vigorous establishment. Early sowing also gives gardeners the flexibility to thin and space seedlings properly, minimizing overcrowding and promoting air circulation—an essential factor for disease prevention in tall, leafy hollyhocks.
For those in colder zones, spring sowing ensures the plant has adequate time to mature before the first frost returns. With proper care, these early starts often lead to healthier overwintering and a dramatic floral show when the next spring arrives.
Fall Planting for Early Spring Growth
Fall planting of hollyhock seeds is a strategic approach for gardeners aiming to get a head start on vibrant spring blooms. By sowing the seeds in late fall, typically a few weeks before the first hard frost, you allow them to undergo a natural cold stratification process over the winter months. This exposure to cold temperatures breaks seed dormancy and enhances germination rates once the soil begins to warm in early spring.
As the seeds settle in over winter, they remain dormant but are well-positioned to sprout as soon as conditions become favorable. This often leads to quicker emergence and earlier development compared to spring-sown seeds. Fall-sown hollyhocks can also establish stronger root systems, making them more resilient to early-season fluctuations in temperature and moisture.
To maximize success, plant in a sunny, well-draining spot and cover seeds lightly with soil. This method not only promotes healthier growth but also increases the chances of enjoying earlier and more robust blooms.
Indoor vs Outdoor Sowing Considerations
Sowing hollyhock seeds indoors allows for better control over temperature, moisture, and lighting, which can result in stronger, earlier seedlings. This method is ideal for colder climates or gardeners looking to extend the growing season. Transplanting after the last frost ensures healthy, well-established plants ready to thrive outdoors.
Outdoor sowing, on the other hand, is simpler and less labor-intensive. It suits regions with mild winters and consistent spring weather. Seeds sown directly in the ground experience natural stratification and often produce plants that are better adapted to local conditions. The choice between indoor and outdoor sowing depends on your climate, available space, and gardening goals.
Preparing the Soil for Seed Success
To give hollyhock seeds the best start, soil preparation is key. Begin by selecting a planting area that receives full sun for at least six hours daily and has good air circulation. Hollyhocks grow best in fertile, well-draining soil that allows roots to expand freely and prevents standing water, which can cause rot.
Loosen the top 6 to 8 inches of soil using a garden fork or tiller, then mix in generous amounts of compost or well-aged manure. This not only improves soil structure and drainage but also provides the nutrients young seedlings need. Testing the soil pH is also helpful—hollyhocks prefer a pH between 6.0 and 7.0, which supports healthy nutrient absorption.
Before sowing seeds, remove rocks and debris, then rake the surface smooth to ensure even seed contact. Lightly water the soil to create a moist, not soggy, environment. A well-prepared seedbed sets the stage for strong germination and healthy early growth.
Light and Temperature Requirements
Hollyhocks thrive best in full sun, needing at least six hours of direct sunlight each day to produce tall, healthy stalks and abundant blooms. Without enough light, plants may become leggy and flower poorly.
Temperature also plays a key role in successful growth. Hollyhock seeds germinate best when soil temperatures range from 60°F to 70°F (15°C to 21°C). Young seedlings prefer mild spring temperatures, while mature plants can tolerate summer heat as long as the roots stay moist.
In colder regions, early planting should wait until frost danger has passed. In warmer zones, seeds can be sown in fall for early spring blooms. Always avoid planting during temperature extremes, as both hot and cold stress can hinder germination and development.
Watering Techniques for Healthy Growth
Consistent moisture is essential for hollyhock growth, especially during germination and early seedling stages. Keep the soil evenly moist but never soggy, as waterlogged conditions can lead to root rot and fungal issues. Use a gentle spray or fine mist to avoid disturbing newly sown seeds or delicate sprouts.
As plants mature, deep watering encourages strong root systems. Water thoroughly at the base of the plants rather than overhead to prevent leaf diseases like rust. In hot or dry conditions, increase watering frequency, especially for hollyhocks grown in sandy or fast-draining soils. However, always allow the soil surface to dry slightly between waterings to maintain healthy oxygen levels in the root zone.
Early morning watering is ideal, giving foliage time to dry before nightfall and reducing the risk of mildew and other fungal infections. Adjust your watering schedule based on weather, soil type, and plant stage for optimal results.
Managing Common Germination Problems
Hollyhock seed germination, while generally reliable, can encounter several setbacks if environmental conditions or care techniques are not optimal. Identifying and addressing common problems early ensures stronger seedlings and better overall plant health.
Poor Germination Rates
One of the most frequent issues is low or uneven germination. This can be caused by old or improperly stored seeds. Hollyhock seeds typically remain viable for up to two years if stored in a cool, dry, and dark place. To avoid disappointment, always check the seed packet’s expiration date and consider performing a germination test before sowing.
Inconsistent soil moisture is another key factor. Seeds need consistent dampness—not too dry, not waterlogged. Dry conditions may halt germination, while excessive moisture can lead to rotting. Use a humidity dome or light mulching to retain moisture and check the soil daily for balance.
Damping-Off Disease
Damping-off is a common fungal issue that affects hollyhock seedlings during the early stages. Symptoms include sudden collapse, stem thinning at the soil line, or seedlings failing to emerge at all. This disease thrives in poorly ventilated, overly moist environments and contaminated soils.
To prevent damping-off, use sterile seed-starting mix and clean containers. Water seedlings from the base rather than overhead and provide good air circulation around trays. Avoid overcrowding, which can promote humidity buildup and fungal spread. If damping-off occurs, immediately remove affected seedlings and allow the soil to dry slightly before resuming watering.
Mold Growth on Soil Surface
White or gray mold appearing on the surface of seed trays is usually due to high humidity and poor air flow. While this mold doesn’t always damage seedlings directly, it signals overly moist conditions that can encourage more harmful pathogens.
Improve air circulation with a small fan, remove any covering once seedlings emerge, and water less frequently but more deeply. Cinnamon or chamomile tea can also be lightly sprinkled on the soil as natural antifungal remedies.
Delayed Germination
Hollyhock seeds may take anywhere from 10 to 21 days to germinate, depending on temperature and moisture. If germination seems slow, ensure that soil temperatures are within the optimal 60°F to 70°F range. Cooler conditions slow metabolic processes, while warmer conditions can sometimes break dormancy more quickly but also risk drying out the soil too fast.
If conditions are right but seeds still haven’t sprouted after three weeks, consider gently digging to inspect one or two seeds. If they’ve softened or rotted, moisture was likely too high. If they remain hard, soaking seeds for 12–24 hours before sowing can improve water uptake and speed germination.
Caring for Hollyhocks After Planting
Once hollyhock seeds have germinated and the young seedlings are established, consistent and attentive care is key to promoting vigorous growth and strong flower development. Start by thinning the seedlings if they are crowded, leaving enough space between each plant to allow for airflow and reduce the risk of fungal diseases.
Regular watering is crucial during the early stages of growth, especially in dry periods. Keep the soil evenly moist but not waterlogged. As the plants mature, they become more drought-tolerant, but deep watering during dry spells will support taller growth and better blooming.
Support is often necessary as hollyhocks can reach impressive heights. Stake tall varieties early to prevent bending or breakage from wind or rain. Mulching around the base of the plants helps retain moisture, regulate soil temperature, and suppress weeds.
Fertilize with a balanced, slow-release formula once the plants are growing steadily. Avoid overfeeding with high-nitrogen fertilizers, as this can encourage excessive foliage at the expense of flowers. Deadheading spent blooms can encourage longer flowering, while removing diseased or yellowing leaves helps maintain overall plant health.
By combining thoughtful maintenance with observation, your hollyhocks can thrive and deliver a vertical show of color year after year.
Promoting First-Year Blooms
While hollyhocks are typically biennial, some varieties can bloom in their first year with the right care. To encourage early flowering, start seeds indoors 10 to 12 weeks before the last frost date and provide plenty of bright light. Transplant seedlings into rich, well-drained soil once outdoor conditions are stable. Use a phosphorus-rich fertilizer during transplanting to promote bud development. Keeping plants evenly moist and protecting them from early stress will further boost their chances of producing blooms in the first growing season.
Dealing with Pests and Diseases
Hollyhocks are beautiful but can be vulnerable to several pests and diseases, especially when grown in warm, humid climates. One of the most common problems is rust, a fungal disease that causes orange or brown pustules on the undersides of leaves. To manage rust, ensure proper air circulation by spacing plants adequately and watering only at the base to keep foliage dry. Remove and destroy affected leaves promptly to reduce the spread.
In addition to rust, hollyhocks may attract aphids, spider mites, and Japanese beetles. Regularly inspect plants for small insects or chewed leaves. A strong blast of water can dislodge minor infestations, while insecticidal soap or neem oil can be used for more persistent problems. Encouraging beneficial insects such as ladybugs can also help keep pest populations in check naturally.
Proper hygiene plays a critical role in disease prevention. Clean up plant debris at the end of the season, rotate planting locations yearly if possible, and avoid overcrowding. Healthy, well-maintained hollyhocks are far more resistant to pest and disease damage and will reward gardeners with vibrant, resilient blooms.
Saving Seeds for Next Season
To save hollyhock seeds effectively, allow the flowers to fade and form seed pods, which should stay on the stalks until they dry and turn brown. Harvest these pods on a dry day to avoid mold. Gently open them to collect the flat, disk-like seeds inside.
Spread the seeds on a paper towel or screen for a few days to ensure they are completely dry before storage. Once dried, place them in a labeled paper envelope or airtight container and store in a cool, dark place. Properly stored seeds remain viable for up to five years.
For best results, select seeds from the healthiest plants with the most vigorous blooms. This helps preserve strong genetics and improves the chances of vibrant, resilient hollyhocks in the next growing season.
Frequently Asked Questions
When is the best time to plant hollyhock seeds?
The best time to plant hollyhock seeds depends on your climate. In most regions, late spring after the last frost is ideal. In warmer zones, you can also plant in early fall for earlier blooms the following spring.
Do hollyhocks bloom in their first year?
Most hollyhocks are biennials, meaning they bloom in their second year. However, if started early indoors or in warm climates, some may flower in their first season, especially if you use techniques like cold stratification or grow shorter varieties.
How deep should I plant hollyhock seeds?
Plant seeds about ¼ inch deep in well-prepared, moist soil. They need light to germinate, so avoid burying them too deep. Consistent moisture and warmth will help speed up sprouting.
Can I grow hollyhocks in containers?
Yes, but hollyhocks have deep taproots and grow tall, so choose large containers with support stakes. Container-grown plants may need extra care with watering and feeding.
How do I prevent rust and other common diseases?
To reduce disease risks, provide good air circulation, avoid overhead watering, and remove infected leaves promptly. Choosing rust-resistant varieties and rotating planting locations each year also helps prevent recurring problems.
Conclusion
Timing is everything when it comes to planting hollyhock seeds. Whether you’re sowing in early spring for summer growth or in fall for an early start next season, careful planning leads to stunning results. By understanding your regional climate, preparing the soil properly, and providing ongoing care, you can enjoy towering hollyhocks and vibrant blooms that add timeless beauty to your garden. Every seed you plant is a step closer to a spectacular spring display that will return year after year.


