Snowdrops are nature’s first whisper that winter will soon give way to spring. These fragile white flowers, often emerging through snow or frost, carry an almost magical charm. Their nodding bell-shaped blooms appear when the rest of the garden is still sleeping, turning barren soil into a scene of quiet beauty. For many gardeners, planting snowdrops feels like planting hope itself—a promise that life will return even in the coldest, most silent months of the year.
But to achieve this enchanting display, timing is everything. Knowing when to plant snowdrops depends on more than just the calendar—it depends on your USDA hardiness zone, your soil’s condition, and how your local climate transitions between fall and winter. Plant too early, and the bulbs may sprout before frost; too late, and they may fail to root properly. Understanding how to match your planting schedule with your regional weather ensures strong roots, healthy blooms, and a stunning sea of white each spring. With the right knowledge, you can make your snowdrops naturalize beautifully and thrive for decades.
Understanding Snowdrops and Their Growing Cycle

Snowdrops, scientifically known as Galanthus nivalis, are hardy perennial bulbs that thrive in cold weather. They belong to the Amaryllidaceae family and are native to Europe and parts of the Middle East. Their small white flowers, shaped like graceful bells, bloom when the soil temperature is still low and the ground remains damp. What makes snowdrops remarkable is their ability to push through frozen soil, often blooming while patches of snow still cover the landscape. This rare resilience and delicate charm make them a favorite among gardeners who crave life and beauty in the middle of winter.
The growing cycle of snowdrops follows a unique natural rhythm that harmonizes with seasonal change. They are planted in autumn, once soil temperatures begin to cool but before frost hardens the ground. Through winter, the bulbs rest underground, quietly forming roots that prepare them for spring growth. When late winter brings longer days and mild warmth, the first green shoots break through the soil, followed by clusters of pure white flowers. After blooming, the foliage continues photosynthesis to store nutrients in the bulb, ensuring strong growth the following year.
Understanding this rhythm is essential for successful cultivation. Snowdrops depend on consistent moisture, cool soil, and protection from harsh sunlight. If their cycle is disrupted by poor timing or dry soil, bulbs may fail to establish or bloom weakly. When planted correctly, however, snowdrops naturalize beautifully, forming thick carpets that spread each year. With patience and proper care, they become one of the most enduring symbols of renewal in any cold-season garden.
Best Time to Plant Snowdrops Based on USDA Zones
The best time to plant snowdrops depends strongly on your USDA hardiness zone, as temperature patterns vary widely across the United States. In general, snowdrops should be planted when the soil is cool but not yet frozen, allowing bulbs to root before winter sets in. For northern gardeners in colder regions, this means late summer to early fall, while in milder climates, planting can extend into late fall. Planting too early in warm soil can cause premature sprouting, while planting too late risks bulbs freezing before they root.
In colder zones such as USDA 3 to 5, snowdrops benefit from early planting, typically in September or early October. These areas experience early frost, and bulbs need time to establish roots before temperatures drop below freezing. Gardeners in these zones should choose a sheltered area with good drainage to prevent bulbs from sitting in icy water. In contrast, gardeners in USDA zones 6 to 7 can plant later in October or even early November, as their soil remains workable for longer periods. These moderate climates provide a longer window for successful establishment.
For warmer zones, particularly 8 and 9, snowdrops should be planted once temperatures begin to cool and nights drop below 60°F. In these areas, it’s crucial to mimic the natural cold that snowdrops require for dormancy. Some gardeners refrigerate bulbs for a few weeks before planting to encourage rooting. Regardless of your zone, aim to plant snowdrops about six weeks before the first hard frost. This ensures the bulbs develop healthy roots and produce stronger blooms when late winter arrives.
How Soil and Moisture Affect Snowdrop Growth
Soil plays a vital role in the success of snowdrops, as these delicate bulbs are highly sensitive to drainage and moisture levels. They prefer loose, humus-rich soil that stays cool and moist throughout the winter. If the ground becomes too compacted or soggy, the bulbs can rot before they even sprout. In their natural woodland habitat, snowdrops grow under deciduous trees where the soil is enriched with leaf mold and organic matter, creating perfect drainage and steady moisture. Mimicking this environment in your garden leads to healthier, more resilient blooms.
Moisture consistency is equally important. Snowdrops thrive in conditions where the soil remains damp but never waterlogged. Dry conditions can cause bulbs to go dormant too early or produce small, weak flowers. During late fall and winter, rainfall usually provides enough water, but in dry spells, gentle watering may be needed. It’s best to water deeply and infrequently, allowing moisture to penetrate the root zone. This encourages strong root systems that can withstand frost and fluctuating winter temperatures.
Mulching around the bulbs helps maintain ideal soil moisture and temperature balance. A thin layer of leaf mulch or compost keeps the soil cool and reduces evaporation. Avoid thick layers that trap excess moisture, as that can lead to fungal diseases. In the spring, when the flowers fade and foliage begins to yellow, the soil should remain slightly moist until the leaves die back naturally. Proper soil and water management ensure that your snowdrops multiply steadily and return every year with renewed strength.
Planting Snowdrops from Bulbs vs. “In the Green”
There are two main ways to plant snowdrops: from dormant bulbs or “in the green.” Understanding the difference helps determine which method works best for your climate and schedule. Planting dormant bulbs, which are dry and sold in the fall, is the traditional approach. These bulbs are planted several inches deep before the ground freezes, allowing roots to form through winter. This method suits gardeners who plan early and live in regions with a clear cold season. However, dry bulbs can sometimes fail if they lose too much moisture before planting.
The “in the green” method involves planting snowdrops while they are still growing, just after flowering but before the foliage dies back. Gardeners usually buy them freshly lifted from the soil, complete with leaves and roots. This approach gives the bulbs an immediate advantage, as they do not experience dormancy or drying out. Planting “in the green” ensures quicker establishment and almost guaranteed survival, especially in areas with unpredictable winters or where fall planting is difficult. It’s an excellent choice for gardeners who want to create drifts or expand existing clumps quickly.
Each method has its ideal conditions depending on the USDA zone. In colder zones, dormant bulbs perform better when planted early in autumn. In milder or coastal climates, “in the green” planting during early spring ensures steady growth and fast recovery. Whichever method you choose, handle bulbs gently, water them after planting, and maintain moisture without overwatering. Both approaches can produce beautiful results when timing and care align with local conditions.
Choosing the Right Location for Planting Snowdrops
Selecting the perfect location for snowdrops is essential to ensure strong growth and long-lasting blooms. These hardy bulbs thrive in environments that mirror their natural woodland origins. They prefer partial shade, where filtered sunlight reaches the soil without intense heat. The best spots are beneath deciduous trees or shrubs, where snowdrops receive light in late winter before the canopy fills out. This allows them to bloom freely and fade gracefully as other plants emerge. Direct summer sunlight can stress the bulbs, so shaded or dappled areas are ideal for long-term success.
Soil quality and drainage also define the success of your planting site. Snowdrops favor soil rich in organic matter that stays moist but drains well after rain. Heavy clay soil can cause standing water that leads to bulb rot. To improve it, mix in compost, leaf mold, or fine bark before planting. The goal is to replicate the airy, soft texture of forest soil where snowdrops naturally thrive. In sandy soils, adding organic material helps retain moisture and nutrients throughout the growing season. This balance prevents extremes that could weaken bulbs over time.
Microclimates within your garden can also affect snowdrop performance. North-facing slopes, shaded garden beds, or the bases of stone walls offer cooler soil temperatures and extra protection from wind. Avoid exposed areas that dry quickly or freeze deeply during winter. Once you find a location that offers consistent moisture and mild shade, snowdrops will multiply beautifully. Over time, they form natural carpets of white blooms that brighten the garden even in the coldest months of the year.
How to Care for Snowdrops After Planting
Watering and Maintenance
Once snowdrops are planted, consistent watering is crucial for helping bulbs establish roots before winter arrives. The soil should remain evenly moist but never saturated, as standing water can cause bulbs to rot before they settle. Deep watering once a week helps moisture reach the bulb layer and supports early root formation. In most northern climates, natural rainfall provides enough moisture through winter, but during dry periods, additional watering ensures steady development. Early hydration helps snowdrops anchor themselves and prepare for their first bloom cycle once the frost begins to lift.
Maintenance throughout the growing season should focus on keeping the soil clean and breathable. Remove weeds, compacted debris, and fallen leaves that may block air circulation or trap excessive moisture. Avoid digging or disturbing the ground around snowdrops because their roots are fine and easily damaged. After blooming, leave the foliage untouched until it yellows completely; this allows nutrients to flow back to the bulbs. When you allow this process to finish naturally, you help bulbs grow stronger each year, ensuring fuller and healthier flower displays every season.
Protecting Snowdrops in Winter and After Bloom
Snowdrops are hardy, but winter protection greatly improves their resilience in challenging climates. In regions with deep frost, cover the soil with a light layer of mulch made from compost or shredded leaves. This barrier insulates the bulbs, maintaining even soil temperatures and protecting roots from freeze–thaw cycles. Avoid heavy mulching, which traps excess water and reduces airflow. In warmer climates, a thin organic covering is enough to retain moisture while keeping the ground cool. Proper insulation ensures bulbs remain stable and continue rooting even during prolonged cold spells.
After snowdrops finish blooming, their care quietly continues beneath the surface. Keep watering lightly for several weeks to help foliage photosynthesize and recharge the bulbs. As leaves fade naturally, resist the urge to cut them too early; premature trimming weakens next year’s flowers. Once foliage turns brown, you can tidy the area and leave the bulbs to rest. If clumps become crowded after a few years, divide and replant them in early fall. This rejuvenation process allows fresh growth and ensures snowdrops remain vibrant and abundant for many winters to come.
Common Mistakes to Avoid When Growing Snowdrops
Planting Too Late or Too Early
Timing is one of the biggest factors in snowdrop success, yet it’s also one of the most common mistakes. Many gardeners plant bulbs too early while the soil is still warm, causing premature sprouting that weakens the plant before winter. On the other hand, waiting too long can be equally damaging. Once the soil freezes, bulbs cannot form roots properly, leading to poor or nonexistent blooms in spring. To avoid this, snowdrops must be planted while the soil remains cool but unfrozen, typically about six weeks before the first hard frost.
Another mistake is misjudging local conditions. Not every region experiences frost at the same time, and relying solely on the calendar can cause problems. Instead, observe your own garden’s soil temperature and moisture. The perfect time is when the ground feels damp and cold to the touch but still workable. Planting within this window helps bulbs anchor deeply and store enough energy to survive winter and emerge strong when the first signs of spring arrive. By respecting nature’s rhythm and your USDA zone, snowdrops reward you with a vigorous carpet of blooms that return every year.
Overwatering and Poor Drainage
Snowdrops love moisture, but they hate sitting in water. Overwatering or planting in compacted soil often leads to root rot, which silently kills bulbs before they can grow. Many gardeners believe that extra watering helps in cold months, yet frozen or waterlogged soil does more harm than good. The bulbs suffocate when water fills air spaces around their roots. Well-drained soil is vital to prevent this. Mixing compost or sand into heavy clay improves aeration and helps excess water escape naturally. Consistent drainage is a key factor behind every healthy snowdrop patch.
In regions with long, wet winters, raised garden beds or sloped planting areas can reduce water accumulation and protect bulbs. It’s also important not to cover bulbs with impermeable mulch or plastic, as these trap moisture and heat. Instead, use organic mulch that allows the soil to breathe and stay cool. If you notice yellowing leaves or soft bulbs, it often signals drainage problems. Adjust watering immediately, and maintain steady, moderate soil moisture. Healthy bulbs need air as much as water, and balance between the two is what keeps snowdrops thriving.
Cutting Foliage Too Early
Another mistake that weakens snowdrops is cutting back the foliage too soon after blooming. Many gardeners remove leaves immediately for a tidy appearance, not realizing this interrupts the plant’s life cycle. After flowering, the leaves continue photosynthesis to replenish nutrients stored in the bulbs. Removing them prematurely prevents this process and results in fewer blooms the following year. The foliage should be left until it turns completely yellow and starts to wither naturally before any trimming occurs.
During this fading period, keep the soil slightly moist to help the plant finish its energy storage. Once the leaves have died back on their own, the bulbs enter dormancy and rest underground until the next season. Patience is key to sustaining strong blooms and steady naturalization. While the fading leaves may seem untidy, they’re essential for long-term bulb strength. Allowing the foliage to complete its cycle ensures a fuller, healthier clump the next spring. When you resist early cutting, your garden rewards you with a stronger, more vibrant snowdrop display.
Tips for Encouraging Snowdrops to Multiply
Snowdrops are naturally self-spreading bulbs, but they need the right environment to multiply effectively. When planted in a location with cool, moist, and nutrient-rich soil, they reproduce through both seeds and bulb division. The key to promoting growth lies in allowing their full life cycle to complete undisturbed. After the flowers fade, the foliage continues working to store vital energy within the bulbs. Cutting leaves too early halts this process and weakens the plants. By letting the foliage die back naturally, the bulbs gather enough strength to produce larger and more numerous offsets each year.
Dividing mature clumps every few years also encourages multiplication and maintains healthy growth. Overcrowded bulbs compete for nutrients, leading to fewer blooms and smaller flowers. The best time to divide snowdrops is immediately after flowering, when leaves are still green and roots active. Gently lift the clump, separate bulbs into smaller clusters, and replant them at the same depth. Water thoroughly afterward to help them reestablish quickly. This simple process rejuvenates old patches and helps create balanced drifts of snowdrops across different parts of the garden.
Finally, naturalization thrives when snowdrops grow in stable microclimates that mimic their woodland origins. Locations under deciduous trees or near stone walls provide shade, moisture, and protection from temperature swings. Avoid disturbing the soil or walking over planted areas, as this can crush delicate shoots or disrupt root development. When given steady conditions and minimal interference, snowdrops multiply gracefully year after year, transforming quiet winter corners into vibrant seas of white that signal the arrival of spring.
Pests, Diseases, and How to Prevent Them
Common Pests That Affect Snowdrops
Snowdrops are resilient, but they’re not immune to pests that target bulbs and tender foliage. One of the most frequent problems comes from bulb-eating pests such as voles and mice. These small animals dig up bulbs during winter when food is scarce, often destroying entire clumps overnight. Using wire mesh or planting bulbs in baskets can protect them from burrowing rodents. Slugs and snails also cause damage by feeding on new shoots in early spring, leaving holes and stunted leaves behind. Regular inspection during damp weather helps control infestations before they spread.
Aphids can occasionally attack snowdrops as well, feeding on sap and transmitting viruses. Their presence weakens young plants and may distort blooms. To reduce risk, remove weeds and nearby decaying material that shelter insects. Natural deterrents like neem oil or insecticidal soap can help manage outbreaks without harming pollinators. Encouraging natural predators such as ladybugs and lacewings is another eco-friendly way to maintain balance. Keeping snowdrops healthy through proper watering and spacing also reduces stress, making them less vulnerable to pest invasions.
Diseases and Prevention Strategies
Fungal diseases are the most common issues affecting snowdrops, particularly in damp or overcrowded soil. Gray mold, also known as Botrytis, can develop during long, wet winters, coating leaves with fuzzy gray spores that lead to rot. Another problem, known as snowdrop smut, causes streaked foliage and weakened bulbs. To prevent these diseases, good air circulation is essential. Avoid planting snowdrops too closely together, and remove any decaying leaves at the end of the season. Keeping the soil well-drained greatly reduces fungal growth.
Overwatering often contributes to bulb rot, especially in clay-heavy soils. If you suspect fungal infection, lift affected bulbs and discard them to prevent contamination. Never compost diseased material, as spores can survive and reinfect future plantings. Applying a light dusting of horticultural sulfur or a fungicide during replanting can add extra protection. The best defense, however, is maintaining healthy soil and proper moisture control. Strong, well-established bulbs resist most diseases naturally, allowing your snowdrop beds to remain vigorous, vibrant, and free from recurring fungal problems.
Frequently Asked Questions About Snowdrop Planting
When is the best month to plant snowdrops?
The ideal planting time depends on your USDA zone. Most gardeners plant from September to November, when the soil is cool but not frozen. This timing allows bulbs to establish strong roots before winter. In warmer climates, planting can continue through early December if the ground remains workable.
Can snowdrops grow in full sun?
Snowdrops thrive best in partial shade, particularly under deciduous trees that let light through in late winter. Full sun can dry the soil too quickly and shorten bloom time. However, they can tolerate morning sunlight if moisture levels remain steady throughout their growing season.
How deep should snowdrop bulbs be planted?
Plant snowdrop bulbs about three inches deep, with the pointed tips facing upward. This depth protects them from frost while letting shoots emerge easily in spring. If planted too shallow, bulbs risk freezing; if too deep, sprouting may slow and reduce early flowering vigor.
Do snowdrops spread on their own?
Yes, snowdrops naturally multiply over time through offsets and sometimes self-seeding. If planted in nutrient-rich, moist soil and left undisturbed, they expand each year. Allow foliage to die back naturally and avoid digging the area, as disturbance can slow down their naturalization process.
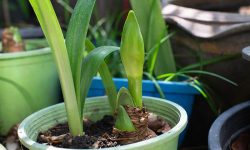
Can I grow snowdrops in pots?
Yes, snowdrops can grow successfully in pots if soil and temperature conditions are right. Use a mix of compost and sand for good drainage, and place pots outdoors during winter. The bulbs need cold exposure to bloom properly, so avoid keeping them indoors for long periods.