Pothos is one of the easiest houseplants to propagate, yet many people still struggle to choose the correct cutting points. The exact spots you cut will determine how well each new plant grows. These points help roots form quickly and allow new vines to gain strength from the start. When you understand the structure of the stem and know which parts support healthy growth, you can create strong new pothos plants with ease. This process also helps refresh the mother plant by removing older or overly long sections.
Propagating pothos is rewarding because you can watch visible changes each day. A small cutting can turn into a full plant within weeks. The key is choosing stem sections with a node and selecting pieces that show good vigor. Each precise cut reduces risk and saves time. Once you learn these simple principles, you can propagate any pothos variety, from Golden Pothos to Marble Queen.
Understanding the Basics of Pothos Propagation
Pothos propagation begins with understanding how the plant produces new roots. Each vine holds nodes that sit along the stem and contain dormant growth tissue. These nodes activate once they meet the right level of moisture and warmth. A cutting with a healthy node forms roots quickly and remains stable during the early phase. The node absorbs water and begins creating white root tips within a short time. A segment without nodes cannot create roots, even in ideal conditions. This makes node placement the most important detail for any successful propagation attempt.
The health and age of the vine also shape the outcome. A strong vine stores nutrients and water inside its tissues. These reserves support the cutting during the first days when it cannot absorb moisture through roots. A cutting with a firm texture adapts well to new conditions and avoids collapse. Older vines may grow roots more slowly because their tissues respond less quickly. Younger vines react faster because they contain more active cells. Color also matters because dull or pale stems often signal stress. Strong color suggests active growth and higher rooting potential. Choosing the right vine increases the chance of producing a healthy new plant.
Environmental conditions further influence early root growth. Bright indirect light supports photosynthesis without creating heat stress. Warm air keeps the internal activity steady and helps the node produce new tissue. High humidity slows water loss from the leaves and prevents wilting. Sudden drops in temperature may shock the cutting and halt root development. A stable setting helps the plant direct all its energy toward root formation. Once the roots grow longer and gain structure, the cutting becomes ready for potting. Understanding these basics prepares you for accurate cutting techniques and better long-term success.
Where to Cut Pothos to Propagate
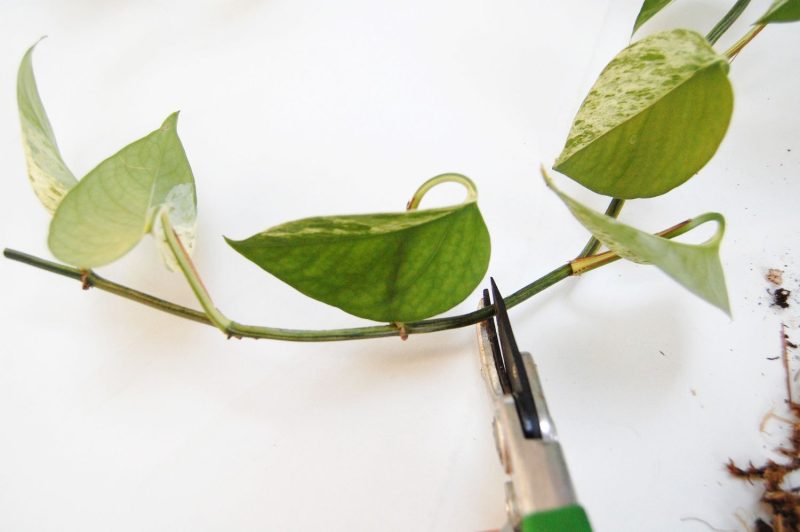
Finding the correct cutting point is the most important step in pothos propagation. Each vine contains a series of nodes spaced between the leaves, and these small bumps are the only places where new roots can form. A proper cutting must include at least one node, although two nodes often speed up early development. The ideal place to cut is one inch below a healthy node because this allows enough stem for water absorption and stability. When you cut too close, the node may weaken or dry out. When you leave too much stem, the excess tissue may rot during the rooting stage.
The condition of the node also affects the plant’s success. A strong node appears firm and slightly raised, with a clear connection to the leaf base. This small area holds all the growth potential needed to form roots, so any damage reduces its ability to activate. Choose vines that carry bright leaves and steady texture. Avoid nodes near fading leaves because weak leaves often signal internal stress. A vine with rich color and a thick stem can handle the shock of cutting and adapt well to water or soil. Proper selection ensures the new plant starts with strong internal structure.
The angle and method of cutting matter as well. Using a clean and sharp tool prevents bruising, which slows growth. A straight cut works well for water propagation, while a slight angle gives more surface area for soil absorption. The cutting should be done in one smooth motion so the tissues stay intact. Place the cutting in its rooting environment immediately to prevent drying. Early placement keeps the internal moisture stable and helps the node transition into growth mode. Once you understand where to cut, each new plant develops faster and grows with fewer complications.
How to Identify Healthy Nodes for Strong Rooting
Healthy nodes are the foundation of successful pothos propagation because they contain the tissue that forms new roots. A strong node appears as a small bump positioned directly along the stem beneath the leaf. It feels firm when touched and shows a clear outline where the root will emerge. This structure activates once it receives moisture, warmth, and light. When a node looks dry or flat, it may not respond well. The goal is to select nodes that show life and vigor because these nodes produce roots faster and with greater strength. A healthy node gives the cutting a reliable starting point during the early stage.
The appearance of the surrounding leaf also helps you judge the quality of a node. A bright, glossy leaf usually indicates stable internal moisture and strong growth signals. Leaves that appear thin or dull often reflect stress within the vine. When the leaf shows fading color or small damaged spots, the node beneath it may be less active. A stable leaf suggests a healthy stem that stores enough energy to support new roots. This stored energy keeps the cutting alive while the node activates. Selecting vines with balanced color and a strong leaf base always increases success during propagation.
The texture of the vine also reveals useful information. A firm stem signals that the plant still holds water and nutrients. Soft or mushy stems often show signs of rot or mold. These conditions weaken the node and reduce rooting speed. A vine with consistent thickness and smooth texture supports the node’s ability to produce roots. Inspecting the vine closely ensures you remove any weak sections before cutting. This step prevents failure during the early rooting stage. Healthy nodes and strong vines work together to create stable, vigorous new pothos plants that grow with confidence.
Choosing the Best Vines for Successful Propagation
Selecting the right vine is a major factor in creating strong new pothos plants. The best vines show consistent color, firm texture, and active growth. A vine with bright leaves and stable structure holds enough internal energy to support new root formation. These vines also respond well after cutting because their tissues remain hydrated and flexible. Older vines can still root, but younger vines often produce roots faster because they contain more active growth cells. When you examine a vine, look for steady thickness and a clean surface without blemishes. These signs suggest healthy internal flow that supports new development.
The position of the vine on the mother plant also influences success. Vines near active growth tips often carry stronger nodes because they receive more light and nutrients. These sections produce roots quickly once placed in water or soil. Vines from shaded or lower areas may root more slowly because they receive less energy. When selecting a vine, choose one that grows outward with confidence and carries leaves spaced evenly along the stem. Even spacing signals balanced internal growth. This balance makes the cutting more stable during the early rooting stage. Proper selection reduces risks and improves the overall success rate.
Environmental conditions during vine growth affect how the cutting responds later. Vines grown in bright indirect light usually carry firm stems and active nodes. These vines show better results during propagation. Vines exposed to low light may stretch and weaken. These vines often show thin stems and reduced energy stores. Avoid vines with signs of pests or disease because hidden issues spread easily to new plants. A clean and vigorous vine adapts well to changes and performs better in the early rooting phase. Choosing the best vine ensures your propagation process starts with strength and stability.
Preparing Your Tools and Workspace Before Making the Cut
Proper preparation ensures each cutting stays healthy from the first moment. Clean tools prevent infections and reduce damage to the stem. A sharp pair of pruning shears or scissors creates a smooth cut that keeps the node intact. Blunt tools crush tissue and slow early development. Before starting, clean your tool with alcohol to kill bacteria and fungi. This step protects the cutting and the mother plant. A clean workspace also helps maintain moisture and prevents contamination. When everything is organized, you can work calmly and make accurate decisions.
Your workspace should provide stable light and temperature. Bright indirect light helps you see each node clearly and reduces cutting mistakes. A warm environment keeps the vine flexible and prevents stress during the process. Cold areas make stems firm and brittle, which increases the risk of cracks. Place a small cloth or tray on the table to support the vines and keep the surface clean. This setup also prevents the cuttings from rolling away or dropping onto the floor. A stable environment lets you focus on accuracy rather than rushing through the task.
Prepare containers or rooting mediums in advance. If you choose water propagation, fill a clean glass with room-temperature water. If you choose soil, prepare a soft and airy mix that drains well. Preparing early reduces the time the cutting stays exposed to air and prevents drying. Cuttings should enter their rooting environment right after you finish trimming. Quick placement helps maintain internal moisture and supports faster root formation. When your tools and workspace are ready, you ensure each step of propagation flows smoothly. Good preparation makes the entire process easier and far more successful.
Making the Perfect Cut for Fast and Healthy Root Growth
A perfect cut begins with steady hands and clear visibility of the node. The cutting should include one node at minimum, though two nodes often create faster rooting. Place your tool about one inch below the lowest node you want to use. This distance helps the stem absorb water without breaking down. A smooth cut keeps the internal tissue intact and reduces shock. When the tissue stays clean, the node activates more quickly once placed in water or soil. Avoid tearing or crushing the stem because damaged tissue slows growth. A clean cut gives the new plant a strong foundation from the start.
The angle of the cut plays a role in how the cutting performs. A straight cut works well for water propagation because it allows the stem to rest evenly in the glass. An angled cut suits soil propagation because it increases surface contact with the mix. Both methods support root formation as long as the cut stays clean and undamaged. Once trimmed, the cutting should go into its rooting environment immediately. Leaving it exposed for too long dries the tissue and reduces success. Quick placement keeps moisture inside the stem and helps the node begin activation. Timing matters as much as technique.
Check the vine again after cutting to confirm that the node remains intact. A weak node may collapse or appear flattened after an improper cut. When the node looks firm, the cutting will respond well in the days ahead. Keep the cutting away from direct sunlight during the first hours to prevent moisture loss. The plant needs calm conditions at this stage because it cannot absorb water through roots yet. This stability allows the node to adjust and start forming new tissue. With the correct cutting method, pothos builds strong roots and grows into a vibrant new plant.
Water Propagation: Placing the Cutting for Strong Root Development
Water propagation gives you a clear view of each new root as it grows. Once you finish cutting, place the vine into a clean glass filled with room-temperature water. The node must stay fully submerged because this is the only place where roots form. Keep the leaves above the water to prevent rot. When the node sits at the right depth, it absorbs moisture and begins activating new tissue. Early root tips appear as small white points. These points grow longer when the environment stays stable. Clean water supports faster growth and prevents bacterial issues that slow development.
Light plays a major role during the early phase. Bright indirect light encourages root growth without overheating the cutting. Direct sunlight warms the water and causes leaf stress. This stress may slow root production. A gentle, bright setting allows the cutting to stay hydrated and balanced. Temperature should stay warm and steady to encourage metabolic activity inside the stem. Cold rooms slow the process and may stop roots from forming. Warm but not hot conditions create the best response. Stability is the key to early success. When everything stays consistent, the cutting adapts quickly.
Water quality affects long-term development. Replace the water every few days to prevent bacterial buildup. Stagnant water reduces oxygen and weakens the node. Fresh water keeps the tissue healthy and promotes clean, strong root growth. Use a clear container so you can monitor progress without disturbing the cutting. Once the roots reach a few inches long, the young plant becomes ready for soil. Transferring at the right time helps the cutting adapt smoothly. Water propagation gives you full control of the early stages. This method builds strong, visible roots that support a healthy new pothos plant.
Soil Propagation: Setting the Cutting for Steady, Natural Growth
Soil propagation supports natural root formation because the cutting develops in the same medium it will grow in long-term. Begin by preparing a soft, airy mix that drains well and holds light moisture. A blend designed for houseplants or a mixture of peat and perlite works well. Place the cutting so the node sits slightly below the surface. This position keeps the node moist while protecting it from excess water. Firm the soil gently around the stem to provide support. The cutting should stand upright without leaning. Once positioned, water lightly to settle the mix. Moist but not soggy soil gives the node the perfect start.
Light and temperature control the speed of root development. Bright indirect light helps the cutting produce energy while avoiding leaf burn. Direct sunlight at this stage may dry the soil too quickly and stress the leaf. A warm room keeps metabolic activity moving at a steady pace. Cold air slows root formation and delays visible changes. Soil propagation works best when humidity stays moderate. Too much moisture invites rot, but too little causes early wilting. Covering the pot with a loose plastic dome can help maintain balance, but airflow is still important. The cutting relies on a stable environment during the first weeks.
Water management is the most important factor in soil propagation. The mix should remain slightly moist at all times. Dry soil slows root growth, while oversaturated soil blocks oxygen and causes decay. Check the surface every few days and water only when needed. Avoid disturbing the cutting because roots form near the node and remain delicate at first. After several weeks, give the stem a gentle tug. A slight resistance means new roots have formed. Once the plant begins producing new leaves, it has settled into the soil. This method creates a strong foundation for long-term growth and helps the plant adapt with confidence.
Monitoring Root Growth and Recognizing Early Progress
Monitoring root growth helps you understand how well the cutting responds to its new environment. During the first days, the node begins absorbing moisture and preparing new tissue. In water propagation, you may notice small white points forming along the node. These points show the first signs of activation. In soil propagation, early progress stays hidden underground, but steady leaf color signals healthy adjustment. The cutting should look firm and hydrated. A soft or wrinkled cutting may indicate stress or slow root development. Early monitoring ensures you catch problems before they affect the plant.
Light and temperature influence how fast roots appear. Bright indirect light allows the cutting to generate energy while avoiding leaf burn. Consistent warmth supports internal activity that pushes root formation. If the environment becomes too cold, growth stops temporarily. The cutting may hold steady without progress. Too much heat causes leaf stress and energy loss. Balanced humidity also helps keep the cutting hydrated. Dry air pulls moisture from the leaves, which forces the plant to use its stored reserves. Stable conditions speed up development and help the node stay active. The cutting should remain in a calm area without sudden changes.
Signs of progress become clearer after the first week. In water, roots lengthen and gain structure. They change from small points to long strands that hold the cutting in place. Healthy roots appear white and smooth. Brown or mushy roots signal poor water quality or bacterial issues. Replacing the water often prevents this problem. In soil, the cutting begins showing signs through new leaf growth. When a cutting produces a fresh leaf, it confirms strong rooting below the surface. Gentle tugging also helps test progress. Light resistance means the roots have anchored. Monitoring ensures each cutting stays on track and grows into a strong new plant.
When to Transfer Your Cutting to Soil for Long-Term Growth
Knowing when to transfer your pothos cutting to soil helps the plant adapt smoothly and continue healthy growth. In water propagation, the best time to transfer is when the roots reach a few inches in length. At this stage, the roots have gained enough strength to handle the change in environment. Short roots struggle because they cannot absorb moisture well. Very long roots may suffer shock because they adapted too deeply to water. A balanced root length supports steady transition. In soil propagation, the cutting is already in the final medium, so timing depends on visible new leaves and firm anchoring.
Root condition also affects the success of the transfer. Healthy roots appear white or light cream, smooth, and firm. These roots adjust easily because they still hold moisture and active cells. Brown or soft roots indicate stress and should be trimmed before planting. If the cutting shows new leaf growth, it means the root system has begun supporting the vine. This is a strong sign that the cutting can handle the next step. Strong leaves show that the plant has balanced hydration and energy. Waiting for these signs helps prevent transplant shock and encourages faster adaptation.
The transfer process itself should be steady and gentle. Prepare a pot with airy, well-draining soil to protect the roots from excess moisture. Place the cutting so the roots spread naturally without bending sharply. Cover the roots lightly with soil and water just enough to settle the mix. Bright indirect light and warm temperature help the plant adjust after the move. Avoid strong sunlight during the first days because the cutting still needs time to stabilize. Once the plant begins producing new growth in its pot, it has completed the transition successfully. Proper timing ensures long-term strength and healthy development.
Common Mistakes to Avoid During Pothos Propagation
Cutting Mistakes That Reduce Rooting Success
Many beginners struggle because they cut the vine in the wrong place. The most common mistake is cutting above the node instead of below it. A cutting taken from the wrong section looks healthy at first, but it cannot form roots because there is no active tissue. Another mistake comes from using dull tools that pinch or bruise the stem. Damaged tissue slows metabolic activity and delays root formation. A crushed node takes longer to activate and may even collapse. Clean and sharp tools create a smooth cut, which helps the plant respond with confidence and adjust quickly to water or soil.
Some growers also hesitate during the cutting process, allowing the stem to remain exposed to air for too long. This delay causes moisture loss and weakens the area around the node. Dry tissue needs more time to recover once placed in water or soil, which slows the entire propagation cycle. Another overlooked issue is leaving too much stem below the node. Extra tissue often decays because it absorbs water unevenly. Rot spreads fast and affects the node. A simple, precise cut placed immediately into the rooting environment prevents these issues and supports faster, healthier root development.
Light, Temperature, and Moisture Mistakes That Slow Growth
Environmental mistakes also prevent cuttings from rooting properly. Many people place their cuttings in direct sunlight, thinking it will speed growth. Strong sun raises water temperature and stresses the leaves. The cutting loses moisture at a faster rate and becomes weaker during the first days. Others place the cutting in deep shade, which deprives it of the energy needed for root formation. Bright indirect light gives the best balance for activation. Temperature matters as well. Cold rooms slow cellular activity, while hot areas dry the cutting too quickly. A stable, warm environment encourages steady progress.
Moisture control is another common challenge. Overwatering soil cuttings is one of the biggest reasons pothos fails during propagation. Constantly wet soil prevents oxygen from reaching the node. Without oxygen, the forming roots suffocate and develop rot. Underwatering is also harmful because dry soil pulls moisture from the stem before the roots appear. Water propagation has its own risks. Stagnant water encourages bacteria that weaken early root tips. Regular water changes keep oxygen flowing and prevent decay. Good environmental stability allows the plant to adjust and stay hydrated without stress, giving the node optimal conditions to form strong roots.
Hygiene, Handling, and Follow-Up Mistakes That Lead to Failure
Poor hygiene remains a hidden cause of propagation problems. Many beginners forget to clean their scissors before making the cut. Dirty tools carry fungi and bacteria that enter the fresh wound and disrupt early growth. Even minor contamination slows root development and may cause rot around the node. Water containers that are never cleaned also create trouble. Residue builds up, reducing oxygen levels and encouraging pathogens. Clean tools and fresh water protect new roots and help the cutting maintain internal balance during the early stage.
Handling mistakes happen when growers become impatient. Some tug the cutting too early, hoping to check progress. Young roots break easily and cannot repair themselves quickly. Each broken root delays new growth and weakens the cutting. Others move the container or pot too often, causing stress from shifting light or temperature. Cuttings need calm surroundings to focus their energy on forming roots. Another subtle mistake is ignoring early warning signs. Soft stems, yellowing leaves, and cloudy water indicate problems that need quick action. Correcting them early prevents complete failure. Careful handling and good hygiene work together to help each cutting grow into a strong new pothos plant.
FAQs About Where to Cut Pothos to Propagate
How long does it take for pothos cuttings to root?
Most pothos cuttings begin forming visible roots within one to two weeks. The exact time depends on temperature, light, and the health of the node. Warm rooms and bright indirect light speed up the process, while cool spaces or weak vines slow it down. Water propagation usually shows progress faster because you can see the early root tips.
Should I use water or soil for better propagation results?
Both methods work well, but water gives you clearer visibility of root growth. Soil offers a more natural environment and reduces transplant shock later. If you prefer fast monitoring, water is better. If you want the cutting to adapt directly to its growing medium, soil propagation provides a smoother transition.
Why are my pothos cuttings turning yellow?
Yellowing leaves often signal stress from excess light, unstable temperature, or bacterial growth in the water. In soil, yellow leaves may indicate overwatering. Keep the cutting in bright indirect light and ensure clean water or well-draining soil. Once conditions stabilize, the plant usually regains strength.
How do I know if a cutting has successfully rooted?
In water, you will see white roots growing from the node. In soil, new leaf growth is the clearest sign of success. You can also give the stem a gentle tug. A slight resistance means the roots have anchored. If there is no resistance, the cutting needs more time.
Can pothos cuttings root without nodes?
No, nodes are essential. The node contains the tissue that produces roots. A stem segment with only leaves will not root, no matter how long it stays in water or soil. Always choose cuttings with at least one strong, healthy node.
Final Thoughts
Pothos propagation becomes simple and enjoyable once you understand how to choose the right node, make a clean cut, and create stable conditions for rooting. With patience and proper care, a small vine segment grows into a strong new plant that thrives in its new environment. Whether you root in water or soil, consistency and gentle handling guide the process toward success. As each cutting develops, you gain not only new plants but also a deeper appreciation for how resilient and rewarding pothos can be. This smooth, steady journey is what makes propagation so satisfying.